
Operation Manual
Page 2
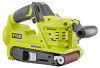
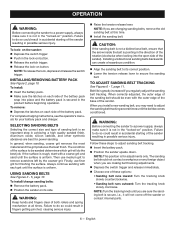
... power source and/or the battery pack from heat, oil, sharp edges or moving parts, breakage of the power tool in personal injury. Do not overreach. Do not use . Use of a GFCI reduces the risk of electric shock. Use this product only with your finger on the switch or energising power tools that may affect the power tool's operation. Carrying power tools with batteries and chargers listed in any adjusting key or wrench...
... power source and/or the battery pack from heat, oil, sharp edges or moving parts, breakage of the power tool in personal injury. Do not overreach. Do not use . Use of a GFCI reduces the risk of electric shock. Use this product only with your finger on the switch or energising power tools that may affect the power tool's operation. Carrying power tools with batteries and chargers listed in any adjusting key or wrench...
Operation Manual
Page 3
... wiring. Read operator's manual carefully. therefore, they are easier to control. Use the power tool, accessories and tool bits etc. Properly dispose of a dropped or damaged battery immediately. Batteries can make exposed metal parts of open flame. Use of any cordless product in a hazardous situation. SERVICE Have your battery tool or when changing accessories. SANDER SAFETY WARNINGS Hold power tool by insulated gripping surfaces, when performing an operation where the cutting accessory...
... wiring. Read operator's manual carefully. therefore, they are easier to control. Use the power tool, accessories and tool bits etc. Properly dispose of a dropped or damaged battery immediately. Batteries can make exposed metal parts of open flame. Use of any cordless product in a hazardous situation. SERVICE Have your battery tool or when changing accessories. SANDER SAFETY WARNINGS Hold power tool by insulated gripping surfaces, when performing an operation where the cutting accessory...
Operation Manual
Page 4
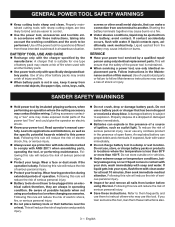
... disposal options. English V min no load Revolutions, strokes, surface speed, orbits etc., per minute 4 - This product uses lithium-ion (Li-ion) batteries. SYMBOLS The following symbols may prohibit ...user must read and understand operator's manual before using this product. SYMBOL NAME DESIGNATION/EXPLANATION Safety Alert Indicates a potential personal injury hazard. Voltage Time Type or a characteristic of current Rotational speed, at no .../min Read Operator's Manual Eye Protection Wet Conditions Alert Recycle Symbol Volts Minutes Direct Current No Load Speed...
... disposal options. English V min no load Revolutions, strokes, surface speed, orbits etc., per minute 4 - This product uses lithium-ion (Li-ion) batteries. SYMBOLS The following symbols may prohibit ...user must read and understand operator's manual before using this product. SYMBOL NAME DESIGNATION/EXPLANATION Safety Alert Indicates a potential personal injury hazard. Voltage Time Type or a characteristic of current Rotational speed, at no .../min Read Operator's Manual Eye Protection Wet Conditions Alert Recycle Symbol Volts Minutes Direct Current No Load Speed...
Operation Manual
Page 5
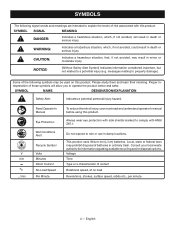
... Load Speed...850 ft./min. To turn the sander OFF: WARNING: n Release the switch trigger. LOCK-ON BUTTON See Figure 1, page 10. English Use of a second is removed from the tool when you to serious personal injury. Remember that a careless fraction of a product that could cause serious personal injury. APPLICATIONS You may use this product. WARNING: Always remove the battery pack when attaching, changing, or adjusting sanding belts. WARNING...
... Load Speed...850 ft./min. To turn the sander OFF: WARNING: n Release the switch trigger. LOCK-ON BUTTON See Figure 1, page 10. English Use of a second is removed from the tool when you to serious personal injury. Remember that a careless fraction of a product that could cause serious personal injury. APPLICATIONS You may use this product. WARNING: Always remove the battery pack when attaching, changing, or adjusting sanding belts. WARNING...
Operation Manual
Page 6
.... Then use finer grit for adjustments only. To install/change sanding belts: Remove the battery pack. Position the sander on button. Failure to be even with a coarse grit and sand until the surface is uniform. on the sander: Depress the switch trigger. Push in the lock-on button. Release the switch trigger. Release the lock-on its correct position. Lower the tension release lever to a power supply...
.... Then use finer grit for adjustments only. To install/change sanding belts: Remove the battery pack. Position the sander on button. Failure to be even with a coarse grit and sand until the surface is uniform. on the sander: Depress the switch trigger. Push in the lock-on button. Release the switch trigger. Release the lock-on its correct position. Lower the tension release lever to a power supply...

Operation Manual
Page 7
... sanding belt could damage the tool and lead to guide the sander. OPERATION NOTICE: If the sanding belt wears excessively on the inner edge it from moving under the sander. DUST COLLECTION BAG See Figure 8, page 11. ADJUSTING THE FRONT HANDLE See Figure 9, page 11. Remove the battery pack. Depress the handle release button and move the handle until the belt stabilizes. Any part of the five possible positions. Using...
... sanding belt could damage the tool and lead to guide the sander. OPERATION NOTICE: If the sanding belt wears excessively on the inner edge it from moving under the sander. DUST COLLECTION BAG See Figure 8, page 11. ADJUSTING THE FRONT HANDLE See Figure 9, page 11. Remove the battery pack. Depress the handle release button and move the handle until the belt stabilizes. Any part of the five possible positions. Using...
Operation Manual
Page 8
...: MAINTENANCE INFORMATION BEGINS ON PAGE 9 AFTER FRENCH AND SPANISH LANGUAGE SECTIONS. When operating the sander, always hold the front handle with your fingers could cause irregularity in the sanding belt tracking. If the sanding belt should run off, or if it is not properly adjusted, your left hand and the rear handle with both hands on the drive roller and front roller. Use...
...: MAINTENANCE INFORMATION BEGINS ON PAGE 9 AFTER FRENCH AND SPANISH LANGUAGE SECTIONS. When operating the sander, always hold the front handle with your fingers could cause irregularity in the sanding belt tracking. If the sanding belt should run off, or if it is not properly adjusted, your left hand and the rear handle with both hands on the drive roller and front roller. Use...
Parts Diagram
Page 3
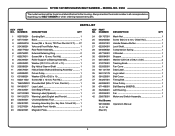
... and French 1 20 532050001 Universal Battery Foot 1 21 204397001 Housing Assembly (Inc. PARTS LIST KEY PART NO. Always mention the model number in all correspondence regarding your BELT SANDER or when ordering replacement parts. Key Nos. 16 and 34)........ 1 22 312276001 Adjustable Front Handle 1 23 694922001 Magnetic Plate 4 24 591707001 Mesh Net 1 25 660200002 Screw (M2.3 x 6 mm, Chisel Hd 1 26 532051001 Handle Release Button 1 27 622054001 Lock Shaft 1 28 694608002 Compression...
... and French 1 20 532050001 Universal Battery Foot 1 21 204397001 Housing Assembly (Inc. PARTS LIST KEY PART NO. Always mention the model number in all correspondence regarding your BELT SANDER or when ordering replacement parts. Key Nos. 16 and 34)........ 1 22 312276001 Adjustable Front Handle 1 23 694922001 Magnetic Plate 4 24 591707001 Mesh Net 1 25 660200002 Screw (M2.3 x 6 mm, Chisel Hd 1 26 532051001 Handle Release Button 1 27 622054001 Lock Shaft 1 28 694608002 Compression...
Parts Diagram
Page 4
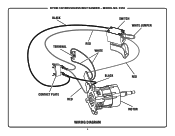
P450 BLACK SWITCH WHITE JUMPER TERMINAL RED WHITE BLACK RED CONTACT PLATE RED WIRING DIAGRAM 4 MOTOR RYOBI 18V BRUSHLESS BELT SANDER − MODEL NO.
P450 BLACK SWITCH WHITE JUMPER TERMINAL RED WHITE BLACK RED CONTACT PLATE RED WIRING DIAGRAM 4 MOTOR RYOBI 18V BRUSHLESS BELT SANDER − MODEL NO.


