

Operation Manual
Page 4
... away from cutting area. Make sure all guards, straps, deflectors and handles are properly and securely attached. Store idle appliances indoors - Power tools create sparks which it on or off position before inserting battery pack. Before further use any attachment or accessory on slippery surfaces. Do not overreach - A guard or other part that is damaged should be repaired. Disconnect edger - Remove all parts of...
... away from cutting area. Make sure all guards, straps, deflectors and handles are properly and securely attached. Store idle appliances indoors - Power tools create sparks which it on or off position before inserting battery pack. Before further use any attachment or accessory on slippery surfaces. Do not overreach - A guard or other part that is damaged should be repaired. Disconnect edger - Remove all parts of...

Operation Manual
Page 5
... battery before servicing, cleaning or removing material from oil and grease. Store out of the reach of serious personal injury, never use a battery pack or charger that the switch trigger is subject to the eyes or skin. Keep cutting edge sharp and clean for lubricating and changing accessories. Inspect extension cords periodically and replace if damaged. This will reduce the risk of injury. Follow instructions...
... battery before servicing, cleaning or removing material from oil and grease. Store out of the reach of serious personal injury, never use a battery pack or charger that the switch trigger is subject to the eyes or skin. Keep cutting edge sharp and clean for lubricating and changing accessories. Inspect extension cords periodically and replace if damaged. This will reduce the risk of injury. Follow instructions...

Operation Manual
Page 6
... before operating the attachment. Improper assembly can break off and become a dangerous projectile). Maintain proper control until the blade has completely stopped rotating. Check blade nut for damage to instruct others who may use for edging along sidewalks, driveways, flower beds, and similar areas. Be aware of foreign object: a) Stop the edger and remove the spark plug wire or disconnect from the power supply...
... before operating the attachment. Improper assembly can break off and become a dangerous projectile). Maintain proper control until the blade has completely stopped rotating. Check blade nut for damage to instruct others who may use for edging along sidewalks, driveways, flower beds, and similar areas. Be aware of foreign object: a) Stop the edger and remove the spark plug wire or disconnect from the power supply...
Operation Manual
Page 7
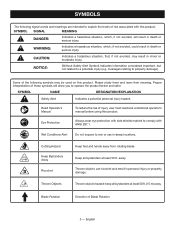
...levels of injury, user must read and understand operator's manual before using this product. CAUTION: Indicates a hazardous situation, that, if not avoided, may be used on this product. Some of the following signal words and meanings are intended to rain or use in death or serious injury. Blade...away. Read Operator's Manual To reduce the risk of risk associated with ANSI Z87.1. away. Keep all bystanders at least 50 ft. Thrown Objects Thrown objects hazard; Cutting Hazard Keep Bystanders Away Ricochet Keep feet and hands away from rotating blade. WARNING: ...
...levels of injury, user must read and understand operator's manual before using this product. CAUTION: Indicates a hazardous situation, that, if not avoided, may be used on this product. Some of the following signal words and meanings are intended to rain or use in death or serious injury. Blade...away. Read Operator's Manual To reduce the risk of risk associated with ANSI Z87.1. away. Keep all bystanders at least 50 ft. Thrown Objects Thrown objects hazard; Cutting Hazard Keep Bystanders Away Ricochet Keep feet and hands away from rotating blade. WARNING: ...

Operation Manual
Page 8
... Direct Current Type or a characteristic of these symbols will allow you to operate the product better and safer. Local, state, or federal laws may be used on this product. SYMBOLS Some of the following symbols may prohibit disposal of batteries in ordinary trash...uses lithium-ion (Li-ion) batteries. English Please study them and learn their meaning. Proper interpretation of current no No Load Speed Rotational speed, at no load .../min Per Minute Revolutions, strokes, surface speed, orbits etc., per minute V Volts Hz Hertz min Minutes Voltage Frequency (cycles per second) Time...
... Direct Current Type or a characteristic of these symbols will allow you to operate the product better and safer. Local, state, or federal laws may be used on this product. SYMBOLS Some of the following symbols may prohibit disposal of batteries in ordinary trash...uses lithium-ion (Li-ion) batteries. English Please study them and learn their meaning. Proper interpretation of current no No Load Speed Rotational speed, at no load .../min Per Minute Revolutions, strokes, surface speed, orbits etc., per minute V Volts Hz Hertz min Minutes Voltage Frequency (cycles per second) Time...
Operation Manual
Page 9
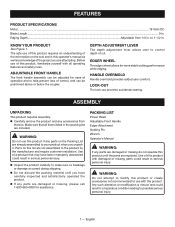
... HANDLE The front handle assembly can be adjusted for use of cut. n If any parts are damaged or missing do not operate this product, familiarize yourself with damaged or missing parts could result in . PACKING LIST Power Head Adjustable Front Handle Edger Attachment Holding Pin Wrench Operator's Manual WARNING: If any parts are replaced. Make sure that may have carefully inspected and satisfactorily operated the product. English FEATURES PRODUCT SPECIFICATIONS Motor...18 Volts DC Blade...
... HANDLE The front handle assembly can be adjusted for use of cut. n If any parts are damaged or missing do not operate this product, familiarize yourself with damaged or missing parts could result in . PACKING LIST Power Head Adjustable Front Handle Edger Attachment Holding Pin Wrench Operator's Manual WARNING: If any parts are replaced. Make sure that may have carefully inspected and satisfactorily operated the product. English FEATURES PRODUCT SPECIFICATIONS Motor...18 Volts DC Blade...
Operation Manual
Page 10
... assembling parts, making adjustments, cleaning, or when not in serious personal injury. Tighten securely. NOTICE: Before each use any attachment while power head is fully seated. TO INSTALL BATTERY PACK See Figure 4. WARNING: Failure to desired operating position. n Reinstall the wing bolt. n Align the arrows on the rear handle pole in serious personal injury. NOTE: Once assembled correctly, the edger attachment and power head should not separate when pulled. ATTACHING...
... assembling parts, making adjustments, cleaning, or when not in serious personal injury. Tighten securely. NOTICE: Before each use any attachment while power head is fully seated. TO INSTALL BATTERY PACK See Figure 4. WARNING: Failure to desired operating position. n Reinstall the wing bolt. n Align the arrows on the rear handle pole in serious personal injury. NOTE: Once assembled correctly, the edger attachment and power head should not separate when pulled. ATTACHING...
Operation Manual
Page 11
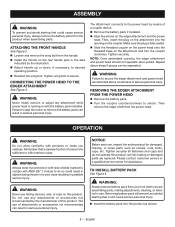
... battery pack STARTING/STOPPING THE EDGER See Figure 6. To stop: Release the switch trigger to the locked position. WARNING: Always hold the lock-out. Depress the switch trigger. NOTE: Adjust the blade depth from the blade guard. If the cutting depth needs adjusting, this should be adjusted 180°. Remove the battery pack. Set the edger on a flat surface and turn the knob counterclockwise to 1 in serious personal injury. English OPERATION...
... battery pack STARTING/STOPPING THE EDGER See Figure 6. To stop: Release the switch trigger to the locked position. WARNING: Always hold the lock-out. Depress the switch trigger. NOTE: Adjust the blade depth from the blade guard. If the cutting depth needs adjusting, this should be adjusted 180°. Remove the battery pack. Set the edger on a flat surface and turn the knob counterclockwise to 1 in serious personal injury. English OPERATION...

Operation Manual
Page 12
... replacement part is inaccessible to children. Keep away from the tool when cleaning or performing any other parts could create a hazard or cause product damage. English Failure to loosen. Remove the old blade from the motor shaft. Clean debris from the edger shaft, flange washer and cupped washer. Center the new blade on blade. Remove the battery pack. Wear gloves when handling blade...
... replacement part is inaccessible to children. Keep away from the tool when cleaning or performing any other parts could create a hazard or cause product damage. English Failure to loosen. Remove the old blade from the motor shaft. Clean debris from the edger shaft, flange washer and cupped washer. Center the new blade on blade. Remove the battery pack. Wear gloves when handling blade...

Operation Manual
Page 13
... Ryobi Help Line! English Your product has been fully tested prior to shipment to the instructions included with your model. Battery is not secure. This product has a Three-year Limited Warranty for personal, family, or household use (90 days for business or commercial use). Charge the battery pack according to ensure your product, call (toll free) 1-800-860-4050. 11 - TROUBLESHOOTING...
... Ryobi Help Line! English Your product has been fully tested prior to shipment to the instructions included with your model. Battery is not secure. This product has a Three-year Limited Warranty for personal, family, or household use (90 days for business or commercial use). Charge the battery pack according to ensure your product, call (toll free) 1-800-860-4050. 11 - TROUBLESHOOTING...
Parts Diagram
Page 3
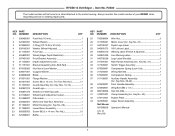
.... 31 1 Switch Trigger Assembly 1 Compression Spring (Lock-Out 1 Wiring Harness 1 Compression Spring 1 Auxiliary Handle Assembly (Inc. Key Nos. 38-42 1 Front Handle Assembly 1 Wing Bolt (M6 x 1 in 1 Hex Nut (M6 1 Clamp Assembly (Inc. RYOBI 18 Volt Edger − Item No. P2300 The model number will be found on a label attached to the motor housing. Key Nos. 16-19 1 Guard Logo 1 Shield Icon Warning Label 1 Wheel Depth Adjustment Label 1 Data Label 1 Motor and Gear Box Assembly 1 Motor Housing (Inc. Key...
.... 31 1 Switch Trigger Assembly 1 Compression Spring (Lock-Out 1 Wiring Harness 1 Compression Spring 1 Auxiliary Handle Assembly (Inc. Key Nos. 38-42 1 Front Handle Assembly 1 Wing Bolt (M6 x 1 in 1 Hex Nut (M6 1 Clamp Assembly (Inc. RYOBI 18 Volt Edger − Item No. P2300 The model number will be found on a label attached to the motor housing. Key Nos. 16-19 1 Guard Logo 1 Shield Icon Warning Label 1 Wheel Depth Adjustment Label 1 Data Label 1 Motor and Gear Box Assembly 1 Motor Housing (Inc. Key...
Parts Diagram
Page 4
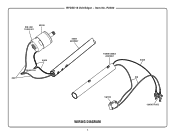
P2300 BOOM ASSEMBLY POWER HANDLE ASSEMBLY SWITCH WIRING DIAGRAM 4 BLACK RED CONTACT PLATE RED LEAD TO RED DOT MOTOR BLACK CONNECTOR RED RYOBI 18 Volt Edger − Item No.
P2300 BOOM ASSEMBLY POWER HANDLE ASSEMBLY SWITCH WIRING DIAGRAM 4 BLACK RED CONTACT PLATE RED LEAD TO RED DOT MOTOR BLACK CONNECTOR RED RYOBI 18 Volt Edger − Item No.


