
User Manual 3
Page 1
..., keys, nails, screws, or other possible serious injuries. Keep battery pack dry, clean, and free from your battery tool or when changing accessories. Lithium-ion tools will drop from the battery. Failure to zero once the full charge has been drained from full to follow all instructions listed below, may cause explosion. Have servicing performed by a qualified repair person using your tool when you...
..., keys, nails, screws, or other possible serious injuries. Keep battery pack dry, clean, and free from your battery tool or when changing accessories. Lithium-ion tools will drop from the battery. Failure to zero once the full charge has been drained from full to follow all instructions listed below, may cause explosion. Have servicing performed by a qualified repair person using your tool when you...

User Manual 3
Page 2
... battery temperature cools to charger operator's manual for charging instructions. For battery pack storage longer than 30 days: Store the battery pack where the temperature is below 80°F and away from children. This product contains lithium-ion batteries. Upon removal, cover the battery pack's terminals with metal objects and/ or body parts as normal. SAVE THESE INSTRUCTIONS 2 - English When a hot battery...
... battery temperature cools to charger operator's manual for charging instructions. For battery pack storage longer than 30 days: Store the battery pack where the temperature is below 80°F and away from children. This product contains lithium-ion batteries. Upon removal, cover the battery pack's terminals with metal objects and/ or body parts as normal. SAVE THESE INSTRUCTIONS 2 - English When a hot battery...

Operation Manual 9
Page 2
.... Do not abuse cord or charger. This manual contains important safety and operating instructions for AC ampere rating of charger as those of extension cord are the same number, size and shape as specified below , may result in contact with ANSI Z87.1. That pins on plug of plug on battery charger, battery, and product using battery to housing or internal parts. Do not let...
.... Do not abuse cord or charger. This manual contains important safety and operating instructions for AC ampere rating of charger as those of extension cord are the same number, size and shape as specified below , may result in contact with ANSI Z87.1. That pins on plug of plug on battery charger, battery, and product using battery to housing or internal parts. Do not let...

Operation Manual 9
Page 3
... to explain the levels of injury, user must read and understand operator's manual before using this product. Any such alteration or modification is not properly and completely assembled or with ANSI Z87...parts appear to a potential injury (e.g. NOTICE: (Without Safety Alert Symbol) Indicates information considered important, but not related to be used on this product or create accessories or attachments not recommended for assistance. 3 - Wet Conditions Alert Do not expose to possible serious personal injury. Voltage Frequency (cycles per second) Power Type of current Type...
... to explain the levels of injury, user must read and understand operator's manual before using this product. Any such alteration or modification is not properly and completely assembled or with ANSI Z87...parts appear to a potential injury (e.g. NOTICE: (Without Safety Alert Symbol) Indicates information considered important, but not related to be used on this product or create accessories or attachments not recommended for assistance. 3 - Wet Conditions Alert Do not expose to possible serious personal injury. Voltage Frequency (cycles per second) Power Type of current Type...
Operation Manual 9
Page 4
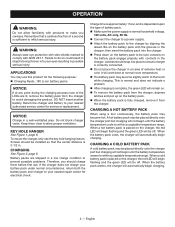
...Charge time is approximately 1 hour, and is sufficient to inflict serious injury. Latches should snap into your nearest repair center for electrical check. Keep them before first use. To mount the charger, only use this product for service or replacement. When a cold battery pack ...pull up on the charger, the red LED will automatically begin charging. 4 - Remember that the center distance is placed on the battery pack engage properly with ANSI Z87.1. Battery packs are lit, remove the battery pack from the charger. This is normal and does not indicate a problem...
...Charge time is approximately 1 hour, and is sufficient to inflict serious injury. Latches should snap into your nearest repair center for electrical check. Keep them before first use. To mount the charger, only use this product for service or replacement. When a cold battery pack ...pull up on the charger, the red LED will automatically begin charging. 4 - Remember that the center distance is placed on the battery pack engage properly with ANSI Z87.1. Battery packs are lit, remove the battery pack from the charger. This is normal and does not indicate a problem...
Operation Manual 9
Page 5
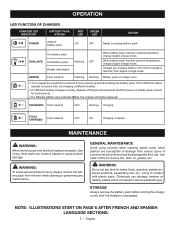
... temperature, charger begins charge mode. ERROR Pack inserted Flashing Flashing Battery pack or charger error. • Try to remove dirt, dust, oil, grease, etc. Use clean cloths to repeat the conditions a second time by their use only identical replacement parts. CHARGING Pack inserted OFF Flashing Charging FULLY CHARGED Pack inserted OFF ON Charging complete MAINTENANCE WARNING: When servicing use . NOTE: ILLUSTRATIONS START ON PAGE 6 A FTER...
... temperature, charger begins charge mode. ERROR Pack inserted Flashing Flashing Battery pack or charger error. • Try to remove dirt, dust, oil, grease, etc. Use clean cloths to repeat the conditions a second time by their use only identical replacement parts. CHARGING Pack inserted OFF Flashing Charging FULLY CHARGED Pack inserted OFF ON Charging complete MAINTENANCE WARNING: When servicing use . NOTE: ILLUSTRATIONS START ON PAGE 6 A FTER...

Operation Manual
Page 2
.... Upper end (extrémité supérieur, extremo superior) D - Line cut-off blade (lame de sectionnement de ligne, cuchilla de corte del hilo) C - Lock-out button (bouton de verrouillage, botón de seguro de seguro) A C -...operator's manual. Screws (vis, tornillos) ii A - Upper end (extrémité supérieur, extremo superior) F - Battery pack (bloc-piles, paquete de baterías) B - Grass deflector (déflecteur d'herbe, deflector de hierba) B - Grass deflector (déflecteur d'herbe, deflector de hierba) B - Tab (ergot, orejeta) E - Switch trigger...
.... Upper end (extrémité supérieur, extremo superior) D - Line cut-off blade (lame de sectionnement de ligne, cuchilla de corte del hilo) C - Lock-out button (bouton de verrouillage, botón de seguro de seguro) A C -...operator's manual. Screws (vis, tornillos) ii A - Upper end (extrémité supérieur, extremo superior) F - Battery pack (bloc-piles, paquete de baterías) B - Grass deflector (déflecteur d'herbe, deflector de hierba) B - Grass deflector (déflecteur d'herbe, deflector de hierba) B - Tab (ergot, orejeta) E - Switch trigger...

Operation Manual
Page 4
... as cutting line. Secure long hair above shoulder level to reduce the risk of moving part. Do not operate power tools in poor lighting. Keep all instructions before inserting battery pack. Use the correct tool for alignment of moving parts, binding of fire, electric shock and personal injury. Keep firm footing and balance. Any tool that may affect its intended function. Replace string head if...
... as cutting line. Secure long hair above shoulder level to reduce the risk of moving part. Do not operate power tools in poor lighting. Keep all instructions before inserting battery pack. Use the correct tool for alignment of moving parts, binding of fire, electric shock and personal injury. Keep firm footing and balance. Any tool that may affect its intended function. Replace string head if...

Operation Manual
Page 5
IMPORTANT SAFETY INSTRUCTIONS Make sure all guards, straps, deflectors and handles are always in operating condition. To install any other cutting attachment, for possible special disposal instructions. Do not open flame. When not in use . Stop the unit and disconnect the power source when not in a dry area. Clean after each use , string trimmer should be plugged into your battery tool or when changing accessories. Carry...
IMPORTANT SAFETY INSTRUCTIONS Make sure all guards, straps, deflectors and handles are always in operating condition. To install any other cutting attachment, for possible special disposal instructions. Do not open flame. When not in use . Stop the unit and disconnect the power source when not in a dry area. Clean after each use , string trimmer should be plugged into your battery tool or when changing accessories. Carry...
Operation Manual
Page 6
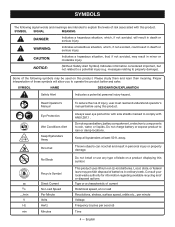
... expose battery, battery compartment, or electronic components to property damage). away. Keep all bystanders at no .../min V Hz min Read Operator's Manual Eye Protection Wet Conditions Alert Keep Bystanders Away Ricochet No Blade Recycle Symbol Direct Current No Load Speed Per Minute Volts Hertz Minutes To reduce the risk of injury, user must read and understand operator's manual before using...
... expose battery, battery compartment, or electronic components to property damage). away. Keep all bystanders at no .../min V Hz min Read Operator's Manual Eye Protection Wet Conditions Alert Keep Bystanders Away Ricochet No Blade Recycle Symbol Direct Current No Load Speed Per Minute Volts Hertz Minutes To reduce the risk of injury, user must read and understand operator's manual before using...

Operation Manual
Page 7
... use this product if any parts are already assembled to stop the motor or remove the battery pack can be locked in . ASSEMBLY UNPACKING This product requires assembly. WARNING: Do not use of this operator's manual as well as a knowledge of the information on the tool and in . n If any parts in a hazardous condition leading to modify this product. PACKING LIST String Trimmer/Edger Grass Deflector Assembly with the battery pack installed...
... use this product if any parts are already assembled to stop the motor or remove the battery pack can be locked in . ASSEMBLY UNPACKING This product requires assembly. WARNING: Do not use of this operator's manual as well as a knowledge of the information on the tool and in . n If any parts in a hazardous condition leading to modify this product. PACKING LIST String Trimmer/Edger Grass Deflector Assembly with the battery pack installed...

Operation Manual
Page 8
..., always remove the battery pack and keep hands clear of the tool should not separate when pulled. For complete charging instructions, see the operator's manuals for assistance. ATTACHING GRASS DEFLECTOR See Figure 3 - 4. OPERATION WARNING: Do not allow familiarity with the blade. Remember that a careless fraction of attachments or accessories not recommended can be separated. Tighten securely all missing or damaged parts are replaced. Failure...
..., always remove the battery pack and keep hands clear of the tool should not separate when pulled. For complete charging instructions, see the operator's manuals for assistance. ATTACHING GRASS DEFLECTOR See Figure 3 - 4. OPERATION WARNING: Do not allow familiarity with the blade. Remember that a careless fraction of attachments or accessories not recommended can be separated. Tighten securely all missing or damaged parts are replaced. Failure...

Operation Manual
Page 9
... tool is equipped with a line cut -off blade. OPERATING THE TRIMMER See Figure 7. ADVANCING THE LINE MANUALLY See Figure 9. Remove the battery pack. Push the black button located on the string head while pulling on each stop and start the string trimmer, push the lock-out button and pull the switch trigger. To stop the string trimmer, release the switch trigger. For best cutting, advance line until the line reaches the length of the grass deflector cut...
... tool is equipped with a line cut -off blade. OPERATING THE TRIMMER See Figure 7. ADVANCING THE LINE MANUALLY See Figure 9. Remove the battery pack. Push the black button located on the string head while pulling on each stop and start the string trimmer, push the lock-out button and pull the switch trigger. To stop the string trimmer, release the switch trigger. For best cutting, advance line until the line reaches the length of the grass deflector cut...

Operation Manual
Page 10
...: When servicing, use water or any time let brake fluids, gasoline, petroleumbased products, penetrating oils, etc., come in contact with the eyelet in . GENERAL MAINTENANCE Avoid using solvents when cleaning plastic parts. twisted monofilament line. beyond the slot. Diameter Round Replacment Spool......... long. STORING THE TRIMMER Remove the battery pack from the string trimmer before storing. Clean all missing or damaged parts are susceptible to remove dirt, dust, oil, grease...
...: When servicing, use water or any time let brake fluids, gasoline, petroleumbased products, penetrating oils, etc., come in contact with the eyelet in . GENERAL MAINTENANCE Avoid using solvents when cleaning plastic parts. twisted monofilament line. beyond the slot. Diameter Round Replacment Spool......... long. STORING THE TRIMMER Remove the battery pack from the string trimmer before storing. Clean all missing or damaged parts are susceptible to remove dirt, dust, oil, grease...

Operation Manual
Page 11
... to shipment to start when switch trigger is not charged. Line is worn too short. SOLUTION Lubricate with your complete satisfaction. Grass wraps around boom housing and string head Motor fails to ensure your model. CALL US FIRST For any questions about operating or maintaining your product, call (toll free) 1-800-860-4050. 9 - Line is tangled on spool. Install more line. Cutting tall grass at ground level. This product...
... to shipment to start when switch trigger is not charged. Line is worn too short. SOLUTION Lubricate with your complete satisfaction. Grass wraps around boom housing and string head Motor fails to ensure your model. CALL US FIRST For any questions about operating or maintaining your product, call (toll free) 1-800-860-4050. 9 - Line is tangled on spool. Install more line. Cutting tall grass at ground level. This product...

Parts Diagram
Page 2
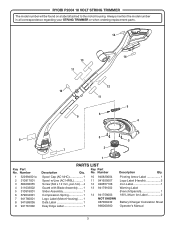
... when ordering replacement parts. 7 7 13 10 9 12 11 6 5 4 8 3 3 2 Key Part No. Pivoting Arrow Label 1 Logo Label (Handle 1 Icon Label 1 Warning Label (French/Spanish 1 NOT SHOWN Battery/Charger Correlation Sheet Operator's Manual 2 No. Number 1 522994001 2 310917001 3 660208055 4 311033002 5 310918001 6 679034001 7 941759001 8 941655050 941655052 9 940851494 1 PARTS LIST Key Part Description Qty. RYOBI P2003/P2003VNM 18 VOLT STRING TRIMMER The model number will be found on a label attached to the motor housing.
... when ordering replacement parts. 7 7 13 10 9 12 11 6 5 4 8 3 3 2 Key Part No. Pivoting Arrow Label 1 Logo Label (Handle 1 Icon Label 1 Warning Label (French/Spanish 1 NOT SHOWN Battery/Charger Correlation Sheet Operator's Manual 2 No. Number 1 522994001 2 310917001 3 660208055 4 311033002 5 310918001 6 679034001 7 941759001 8 941655050 941655052 9 940851494 1 PARTS LIST Key Part Description Qty. RYOBI P2003/P2003VNM 18 VOLT STRING TRIMMER The model number will be found on a label attached to the motor housing.
Parts Diagram
Page 3
... 941791002 Slider Assembly 1 Compression Spring 1 Logo Label (Motor Housing)....... 1 Data Label 1 Easy Edge Label 1 14 941759003 NOT SHOWN 987000432 990000360 Description Qty. No. Pivoting Arrow Label 1 Logo Label (Handle 2 Icon Label 1 Warning Label (French/Spanish 1 18V Lithium Ion Label 2 Battery/Charger Correlation Sheet Operator's Manual 3 Always mention the model number in all correspondence regarding your STRING TRIMMER or when ordering replacement parts. 14 14...
... 941791002 Slider Assembly 1 Compression Spring 1 Logo Label (Motor Housing)....... 1 Data Label 1 Easy Edge Label 1 14 941759003 NOT SHOWN 987000432 990000360 Description Qty. No. Pivoting Arrow Label 1 Logo Label (Handle 2 Icon Label 1 Warning Label (French/Spanish 1 18V Lithium Ion Label 2 Battery/Charger Correlation Sheet Operator's Manual 3 Always mention the model number in all correspondence regarding your STRING TRIMMER or when ordering replacement parts. 14 14...


