Ryobi JS451L Support and Manuals
Get Help and Manuals for this Ryobi item
View All Support Options Below
Free Ryobi JS451L manuals!
Problems with Ryobi JS451L?
Ask a Question
Free Ryobi JS451L manuals!
Problems with Ryobi JS451L?
Ask a Question
Most Recent Ryobi JS451L Questions

Popular Ryobi JS451L Manual Pages
English Manual - Page 4
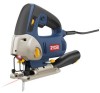
...lenses; SPECIFIC SAFETY RULES
Hold power tools by a qualified repair
person using an extension cord, be sure to use of at your nearest Authorized Service Center. Following this rule will reduce the risk of injury, user must read instruction manual.
When servicing a power tool, use the next heavier gauge. When using only identical replacement parts. LASER GUIDE...
English Manual - Page 6

...a qualified service technician. SAVE THESE INSTRUCTIONS
-
For service we suggest you do not use only identical replacement parts. Before...sawing, grinding, drilling, and other construction activities contains chemicals known to comply with ANSI Z87.1. When servicing, use this product until you read thoroughly and understand completely the operator's manual. Call Ryobi customer service...
English Manual - Page 8
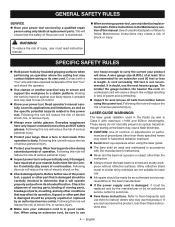
Stroke Length 3/4 in. FEATURES
PRODUCT SPECIFICATIONS
Input 120 Volts, AC Only, 60 Hz, 4.8 Amps No Load Speed 600-2600/min. Orbital Settings 4 Laser Guide Class II,
English Manual - Page 9

...
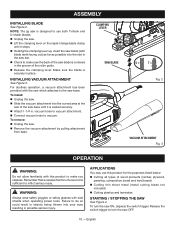
The jig saw . n Carefully remove the product and any parts are replaced. WARNING:
Do not attempt to follow. WARNING:
Do not connect to the bevel setting. English BASE ADJUSTMENT LEVER
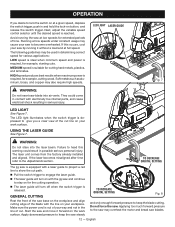
Using the base adjustment lever, you can be angled 45˚ left or right for a smoother cut line. FEATURES
KNOW YOUR JIG SAW
See Figure 1.
VACUUM ATTACHMENT / BLADE...
English Manual - Page 10
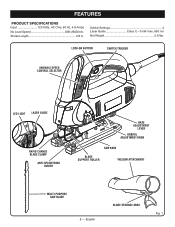
.... English To remove: Unplug the saw OFF.
10 -
ASSEMBLY
installing BLADE
See Figure 2. Make sure the blade is centered in . vacuum hose to vacuum attachment. Connect vacuum hose to do so could result in objects being thrown into your eyes resulting in place. NOTE: The jig saw is designed to use this product to...
English Manual - Page 12
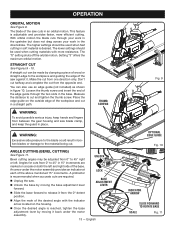
... already installed and aligned. Apply downward pressure to keep the blade cutting. Applying too much forward pressure to the saw may cause your saw by running the saw to ...saw blade into the laser beam. Avoid running it forward on with the jig saw steady
TO INCREASE ORBITAL SETTING
1
2 3
Fig. 8
and only enough forward pressure to the Adjustments section. LED light Laser guide...
English Manual - Page 13
...
Fig. 9
optional edge guide
Fig. 10
indicator arrow
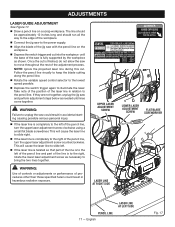
SLIDE FORWARD TO ROTATE BASE
scale
Fig. 11 This feature is reached, tighten the base adjustment lever by clamping a piece of wood or straight-edge to the blade could result in 15° increments are required.
Unplug the saw cuts in a straight path. The "0" setting shuts off...
English Manual - Page 14
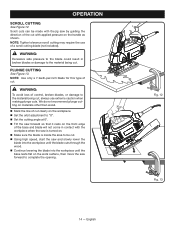
... the saw by guiding the direction of the base and blade will not come in broken blades or damage to the material being cut with the jig saw forward to the material being cut .
We do not recommend plunge cutting on materials other than wood. Mark the line of cut clearly on the workpiece. Set...
English Manual - Page 15

... of job to cut with an oily cloth.
Do not force. English By doing this, the material will be cut metals and conduit. NOTE: The jig saw using a metal blade (not included). Set the orbital adjustment knob to twist or bend the...
English Manual - Page 17
... left of the pencil line and part of the laser line in hazardous radiation exposure.
The line should
be approximately 12 inches long and should run all the way to the edge of the workpiece. Connect the jig saw to the power supply. Align the blade of the jig saw to illuminate the laser. upper...
English Manual - Page 18

...parts.
MAINTENANCE
WARNING:
When servicing, use . WARNING:
Do not at any other parts may result in this product are highly abrasive to avoid a safety hazard. However, if you purchased this product: Edge Guide...order to bearings, brushes, commutators, etc.
POWER SUPPLY CORD REPLACEMENT
If replacement of the unit under normal operating conditions. ACCESSORIES
Look for...
Repair Sheet - Page 2
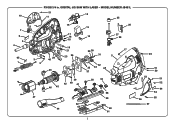
RYOBI 3/4 in. MODEL NUMBER JS451L
51
10
11
12 25
89 7
6
5 4
65
3
1
2
15
17 16
18
20 22 24 48
19 21
23 36
46
26 13
27
14
28
29 30
17
31
5
32
35 33
48
37
46 45
39 42 40 41
38
34
43
58
47
59
62
63
44
60
61
2
49
53
56 57
16 50
51 52
64 54 55 ORBITAL JIG SAW WITH LASER -
Repair Sheet - Page 3
... 1 039076001038 ANTI-SPLINTERING INSERT 1 039076001022 WASHER 2 039064001049 PIN 1
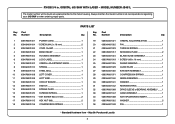
* Standard Hardware Item - May Be Purchased Locally 3 Always mention the model number in . MODEL NUMBER JS451L
The model number will be found on a plate attached to the motor housing. RYOBI 3/4 in all correspondence regarding your JIG SAW or when ordering repair parts. PARTS LIST
Key Part No.
Repair Sheet - Page 4
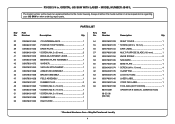
... CORD TAG LABEL 1 039076001059 TOOL BAG (NOT SHOWN 1 987000391 OPERATOR'S MANUAL (039076001048) 08-22-08 (REV:00)
* Standard Hardware Item - MODEL NUMBER JS451L
The model number will be found on a plate attached to the motor housing. PARTS LIST
Key Part No. May Be Purchased Locally 4 RYOBI 3/4 in all correspondence regarding your JIG SAW or when ordering repair parts.
Repair Sheet - Page 5
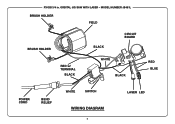
ORBITAL JIG SAW WITH LASER - MODEL NUMBER JS451L
BRUSH HOLDER
FIELD
BRUSH HOLDER
RED w/ TERMINAL
BLACK
BLACK WHITE
CIRCUIT BOARD
BLACK
RED BLUE
POWER CORD
BEND RELIEF
WHITE
SWITCH
WIRING DIAGRAM
5
LASER LED RYOBI 3/4 in.
Ryobi JS451L Reviews
We have not received any reviews for Ryobi yet.