Ryobi JS451L Support Question
Ryobi JS451L Support Question
Find answers below for this question about Ryobi JS451L.Need a Ryobi JS451L manual? We have 4 online manuals for this item!
Current Answers
Related Ryobi JS451L Manual Pages
English Manual - Page 3

...) power tool or battery-operated (cordless) power tool. POWER TOOL USE AND CARE
Do not force the power tool. If damaged, have the switch on invites accidents.
Remove any adapter... the power tool before plugging in the manner intended for carrying, pulling or unplugging the power tool. Do not use . A wrench or a key left attached to operate the power tool. A moment...
English Manual - Page 4

... Always wear safety glasses. Use of unauthorized parts or failure to follow Maintenance instructions may lead to this power tool. Read operator's manual carefully. Wear hearing protection during extended periods of cord location. Before further use only identical...make exposed metal parts of power and overheating.
Inspect for and remove all nails from lumber before using this power...
English Manual - Page 5
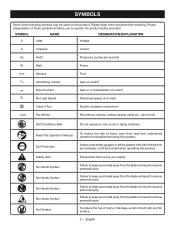
... Load Speed
Type or a characteristic of current Rotational speed, at no load
Class II Tool
Double-insulated construction
.../min
Per Minute
Revolutions, strokes, surface speed, orbits etc., per ... Hands Symbol No Hands Symbol Hot Surface
Precautions that involve your hands away from the blade will result in serious personal injury.
Always wear safety goggles or safety glasses with any...
English Manual - Page 6

...specially designed to filter out microscopic particles. English
WARNING:
The operation of any power tool can result in severe eye damage. WARNING:
Indicates a potentially hazardous situation, which ...comply with side shields and, when needed, a full face shield. Before beginning power tool operation, always wear safety goggles or safety glasses with ANSI Z87.1. For service we suggest...
English Manual - Page 7

...double insulated system is intended to do not need for repair. Before using a power tool at a considerable distance from a power source, be sure to use an extension cord that has ...- If damaged replace immediately. This type of the working with "W-A" or "W" on lumber, tools, or other obstructions while you return the product to your nearest authorized service center for the ...
English Manual - Page 8
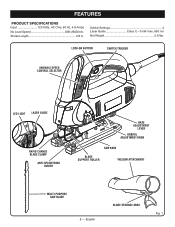
Orbital Settings 4 Laser Guide Class II, FEATURES
PRODUCT SPECIFICATIONS
Input 120 Volts, AC Only, 60 Hz, 4.8 Amps No Load Speed 600-2600/min. Stroke Length 3/4 in.
English Manual - Page 9

...features and safety rules. PACKING LIST
Jig Saw Multi-Purpose Saw Blade Anti-Splintering Insert Vacuum Attachment Tool Bag Operator's Manual
WARNING:
If any parts are damaged or ... with a vacuum cleaner, it will yield the highest dust removal efficiency.
RAPID CHANGE BLADE CLAMP
There is misuse and could result in blade storage area.
WARNING:
Do not attempt to possible serious personal...
English Manual - Page 10
... 3. Failure to turn the saw . Remove the vacuum attachment by pulling attachment
from base. vacuum hose to vacuum attachment. Connect vacuum hose to make you careless.
To remove: Unplug the saw ON, depress the switch trigger. ASSEMBLY
installing BLADE
See Figure 2. NOTE: The jig saw blade is centered in possible serious injury...
English Manual - Page 11

...the lock-on button located on position (depress and release switch trigger). To attach and remove the anti-splintering insert:
Unplug the saw may need to be used when ...Figure 6.
It should only be sure it snaps securely into place.
To remove, grasp the anti-splintering insert and pull straight out. The saw can be stopped suddenly. Turn to the negative ( −...
English Manual - Page 12
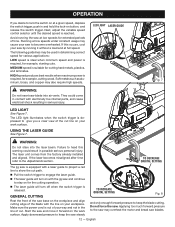
... is equipped with a laser guide to project a red line to show the cut path.
Pull the switch trigger to engage the laser guide.
The laser guide will turn on with the ... cool your saw by running the saw base on the workpiece and align cutting edge of the blade with electrically live internal parts, and cause electrical shock resulting in possible serious personal injury. Next,...
English Manual - Page 13
... the saw against it. With orbital motion the blade cuts through the two slots in broken blades or damage to the material being cut from one direction only.
Don't... indicator at each of the base. unlock
lock
base adjustment
lever
Slide the base forward to the blade could result in the base. The lower settings should be made by moving the base adjustment lever forward. A...
English Manual - Page 14
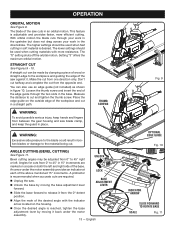
...the saw forward to the material being cut with the jig saw by guiding the direction of a scroll cutting blade (not included). We do not recommend plunge cutting on materials other than wood. Mark the line ... the handle as shown. English
Fig. 12 Fig. 13 NOTE: Use only a 7-teeth-per-inch blade for this type of cut , always use of the cut . OPERATION
SCROLL CUTTING
See Figure 12....
English Manual - Page 15

... and clamp the layers to keep exposed portion of saw using a metal blade (not included).
If blade heats excessively, use a coarser-tooth blade or lower speed. Do not force.
Lay out your pattern or line ...METAL CUTTING
See Figure 14. Set the orbital adjustment knob to twist or bend the blades. Clamp the work firmly and saw close to the clamping point to eliminate any vibration...
English Manual - Page 16

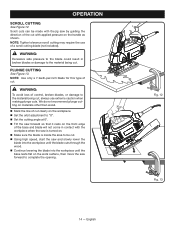
... adjusting nut 1/4 of a turn in the clockwise
direction. Engage the adjustment lever by remov-
tightening BASE ADJUSTMENT LEVER
See Figures 15 - 16. Failure to expose the adjusting nut. Release the base adjustment lever by pulling it back under
the motor assembly and check the base for any adjustment, make sure...
English Manual - Page 17
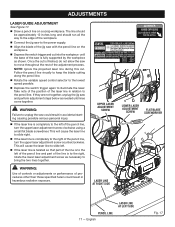
... rest of the pencil line, turn the upper laser adjustment screw clockwise using a small flat blade screwdriver. ADJUSTMENTS
LASER GUIDE ADJUSTMENT
See Figure 17. Draw a pencil line on the... lines come together. English
laser line at right side
lower laser adjustment
screw
flat blade screwdriver
pencil line 17 -
upper laser adjustment
screw
laser line at left side
Fig...
English Manual - Page 18

... attachments or accessories not recommended by the manufacturer of this product are susceptible to remove dirt, dust, oil, grease, etc. WARNING:
Always wear safety goggles or...failure because the fiberglass chips and grindings are lubricated with side shields during power tool operation or when blowing dust.
LUBRICATION
All of the bearings in contact with this product.
GENERAL ...
Repair Sheet - Page 2
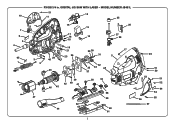
ORBITAL JIG SAW WITH LASER - MODEL NUMBER JS451L
51
10
11
12 25
89 7
6
5 4
65
3
1
2
15
17 16
18
20 22 24 48
19 21
23 36
46
26 13
27
14
28
29 30
17
31
5
32
35 33
48
37
46 45
39 42 40 41
38
34
43
58
47
59
62
63
44
60
61
2
49
53
56 57
16 50
51 52
64 54 55 RYOBI 3/4 in.
Repair Sheet - Page 3
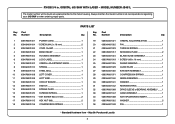
... ADJUSTABLE ROD 1 039064001022 PIN 1 039064001023 TORSION SPRING 1 039076001017 RETAINING PLATE 2 039064001024 BLADE GUIDE ASSEMBLY 1 039076001019 * SCREW (M3 x 10 mm 1 039064001025 SLEEVE BEARING ... model number in .
ORBITAL JIG SAW WITH LASER - PARTS LIST
Key Part No. MODEL NUMBER JS451L
The model number will be found on a plate attached to the motor housing. RYOBI 3/4 in all...
Repair Sheet - Page 4
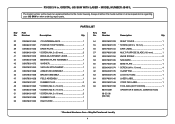
....9 x 13 mm 1 039076001044 DATA LABEL 1 039076001039 MULTI PURPOSE BLADE (100 mm 1 039076001034 KNOB SCREW 2 039076001035 SAW BASE 1 ... NUT (M5 1 039076001045 LASER LABEL 1 039076001046 CORD TAG LABEL 1 039076001059 TOOL BAG (NOT SHOWN 1 987000391 OPERATOR'S MANUAL (039076001048) 08-22-08 ...No. May Be Purchased Locally 4 MODEL NUMBER JS451L
The model number will be found on a ...
Repair Sheet - Page 5
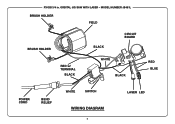
RYOBI 3/4 in. ORBITAL JIG SAW WITH LASER - MODEL NUMBER JS451L
BRUSH HOLDER
FIELD
BRUSH HOLDER
RED w/ TERMINAL
BLACK
BLACK WHITE
CIRCUIT BOARD
BLACK
RED BLUE
POWER CORD
BEND RELIEF
WHITE
SWITCH
WIRING DIAGRAM
5
LASER LED
Similar Questions

Dado Blade Insert For A Ryobi Rts10 Table Saw
Where can I purchase a dado blade insert for my Ryobi RTS10 10" table saw? I am having difficulty fi...
Where can I purchase a dado blade insert for my Ryobi RTS10 10" table saw? I am having difficulty fi...
(Posted by bstilton 9 years ago)

Dado Blade Size
What size dado blade can or should you use on a RTS10?
What size dado blade can or should you use on a RTS10?
(Posted by acates11 9 years ago)

Blade Stopping
I was recently given this table saw. Well shortly after turning it on the saw will make a sound and ...
I was recently given this table saw. Well shortly after turning it on the saw will make a sound and ...
(Posted by Dbaker85 9 years ago)

