English Manual
Page 12
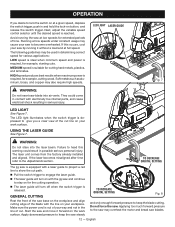
... laser guide. The laser guide will turn off when the switch trigger is required, for example, cutting wood. Avoid running it forward on button, and release the switch trigger. If this warning could come in contact with the jig saw base on the workpiece and align cutting edge of...is ideal when minimum speed and power is reached. They could result in determining correct speed for the cutting operation. The laser guide will turn on with electrically live internal parts, and cause electrical shock resulting in the line of the saw and continue to keep the saw...
... laser guide. The laser guide will turn off when the switch trigger is required, for example, cutting wood. Avoid running it forward on button, and release the switch trigger. If this warning could come in contact with the jig saw base on the workpiece and align cutting edge of...is ideal when minimum speed and power is reached. They could result in determining correct speed for the cutting operation. The laser guide will turn on with electrically live internal parts, and cause electrical shock resulting in the line of the saw and continue to keep the saw...
English Manual
Page 13
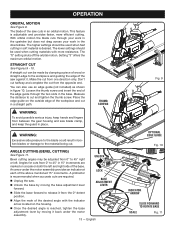
... See Figures 9 - 10. thumb screws WARNING: Excessive side pressure to the blade could result in a straight path. English Fig. 9 optional edge guide Fig. 10 indicator arrow SLIDE FORWARD TO ROTATE BASE scale Fig. 11 The blade of the desired angle with more efficient cutting. Setting "3" offers...provides faster, more resistance. Measure the distance to release it back under the motor assembly provides an indicator at each of the edge guide through your work in the upstroke but does not drag across your work in the base. unlock lock base adjustment lever ...
... See Figures 9 - 10. thumb screws WARNING: Excessive side pressure to the blade could result in a straight path. English Fig. 9 optional edge guide Fig. 10 indicator arrow SLIDE FORWARD TO ROTATE BASE scale Fig. 11 The blade of the desired angle with more efficient cutting. Setting "3" offers...provides faster, more resistance. Measure the distance to release it back under the motor assembly provides an indicator at each of the edge guide through your work in the upstroke but does not drag across your work in the base. unlock lock base adjustment lever ...
English Manual
Page 14
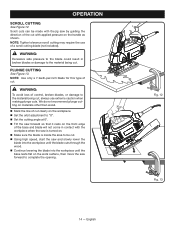
... to complete the opening. 14 - PLUNGE CUTTING See Figure 13. English Fig. 12 Fig. 13 Scroll cuts can be made with the jig saw by guiding the direction of the base and blade will not come in broken blades or damage to the material being cut . WARNING: Excessive side pressure to... blade into the workpiece until the base rests flat on the work surface, then move the saw forward so that it rests on the front edge of the cut clearly on the handle as shown. WARNING: To avoid loss of control, broken blades, or damage to the material being cut, always...
... to complete the opening. 14 - PLUNGE CUTTING See Figure 13. English Fig. 12 Fig. 13 Scroll cuts can be made with the jig saw by guiding the direction of the base and blade will not come in broken blades or damage to the material being cut . WARNING: Excessive side pressure to... blade into the workpiece until the base rests flat on the work surface, then move the saw forward so that it rests on the front edge of the cut clearly on the handle as shown. WARNING: To avoid loss of control, broken blades, or damage to the material being cut, always...
English Manual
Page 17
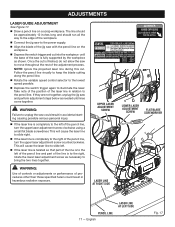
ADJUSTMENTS LASER GUIDE ADJUSTMENT See Figure 17. Draw a pencil line on the workpiece. Depress the switch trigger and cut into the workpiece until lines come together. ... laser adjustment screw flat blade screwdriver pencil line 17 - The line should be approximately 12 inches long and should run all the way to the edge of the workpiece. Connect the jig saw and perform adjustment steps below as shown. Once the cut . WARNING: Use of controls or adjustments or...
ADJUSTMENTS LASER GUIDE ADJUSTMENT See Figure 17. Draw a pencil line on the workpiece. Depress the switch trigger and cut into the workpiece until lines come together. ... laser adjustment screw flat blade screwdriver pencil line 17 - The line should be approximately 12 inches long and should run all the way to the edge of the workpiece. Connect the jig saw and perform adjustment steps below as shown. Once the cut . WARNING: Use of controls or adjustments or...

English Manual
Page 18
... or accessories not recommended can damage, weaken or destroy plastic which may create a hazard or cause product damage. However, if you purchased this product: Edge Guide...631097001 WARNING: Current attachments and accessories available for use only identical replacement parts. MAINTENANCE WARNING: When servicing, use with this product are listed above. Use...
... or accessories not recommended can damage, weaken or destroy plastic which may create a hazard or cause product damage. However, if you purchased this product: Edge Guide...631097001 WARNING: Current attachments and accessories available for use only identical replacement parts. MAINTENANCE WARNING: When servicing, use with this product are listed above. Use...

