Getting Started Guide
Page 3
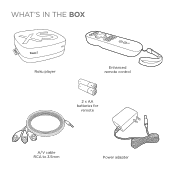
What's in the Box Roku player Enhanced remote control 2 x AA batteries for remote A/V cable RCA to 3.5mm Power adapter
What's in the Box Roku player Enhanced remote control 2 x AA batteries for remote A/V cable RCA to 3.5mm Power adapter
Getting Started Guide
Page 5
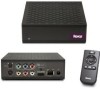
... with the included A/V cable (3.5mm to its original factory settings when pressed and held for Roku apps with an HDMI cable (not included). Resets your Roku player to a wired network with the included power adapter. Plays your storage capacity for 10 seconds... G Reset button - Lets you notice? Connects your Roku player to an HDTV with a microSD card (optional, not included). Connects your Roku player to a TV with each press of the remote control. A Status light - Flashes slowly when the Roku player starts up. C Storage expansion slot - Did you ...
... with the included A/V cable (3.5mm to its original factory settings when pressed and held for Roku apps with an HDMI cable (not included). Resets your Roku player to a wired network with the included power adapter. Plays your storage capacity for 10 seconds... G Reset button - Lets you notice? Connects your Roku player to an HDTV with a microSD card (optional, not included). Connects your Roku player to a TV with each press of the remote control. A Status light - Flashes slowly when the Roku player starts up. C Storage expansion slot - Did you ...
Getting Started Guide
Page 9
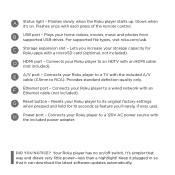
What To Do Step 2 POWER UP KEY COMPONENTS In this step, we'll make sure all systems are GO! First, power your Roku remote by inserting the included batteries: • Turn the remote control over and locate the rectangular battery door on the rear of the unit. • Press the latch at the top...
What To Do Step 2 POWER UP KEY COMPONENTS In this step, we'll make sure all systems are GO! First, power your Roku remote by inserting the included batteries: • Turn the remote control over and locate the rectangular battery door on the rear of the unit. • Press the latch at the top...
Getting Started Guide
Page 10
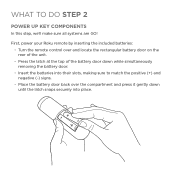
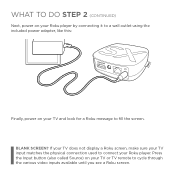
Press the Input button (also called Source) on your TV and look for a Roku message to cycle through the various video inputs available until you see a Roku screen. If your TV does not display a Roku screen, make sure your TV input matches the physical connection used to connect your TV or TV remote to fill the screen. BLANK SCREEN? What To Do Step 2 (CONTINUED) Next, power on your Roku player by connecting it to a wall outlet using the included power adapter, like this: Finally, power on your Roku player.
Press the Input button (also called Source) on your TV and look for a Roku message to cycle through the various video inputs available until you see a Roku screen. If your TV does not display a Roku screen, make sure your TV input matches the physical connection used to connect your TV or TV remote to fill the screen. BLANK SCREEN? What To Do Step 2 (CONTINUED) Next, power on your Roku player by connecting it to a wall outlet using the included power adapter, like this: Finally, power on your Roku player.
Getting Started Guide
Page 11
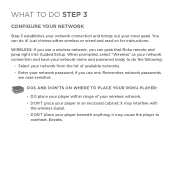
... grab that Roku remote and jump right into Guided Setup. Just choose either wireless or wired and read on where to overheat. it may cause the player to place your Roku player: • DO place your player within range of available networks. • Enter your player beneath anything;... What To Do Step 3 CONFIGURE YOUR NETWORK Step 3 establishes your network connection and brings out your player in an enclosed cabinet;...
... grab that Roku remote and jump right into Guided Setup. Just choose either wireless or wired and read on where to overheat. it may cause the player to place your Roku player: • DO place your player within range of available networks. • Enter your player beneath anything;... What To Do Step 3 CONFIGURE YOUR NETWORK Step 3 establishes your network connection and brings out your player in an enclosed cabinet;...
Getting Started Guide
Page 12
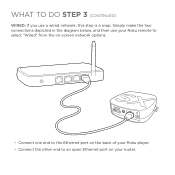
Simply make the two connections depicted in the diagram below, and then use a wired network, this step is a snap. What To Do step 3 (CONTINUED) WIRED: If you use your Roku remote to select "Wired" from the on-screen network options. • Connect one end to the Ethernet port on the back of your Roku player. • Connect the other end to an open Ethernet port on your router.
Simply make the two connections depicted in the diagram below, and then use a wired network, this step is a snap. What To Do step 3 (CONTINUED) WIRED: If you use your Roku remote to select "Wired" from the on-screen network options. • Connect one end to the Ethernet port on the back of your Roku player. • Connect the other end to an open Ethernet port on your router.
Getting Started Guide
Page 13
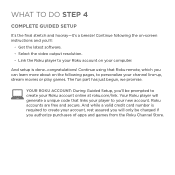
...'s the final stretch and hooray-it's a breeze! Continue using that links your player to personalize your Roku account online at roku.com/link. Your Roku player will only be prompted to create your account, rest assured you will generate a unique code that Roku remote, which you can learn more about on the following the on-screen instructions...
...'s the final stretch and hooray-it's a breeze! Continue using that links your player to personalize your Roku account online at roku.com/link. Your Roku player will only be prompted to create your account, rest assured you will generate a unique code that Roku remote, which you can learn more about on the following the on-screen instructions...
Getting Started Guide
Page 14
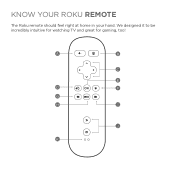
A B C E D F G H I J K KNOW YOUR roku REMOTE The Roku remote should feel right at home in your hand. We designed it to be incredibly intuitive for watching TV and great for gaming, too!
A B C E D F G H I J K KNOW YOUR roku REMOTE The Roku remote should feel right at home in your hand. We designed it to be incredibly intuitive for watching TV and great for gaming, too!
Getting Started Guide
Page 15
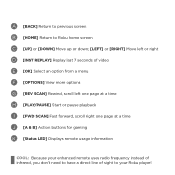
[BACK] Return to previous screen [HOME] Return to Roku home screen [UP] or [DOWN] Move up or down; [LEFT] or [RIGHT] Move left or right [INST REPLAY] Replay last 7 seconds of video [OK] Select ... at a time [PLAY/PAUSE] Start or pause playback [FWD SCAN] Fast forward, scroll right one page at a time [A & B] Action buttons for gaming [Status LED] Displays remote usage information Cool: Because your enhanced remote uses radio frequency instead of infrared, you don't need to have a direct line of sight to your...
[BACK] Return to previous screen [HOME] Return to Roku home screen [UP] or [DOWN] Move up or down; [LEFT] or [RIGHT] Move left or right [INST REPLAY] Replay last 7 seconds of video [OK] Select ... at a time [PLAY/PAUSE] Start or pause playback [FWD SCAN] Fast forward, scroll right one page at a time [A & B] Action buttons for gaming [Status LED] Displays remote usage information Cool: Because your enhanced remote uses radio frequency instead of infrared, you don't need to have a direct line of sight to your...

Getting Started Guide
Page 16
... lever on the strap lock and place your hand through the wrist strap. Hold the remote firmly in your Roku enhanced remote. • It's sensitive and smart. Close the lever to hold the wrist strap in place. The Roku XS remote incorporates motion-sensing technology, allowing more precise and detailed control of your wrist. Do...
... lever on the strap lock and place your hand through the wrist strap. Hold the remote firmly in your Roku enhanced remote. • It's sensitive and smart. Close the lever to hold the wrist strap in place. The Roku XS remote incorporates motion-sensing technology, allowing more precise and detailed control of your wrist. Do...
Getting Started Guide
Page 17
...sure your TV is turned on. (This tip could save you some embarrassment.) • Make sure the connectors on the cables between your Roku player and your TV. If the Roku player is connected to your wireless router. • Make sure you select "Wireless" and not "Wired" on the "Network connection selection" screen...the location of the unit will be on the other end. Most TVs have an Input button on the remote control to change video inputs. • Make sure the power cable for the Roku player is set to match the output (usually HDMI or composite video) used with a home theater receiver, ...
...sure your TV is turned on. (This tip could save you some embarrassment.) • Make sure the connectors on the cables between your Roku player and your TV. If the Roku player is connected to your wireless router. • Make sure you select "Wireless" and not "Wired" on the "Network connection selection" screen...the location of the unit will be on the other end. Most TVs have an Input button on the remote control to change video inputs. • Make sure the power cable for the Roku player is set to match the output (usually HDMI or composite video) used with a home theater receiver, ...
Getting Started Guide
Page 18
...your TV or home theater receiver matches the output (HDMI or analog audio) used with the remote. IF YOU CAN'T HEAR SOUND: • Make sure the connectors on the cables between your Roku player and your TV or home theater receiver are working and inserted properly (see Step 2). •... Make sure your remote is paired (see next section) with the Roku player. • If the status light on the front of your Roku player flashes once each time you press a remote button, the...
...your TV or home theater receiver matches the output (HDMI or analog audio) used with the remote. IF YOU CAN'T HEAR SOUND: • Make sure the connectors on the cables between your Roku player and your TV or home theater receiver are working and inserted properly (see Step 2). •... Make sure your remote is paired (see next section) with the Roku player. • If the status light on the front of your Roku player flashes once each time you press a remote button, the...
Getting Started Guide
Page 19
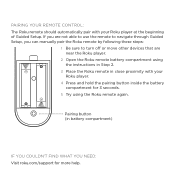
... able to use the remote to navigate through Guided Setup, you can manually pair the Roku remote by following these steps: 1 Be sure to turn off or move other devices that are near the Roku player. 2 Open the Roku remote battery compartment using the Roku remote again. PAIRING YOUR REMOTE CONTROL: The Roku remote should automatically pair with your Roku player at the beginning...
... able to use the remote to navigate through Guided Setup, you can manually pair the Roku remote by following these steps: 1 Be sure to turn off or move other devices that are near the Roku player. 2 Open the Roku remote battery compartment using the Roku remote again. PAIRING YOUR REMOTE CONTROL: The Roku remote should automatically pair with your Roku player at the beginning...
Setup Guide
Page 1
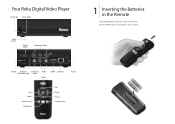
Your Roku Digital Video Player IR receiver Status light Reset button Optical audio Component video 1 Inserting the Batteries in your remote. S-Video USB port Composite Audio (XR model only) video Home HDMI Ethernet Power Left Select Reverse scan Play/Pause Up Right Down Forward scan Put two AAA batteries (included) in the Remote Slide the top panel upward to open the remote.
Your Roku Digital Video Player IR receiver Status light Reset button Optical audio Component video 1 Inserting the Batteries in your remote. S-Video USB port Composite Audio (XR model only) video Home HDMI Ethernet Power Left Select Reverse scan Play/Pause Up Right Down Forward scan Put two AAA batteries (included) in the Remote Slide the top panel upward to open the remote.
Setup Guide
Page 3
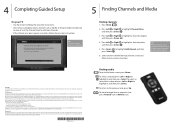
...a Class B digital device, pursuant to Part 15 of this equipment. U.S. To move through items a page at your player. 5 Finding Channels and Media Finding channels 1. TIP: Point your remote directly at a time, press Forward scan or Reverse scan. Press Left or Right to highlight Add channel, and then ... the new channel from your home screen and follow the onscreen instructions. TIP: Adding channels is prohibited. Copyright Copyright © 2008-2009 by Roku, Inc. Press Home . 2. All rights reserved. Use of supplied data cable is required to comply with the Class B limits of Part 15...
...a Class B digital device, pursuant to Part 15 of this equipment. U.S. To move through items a page at your player. 5 Finding Channels and Media Finding channels 1. TIP: Point your remote directly at a time, press Forward scan or Reverse scan. Press Left or Right to highlight Add channel, and then ... the new channel from your home screen and follow the onscreen instructions. TIP: Adding channels is prohibited. Copyright Copyright © 2008-2009 by Roku, Inc. Press Home . 2. All rights reserved. Use of supplied data cable is required to comply with the Class B limits of Part 15...
