Owners Manual
Page 13
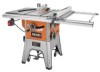
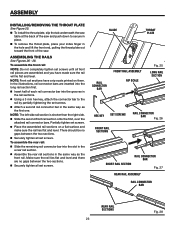
... KEY REMOVED NOTE: The cover does not need to turn the switch off ( O ) position before operating the switch to use by an insert called the throat plate. This feature is intended to position work for all through the table and is not in a safe place. TO lock your workpiece is surrounded by...
... KEY REMOVED NOTE: The cover does not need to turn the switch off ( O ) position before operating the switch to use by an insert called the throat plate. This feature is intended to position work for all through the table and is not in a safe place. TO lock your workpiece is surrounded by...
Owners Manual
Page 15
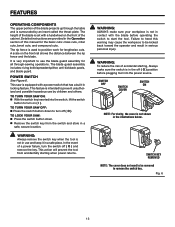
Rip Fence 1 E. Push Stick 1 H. Blade Wrench, open end 1 I. Front Rail 2 M. Table Extensions 2 O. Dust Chute 1 Q. Throat Plate 1 R. Fastener Pack - Fastener Pack - LOOSE PARTS The following items are included with the table saw: A G B C E, F N Q D K L K O P M S L J HI R Fig. 8 A. Bevel Adjusting Handwheel, Washer, and Knob........ 1 G. Spreader Bar 1 P. ...
Rip Fence 1 E. Push Stick 1 H. Blade Wrench, open end 1 I. Front Rail 2 M. Table Extensions 2 O. Dust Chute 1 Q. Throat Plate 1 R. Fastener Pack - Fastener Pack - LOOSE PARTS The following items are included with the table saw: A G B C E, F N Q D K L K O P M S L J HI R Fig. 8 A. Bevel Adjusting Handwheel, Washer, and Knob........ 1 G. Spreader Bar 1 P. ...
Owners Manual
Page 22
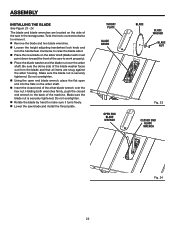
... blade WRENCH Fig. 24 22 Make sure the blade nut is securely tightened. Be sure the dome side of the saw blade and install the throat plate. throat plate blade arbor OPEN END blade WRENCH blade blade washer blade nut Fig. 23 closed end wrench to the back of the machine. The blade and...
... blade WRENCH Fig. 24 22 Make sure the blade nut is securely tightened. Be sure the dome side of the saw blade and install the throat plate. throat plate blade arbor OPEN END blade WRENCH blade blade washer blade nut Fig. 23 closed end wrench to the back of the machine. The blade and...
Owners Manual
Page 23
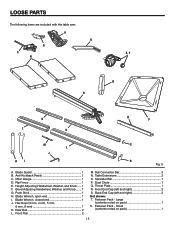
... all front rail pieces are assembled and you have a rip scale printed on a flat surface and make sure the rail lies flat and level. BLADE THROAT PLATE FRONT RAIL ASSEMBLY Rail connector bar RIP scale Fig. 25 LONG RAIL SECTION HEX KEY SET SCREWS Rail connector bar Fig. 26 FRONT RAIL sections... bar into the grooves in the rail sections. Using a 3 mm hex key, attach the connector bar to secure in place. To remove the throat plate, place your index finger in the same way as the first one. Make sure the rail lies flat and level and there are inserted into...
... all front rail pieces are assembled and you have a rip scale printed on a flat surface and make sure the rail lies flat and level. BLADE THROAT PLATE FRONT RAIL ASSEMBLY Rail connector bar RIP scale Fig. 25 LONG RAIL SECTION HEX KEY SET SCREWS Rail connector bar Fig. 26 FRONT RAIL sections... bar into the grooves in the rail sections. Using a 3 mm hex key, attach the connector bar to secure in place. To remove the throat plate, place your index finger in the same way as the first one. Make sure the rail lies flat and level and there are inserted into...

Owners Manual
Page 26
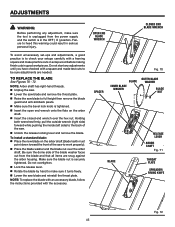
... cap SCREWS Front rail end cap Fig. 35 release lever (UNLOCKED) in "UP" POSITION for all through cutting): Remove the throat plate. Raise the saw blade by turning the height adjusting handwheel clockwise. Unlock the release lever by pulling it up. ...down " position (riving knife position). To place in riving knife position (or "down" position for all non-through cutting): Remove the throat plate. Raise the saw blade by turning the height adjusting handwheel clockwise. Unlock the release lever by pulling it up. Grasp...
... cap SCREWS Front rail end cap Fig. 35 release lever (UNLOCKED) in "UP" POSITION for all through cutting): Remove the throat plate. Raise the saw blade by turning the height adjusting handwheel clockwise. Unlock the release lever by pulling it up. ...down " position (riving knife position). To place in riving knife position (or "down" position for all non-through cutting): Remove the throat plate. Raise the saw blade by turning the height adjusting handwheel clockwise. Unlock the release lever by pulling it up. Grasp...

Owners Manual
Page 43
... Reinstall the blade nut. WARNING: Always use either the rip fence or miter gauge, you turn the saw . Fig. 67 Install the dado throat plate and rotate the blade by hand to make a dado cut with an up to width of 1-1/2 in.). NOTE: If you cannot use a push stick....engaged and the arbor extends past the blade. Failure to do so can result in . An optional dado throat plate is not raising the throat plate. NOTE: Always store the blade washer and throat plate in the "up to full speed before removing the workpiece. Note: The blade washer may purchase an ...
... Reinstall the blade nut. WARNING: Always use either the rip fence or miter gauge, you turn the saw . Fig. 67 Install the dado throat plate and rotate the blade by hand to make a dado cut with an up to width of 1-1/2 in.). NOTE: If you cannot use a push stick....engaged and the arbor extends past the blade. Failure to do so can result in . An optional dado throat plate is not raising the throat plate. NOTE: Always store the blade washer and throat plate in the "up to full speed before removing the workpiece. Note: The blade washer may purchase an ...
Owners Manual
Page 45
... Arbor shaft has right-hand threads. Unplug the saw. Lower the saw blade and remove the throat plate. Raise the saw blade and reinstall the throat plate. OPEN END blade WRENCH CLOSED END blade WRENCH Fig. 70 spacer Blade inner Blade washer OUTER Blade washer Blade nut... BLADE release lever arbor shaft Fig. 71 THROAT PLATE spreader/ RIVING KNIFE Fig. 72 45 Do not overtighten. Lock the release lever. Rotate the blade by hand to work...
... Arbor shaft has right-hand threads. Unplug the saw. Lower the saw blade and remove the throat plate. Raise the saw blade and reinstall the throat plate. OPEN END blade WRENCH CLOSED END blade WRENCH Fig. 70 spacer Blade inner Blade washer OUTER Blade washer Blade nut... BLADE release lever arbor shaft Fig. 71 THROAT PLATE spreader/ RIVING KNIFE Fig. 72 45 Do not overtighten. Lock the release lever. Rotate the blade by hand to work...
Owners Manual
Page 49
... miter gauge. Protect the blade by their use. GENERAL MAINTENANCE Avoid using solvents when cleaning plastic parts. Make sure the throat plate is in the blade teeth. To prevent work from slipping during power tool operation or when blowing dust. Use a resin solvent on...of any aerosol or petroleum solvents. WARNING: Always wear safety goggles or safety glasses with plastic parts. Do not use only identical RIDGID replacement parts. MAINTENANCE warning: When servicing, use any other parts may create a hazard or cause product damage. Use of commercial solvents...
... miter gauge. Protect the blade by their use. GENERAL MAINTENANCE Avoid using solvents when cleaning plastic parts. Make sure the throat plate is in the blade teeth. To prevent work from slipping during power tool operation or when blowing dust. Use a resin solvent on...of any aerosol or petroleum solvents. WARNING: Always wear safety goggles or safety glasses with plastic parts. Do not use only identical RIDGID replacement parts. MAINTENANCE warning: When servicing, use any other parts may create a hazard or cause product damage. Use of commercial solvents...

