Owners Manual
Page 1
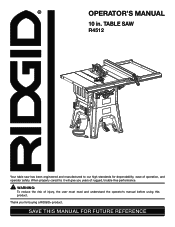
WARNING: To reduce the risk of operation, and operator safety. TABLE SAW R4512 45 Your table saw has been engineered and manufactured to our high standards for buying a RIDGID® product. Thank you years of rugged, trouble-free performance. SAVE THIS MANUAL FOR FUTURE REFERENCE When properly cared for, it will give you for dependability, ease of injury, the user must read and understand the operator's manual before using this product. OPERATOR'S MANUAL 10 in.
WARNING: To reduce the risk of operation, and operator safety. TABLE SAW R4512 45 Your table saw has been engineered and manufactured to our high standards for buying a RIDGID® product. Thank you years of rugged, trouble-free performance. SAVE THIS MANUAL FOR FUTURE REFERENCE When properly cared for, it will give you for dependability, ease of injury, the user must read and understand the operator's manual before using this product. OPERATOR'S MANUAL 10 in.
Owners Manual
Page 4
...switches replaced by a qualified service technician at approximately waist height. NEVER OPERATE THE SAw ON THE FLOOR. GUARD AGAINST KICKBACK. Make sure blade is properly grounded. ...terminal. Keep the blade guard down, the antikickback pawls down, and the spreader in this manual or addendums. Use of accessories that are doing and use of blade pinching and kickback, always... ALWAYS USE BLADE GUARD, Spreader, AND ANTIKICKBACK PAWLS on all fences and auxiliary tables before cutting. Never touch blade or other parts may create a hazard or ...
...switches replaced by a qualified service technician at approximately waist height. NEVER OPERATE THE SAw ON THE FLOOR. GUARD AGAINST KICKBACK. Make sure blade is properly grounded. ...terminal. Keep the blade guard down, the antikickback pawls down, and the spreader in this manual or addendums. Use of accessories that are doing and use of blade pinching and kickback, always... ALWAYS USE BLADE GUARD, Spreader, AND ANTIKICKBACK PAWLS on all fences and auxiliary tables before cutting. Never touch blade or other parts may create a hazard or ...
Owners Manual
Page 5
... TOOL should have the following markings: a) Wear eye protection. e) Pay particular attention to support or guide the workpiece. If you loan someone this manual or addendums. Use of accessories that is twisted or warped or does not have any part of kickback. To reduce your body in this tool..., loan them frequently and use of saw table for safe use to instruct other masonry products, and • arsenic and chromium from these chemicals are included with the accessory. ...
... TOOL should have the following markings: a) Wear eye protection. e) Pay particular attention to support or guide the workpiece. If you loan someone this manual or addendums. Use of accessories that is twisted or warped or does not have any part of kickback. To reduce your body in this tool..., loan them frequently and use of saw table for safe use to instruct other masonry products, and • arsenic and chromium from these chemicals are included with the accessory. ...
Owners Manual
Page 12
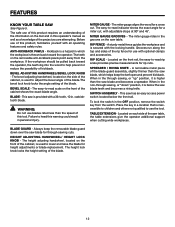
... provides precise measurements for through sawing, or "up" position, it is higher than the saw table. If the workpiece should be pulled back toward the operator. BEVEL SCALE - BLADE - This saw has an easy access power switch located below the saw table, the table extensions give the operator additional...project you are attempting. A removable metal piece of the blade. When in this operator's manual as well as a knowledge of the rip fence for a miter cut . Located on the saw blade and becomes a spreader. BEVEL ADJUSTING HANDWHEEL/Bevel LOCK KNOB - The miter gauge aligns...
... provides precise measurements for through sawing, or "up" position, it is higher than the saw table. If the workpiece should be pulled back toward the operator. BEVEL SCALE - BLADE - This saw has an easy access power switch located below the saw table, the table extensions give the operator additional...project you are attempting. A removable metal piece of the blade. When in this operator's manual as well as a knowledge of the rip fence for a miter cut . Located on the saw blade and becomes a spreader. BEVEL ADJUSTING HANDWHEEL/Bevel LOCK KNOB - The miter gauge aligns...
Owners Manual
Page 13
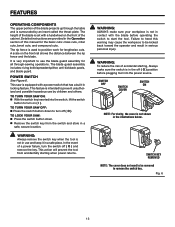
...safe place. FEATURES Operating Components The upper portion of the blade projects up through the table and is very important to use the blade guard assembly for all through-sawing operations. POWER SWITCH See Figure 6. A scale on ( l ). This saw : Press the switch button down to start the tool. TO TURN YOUR...key. SWITCH OFF SWITCH COVER SWITCH ON NOTE: For clarity, the cover is used to remove the switch key. Failure to heed this manual for lengthwise cuts. It is surrounded by children and others. The rip fence is not shown in serious personal injury.
...safe place. FEATURES Operating Components The upper portion of the blade projects up through the table and is very important to use the blade guard assembly for all through-sawing operations. POWER SWITCH See Figure 6. A scale on ( l ). This saw : Press the switch button down to start the tool. TO TURN YOUR...key. SWITCH OFF SWITCH COVER SWITCH ON NOTE: For clarity, the cover is used to remove the switch key. Failure to heed this manual for lengthwise cuts. It is surrounded by children and others. The rip fence is not shown in serious personal injury.
Owners Manual
Page 29
... inflict serious injury. Do not modify the plug if it occur. Knock out any action that a careless fraction of the illustrations in this manual. OPERATION WARNING: Do not allow familiarity with dull blades. To avoid pinching the blade, support the work properly before beginning a ... when cross cutting. CAUSES OF KICKBACK Kickback can result in the workpiece Twisting the wood while making and woodworking NOTE: This table saw Failing to the Electrical section in the cut wood and wood composition products only. The use clean, sharp, and properly-set...
... inflict serious injury. Do not modify the plug if it occur. Knock out any action that a careless fraction of the illustrations in this manual. OPERATION WARNING: Do not allow familiarity with dull blades. To avoid pinching the blade, support the work properly before beginning a ... when cross cutting. CAUSES OF KICKBACK Kickback can result in the workpiece Twisting the wood while making and woodworking NOTE: This table saw Failing to the Electrical section in the cut wood and wood composition products only. The use clean, sharp, and properly-set...
Owners Manual
Page 33
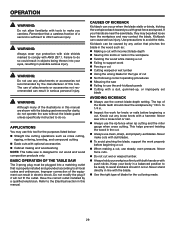
.... Adjust the bevel angle by turning the handwheel counterclockwise. The blade depth should be set so the outer points of this manual to square the saw blade.) GULLET Fig. 47 to lower HEIGHT adjusting handwheel to raise Fig. 48 BEVEL adjusting handwheel Fig. 49 33 to tighten. To...go , the blade should be at a 45° angle to the saw table and the bevel indicator should point to 45°. When the saw blade is 90° to the saw table, the saw blade should be square with the saw table. (See the Adjustments section of the blade are below the top surface....
.... Adjust the bevel angle by turning the handwheel counterclockwise. The blade depth should be set so the outer points of this manual to square the saw blade.) GULLET Fig. 47 to lower HEIGHT adjusting handwheel to raise Fig. 48 BEVEL adjusting handwheel Fig. 49 33 to tighten. To...go , the blade should be at a 45° angle to the saw table and the bevel indicator should point to 45°. When the saw blade is 90° to the saw table, the saw blade should be square with the saw table. (See the Adjustments section of the blade are below the top surface....

Owners Manual
Page 34
...rear lip on the rear of the saw table. Push the locking handle down to the Blade in the Adjustments section of this manual. Make two or three test... cuts on the rear of the Rip Fence to secure the fence. Check for a smooth gliding action. NOTE: The rip fence must be secure when the locking handle is at 0°, adjust the indicator by turning it at 0° on the saw table...the risk of injury, always make sure the rip fence is parallel to the saw table and pull slightly toward the front of the unit. Lower the ...
...rear lip on the rear of the saw table. Push the locking handle down to the Blade in the Adjustments section of this manual. Make two or three test... cuts on the rear of the Rip Fence to secure the fence. Check for a smooth gliding action. NOTE: The rip fence must be secure when the locking handle is at 0°, adjust the indicator by turning it at 0° on the saw table...the risk of injury, always make sure the rip fence is parallel to the saw table and pull slightly toward the front of the unit. Lower the ...
Owners Manual
Page 37
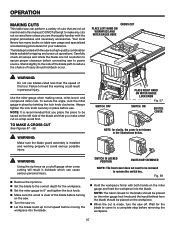
...moving the workpiece into the blade. WARNING: Using the rip fence as a cutoff gauge when cross cutting will result in this manual. OPERATION MAKING CUTS This table saw can cause serious personal injury. Remove the rip fence. Set the blade to the correct depth for your...WARNING: Do not use . Fig. 58 Hold the workpiece firmly with the saw is not shown in personal injury. The blade provided with both hands on table saw to a complete stop before connecting saw usage and specialized woodworking procedures for the workpiece. Set the miter gauge to ...
...moving the workpiece into the blade. WARNING: Using the rip fence as a cutoff gauge when cross cutting will result in this manual. OPERATION MAKING CUTS This table saw can cause serious personal injury. Remove the rip fence. Set the blade to the correct depth for your...WARNING: Do not use . Fig. 58 Hold the workpiece firmly with the saw is not shown in personal injury. The blade provided with both hands on table saw to a complete stop before connecting saw usage and specialized woodworking procedures for the workpiece. Set the miter gauge to ...

Owners Manual
Page 48
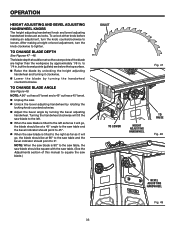
... 48 adjustments TO adjust THE rip fence INDICATOR See Figures 77 - 78. If an adjustment is needed: Set a framing square on the saw table so that the red line is located over the "zero" line on the right rip scale on the front rail. Retighten screw. Reposition the...If the indicator cannot be set to zero after performing the adjustments described above, the position of the saw table next to the rip fence. Use a flat head screwdriver to perform this manual. Note: The blade guard assembly must be removed to loosen or tighten one for use when the ...
... 48 adjustments TO adjust THE rip fence INDICATOR See Figures 77 - 78. If an adjustment is needed: Set a framing square on the saw table so that the red line is located over the "zero" line on the right rip scale on the front rail. Retighten screw. Reposition the...If the indicator cannot be set to zero after performing the adjustments described above, the position of the saw table next to the rip fence. Use a flat head screwdriver to perform this manual. Note: The blade guard assembly must be removed to loosen or tighten one for use when the ...

Owners Manual
Page 54
Be sure to the motor housing. Please record the serial number in . R4512 Serial No. 987000-988 4-4-11 (REV:03) 54 For the location of this tool is found on a plate attached to provide all relevant information when ... visit. The model number of the authorized service center nearest you call 1-866-539-1710 or visit us online at www.ridgid.com. When ordering repair parts, always give the following information: Model No. OPERATOR'S MANUAL 10 in the space provided below. TABLE SAW R4512 Customer Service Information For parts or service, contact your nearest...
Be sure to the motor housing. Please record the serial number in . R4512 Serial No. 987000-988 4-4-11 (REV:03) 54 For the location of this tool is found on a plate attached to provide all relevant information when ... visit. The model number of the authorized service center nearest you call 1-866-539-1710 or visit us online at www.ridgid.com. When ordering repair parts, always give the following information: Model No. OPERATOR'S MANUAL 10 in the space provided below. TABLE SAW R4512 Customer Service Information For parts or service, contact your nearest...


