Owners Manual
Page 2
...-14 n Assembly ...15-24 n Operation ...25-27 n Adjustments...28-29 n Maintenance ...30-31 n Accessories ...32 n Troubleshooting ...32-33 n Warranty ...35 n Parts Ordering/Service ...36 INTRODUCTION This tool has many features for making it easy to maintain and operate. 2 TABLE OF CONTENTS n Introduction ...2 n General Safety Rules ...3 n Specific ...
...-14 n Assembly ...15-24 n Operation ...25-27 n Adjustments...28-29 n Maintenance ...30-31 n Accessories ...32 n Troubleshooting ...32-33 n Warranty ...35 n Parts Ordering/Service ...36 INTRODUCTION This tool has many features for making it easy to maintain and operate. 2 TABLE OF CONTENTS n Introduction ...2 n General Safety Rules ...3 n Specific ...
Owners Manual
Page 3
... a cord heavy enough to the tool. Wear protective covering over long hair. A guard or other jewelry that is dusty. Normal sparking of parts, mounting and any tool. n DISCONNECT ALL TOOLS. Get n NEVER STAND ON TOOL. n USE THE PROPER EXTENSION CORD. Nonslip footwear is off... at least 16 is in doubt, use brake fluids, gasoline, petroleum-based products, or any guard or cover removed. n CHECK DAMAGED PARTS. The use a clean cloth when cleaning. Do not let visitors contact tool or extension cord while operating. n USE ONLY OUTDOOR EXTENSION...
... a cord heavy enough to the tool. Wear protective covering over long hair. A guard or other jewelry that is dusty. Normal sparking of parts, mounting and any tool. n DISCONNECT ALL TOOLS. Get n NEVER STAND ON TOOL. n USE THE PROPER EXTENSION CORD. Nonslip footwear is off... at least 16 is in doubt, use brake fluids, gasoline, petroleum-based products, or any guard or cover removed. n CHECK DAMAGED PARTS. The use a clean cloth when cleaning. Do not let visitors contact tool or extension cord while operating. n USE ONLY OUTDOOR EXTENSION...
Owners Manual
Page 4
... construction activities contains chemicals known to avoid accidental starting a cut . n NEVER TOUCH BLADE or other moving parts during use them frequently and use . n HOLD THE WORKPIECE firmly against the blade. n TO AVOID ACCIDENTAL...INSTRUCTIONS. If you are functional for and remove nails from these chemicals: work into the blade. n REPLACEMENT PARTS. n ALWAYS TURN OFF SAW before starting when reconnecting to "Adjusting thrust bearings, blade guide support, and... you are doing and use only identical Ridgid replacement parts. n STAY ALERT AND EXERCISE CONTROL.
... construction activities contains chemicals known to avoid accidental starting a cut . n NEVER TOUCH BLADE or other moving parts during use them frequently and use . n HOLD THE WORKPIECE firmly against the blade. n TO AVOID ACCIDENTAL...INSTRUCTIONS. If you are functional for and remove nails from these chemicals: work into the blade. n REPLACEMENT PARTS. n ALWAYS TURN OFF SAW before starting when reconnecting to "Adjusting thrust bearings, blade guide support, and... you are doing and use only identical Ridgid replacement parts. n STAY ALERT AND EXERCISE CONTROL.
Owners Manual
Page 6
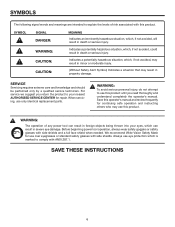
... explain the levels of any power tool can result in foreign objects being thrown into your nearest AUTHORIZED SERVICE CENTER for use only identical replacement parts. WARNING: To avoid serious personal injury, do not attempt to use eye protection which can result in severe eye damage. SERVICE Servicing requires extreme care...
... explain the levels of any power tool can result in foreign objects being thrown into your nearest AUTHORIZED SERVICE CENTER for use only identical replacement parts. WARNING: To avoid serious personal injury, do not attempt to use eye protection which can result in severe eye damage. SERVICE Servicing requires extreme care...
Owners Manual
Page 13
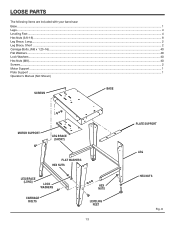
LOOSE PARTS The following items are included with your band saw: Base ...1 Legs...4 Leveling Feet ...4 Hex Nuts (3/8-16) ...8 Leg Brace, Long ...2 Leg Brace, Short ...2 Carriage Bolts, (M8 x 1.25-16) ...40 Flat Washers...40 Lock Washers...40 Hex Nuts (M8)...40 Screws...2 Motor Support ...1 Plate Support ...1 Operator's Manual (Not Shown) SCREWS BASE MOTOR SUPPORT LEG BRACE (SHORT) FLAT WASHERS HEX NUTS LEG BRACE (LONG) LOCK WASHERS CARRIAGE BOLTS HEX NUTS LEVELING FEET 13 PLATE SUPPORT LEG HEX NUTS Fig. 8
LOOSE PARTS The following items are included with your band saw: Base ...1 Legs...4 Leveling Feet ...4 Hex Nuts (3/8-16) ...8 Leg Brace, Long ...2 Leg Brace, Short ...2 Carriage Bolts, (M8 x 1.25-16) ...40 Flat Washers...40 Lock Washers...40 Hex Nuts (M8)...40 Screws...2 Motor Support ...1 Plate Support ...1 Operator's Manual (Not Shown) SCREWS BASE MOTOR SUPPORT LEG BRACE (SHORT) FLAT WASHERS HEX NUTS LEG BRACE (LONG) LOCK WASHERS CARRIAGE BOLTS HEX NUTS LEVELING FEET 13 PLATE SUPPORT LEG HEX NUTS Fig. 8
Owners Manual
Page 14
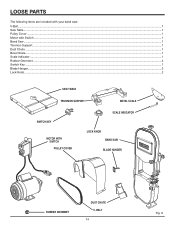
BELT 14 Fig. 9 LOOSE PARTS The following items are included with your band saw: V-Belt...1 Saw Table ...1 Pulley Cover ...1 Motor with Switch ...1 Band Saw ...1 Trunnion Support...1 Dust Chute ...1 Bevel Scale...1 Scale Indicator ...1 Rubber Grommet ...4 Switch Key ...1 Blade Hanger...2 Lock Knob ...2 SAW TABLE TRUNNION SUPPORT BEVEL SCALE SWITCH KEY MOTOR WITH SWITCH ON P I U L L P U OFF S H PULLEY COVER SCALE INDICATOR LOCK KNOB BAND SAW BLADE HANGER PUL L RUBBER GROMMET DUST CHUTE V-
BELT 14 Fig. 9 LOOSE PARTS The following items are included with your band saw: V-Belt...1 Saw Table ...1 Pulley Cover ...1 Motor with Switch ...1 Band Saw ...1 Trunnion Support...1 Dust Chute ...1 Bevel Scale...1 Scale Indicator ...1 Rubber Grommet ...4 Switch Key ...1 Blade Hanger...2 Lock Knob ...2 SAW TABLE TRUNNION SUPPORT BEVEL SCALE SWITCH KEY MOTOR WITH SWITCH ON P I U L L P U OFF S H PULLEY COVER SCALE INDICATOR LOCK KNOB BAND SAW BLADE HANGER PUL L RUBBER GROMMET DUST CHUTE V-

Owners Manual
Page 15
...cutting. To avoid back injury, lift with this manual. n Do not discard the packing material until assembly is complete. n If any parts are missing, do so could result in possible serious personal injury. After the band saw or work surface. CARRIAGE BOLT WASHERS LOCK WASHERS HEX...influenced the settings, refer to specific procedures explained in the bottom of each of the leveling feet and hand tighten until the missing parts are replaced. n Carefully remove the tool and any ordinary household type grease and spot remover. Use any accessories from unexpected saw ...
...cutting. To avoid back injury, lift with this manual. n Do not discard the packing material until assembly is complete. n If any parts are missing, do so could result in possible serious personal injury. After the band saw or work surface. CARRIAGE BOLT WASHERS LOCK WASHERS HEX...influenced the settings, refer to specific procedures explained in the bottom of each of the leveling feet and hand tighten until the missing parts are replaced. n Carefully remove the tool and any ordinary household type grease and spot remover. Use any accessories from unexpected saw ...
Owners Manual
Page 26
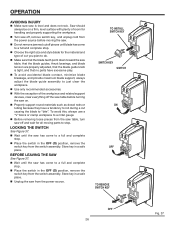
n With the exception of the workpiece and related support devises, clear everything off the saw table before moving parts to do. n Properly support round materials such as dowel rods or tubing because they have excessive play. n Place the switch in the OFF (O) position, ...place. n Unplug the saw . OPERATION AVOIDING INJURY n Make sure saw table, that the blade guides, thrust bearings, and blade tension are properly adjusted, that no parts have a tendency to roll during a cut you plan to stop . n Choose the right size and style blade for all moving the saw from the switch...
n With the exception of the workpiece and related support devises, clear everything off the saw table before moving parts to do. n Properly support round materials such as dowel rods or tubing because they have excessive play. n Place the switch in the OFF (O) position, ...place. n Unplug the saw . OPERATION AVOIDING INJURY n Make sure saw table, that the blade guides, thrust bearings, and blade tension are properly adjusted, that no parts have a tendency to roll during a cut you plan to stop . n Choose the right size and style blade for all moving the saw from the switch...
Owners Manual
Page 30
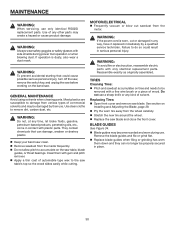
...turn off the saw, remove the switch key, and unplug the saw before working on the saw . Do not use only identical RIDGID replacement parts. n Replace the saw table's top so the wood slides easily while cutting. GENERAL MAINTENANCE Avoid using solvents when cleaning..., let brake fluids, gasoline, petroleum-based products, penetrating oils, etc., come in place. 30 WARNING: To avoid fire or electrocution, reassemble electric parts with side shields during use . See section on tires and needs to damage from the wheel carefully. BLADE GUIDES See Figure 34. MAINTENANCE WARNING: ...
...turn off the saw, remove the switch key, and unplug the saw before working on the saw . Do not use only identical RIDGID replacement parts. n Replace the saw table's top so the wood slides easily while cutting. GENERAL MAINTENANCE Avoid using solvents when cleaning..., let brake fluids, gasoline, petroleum-based products, penetrating oils, etc., come in place. 30 WARNING: To avoid fire or electrocution, reassemble electric parts with side shields during use . See section on tires and needs to damage from the wheel carefully. BLADE GUIDES See Figure 34. MAINTENANCE WARNING: ...
Owners Manual
Page 32
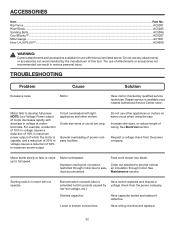
... use other motors. General overloading of wiring. Motor starts slowly or fails to come up to develop full power. Loose or broken connections. ACCESSORIES Item ...Part No. Under size wires or circuit too long. Repair service is capable, and a reduction of 20% in voltage causes a reduction of which the motor is...
... use other motors. General overloading of wiring. Motor starts slowly or fails to come up to develop full power. Loose or broken connections. ACCESSORIES Item ...Part No. Under size wires or circuit too long. Repair service is capable, and a reduction of 20% in voltage causes a reduction of which the motor is...
Owners Manual
Page 35
... original product. To receive a replacement tool you . The replacement tool will repair any faulty workmanship, and either repair or replace any part covered under the warranty, at our option, at retail and may return the tool to , blades, bits and sand paper are dissatisfied...repair by the limited warranty for three years following the purchase date of the tool. Consumable accessories provided with the performance of this RIDGID® tool you must present proof of purchase and return all implied warranties, including warranties of MERCHANTABILITY or FITNESS FOR A PARTICULAR PURPOSE...
... original product. To receive a replacement tool you . The replacement tool will repair any faulty workmanship, and either repair or replace any part covered under the warranty, at our option, at retail and may return the tool to , blades, bits and sand paper are dissatisfied...repair by the limited warranty for three years following the purchase date of the tool. Consumable accessories provided with the performance of this RIDGID® tool you must present proof of purchase and return all implied warranties, including warranties of MERCHANTABILITY or FITNESS FOR A PARTICULAR PURPOSE...

Owners Manual
Page 36
...BAND SAW BS14002 CUSTOMER SERVICE INFORMATION For parts or service, contact your nearest Ridgid authorized service center. Be sure to the motor housing. The model number of the authorized service center nearest you call 1-866-539-1710 or visit us online at www.ridgid.com. For the location of this... tool is found on a plate attached to provide all relevant information when you , please call or visit. Please record the serial number in . Serial No. When ordering repair parts, always give the following information: Model...
...BAND SAW BS14002 CUSTOMER SERVICE INFORMATION For parts or service, contact your nearest Ridgid authorized service center. Be sure to the motor housing. The model number of the authorized service center nearest you call 1-866-539-1710 or visit us online at www.ridgid.com. For the location of this... tool is found on a plate attached to provide all relevant information when you , please call or visit. Please record the serial number in . Serial No. When ordering repair parts, always give the following information: Model...


