User Guide
Page 1
GX e2600/GX e3300N/GX e3350N User Guide 1 Read This First 2 Preparing for future reference. For safe and correct use this machine and keep it handy for Printing 3 Printer Driver 4 Monitoring and Configuring the Printer 5 Using the Printer with a Macintosh 6 Maintaining 7 Troubleshooting 8 Appendix Read this manual carefully before you use , be sure to read the "Safety Information" before using the machine.
GX e2600/GX e3300N/GX e3350N User Guide 1 Read This First 2 Preparing for future reference. For safe and correct use this machine and keep it handy for Printing 3 Printer Driver 4 Monitoring and Configuring the Printer 5 Using the Printer with a Macintosh 6 Maintaining 7 Troubleshooting 8 Appendix Read this manual carefully before you use , be sure to read the "Safety Information" before using the machine.
User Guide
Page 5
... 138 Printing with a Macintosh...141 Basic Printing Procedure for Monitoring the Printer 110 Displaying the Printer Status...111 Using Web Browser...112 Displaying Top Page...113 Menu...114 Checking the Printer Status...114 Changing the Printer Settings (GX e3350N only 115 Notifying the Printer Status by E-mail...115 About the Web Browser Help...128 SNMP...129...
... 138 Printing with a Macintosh...141 Basic Printing Procedure for Monitoring the Printer 110 Displaying the Printer Status...111 Using Web Browser...112 Displaying Top Page...113 Menu...114 Checking the Printer Status...114 Changing the Printer Settings (GX e3350N only 115 Notifying the Printer Status by E-mail...115 About the Web Browser Help...128 SNMP...129...
User Guide
Page 9
Appendix Updating the Firmware...283 Checking the Current Printer Driver Version 284 Software on the CD-ROM...285 Files...285 RPCS Raster Printer Drivers...285 PCL Printer Drivers (GX e3350N only 286 SmartDeviceMonitor for Client...286 Manuals (HTML files)...287 Cautions to Take When Using ...in a Network 288 Using DHCP...288 Electromagnetic Interference...289 Specifications...290 Printer Body...290 Option (Bypass ...
Appendix Updating the Firmware...283 Checking the Current Printer Driver Version 284 Software on the CD-ROM...285 Files...285 RPCS Raster Printer Drivers...285 PCL Printer Drivers (GX e3350N only 286 SmartDeviceMonitor for Client...286 Manuals (HTML files)...287 Cautions to Take When Using ...in a Network 288 Using DHCP...288 Electromagnetic Interference...289 Specifications...290 Printer Body...290 Option (Bypass ...
User Guide
Page 17
... details, please contact your local dealer. Three kinds of models notation are employed in this manual might be optional. GX e3300N: This model supports the RPCS Raster printer driver. Read if you are in some countries. Some illustrations in this manual, the following items explain about the machine...-27 models. Information under these numbers is applicable to J017-17 and J019-17 models. GX e2600: This model supports the RPCS Raster printer driver. Read if you are using. The color samples in this model. You can identify the machine's model code by checking the label on...
... details, please contact your local dealer. Three kinds of models notation are employed in this manual might be optional. GX e3300N: This model supports the RPCS Raster printer driver. Read if you are in some countries. Some illustrations in this manual, the following items explain about the machine...-27 models. Information under these numbers is applicable to J017-17 and J019-17 models. GX e2600: This model supports the RPCS Raster printer driver. Read if you are using. The color samples in this model. You can identify the machine's model code by checking the label on...
User Guide
Page 23
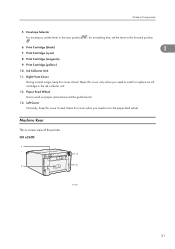
..., keep this cover closed . Paper Feed Wheel Use to Components 5. Left Cover Normally, keep this cover closed . Machine Rear This is a rear view of the printer. Open this cover only when you need to the forward position 6. Ink Collector Unit 11. Guide to wind out paper jammed around the guide board... the lever to install or replace an ink cartridge or the ink collector unit. 12. Open this cover when you need to the rear position . ; GX e2600 1 4 7 5 BYJ260S 21 for everything else, set the lever to turn the paper feed wheel.
..., keep this cover closed . Paper Feed Wheel Use to Components 5. Left Cover Normally, keep this cover closed . Machine Rear This is a rear view of the printer. Open this cover only when you need to the forward position 6. Ink Collector Unit 11. Guide to wind out paper jammed around the guide board... the lever to install or replace an ink cartridge or the ink collector unit. 12. Open this cover when you need to the rear position . ; GX e2600 1 4 7 5 BYJ260S 21 for everything else, set the lever to turn the paper feed wheel.
User Guide
Page 25
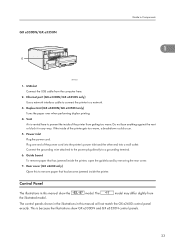
... illustrated model. Rear cover (GX e2600 only) Open this manual show GX e3300N and GX e3350N control panels. 23 This is vented here to prevent the inside the printer. Plug one end of the printer gets too warm, a breakdown could occur. 5. model. GX e3300N/GX e3350N 56 Guide to a network...that has become jammed inside of the printer from the computer here. 2. If the inside the printer, open the guide board by removing the rear cover. 7. Ethernet port (GX e3300N/GX e3350N only) Use a network interface cable to connect the printer to Components 1 BPR105S 1. The ...
... illustrated model. Rear cover (GX e2600 only) Open this manual show GX e3300N and GX e3350N control panels. 23 This is vented here to prevent the inside the printer. Plug one end of the printer gets too warm, a breakdown could occur. 5. model. GX e3300N/GX e3350N 56 Guide to a network...that has become jammed inside of the printer from the computer here. 2. If the inside the printer, open the guide board by removing the rear cover. 7. Ethernet port (GX e3300N/GX e3350N only) Use a network interface cable to connect the printer to Components 1 BPR105S 1. The ...
User Guide
Page 29
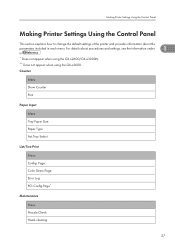
...the default settings of the printer and provides information about procedures and settings, see the information under 1 in each menu. For details about the parameters included in . * Does not appear when using the GX e2600/GX e3300N. ** Does not appear when using the GX e2600. Counter Menu Show Counter... Print Paper Input Menu Tray Paper Size Paper Type Aut.Tray Select List/Test Print Menu Config. Page Color Demo Page Error Log PCL Config.Page* ...
...the default settings of the printer and provides information about procedures and settings, see the information under 1 in each menu. For details about the parameters included in . * Does not appear when using the GX e2600/GX e3300N. ** Does not appear when using the GX e2600. Counter Menu Show Counter... Print Paper Input Menu Tray Paper Size Paper Type Aut.Tray Select List/Test Print Menu Config. Page Color Demo Page Error Log PCL Config.Page* ...

User Guide
Page 41
... cords that in a confined space, confirm that there is near the machine and freely accessible so that are as follows: GX e2600/GX e3300N • 100-240V: 50/60Hz 1.0-0.6A GX e3350N • 100-120V: 50/60Hz 1.0A • 220-240V: 50/60Hz 0.6A Checking the Computer to be unplugged... easily. Otherwise, the machine might occur. • Place the machine on this printer, your hands wet. Check the power source Setting Up the...
... cords that in a confined space, confirm that there is near the machine and freely accessible so that are as follows: GX e2600/GX e3300N • 100-240V: 50/60Hz 1.0-0.6A GX e3350N • 100-120V: 50/60Hz 1.0A • 220-240V: 50/60Hz 0.6A Checking the Computer to be unplugged... easily. Otherwise, the machine might occur. • Place the machine on this printer, your hands wet. Check the power source Setting Up the...
User Guide
Page 59
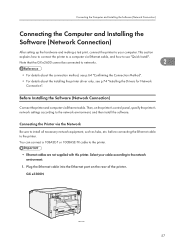
... (Network Connection) After setting up the hardware and making a test print, connect the printer to your cable according to the network environment. 1. Select your computer. Note that the GX e2600 cannot be connected to install all necessary network equipment, such as hubs, etc. ...Connecting the Printer via the Network Be sure to networks. 2 • For details about the connection method, see p.64 "Confirming the Connection Method". • For details about the installing the printer driver only, see p.74 "Installing the Drivers for Network Connection". GX e3300N BPR129S 57
... (Network Connection) After setting up the hardware and making a test print, connect the printer to your cable according to the network environment. 1. Select your computer. Note that the GX e2600 cannot be connected to install all necessary network equipment, such as hubs, etc. ...Connecting the Printer via the Network Be sure to networks. 2 • For details about the connection method, see p.64 "Confirming the Connection Method". • For details about the installing the printer driver only, see p.74 "Installing the Drivers for Network Connection". GX e3300N BPR129S 57
User Guide
Page 60
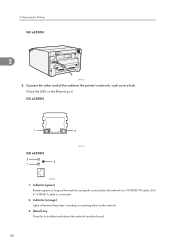
Indicator (green) Remains green as long as to a hub. Unlit if 10 BASE-T cable is properly connected to initialize and reboot the network interface board. 58 Preparing for Printing GX e3350N 2 BPR124S 2. Check the LEDs on the Ethernet port GX e3300N 1 2 GX e3350N 2 3 1 BPR177S AKR136S 1. Indicator (orange) Lights whenever the printer is sending or receiving data via the network. 3. [Reset] key Press this to the network via 100 BASE-TX cable. Connect the other end of the cable to the printer's network, such as the machine is connected. 2. 2.
Indicator (green) Remains green as long as to a hub. Unlit if 10 BASE-T cable is properly connected to initialize and reboot the network interface board. 58 Preparing for Printing GX e3350N 2 BPR124S 2. Check the LEDs on the Ethernet port GX e3300N 1 2 GX e3350N 2 3 1 BPR177S AKR136S 1. Indicator (orange) Lights whenever the printer is sending or receiving data via the network. 3. [Reset] key Press this to the network via 100 BASE-TX cable. Connect the other end of the cable to the printer's network, such as the machine is connected. 2. 2.
User Guide
Page 61
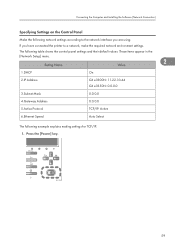
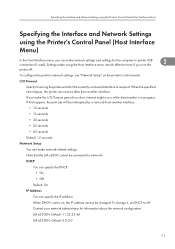
If you have connected the printer to the network interface you are using. Setting Name Value 2 1.DHCP On 2.IP Address GX e3300N: 11.22.33.44 GX e3350N: 0.0.0.0 3.Subnet Mask 0.0.0.0 4.Gateway Address 0.0.0.0 5.Active Protocol TCP/IP: Active 6.Ethernet Speed Auto Select The following table shows the control panel settings and their default ...
If you have connected the printer to the network interface you are using. Setting Name Value 2 1.DHCP On 2.IP Address GX e3300N: 11.22.33.44 GX e3350N: 0.0.0.0 3.Subnet Mask 0.0.0.0 4.Gateway Address 0.0.0.0 5.Active Protocol TCP/IP: Active 6.Ethernet Speed Auto Select The following table shows the control panel settings and their default ...
User Guide
Page 66
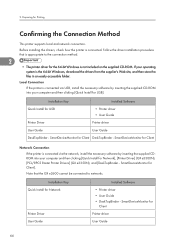
... into your computer and then clicking [Quick Install for Printing Confirming the Connection Method This printer supports local and network connection. 2. Preparing for Network], [Printer Driver] (GX e3300N), [PCL/RPCS Raster Printer Drivers] (GX e3350N), and [DeskTopBinder - Local Connection If the printer is appropriate to networks. If your computer and then clicking [Quick Install for USB]. SmartDeviceMonitor...
... into your computer and then clicking [Quick Install for Printing Confirming the Connection Method This printer supports local and network connection. 2. Preparing for Network], [Printer Driver] (GX e3300N), [PCL/RPCS Raster Printer Drivers] (GX e3350N), and [DeskTopBinder - Local Connection If the printer is appropriate to networks. If your computer and then clicking [Quick Install for USB]. SmartDeviceMonitor...

User Guide
Page 68
...and then click [OK]. 3. If your model is no need to the operating environment. 1. Quit all other operating systems may appear. Click [Printer Driver]. Procedures under [My Computer] or [Explorer], and then double-click [SETUP.EXE]. Screens vary according to install it does not, double-...Add New Hardware Wizard may differ. Log on the screen. 2. If this installation. Select a language for USB, there is the GX e3350N, click [PCL/RPCS Raster Printer Drivers]. 66 Check again that appear on as an example. 2. Start Windows, and insert the provided CD-ROM into the CD...
...and then click [OK]. 3. If your model is no need to the operating environment. 1. Quit all other operating systems may appear. Click [Printer Driver]. Procedures under [My Computer] or [Explorer], and then double-click [SETUP.EXE]. Screens vary according to install it does not, double-...Add New Hardware Wizard may differ. Log on the screen. 2. If this installation. Select a language for USB, there is the GX e3350N, click [PCL/RPCS Raster Printer Drivers]. 66 Check again that appear on as an example. 2. Start Windows, and insert the provided CD-ROM into the CD...
User Guide
Page 71
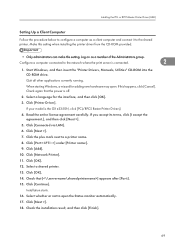
... Installation starts. 16. Log on as a client computer and connect it to the shared printer. If your model is the GX e3350N, click [PCL/RPCS Raster Printer Drivers]. 4. Start Windows, and then insert the "Printer Drivers, Manuals, Utilities" CD-ROM into the CD-ROM drive. If you accept its... to configure a computer as a member of the Administrators group. When starting Windows, a wizard for the interface, and then click [OK]. 3. Click [Printer Driver]. Click the plus mark next to open . Click [Add]. 10. Click [OK]. 12. Check that the power is connected. 2 1. Click ...
... Installation starts. 16. Log on as a client computer and connect it to the shared printer. If your model is the GX e3350N, click [PCL/RPCS Raster Printer Drivers]. 4. Start Windows, and then insert the "Printer Drivers, Manuals, Utilities" CD-ROM into the CD-ROM drive. If you accept its... to configure a computer as a member of the Administrators group. When starting Windows, a wizard for the interface, and then click [OK]. 3. Click [Printer Driver]. Click the plus mark next to open . Click [Add]. 10. Click [OK]. 12. Check that the power is connected. 2 1. Click ...
User Guide
Page 73
... time elapses, the printer can receive data from another interface. Note that the GX e2600 cannot be changed. GX e3300N: Default: 11.22.33.44 GX e3350N: Default: 0.0.0.0 71 I /O Timeout period too short, timeout might occur while data transfer is set DHCP to printer USB connection (if ... and settings for information about the network configuration. To change it, set to on the printer's control panel. Specifying the Interface and Network Settings using the Printer's Control Panel (Host Interface Menu) Specifying the Interface and Network Settings using the Host Interface...
... time elapses, the printer can receive data from another interface. Note that the GX e2600 cannot be changed. GX e3300N: Default: 11.22.33.44 GX e3350N: Default: 0.0.0.0 71 I /O Timeout period too short, timeout might occur while data transfer is set DHCP to printer USB connection (if ... and settings for information about the network configuration. To change it, set to on the printer's control panel. Specifying the Interface and Network Settings using the Printer's Control Panel (Host Interface Menu) Specifying the Interface and Network Settings using the Host Interface...
User Guide
Page 76
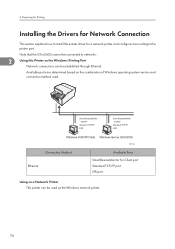
...Network Connection This section explains how to install the printer driver for Client port Standard TCP/IP port LPR port Using as the Windows network printer. 74 Note that the GX e2600 cannot be connected to the printer port. Available ports are determined based on the ...combination of Windows operating system version and connection method used as a Network Printer This printer can be used . 2. Connection ...
...Network Connection This section explains how to install the printer driver for Client port Standard TCP/IP port LPR port Using as the Windows network printer. 74 Note that the GX e2600 cannot be connected to the printer port. Available ports are determined based on the ...combination of Windows operating system version and connection method used as a Network Printer This printer can be used . 2. Connection ...

User Guide
Page 77
... Administrators group. 1. Select an interface language, and then click [OK]. 3. Log on as the Windows Network Printer" Installing the PCL or RPCS Raster Printer Driver (Network) Using the SmartDeviceMonitor for Client Port This section explains how to install the SmartDeviceMonitor for Client. &#...8226; Only administrators can perform this installation. If your model is the GX e3350N, click [PCL/RPCS Raster Printer Drivers]. The software license agreement appears in the [] dialog box. 4. Read the entire license agreement carefully....
... Administrators group. 1. Select an interface language, and then click [OK]. 3. Log on as the Windows Network Printer" Installing the PCL or RPCS Raster Printer Driver (Network) Using the SmartDeviceMonitor for Client Port This section explains how to install the SmartDeviceMonitor for Client. &#...8226; Only administrators can perform this installation. If your model is the GX e3350N, click [PCL/RPCS Raster Printer Drivers]. The software license agreement appears in the [] dialog box. 4. Read the entire license agreement carefully....

User Guide
Page 79
...the Status monitor automatically. 16. Click [Finish] in the [] dialog box. 4. Configure the default printer as a member of the selected printer is the GX e3350N, click [PCL/RPCS Raster Printer Drivers]. Click [Continue]. Click [Connected via LAN]. 6. Click [Standard TCP/IP], and then ... restarting the computer may appear. Installing the Drivers for Device selection appears, select "RICOH Network Printer C model". 11. The printer driver installation starts. 15. Log on the operating system, printer model, and port. 7. Start Windows, and then insert the provided CD-ROM ...
...the Status monitor automatically. 16. Click [Finish] in the [] dialog box. 4. Configure the default printer as a member of the selected printer is the GX e3350N, click [PCL/RPCS Raster Printer Drivers]. Click [Continue]. Click [Connected via LAN]. 6. Click [Standard TCP/IP], and then ... restarting the computer may appear. Installing the Drivers for Device selection appears, select "RICOH Network Printer C model". 11. The printer driver installation starts. 15. Log on the operating system, printer model, and port. 7. Start Windows, and then insert the provided CD-ROM ...
User Guide
Page 80
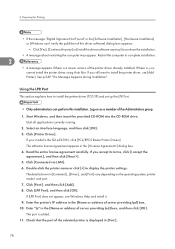
...may appear. If you accept its terms, click [I accept the agreement.], and then click [Next >]. 5. Double-click the printer name or click [+] to install the printer driver, use [Add Printer]. Click [Port:], and then click [Add]. 8. Using the LPR Port This section explains how to complete installation. 2 &#.... 11. Read the entire license agreement carefully. Click [LPR Port], and then click [OK]. The port is the GX e3350N, click [PCL/RPCS Raster Printer Drivers]. Select an interface language, and then click [OK]. 3. The details shown in the [] dialog box. 4. Click...
...may appear. If you accept its terms, click [I accept the agreement.], and then click [Next >]. 5. Double-click the printer name or click [+] to install the printer driver, use [Add Printer]. Click [Port:], and then click [Add]. 8. Using the LPR Port This section explains how to complete installation. 2 &#.... 11. Read the entire license agreement carefully. Click [LPR Port], and then click [OK]. The port is the GX e3350N, click [PCL/RPCS Raster Printer Drivers]. Select an interface language, and then click [OK]. 3. The details shown in the [] dialog box. 4. Click...
User Guide
Page 124
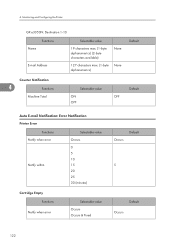
Monitoring and Configuring the Printer GX e3350N: Destination 1-10 Name Functions E-mail Address Selectable value 19 characters max. (1-byte alphanumerics) (2-byte characters available) 127 characters max. (1-byte alphanumerics) None None Default Counter Notification 4 Functions Machine Total Selectable value ON OFF Default OFF Auto E-mail Notification: Error Notification Printer Error Functions Notify when error Notify...
Monitoring and Configuring the Printer GX e3350N: Destination 1-10 Name Functions E-mail Address Selectable value 19 characters max. (1-byte alphanumerics) (2-byte characters available) 127 characters max. (1-byte alphanumerics) None None Default Counter Notification 4 Functions Machine Total Selectable value ON OFF Default OFF Auto E-mail Notification: Error Notification Printer Error Functions Notify when error Notify...


