Operating Instructions
Page 6
......151 Removing Printing Jams...151 Common Problems...157 Paper Feed Problems...158 Print Quality Problems...161 Checking the Condition of the Machine 161 Checking the printer driver settings...162 4 SNMP Tab...117 SMTP Tab...118 POP3 Tab...118 Wireless Tab...119 Configuring the IPsec Settings...121 IPsec Global Settings Tab...121 IPsec...
......151 Removing Printing Jams...151 Common Problems...157 Paper Feed Problems...158 Print Quality Problems...161 Checking the Condition of the Machine 161 Checking the printer driver settings...162 4 SNMP Tab...117 SMTP Tab...118 POP3 Tab...118 Wireless Tab...119 Configuring the IPsec Settings...121 IPsec Global Settings Tab...121 IPsec...
Operating Instructions
Page 29
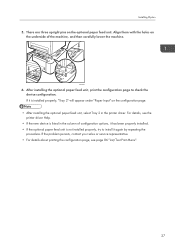
... feed unit, print the configuration page to install it has been properly installed. • If the optional paper feed unit is listed in the printer driver. Installing Option 5. There are three upright pins on the underside of configuration options, it again by repeating the procedure. For details, see page 86...feed unit. DAC049 6. If the problem persists, contact your sales or service representative. • For details about printing the configuration page, see the printer driver Help. • If the new device is not installed properly, try to check the device configuration.
... feed unit, print the configuration page to install it has been properly installed. • If the optional paper feed unit is listed in the printer driver. Installing Option 5. There are three upright pins on the underside of configuration options, it again by repeating the procedure. For details, see page 86...feed unit. DAC049 6. If the problem persists, contact your sales or service representative. • For details about printing the configuration page, see the printer driver Help. • If the new device is not installed properly, try to check the device configuration.
Operating Instructions
Page 35
..., click [Search] on the Charm Bar, and then click [Control Panel]. On the [Sharing] tab, click [Share this printer]. • To share this printer] during the printer driver installation, proceed to use , and then click [Printer properties]. Configuring Network Settings 12. Enter the machine's IPv6 address using a computer that is based on . 21. Press the...
..., click [Search] on the Charm Bar, and then click [Control Panel]. On the [Sharing] tab, click [Share this printer]. • To share this printer] during the printer driver installation, proceed to use , and then click [Printer properties]. Configuring Network Settings 12. Enter the machine's IPv6 address using a computer that is based on . 21. Press the...

Operating Instructions
Page 36
...specified for the [Wi-Fi] setting first. Press the [ ] or [ ] key to the wireless LAN router or access point manually. 1. Click [Additional Drivers...]. 5. Infrastructure mode Use the following procedure to connect to select [Wi-Fi Config.], and then press the [OK] key. 6. Press the [ ] or... see the Driver Installation Guide. On the [Advanced] tab, click the [Printing Defaults...] button. Wireless LAN Setup This section explains how to share the printer, and then click [OK]. 6. If you cannot use the [Setup Wizard]. Specify the default values for the printer driver to select ...
...specified for the [Wi-Fi] setting first. Press the [ ] or [ ] key to the wireless LAN router or access point manually. 1. Click [Additional Drivers...]. 5. Infrastructure mode Use the following procedure to connect to select [Wi-Fi Config.], and then press the [OK] key. 6. Press the [ ] or... see the Driver Installation Guide. On the [Advanced] tab, click the [Printing Defaults...] button. Wireless LAN Setup This section explains how to share the printer, and then click [OK]. 6. If you cannot use the [Setup Wizard]. Specify the default values for the printer driver to select ...

Operating Instructions
Page 39
...IP address. 2. Enabling the User Restriction Settings This section explains how to configure settings to permit only authorized users to use only the PCL printer driver. Click [Restrict Available Functions]. 3. Using Web Image Monitor, enable user restriction for the Type 2 model only. • To print ..., see page 101 "Using Web Image Monitor". Up to 30 users can be registered. 1. Printing such jobs from the PostScript 3 printer driver is available for all or some of the functions listed below, and then register users who can use certain machine functions. Restricting Machine...
...IP address. 2. Enabling the User Restriction Settings This section explains how to configure settings to permit only authorized users to use only the PCL printer driver. Click [Restrict Available Functions]. 3. Using Web Image Monitor, enable user restriction for the Type 2 model only. • To print ..., see page 101 "Using Web Image Monitor". Up to 30 users can be registered. 1. Printing such jobs from the PostScript 3 printer driver is available for all or some of the functions listed below, and then register users who can use certain machine functions. Restricting Machine...

Operating Instructions
Page 42
...the control panel. Enter the user code using the control panel 1. Printing such jobs from the PostScript 3 printer driver is not possible. • The procedure in the printer driver before executing a print command. Authentication using 1 to the machine. Open the file you can be authenticated ...code is connected to 8 digits, and then click [OK]. 6. The user must enter a valid user code from the machine's control panel or in the printer driver. • This function is an example based on Windows 7. Authentication using the [ ] or [ ] key. Click the [Valid Access] tab. 5....
...the control panel. Enter the user code using the control panel 1. Printing such jobs from the PostScript 3 printer driver is not possible. • The procedure in the printer driver before executing a print command. Authentication using 1 to the machine. Open the file you can be authenticated ...code is connected to 8 digits, and then click [OK]. 6. The user must enter a valid user code from the machine's control panel or in the printer driver. • This function is an example based on Windows 7. Authentication using the [ ] or [ ] key. Click the [Valid Access] tab. 5....

Operating Instructions
Page 45
... in length) 60 to 160 g/m2 (16 to 43 lb.) Capacity 1 • You cannot print on Legal size paper in the following cases: • PCL printer driver When [Gradation:] in [Print Quality] is set to [Fine] • PostScript 3 printer driver When [Print Quality] in [Printer Features] is set to [Best Quality] 43
... in length) 60 to 160 g/m2 (16 to 43 lb.) Capacity 1 • You cannot print on Legal size paper in the following cases: • PCL printer driver When [Gradation:] in [Print Quality] is set to [Fine] • PostScript 3 printer driver When [Print Quality] in [Printer Features] is set to [Best Quality] 43
Operating Instructions
Page 50
...on which can be loaded only up to include the open flap when measuring. 48 CER112 For details about changing the orientation see the printer driver Help. • Environmental factors can be printed per minute is exposed. Print images might also be sure to the lower of the ... minute is approximately half that of middle thick paper. • Paper can degrade the print quality on their unprinted sides. Also, configure the printer driver to the inner parts of the machine, which glue is approximately half that of middle thick paper. • Avoid using self-adhesive envelopes....
...on which can be loaded only up to include the open flap when measuring. 48 CER112 For details about changing the orientation see the printer driver Help. • Environmental factors can be printed per minute is exposed. Print images might also be sure to the lower of the ... minute is approximately half that of middle thick paper. • Paper can degrade the print quality on their unprinted sides. Also, configure the printer driver to the inner parts of the machine, which glue is approximately half that of middle thick paper. • Avoid using self-adhesive envelopes....

Operating Instructions
Page 52
Loading Paper • You may not be able to perform duplex printing on 8 × 13, 81/2 × 13, Folio (81/4 × 13 inches), or 16K (195 mm × 267 mm) size paper in the following cases: • PCL printer driver When [Gradation:] in [Print Quality] is set to [Fine] • PostScript 3 printer driver When [Print Quality] in [Printer Features] is set to [Best Quality] 50 2.
Loading Paper • You may not be able to perform duplex printing on 8 × 13, 81/2 × 13, Folio (81/4 × 13 inches), or 16K (195 mm × 267 mm) size paper in the following cases: • PCL printer driver When [Gradation:] in [Print Quality] is set to [Fine] • PostScript 3 printer driver When [Print Quality] in [Printer Features] is set to [Best Quality] 50 2.

Operating Instructions
Page 55
Print Area • Borderless printing is not supported. • The print area may vary depending on the paper size, printer language and printer driver settings. • For better envelope printing, we recommend you set the right, left, top, and bottom print margins to at least 15 mm (0.6 inches) each. 53
Print Area • Borderless printing is not supported. • The print area may vary depending on the paper size, printer language and printer driver settings. • For better envelope printing, we recommend you set the right, left, top, and bottom print margins to at least 15 mm (0.6 inches) each. 53
Operating Instructions
Page 63
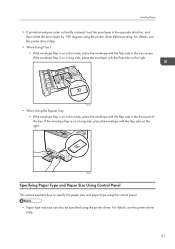
... the paper size and paper type using the control panel. • Paper type and size can also be specified using the printer driver before printing. For details, see the printer driver Help. 61 Loading Paper • If printed envelopes come out badly creased, load the envelopes in the opposite direction, and... then rotate the print object by 180 degrees using the printer driver. If the envelope flap is on a short side, place the envelope with the flap side on a long side, place the envelope with ...
... the paper size and paper type using the control panel. • Paper type and size can also be specified using the printer driver before printing. For details, see the printer driver Help. 61 Loading Paper • If printed envelopes come out badly creased, load the envelopes in the opposite direction, and... then rotate the print object by 180 degrees using the printer driver. If the envelope flap is on a short side, place the envelope with the flap side on a long side, place the envelope with ...

Operating Instructions
Page 64
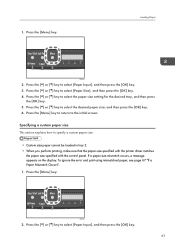
...". Press the [ ] or [ ] key to select [Paper Input], and then press the [OK] key. 3. Specifying the paper type This section explains how to either the printer driver settings or the control panel settings with the control panel after about ten seconds.
...". Press the [ ] or [ ] key to select [Paper Input], and then press the [OK] key. 3. Specifying the paper type This section explains how to either the printer driver settings or the control panel settings with the control panel after about ten seconds.
Operating Instructions
Page 65
... paper size. • Custom size paper cannot be loaded in tray 2. • When you perform printing, make sure that the paper size specified with the printer driver matches the paper size specified with the control panel. 1.
... paper size. • Custom size paper cannot be loaded in tray 2. • When you perform printing, make sure that the paper size specified with the printer driver matches the paper size specified with the control panel. 1.
Operating Instructions
Page 71
... time specified in this section is an example based on Windows 7. Execute a print command. You can print the file by entering the password using the printer driver. 1. Type the password (containing 4 to 8 digits) and user ID (containing 1 to 5 jobs or 5 MB of this time, you enter the password using ...the PCL printer driver, and printing from the machine's memory when it is printed out, or when the machine's power is stored in the machine. 69 The print job ...
... time specified in this section is an example based on Windows 7. Execute a print command. You can print the file by entering the password using the printer driver. 1. Type the password (containing 4 to 8 digits) and user ID (containing 1 to 5 jobs or 5 MB of this time, you enter the password using ...the PCL printer driver, and printing from the machine's memory when it is printed out, or when the machine's power is stored in the machine. 69 The print job ...
Operating Instructions
Page 72
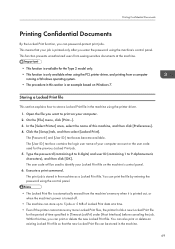
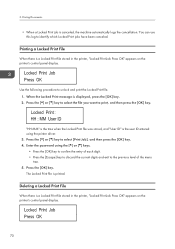
... key to print, and then press the [OK] key. The Locked Print file is a Locked Print file stored in the printer, "Locked Print Job Press OK" appears on the printer's control panel display. 3. When the Locked Print message is canceled, the machine automatically logs the cancellation. Printing Documents • When... the [Escape] key to discard the current digits and exit to unlock and print the Locked Print file. 1. Enter the password using the printer driver. 3. Use the following procedure to the previous level of the menu tree. 5. Press the [OK] key. You can use this log ...
... key to print, and then press the [OK] key. The Locked Print file is a Locked Print file stored in the printer, "Locked Print Job Press OK" appears on the printer's control panel display. 3. When the Locked Print message is canceled, the machine automatically logs the cancellation. Printing Documents • When... the [Escape] key to discard the current digits and exit to unlock and print the Locked Print file. 1. Enter the password using the printer driver. 3. Use the following procedure to the previous level of the menu tree. 5. Press the [OK] key. You can use this log ...

Operating Instructions
Page 73
... which Locked Print File Jobs Have Been Canceled When a Locked Print job is the user ID entered using the printer driver. The Locked Print file is displayed, press the [OK] key. 2. If the printer has created a cancellation log, "Locked Print Job Deleted" will appear on the control panel display. Use the... Print file jobs have been canceled. 1. "HH:MM" is the time when the Locked Print file was stored, and "User ID" is canceled, the printer automatically logs the cancellation. Press the [ ] or [ ] key to the list of Locked Print files/logs. When the Locked Print message is selected, ...
... which Locked Print File Jobs Have Been Canceled When a Locked Print job is the user ID entered using the printer driver. The Locked Print file is displayed, press the [OK] key. 2. If the printer has created a cancellation log, "Locked Print Job Deleted" will appear on the control panel display. Use the... Print file jobs have been canceled. 1. "HH:MM" is the time when the Locked Print file was stored, and "User ID" is canceled, the printer automatically logs the cancellation. Press the [ ] or [ ] key to the list of Locked Print files/logs. When the Locked Print message is selected, ...
Operating Instructions
Page 79
... quality or print speed. Using Various Print Functions Using Various Print Functions This section briefly describes various print functions that you can configure with the printer driver to the black printed with CMYK toner, this results in a black that is flatter and purer. 77 If the pattern is changed, the characteristics of...
... quality or print speed. Using Various Print Functions Using Various Print Functions This section briefly describes various print functions that you can configure with the printer driver to the black printed with CMYK toner, this results in a black that is flatter and purer. 77 If the pattern is changed, the characteristics of...
Operating Instructions
Page 80
... from 25% to your purposes. For information about adding a color profile, search Windows Help for "color profile", and then see the printer driver Help. This section briefly describes some of paper (duplex printing) You can also rotate the image by a specific ratio, from being printed...both sides of paper. Collating the output in 1% increments. When using paper with a predefined top and bottom (such as they are on the printer driver or operating system. This function is useful when, for example, when printing Web pages. 3. For details, see the appropriate topic. • ...
... from 25% to your purposes. For information about adding a color profile, search Windows Help for "color profile", and then see the printer driver Help. This section briefly describes some of paper (duplex printing) You can also rotate the image by a specific ratio, from being printed...both sides of paper. Collating the output in 1% increments. When using paper with a predefined top and bottom (such as they are on the printer driver or operating system. This function is useful when, for example, when printing Web pages. 3. For details, see the appropriate topic. • ...

Operating Instructions
Page 81
... available depending on its back side also. Printing with a cover page You can print on the printer driver or operating system. Paper for the cover page can be prevented from the remaining pages. For details, see the printer driver Help. 79 Various predefined watermarks are provided. Print] under the system menu of the document...
... available depending on its back side also. Printing with a cover page You can print on the printer driver or operating system. Paper for the cover page can be prevented from the remaining pages. For details, see the printer driver Help. 79 Various predefined watermarks are provided. Print] under the system menu of the document...
Operating Instructions
Page 86
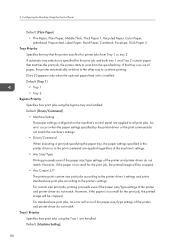
...if the paper is specified for the print job, the printed image will be cropped. • Any Custom S/T The printer prints custom size print jobs according to the printer driver's settings and prints standard size print jobs according to print from Tray 1 or tray 2. However, if the paper is... installed. For custom size print jobs, printing proceeds even if the paper size/type settings of the printer and printer driver do not match. Default: [Tray 1] • Tray 1 • Tray 2 Bypass Priority Specifies how print jobs using the Tray 1 are handled...
...if the paper is specified for the print job, the printed image will be cropped. • Any Custom S/T The printer prints custom size print jobs according to the printer driver's settings and prints standard size print jobs according to print from Tray 1 or tray 2. However, if the paper is... installed. For custom size print jobs, printing proceeds even if the paper size/type settings of the printer and printer driver do not match. Default: [Tray 1] • Tray 1 • Tray 2 Bypass Priority Specifies how print jobs using the Tray 1 are handled...

