
Operating Instructions
Page 3
... Models 8 Note to Administrator...8 About IP Address...9 List of Option...9 Model-Specific Information...10 Important Safety Instructions ...11 User Information on a Network...33 Wireless LAN Setup...34 Restricting Machine Functions According to Users in the State of California...13 ENERGY STAR Program...14 Saving Energy...14 1. Getting Started Guide to Components...
... Models 8 Note to Administrator...8 About IP Address...9 List of Option...9 Model-Specific Information...10 Important Safety Instructions ...11 User Information on a Network...33 Wireless LAN Setup...34 Restricting Machine Functions According to Users in the State of California...13 ENERGY STAR Program...14 Saving Energy...14 1. Getting Started Guide to Components...

Operating Instructions
Page 36
... the [Wi-Fi] setting first. Specify the default values for the printer driver to share the printer, and then click [OK]. 6. For easy setup using the control panel. On the [Advanced] tab, click the [Printing Defaults...] button. Press the [Menu] key. 3. Press the [ ] or [..., and then click [Open]. 7. Press the [ ] or [ ] key to select [Host Interface], and then press the [OK] key. 4. 1. Wireless LAN Setup This section explains how to select [Infrastructure], and then press the [OK] key. 8. For details about installing the driver, see Wi-Fi Settings Guide. •...
... the [Wi-Fi] setting first. Specify the default values for the printer driver to share the printer, and then click [OK]. 6. For easy setup using the control panel. On the [Advanced] tab, click the [Printing Defaults...] button. Press the [Menu] key. 3. Press the [ ] or [..., and then click [Open]. 7. Press the [ ] or [ ] key to select [Host Interface], and then press the [OK] key. 4. 1. Wireless LAN Setup This section explains how to select [Infrastructure], and then press the [OK] key. 8. For details about installing the driver, see Wi-Fi Settings Guide. •...

Operating Instructions
Page 38
Press the [ ] or [ ] key to select [Setup Wizard], and then press the [OK] key. 7. Press the [ ] or [ ] key to select [Network Setting], and then press the [OK] key. 5. Select a channel that corresponds ...
Press the [ ] or [ ] key to select [Setup Wizard], and then press the [OK] key. 7. Press the [ ] or [ ] key to select [Network Setting], and then press the [OK] key. 5. Select a channel that corresponds ...
Operating Instructions
Page 71
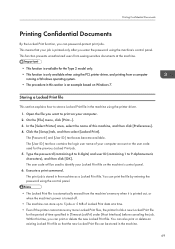
... Locked Print file on the machine's control panel. 6. Storing a Locked Print file This section explains how to 9 alphanumeric characters), and then click [OK]. Click the [Setup] tab, and then select [Locked Print]. Execute a print command. The [Password:] and [User ID:] text boxes become available. Printing Confidential Documents Printing Confidential Documents By...
... Locked Print file on the machine's control panel. 6. Storing a Locked Print file This section explains how to 9 alphanumeric characters), and then click [OK]. Click the [Setup] tab, and then select [Locked Print]. Execute a print command. The [Password:] and [User ID:] text boxes become available. Printing Confidential Documents Printing Confidential Documents By...

Operating Instructions
Page 95
...the machine's MAC address. • Currnt Connectn Displays detailed information about the connection, such as the SSID and the wireless signal strength. • Setup Wizard Displays the procedure for connecting with a wireless LAN. • WPS Connects with one touch using WPS (Wi-Fi Protected... Setup). It leads you step-bystep through configuring the settings for manually connecting to receive its IPv4 address, subnet mask, and default gateway address automatically...
...the machine's MAC address. • Currnt Connectn Displays detailed information about the connection, such as the SSID and the wireless signal strength. • Setup Wizard Displays the procedure for connecting with a wireless LAN. • WPS Connects with one touch using WPS (Wi-Fi Protected... Setup). It leads you step-bystep through configuring the settings for manually connecting to receive its IPv4 address, subnet mask, and default gateway address automatically...
Operating Instructions
Page 203
U User code 40 User restriction 8 W Waste toner bottle 134 Web Image Monitor 101 Where to put the machine 22 Wireless LAN settings 119 Wireless LAN setup 34 Wireless settings 119 WPA Supplicant 195 201
U User code 40 User restriction 8 W Waste toner bottle 134 Web Image Monitor 101 Where to put the machine 22 Wireless LAN settings 119 Wireless LAN setup 34 Wireless settings 119 WPA Supplicant 195 201