Operating Instructions
Page 6
Maintaining the Machine Replacing the Print Cartridge...129 Replacing the Waste Toner Bottle...134 Replacing a Component...140 Replacing the Intermediate Transfer Unit 140 Replacing the Fusing Unit and Transfer Roller 140 Cautions ...
Maintaining the Machine Replacing the Print Cartridge...129 Replacing the Waste Toner Bottle...134 Replacing a Component...140 Replacing the Intermediate Transfer Unit 140 Replacing the Fusing Unit and Transfer Roller 140 Cautions ...
Operating Instructions
Page 7
... Using the Control Panel 183 Notes About the Toner...184 Moving and Transporting the Machine...185 Disposal...185 Where to Inquire...186 Consumables...187 Print Cartridge...187 Waste Toner Bottle...189 Specifications of the Machine...190 General Function Specifications...190 Printer Function Specifications...192 Specifications of Options...193 Paper Feed Unit...
... Using the Control Panel 183 Notes About the Toner...184 Moving and Transporting the Machine...185 Disposal...185 Where to Inquire...186 Consumables...187 Print Cartridge...187 Waste Toner Bottle...189 Specifications of the Machine...190 General Function Specifications...190 Printer Function Specifications...192 Specifications of Options...193 Paper Feed Unit...
Operating Instructions
Page 14
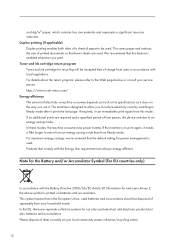
... enables both sides of a sheet of charge from this feature is designed to allow you print. Toner and ink cartridge return program Toner and ink cartridge for the Battery and/or Accumulator Symbol (For EU countries only) In accordance with the Energy Star requirement are separate...users in the European Union, used batteries and accumulators should be used electrical and electronic products but also batteries and accumulators. https://www.ricoh-return.com/ Energy efficiency The amount of separately from Ready mode. In these modes, the machine consumes less power (watts). If...
... enables both sides of a sheet of charge from this feature is designed to allow you print. Toner and ink cartridge return program Toner and ink cartridge for the Battery and/or Accumulator Symbol (For EU countries only) In accordance with the Energy Star requirement are separate...users in the European Union, used batteries and accumulators should be used electrical and electronic products but also batteries and accumulators. https://www.ricoh-return.com/ Energy efficiency The amount of separately from Ready mode. In these modes, the machine consumes less power (watts). If...

Operating Instructions
Page 19
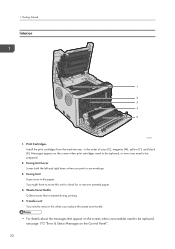
... Exterior: Front View 4 5 6 1 7 2 8 3 9 10 DAC023 1. Power Switch Use this cover to prevent paper falling off . 4. Stop Fences Pull up this fence to replace the print cartridge. 2. Control Panel Contains keys for machine control and indicators that show the machine status. 3. The fence can be adjusted at a time. 1.
... Exterior: Front View 4 5 6 1 7 2 8 3 9 10 DAC023 1. Power Switch Use this cover to prevent paper falling off . 4. Stop Fences Pull up this fence to replace the print cartridge. 2. Control Panel Contains keys for machine control and indicators that show the machine status. 3. The fence can be adjusted at a time. 1.

Operating Instructions
Page 20
... to prevent Legal-size prints from falling off . 1 2 3 18 DAC035 Tray 1 This tray can hold up the retainer as shown below to replace the print cartridges. 8. 1. or Letter-size prints from falling off .
... to prevent Legal-size prints from falling off . 1 2 3 18 DAC035 Tray 1 This tray can hold up the retainer as shown below to replace the print cartridges. 8. 1. or Letter-size prints from falling off .
Operating Instructions
Page 22
.... Fusing Unit Fuses toner to check for or remove jammed paper. 4. You might have to move this when you print on the screen when print cartridges need to be replaced, or new ones need to be replaced, see page 172 "Error & Status Messages on the Control Panel". 20 Getting Started Interior...
.... Fusing Unit Fuses toner to check for or remove jammed paper. 4. You might have to move this when you print on the screen when print cartridges need to be replaced, or new ones need to be replaced, see page 172 "Error & Status Messages on the Control Panel". 20 Getting Started Interior...
Operating Instructions
Page 50
... that can degrade the print quality on which can occur as a result of the envelopes overlapping. • To correctly specify the length of the print cartridge's photo conductor unit. They may stick to include the open flap when measuring. 48 CER112 For details about changing the orientation see the printer driver...
... that can degrade the print quality on which can occur as a result of the envelopes overlapping. • To correctly specify the length of the print cartridge's photo conductor unit. They may stick to include the open flap when measuring. 48 CER112 For details about changing the orientation see the printer driver...
Operating Instructions
Page 107
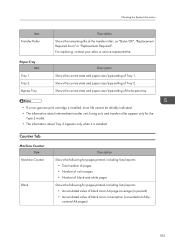
... Information Item Transfer Roller Paper Tray Item Tray 1 Tray 2 Bypass Tray Description Shows the remaining life of the bypass tray. • If a non-genuine print cartridge is installed, toner life cannot be reliably indicated. • The information about intermediate transfer unit, fusing unit, and transfer roller appear only for pages printed...
... Information Item Transfer Roller Paper Tray Item Tray 1 Tray 2 Bypass Tray Description Shows the remaining life of the bypass tray. • If a non-genuine print cartridge is installed, toner life cannot be reliably indicated. • The information about intermediate transfer unit, fusing unit, and transfer roller appear only for pages printed...
Operating Instructions
Page 131
...paper type and size, and environmental conditions such as temperature and humidity. 6. Messages on the screen • Replace the indicated print cartridge when any of the following messages appear on image volume and density, number of those pages may be necessary. Toner quality degrades ...over time. Therefore, we recommend you always keep a new print cartridge ready. • For good print quality, the manufacturer recommends that you use of the following messages appear on the screen: "Replace Toner...
...paper type and size, and environmental conditions such as temperature and humidity. 6. Messages on the screen • Replace the indicated print cartridge when any of the following messages appear on image volume and density, number of those pages may be necessary. Toner quality degrades ...over time. Therefore, we recommend you always keep a new print cartridge ready. • For good print quality, the manufacturer recommends that you use of the following messages appear on the screen: "Replace Toner...
Operating Instructions
Page 132
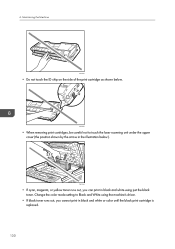
DAC044 • If cyan, magenta, or yellow toner runs out, you cannot print in black and white or color until the black print cartridge is replaced. 130 Change the color mode setting to touch the laser scanning unit under the upper cover (the position shown by the arrow in ...black and white using just the black toner. 6. DAC046 • When removing print cartridges, be careful not to Black and White using the machine's driver. • If black toner runs out, you can print in the illustration below . Maintaining...
DAC044 • If cyan, magenta, or yellow toner runs out, you cannot print in black and white or color until the black print cartridge is replaced. 130 Change the color mode setting to touch the laser scanning unit under the upper cover (the position shown by the arrow in ...black and white using just the black toner. 6. DAC046 • When removing print cartridges, be careful not to Black and White using the machine's driver. • If black toner runs out, you can print in the illustration below . Maintaining...
Operating Instructions
Page 133
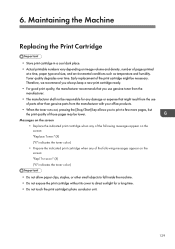
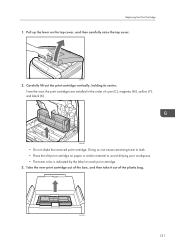
...order of the plastic bag. Replacing the Print Cartridge 1. Carefully lift out the print cartridge vertically, holding its center. DAC040 • Do not shake the removed print cartridge. DAC036 131 Doing so can cause remaining toner to leak. • Place the old print cartridge on paper or similar material to avoid dirtying...8226; The toner color is indicated by the label on the top cover, and then carefully raise the top cover. Take the new print cartridge out of the box, and then take it out of cyan (C), magenta (M), yellow (Y), and black (K). Pull up the lever on each print...
...order of the plastic bag. Replacing the Print Cartridge 1. Carefully lift out the print cartridge vertically, holding its center. DAC040 • Do not shake the removed print cartridge. DAC036 131 Doing so can cause remaining toner to leak. • Place the old print cartridge on paper or similar material to avoid dirtying...8226; The toner color is indicated by the label on the top cover, and then carefully raise the top cover. Take the new print cartridge out of the box, and then take it out of cyan (C), magenta (M), yellow (Y), and black (K). Pull up the lever on each print...

Operating Instructions
Page 134
6. DAC039 Even distribution of toner within the bottle improves print quality. 5. Remove the protective cover from side to side five or six times. Maintaining the Machine 4. DAC037 6. Check the toner color and corresponding location, and then carefully insert the print cartridge vertically. 132 DAC043 Hold the print cartridge and shake it from the print cartridge.
6. DAC039 Even distribution of toner within the bottle improves print quality. 5. Remove the protective cover from side to side five or six times. Maintaining the Machine 4. DAC037 6. Check the toner color and corresponding location, and then carefully insert the print cartridge vertically. 132 DAC043 Hold the print cartridge and shake it from the print cartridge.

Operating Instructions
Page 135
... sales or service representative. 133 Be careful not to cover the old print cartridge with the protective cover for recycling and environmental purposes. • Comply with the print cartridge recycling program, whereby used print cartridges are collected for processing. DAC064 8. For details, ask your fingers. Using both... hands, hold the center of the top cover and close the cover carefully. Replacing the Print Cartridge 7. Then, put the old print cartridge into the bag, and then put it into the box. Attach the protective cover you removed in Step 5 on the...
... sales or service representative. 133 Be careful not to cover the old print cartridge with the protective cover for recycling and environmental purposes. • Comply with the print cartridge recycling program, whereby used print cartridges are collected for processing. DAC064 8. For details, ask your fingers. Using both... hands, hold the center of the top cover and close the cover carefully. Replacing the Print Cartridge 7. Then, put the old print cartridge into the bag, and then put it into the box. Attach the protective cover you removed in Step 5 on the...

Operating Instructions
Page 144
Pull up the lever on the control panel. Remove the rearmost print cartridge. Slide the toner density sensor lever once to the left. 142 DAC093 DAC477 2. DAC040 3. 6. Maintaining the Machine Cleaning the Toner Density Sensor Clean the toner density sensor when the following message appears on the top cover, and then carefully raise the top cover. "Density Sensor Require Cleaning" 1.
Pull up the lever on the control panel. Remove the rearmost print cartridge. Slide the toner density sensor lever once to the left. 142 DAC093 DAC477 2. DAC040 3. 6. Maintaining the Machine Cleaning the Toner Density Sensor Clean the toner density sensor when the following message appears on the top cover, and then carefully raise the top cover. "Density Sensor Require Cleaning" 1.

Operating Instructions
Page 145
DAC064 143 Cleaning the Toner Density Sensor 4. DAC043 5. Be careful not to trap your fingers. Using both hands, hold the center of the top cover and close the cover carefully. Carefully insert the print cartridge removed in Step 2 vertically.
DAC064 143 Cleaning the Toner Density Sensor 4. DAC043 5. Be careful not to trap your fingers. Using both hands, hold the center of the top cover and close the cover carefully. Carefully insert the print cartridge removed in Step 2 vertically.

Operating Instructions
Page 163
... with the machine's location. Print Quality Problems Print Quality Problems Checking the Condition of the Machine If there is incorrect. Print cartridge should be subject to vibration or shock. Make sure that the paper type setting of the printer driver matches the type of paper... loaded. See page 41 "Supported Paper". A non-genuine print cartridge is supported by executing [Color Dens/ Reg] in color printing after being used . See page 187 "Consumables". Color degradation has occurred. ...
... with the machine's location. Print Quality Problems Print Quality Problems Checking the Condition of the Machine If there is incorrect. Print cartridge should be subject to vibration or shock. Make sure that the paper type setting of the printer driver matches the type of paper... loaded. See page 41 "Supported Paper". A non-genuine print cartridge is supported by executing [Color Dens/ Reg] in color printing after being used . See page 187 "Consumables". Color degradation has occurred. ...
Operating Instructions
Page 169
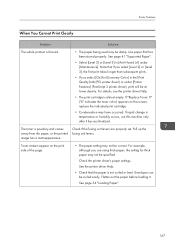
...driver's paper settings. Flatten out the paper before loading it has acclimatized. For details, see the printer driver Help. • The print cartridge is not curled or bent. For example, although you select [On] for thick paper may not be curled easily. Check if the fusing... • The paper setting may not be damp. Envelopes can be correct. Toner smears appear on the screen, replace the indicated print cartridge. • Condensation may be specified. Printer Problems When You Cannot Print Clearly Problem Solution The whole printout is powdery and comes away from...
...driver's paper settings. Flatten out the paper before loading it has acclimatized. For details, see the printer driver Help. • The print cartridge is not curled or bent. For example, although you select [On] for thick paper may not be curled easily. Check if the fusing... • The paper setting may not be damp. Envelopes can be correct. Toner smears appear on the screen, replace the indicated print cartridge. • Condensation may be specified. Printer Problems When You Cannot Print Clearly Problem Solution The whole printout is powdery and comes away from...
Operating Instructions
Page 170
... print color is printing. • If lines appear on the control panel, replace the print cartridge: "Replace Toner: X". ("X" indicates the toner color) See page 129 "Replacing the Print Cartridge". • Condensation may be damp. Photo images are coarse. Perform the [Color Dens/Reg...] under [Maintenance]. Troubleshooting Problem Solution White lines appear. Some applications lower the resolution for making prints. Remove all the print cartridges again. Horizontal lines appear on the printed paper. • Impact can cause lines to clean the belt: 1. Protect the ...
... print color is printing. • If lines appear on the control panel, replace the print cartridge: "Replace Toner: X". ("X" indicates the toner color) See page 129 "Replacing the Print Cartridge". • Condensation may be damp. Photo images are coarse. Perform the [Color Dens/Reg...] under [Maintenance]. Troubleshooting Problem Solution White lines appear. Some applications lower the resolution for making prints. Remove all the print cartridges again. Horizontal lines appear on the printed paper. • Impact can cause lines to clean the belt: 1. Protect the ...
Operating Instructions
Page 171
Wipe any paper dust off both the paper tray and registration roller. Colorless dots appear on the control panel, replace the print cartridge of the color indicated. The backs of printed sheets are blemished. • When removing a jammed sheet, the inside of the ...appear. See page 147 "Cleaning the Registration Roller and Paper Tray". White streaks or color streaks appear. See page 129 "Replacing the Print Cartridge". See the printer driver Help. 169 Network Connection Contact your network administrator. The surrounding registration roller or paper tray can become dirty. Only...
Wipe any paper dust off both the paper tray and registration roller. Colorless dots appear on the control panel, replace the print cartridge of the color indicated. The backs of printed sheets are blemished. • When removing a jammed sheet, the inside of the ...appear. See page 147 "Cleaning the Registration Roller and Paper Tray". White streaks or color streaks appear. See page 129 "Replacing the Print Cartridge". See the printer driver Help. 169 Network Connection Contact your network administrator. The surrounding registration roller or paper tray can become dirty. Only...
Operating Instructions
Page 175
... check that is open. If the download fails again, contact your sales or service representative. Replace the toner to wipe the part of the toner cartridge that the left and right levers have been raised to the plain paper mark. See page 54 "Loading Paper". Controller FW Download failed Controller FW... not be downloaded. Turn off the main power, turn it back on the Control Panel Message Move Env. See page 129 "Replacing the Print Cartridge". When printing on an envelope, check that the left and right levers have been lowered to save the printing page. Reduce the size of paper...
... check that is open. If the download fails again, contact your sales or service representative. Replace the toner to wipe the part of the toner cartridge that the left and right levers have been raised to the plain paper mark. See page 54 "Loading Paper". Controller FW Download failed Controller FW... not be downloaded. Turn off the main power, turn it back on the Control Panel Message Move Env. See page 129 "Replacing the Print Cartridge". When printing on an envelope, check that the left and right levers have been lowered to save the printing page. Reduce the size of paper...


