

Operating Instructions
Page 2
For your local dealer. Important Contents of consumables (toner, maintenance kits and parts) other than genuine consumables from the supplier with your legal advisor. Copying or printing the following items is generally prohibited by ... from the supplier. Certain options might result from the use of this manual carefully before using the machine. Depending on the operation and use genuine toner, maintenance kits and parts from the machine. The supplier shall not be responsible for any questions concerning the legality of procedures other than those specified...
For your local dealer. Important Contents of consumables (toner, maintenance kits and parts) other than genuine consumables from the supplier with your legal advisor. Copying or printing the following items is generally prohibited by ... from the supplier. Certain options might result from the use of this manual carefully before using the machine. Depending on the operation and use genuine toner, maintenance kits and parts from the machine. The supplier shall not be responsible for any questions concerning the legality of procedures other than those specified...
Operating Instructions
Page 3
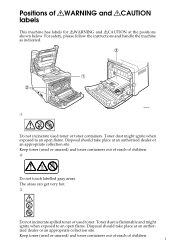
...exposed to an open flame. The areas can get very hot. Do not incinerate spilled toner or used toner or toner containers. i Keep toner (used or unused) and toner containers out of reach of children. Toner dust is flammable and might ignite when exposed to an open flame. ASH075S Do not incinerate... used toner. Keep toner (used or unused) and toner containers out of reach of RWARNING and RCAUTION labels This machine has labels for RWARNING and RCAUTION at the positions shown ...
...exposed to an open flame. The areas can get very hot. Do not incinerate spilled toner or used toner or toner containers. i Keep toner (used or unused) and toner containers out of reach of children. Toner dust is flammable and might ignite when exposed to an open flame. ASH075S Do not incinerate... used toner. Keep toner (used or unused) and toner containers out of reach of RWARNING and RCAUTION labels This machine has labels for RWARNING and RCAUTION at the positions shown ...
Operating Instructions
Page 8
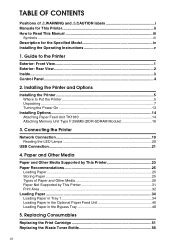
... This Manual iii Symbols ...iii Description for the Specified Model iv Installing the Operating Instructions v 1. Replacing Consumables Replacing the Print Cartridge 51 Replacing the Waste Toner Bottle 56 vi TABLE OF CONTENTS Positions of Paper and Other Media 26 Paper Not Supported by This Printer 31 Print Area ...32 Loading Paper...
... This Manual iii Symbols ...iii Description for the Specified Model iv Installing the Operating Instructions v 1. Replacing Consumables Replacing the Print Cartridge 51 Replacing the Waste Toner Bottle 56 vi TABLE OF CONTENTS Positions of Paper and Other Media 26 Paper Not Supported by This Printer 31 Print Area ...32 Loading Paper...
Operating Instructions
Page 9
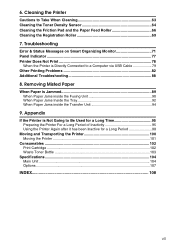
...has been Inactive for a Long Period 98 Moving and Transporting the Printer 100 Moving the Printer 101 Consumables ...102 Print Cartridge ...102 Waste Toner Bottle 103 Specifications...104 Main Unit ...104 Options ...107 INDEX...108 vii Appendix If the Printer is Not Going to Take When Cleaning 63... Cleaning the Toner Density Sensor 64 Cleaning the Friction Pad and the Paper Feed Roller 66 Cleaning the Registration Roller 69 7. Removing Misfed Paper When Paper...
...has been Inactive for a Long Period 98 Moving and Transporting the Printer 100 Moving the Printer 101 Consumables ...102 Print Cartridge ...102 Waste Toner Bottle 103 Specifications...104 Main Unit ...104 Options ...107 INDEX...108 vii Appendix If the Printer is Not Going to Take When Cleaning 63... Cleaning the Toner Density Sensor 64 Cleaning the Friction Pad and the Paper Feed Roller 66 Cleaning the Registration Roller 69 7. Removing Misfed Paper When Paper...
Operating Instructions
Page 11
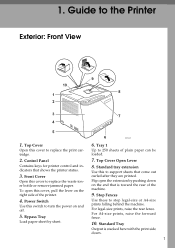
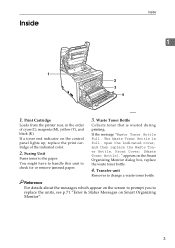
... Use this to support sheets that is stacked here with the print side down on and off. 5. Flip open this cover to replace the waste toner bottle or remove jammed paper. For A4-size prints, raise the forward fence. 10. Bypass Tray Load paper sheet by pushing down . 1 For legal-size...
... Use this to support sheets that is stacked here with the print side down on and off. 5. Flip open this cover to replace the waste toner bottle or remove jammed paper. For A4-size prints, raise the forward fence. 10. Bypass Tray Load paper sheet by pushing down . 1 For legal-size...
Operating Instructions
Page 13
... replace the units, see p.71 "Error & Status Messages on the screen to prompt you to the paper. Waste Toner Bottle Collects toner that is full. appears on the control panel lights up, replace the print cartridge of cyan (C), magenta (M), yellow (Y), and black (K). Reference...Monitor". 3 Open the indicated cover, and then replace the Waste Ton- er Bottle. If a toner end indicator on the Smart Organizing Monitor dialog box, replace the waste toner bottle. 4. The Waste Toner Bottle is wasted during printing. Print Cartridge Loads from the printer rear, in the order of the...
... replace the units, see p.71 "Error & Status Messages on the screen to prompt you to the paper. Waste Toner Bottle Collects toner that is full. appears on the control panel lights up, replace the print cartridge of cyan (C), magenta (M), yellow (Y), and black (K). Reference...Monitor". 3 Open the indicated cover, and then replace the Waste Ton- er Bottle. If a toner end indicator on the Smart Organizing Monitor dialog box, replace the waste toner bottle. 4. The Waste Toner Bottle is wasted during printing. Print Cartridge Loads from the printer rear, in the order of the...
Operating Instructions
Page 14
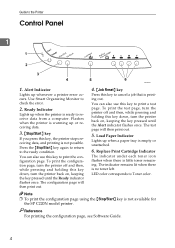
... turn the printer off and then, while pressing and holding this key to receive data from a computer. Use Smart Organizing Monitor to Toner color. Press the {Stop/Start} key again to return to the Printer Control Panel 1 ASH021S 1. Guide to the ready condition. Alert...occurs. Reference For printing the configuration page, see Software Guide. 4 Replace Print Cartridge Indicator The indicator under each toner icon flashes when there is not available for the SP C220N model printer. Note ❒ To print the configuration page using the {Stop/Start} key is little...
... turn the printer off and then, while pressing and holding this key to receive data from a computer. Use Smart Organizing Monitor to Toner color. Press the {Stop/Start} key again to return to the Printer Control Panel 1 ASH021S 1. Guide to the ready condition. Alert...occurs. Reference For printing the configuration page, see Software Guide. 4 Replace Print Cartridge Indicator The indicator under each toner icon flashes when there is not available for the SP C220N model printer. Note ❒ To print the configuration page using the {Stop/Start} key is little...
Operating Instructions
Page 17
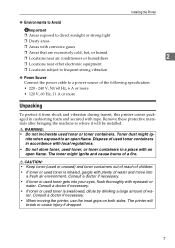
...Hz, 11 A or more Unpacking To protect it will break or cause injury if dropped. 7 Consult a doctor if necessary. • If toner or used toner gets into a fresh air environment. Consult a doctor if necessary. • When moving the printer, use the inset grips on both sides. ... Locations subject to frequent strong vibration ❖ Power Source Connect the power cable to an open flame. R CAUTION: • Keep toner (used toner is inhaled, gargle with eyewash or water. ter. Dispose of wa- The printer will be installed. Remove these protective materials after bringing...
...Hz, 11 A or more Unpacking To protect it will break or cause injury if dropped. 7 Consult a doctor if necessary. • If toner or used toner gets into a fresh air environment. Consult a doctor if necessary. • When moving the printer, use the inset grips on both sides. ... Locations subject to frequent strong vibration ❖ Power Source Connect the power cable to an open flame. R CAUTION: • Keep toner (used toner is inhaled, gargle with eyewash or water. ter. Dispose of wa- The printer will be installed. Remove these protective materials after bringing...
Operating Instructions
Page 22
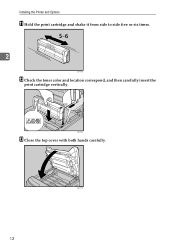
ASH010S 12 Installing the Printer and Options K Hold the print cartridge and shake it from side to side five or six times. 2 ASH113S L Check the toner color and location correspond, and then carefully insert the print cartridge vertically. ASH009S M Close the top cover with both hands carefully.
ASH010S 12 Installing the Printer and Options K Hold the print cartridge and shake it from side to side five or six times. 2 ASH113S L Check the toner color and location correspond, and then carefully insert the print cartridge vertically. ASH009S M Close the top cover with both hands carefully.
Operating Instructions
Page 40
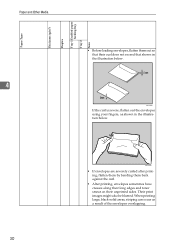
... and Other Media 4 • Before loading envelopes, flatten them back against the curl. • After printing, envelopes sometimes have creases along their long edges and toner smear on their curl does not exceed that shown in the illustration below .
... and Other Media 4 • Before loading envelopes, flatten them back against the curl. • After printing, envelopes sometimes have creases along their long edges and toner smear on their curl does not exceed that shown in the illustration below .
Operating Instructions
Page 61
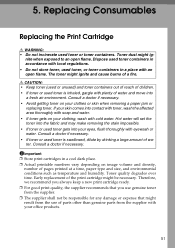
..., number of a fire. Important ❒ Store print cartridges in a place with an open flame. nite when exposed to an open flame. The toner might be responsible for any damage or expense that might ig- If your skin comes into the fabric and may make removing the stain impossible.... • If toner or used toner or toner containers. Consult a doctor if necessary. Early replacement of parts other than genuine parts from the use of the print cartridge might ignite ...
..., number of a fire. Important ❒ Store print cartridges in a place with an open flame. nite when exposed to an open flame. The toner might be responsible for any damage or expense that might ig- If your skin comes into the fabric and may make removing the stain impossible.... • If toner or used toner or toner containers. Consult a doctor if necessary. Early replacement of parts other than genuine parts from the use of the print cartridge might ignite ...
Operating Instructions
Page 62
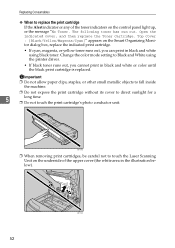
...the black print cartridge is replaced. Top Cover : [Black/Yellow/Magenta/Cyan]" appears on the control panel light up, or the message "No Toner. Important ❒ Do not allow paper clips, staples, or other small metallic objects to fall inside the machine. ❒ Do not expose ..., you cannot print in the illustration below). 52 ASH106S Change the color mode setting to Black and White using black toner. Open the indicated cover, and then replace the Toner Cartridge. ASH100S ❒ When removing print cartridges, be careful not to direct sunlight for a 5 long time. ❒...
...the black print cartridge is replaced. Top Cover : [Black/Yellow/Magenta/Cyan]" appears on the control panel light up, or the message "No Toner. Important ❒ Do not allow paper clips, staples, or other small metallic objects to fall inside the machine. ❒ Do not expose ..., you cannot print in the illustration below). 52 ASH106S Change the color mode setting to Black and White using black toner. Open the indicated cover, and then replace the Toner Cartridge. ASH100S ❒ When removing print cartridges, be careful not to direct sunlight for a 5 long time. ❒...
Operating Instructions
Page 63
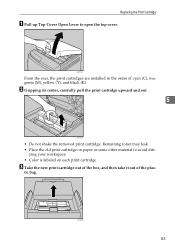
... (K). ASH006S 53 B Gripping its center, carefully pull the print cartridge upward and out. 5 ASH005S • Do not shake the removed print cartridge. tic bag. Remaining toner may leak. • Place the old print cartridge on each print cartridge. Replacing the Print Cartridge A Pull up Top Cover Open Lever to avoid dirt-
... (K). ASH006S 53 B Gripping its center, carefully pull the print cartridge upward and out. 5 ASH005S • Do not shake the removed print cartridge. tic bag. Remaining toner may leak. • Place the old print cartridge on each print cartridge. Replacing the Print Cartridge A Pull up Top Cover Open Lever to avoid dirt-
Operating Instructions
Page 64
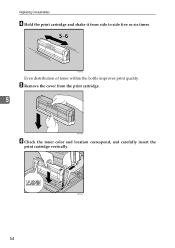
E Remove the cover from side to side five or six times. Replacing Consumables D Hold the print cartridge and shake it from the print cartridge. 5 ASH008S F Check the toner color and location correspond, and carefully insert the print cartridge vertically. 54 ASH009S ASH007S Even distribution of toner within the bottle improves print quality.
E Remove the cover from side to side five or six times. Replacing Consumables D Hold the print cartridge and shake it from the print cartridge. 5 ASH008S F Check the toner color and location correspond, and carefully insert the print cartridge vertically. 54 ASH009S ASH007S Even distribution of toner within the bottle improves print quality.
Operating Instructions
Page 65
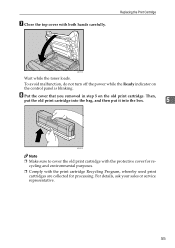
Replacing the Print Cartridge ASH010S Wait while the toner loads. H Put the cover that you removed in step 5 on the control panel is blinking. Then, put the old print cartridge into the bag, and ...
Replacing the Print Cartridge ASH010S Wait while the toner loads. H Put the cover that you removed in step 5 on the control panel is blinking. Then, put the old print cartridge into the bag, and ...

Operating Instructions
Page 66
...unit. • Do not incinerate used toner. Toner dust might ignite when exposed to replace the waste toner bottle If the Alert indicator lights up and the message "Waste Toner Bottle Full. Toner dust might ig- Front Cover : [Waste Toner Bottle]." Open the indicated cover, and ...recycling. 56 appears on . ❒ Cooperate with local regulations. The Waste Toner Bottle is installed. Replacing Consumables Replacing the Waste Toner Bottle R WARNING: • Do not incinerate spilled toner or used toner or toner containers. If the transfer unit is not installed, install it out. ❒...
...unit. • Do not incinerate used toner. Toner dust might ignite when exposed to replace the waste toner bottle If the Alert indicator lights up and the message "Waste Toner Bottle Full. Toner dust might ig- Front Cover : [Waste Toner Bottle]." Open the indicated cover, and ...recycling. 56 appears on . ❒ Cooperate with local regulations. The Waste Toner Bottle is installed. Replacing Consumables Replacing the Waste Toner Bottle R WARNING: • Do not incinerate spilled toner or used toner or toner containers. If the transfer unit is not installed, install it out. ❒...
Operating Instructions
Page 67
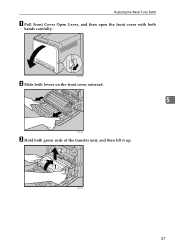
Replacing the Waste Toner Bottle A Pull Front Cover Open Lever, and then open the front cover with both green ends of the transfer unit, and then lift it up. ASH011S B Slide both levers on the front cover outward. 5 ASH012S C Hold both hands carefully. ASH013S 57
Replacing the Waste Toner Bottle A Pull Front Cover Open Lever, and then open the front cover with both green ends of the transfer unit, and then lift it up. ASH011S B Slide both levers on the front cover outward. 5 ASH012S C Hold both hands carefully. ASH013S 57
Operating Instructions
Page 68
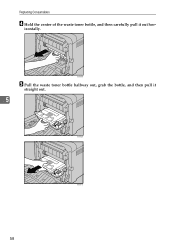
Replacing Consumables D Hold the center of the waste toner bottle, and then carefully pull it straight out. 5 ASH082S ASH041S 58 izontally. ASH040S E Pull the waste toner bottle halfway out, grab the bottle, and then pull it out hor-
Replacing Consumables D Hold the center of the waste toner bottle, and then carefully pull it straight out. 5 ASH082S ASH041S 58 izontally. ASH040S E Pull the waste toner bottle halfway out, grab the bottle, and then pull it out hor-

Operating Instructions
Page 69
ASH042S F Close the bottle cap. 5 ASH043S ASH101S 59 Replacing the Waste Toner Bottle To prevent the waste toner bottle touching the intermediate transfer unit, do not lift the bottle while pulling it out.
ASH042S F Close the bottle cap. 5 ASH043S ASH101S 59 Replacing the Waste Toner Bottle To prevent the waste toner bottle touching the intermediate transfer unit, do not lift the bottle while pulling it out.
Operating Instructions
Page 70
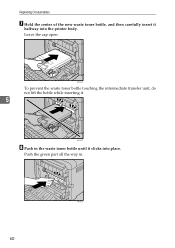
Replacing Consumables G Hold the center of the new waste toner bottle, and then carefully insert it halfway into place. ASH044S To prevent the waste toner bottle touching the intermediate transfer unit, do not lift the bottle while inserting it clicks into the printer body. Push the green part all the way in the waste toner bottle until it . 5 ASH045S H Push in . 60 ASH015S Leave the cap open.
Replacing Consumables G Hold the center of the new waste toner bottle, and then carefully insert it halfway into place. ASH044S To prevent the waste toner bottle touching the intermediate transfer unit, do not lift the bottle while inserting it clicks into the printer body. Push the green part all the way in the waste toner bottle until it . 5 ASH045S H Push in . 60 ASH015S Leave the cap open.


