

Mopria Guide
Page 14
Start Mopria Scan from an Android device. This procedure is set the scanning conditions, and then tap [SCAN]. 12 M0ESOC0054 Place the original on the machine and users are restricted. 1. If necessary, set on the machine. 2. Using Mopria Scan Using the Scanner Function You can use Mopria Scan's scanner function when personal authentication or user code authentication is explained using M 320FB as an example. • You cannot use Mopria Scan to scan from an Android device, and then select the machine. M0ESOC0055 3. 2.
Start Mopria Scan from an Android device. This procedure is set the scanning conditions, and then tap [SCAN]. 12 M0ESOC0054 Place the original on the machine and users are restricted. 1. If necessary, set on the machine. 2. Using Mopria Scan Using the Scanner Function You can use Mopria Scan's scanner function when personal authentication or user code authentication is explained using M 320FB as an example. • You cannot use Mopria Scan to scan from an Android device, and then select the machine. M0ESOC0055 3. 2.

AirPrint Guide
Page 10
This procedure is explained using a web browser. The top page of the web browser. M0ESAC0050 M0ESAC0052 8 Enter "http://(IP address of the machine or host name)/" on the address bar of Web Image Monitor appears. 3. Click [Network Settings]. 4. Appendix Check the Settings of AirPrint for the Machine You can check the settings of AirPrint using M 320FB as an example. 1. Click the [AirPrint] tab. Start the web browser. 2. 3.
This procedure is explained using a web browser. The top page of the web browser. M0ESAC0050 M0ESAC0052 8 Enter "http://(IP address of the machine or host name)/" on the address bar of Web Image Monitor appears. 3. Click [Network Settings]. 4. Appendix Check the Settings of AirPrint for the Machine You can check the settings of AirPrint using M 320FB as an example. 1. Click the [AirPrint] tab. Start the web browser. 2. 3.
AirPrint Guide
Page 12
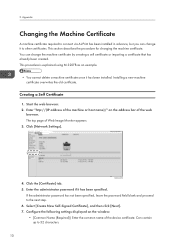
This procedure is explained using M 320FB as an example. • You cannot delete a machine certificate once it has been specified. Enter "http://(IP address of the machine or host name)/" on ...
This procedure is explained using M 320FB as an example. • You cannot delete a machine certificate once it has been specified. Enter "http://(IP address of the machine or host name)/" on ...

Firmware Update Guide
Page 3
Update the Firmware Getting Started...3 About the Firmware Package...3 Disclaimer...3 Before Updating the Firmware...4 Compatible Operating Systems...4 Backing Up the Machine's Settings...4 Connection...4 Computer Settings...4 Updating the Firmware...6 Troubleshooting...10 If Initialization Does not end Following a Firmware Update 10 Firmware Update Tool Messages...13 Control Panel Indicator Patterns (M 320FB/320F 16 Control Panel Indicator Patterns (P 310/311/M 320 16 Trademarks...18 1 TABLE OF CONTENTS 1.
Update the Firmware Getting Started...3 About the Firmware Package...3 Disclaimer...3 Before Updating the Firmware...4 Compatible Operating Systems...4 Backing Up the Machine's Settings...4 Connection...4 Computer Settings...4 Updating the Firmware...6 Troubleshooting...10 If Initialization Does not end Following a Firmware Update 10 Firmware Update Tool Messages...13 Control Panel Indicator Patterns (M 320FB/320F 16 Control Panel Indicator Patterns (P 310/311/M 320 16 Trademarks...18 1 TABLE OF CONTENTS 1.

Firmware Update Guide
Page 5
... manufacturer be used for its examples. Update the Firmware Updates allow the machine to update the firmware of the following machine: • Multifunctional Printer: M 320/320FB/320F • Printer: P 310/311 This guide uses Windows 10 procedures for any damages whatsoever arising out of failures of this software, losses of documents or...
... manufacturer be used for its examples. Update the Firmware Updates allow the machine to update the firmware of the following machine: • Multifunctional Printer: M 320/320FB/320F • Printer: P 310/311 This guide uses Windows 10 procedures for any damages whatsoever arising out of failures of this software, losses of documents or...

Firmware Update Guide
Page 8
.... • The update may take a while to check whether or not the update was successful. Use the following procedure to launch the firmware update tool. M 320FB/320F 1. Press the [OK] key. 3. Turn on the printer. 2. P 310/311/M 320 1. Press [Print List/Report]. 4. Turn on the machine. 2. Double-click the [FwUpdateTool.exe] (Windows...
.... • The update may take a while to check whether or not the update was successful. Use the following procedure to launch the firmware update tool. M 320FB/320F 1. Press the [OK] key. 3. Turn on the printer. 2. P 310/311/M 320 1. Press [Print List/Report]. 4. Turn on the machine. 2. Double-click the [FwUpdateTool.exe] (Windows...
Firmware Update Guide
Page 10
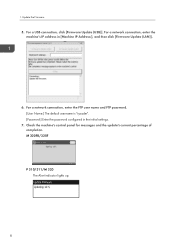
Check the machine's control panel for messages and the update's current percentage of completion. Update the Firmware 5. For a USB connection, click [Firmware Update (USB)]. For a network connection, enter the machine's IP address in the initial settings. 7. For a network connection, enter the FTP user name and FTP password. [User Name:] The default username is "sysadm". [Password:] Enter the password configured in [Machine IP Address:], and then click [Firmware Update (LAN)]. 6. M 320FB/320F P 310/311/M 320 The Alert indicator lights up. 8 1.
Check the machine's control panel for messages and the update's current percentage of completion. Update the Firmware 5. For a USB connection, click [Firmware Update (USB)]. For a network connection, enter the machine's IP address in the initial settings. 7. For a network connection, enter the FTP user name and FTP password. [User Name:] The default username is "sysadm". [Password:] Enter the password configured in [Machine IP Address:], and then click [Firmware Update (LAN)]. 6. M 320FB/320F P 310/311/M 320 The Alert indicator lights up. 8 1.

Firmware Update Guide
Page 11
...check the machine's firmware version by checking its version (shown under [Firmware Version] on the machine's control panel. 10. If the Home screen (M 320FB/320F) or "Ready" (P 310/311/M 320) does not appear on the machine's control panel. For details about how to print, see page 10... "If Initialization Does not end Following a Firmware Update". 11. Wait until the Home screen (M 320FB/320F) or "Ready" (P 310/311/M 320) appears on the machine's control panel after restarting. If this happens, see page 4 "Before Updating the Firmware...
...check the machine's firmware version by checking its version (shown under [Firmware Version] on the machine's control panel. 10. If the Home screen (M 320FB/320F) or "Ready" (P 310/311/M 320) does not appear on the machine's control panel. For details about how to print, see page 10... "If Initialization Does not end Following a Firmware Update". 11. Wait until the Home screen (M 320FB/320F) or "Ready" (P 310/311/M 320) appears on the machine's control panel after restarting. If this happens, see page 4 "Before Updating the Firmware...

Firmware Update Guide
Page 12
Update the Firmware Troubleshooting This section provides solutions to common update-related problems. If Initialization Does not end Following a Firmware Update If the Home screen (M 320FB/320F) or "Ready" (P 310/311/M 320) does not appear on a Windows operating system, you performed the update through a network connection, disconnect the network cable, and then ...
Update the Firmware Troubleshooting This section provides solutions to common update-related problems. If Initialization Does not end Following a Firmware Update If the Home screen (M 320FB/320F) or "Ready" (P 310/311/M 320) does not appear on a Windows operating system, you performed the update through a network connection, disconnect the network cable, and then ...

Firmware Update Guide
Page 13
Click [Firmware Update (USB)]. When the Home screen (M 320FB/320F) or "Ready" (P 310/311/M 320) appeared, click [Firmware Update (USB)] again. 11 Wait until the Home screen (M 320FB/320F) or "Ready" (P 310/311/M 320) appears on . Make sure that you are instructed to do so. 4. Troubleshooting Do not close the update tool unless you keep the power of the machine turned on the machine's control panel. 5.
Click [Firmware Update (USB)]. When the Home screen (M 320FB/320F) or "Ready" (P 310/311/M 320) appeared, click [Firmware Update (USB)] again. 11 Wait until the Home screen (M 320FB/320F) or "Ready" (P 310/311/M 320) appears on . Make sure that you are instructed to do so. 4. Troubleshooting Do not close the update tool unless you keep the power of the machine turned on the machine's control panel. 5.

Firmware Update Guide
Page 14
M 320FB/320F P 310/311/M 320 The Alert indicator starts flashing. Check the machine's control panel for messages and the update's current percentage of completion. Wait until the ... close the update tool. Wait until the update completion message appears on the machine's control panel. 12 "Please wait" appears on the machine's control panel. M 320FB/320F P 310/311/M 320 The Alert indicator lights up. 7. 1. Completed Update FW Restart Machine...
M 320FB/320F P 310/311/M 320 The Alert indicator starts flashing. Check the machine's control panel for messages and the update's current percentage of completion. Wait until the ... close the update tool. Wait until the update completion message appears on the machine's control panel. 12 "Please wait" appears on the machine's control panel. M 320FB/320F P 310/311/M 320 The Alert indicator lights up. 7. 1. Completed Update FW Restart Machine...

Firmware Update Guide
Page 15
Troubleshooting 9. If the Home screen (M 320FB/320F) or "Ready" (P 310/311/M 320) does not appear on the configuration page). Make sure that the path to the update tool is not stored in a ... the System Information" in the same folder as they appear. (Messages are using a Web browser. Please check ROM file. Wait a while until the Home screen (M 320FB/320F) or "Ready" (P 310/311/M 320) appears on the machine's control panel. Also, make sure that the firmware file (*.brn) and setting file (*.ini) are stored...
Troubleshooting 9. If the Home screen (M 320FB/320F) or "Ready" (P 310/311/M 320) does not appear on the configuration page). Make sure that the path to the update tool is not stored in a ... the System Information" in the same folder as they appear. (Messages are using a Web browser. Please check ROM file. Wait a while until the Home screen (M 320FB/320F) or "Ready" (P 310/311/M 320) appears on the machine's control panel. Also, make sure that the firmware file (*.brn) and setting file (*.ini) are stored...

Firmware Update Guide
Page 18
... update. The machine you have downloaded from completing. If the recovery fails and the indicators continue to take when they appear. Control Panel Indicator Patterns (M 320FB/320F) The following table to update was clicked. A power failure or similar interruption prevented the update from our Web site. Turn the machine's power off, wait...
... update. The machine you have downloaded from completing. If the recovery fails and the indicators continue to take when they appear. Control Panel Indicator Patterns (M 320FB/320F) The following table to update was clicked. A power failure or similar interruption prevented the update from our Web site. Turn the machine's power off, wait...

Wi-Fi Direct Guide
Page 3
Easy Setup Using Wi-Fi Direct Checking the SSID...3 Connecting Using Windows...4 M 320FB/320F...4 P 310/311/M 320...5 Connecting Using Mac...8 M 320FB/320F...8 P 310/311/M 320...9 Connecting Using Android Device...11 M 320FB/320F...11 P 310/311/M 320...12 Connecting Using iOS Device...14 M 320FB/320F...14 P 310/311/M 320...16 2. Troubleshooting Connection Problems...19 Connection has Succeeded ... the Manuals...2 Symbols Used in the Manuals...2 Disclaimer...2 1. TABLE OF CONTENTS How to Change the Encryption Key of Wi-Fi Direct 21 M 320FB/320F...21 P 310/311/M 320...23 Trademark...26 1
Easy Setup Using Wi-Fi Direct Checking the SSID...3 Connecting Using Windows...4 M 320FB/320F...4 P 310/311/M 320...5 Connecting Using Mac...8 M 320FB/320F...8 P 310/311/M 320...9 Connecting Using Android Device...11 M 320FB/320F...11 P 310/311/M 320...12 Connecting Using iOS Device...14 M 320FB/320F...14 P 310/311/M 320...16 2. Troubleshooting Connection Problems...19 Connection has Succeeded ... the Manuals...2 Symbols Used in the Manuals...2 Disclaimer...2 1. TABLE OF CONTENTS How to Change the Encryption Key of Wi-Fi Direct 21 M 320FB/320F...21 P 310/311/M 320...23 Trademark...26 1

Wi-Fi Direct Guide
Page 6
Press [Wireless (Wi-Fi) Sett.]. 4. Press [Wi-Fi Direct]. 5. Press the wireless LAN icon. Enter the password using the number keys, and then press [OK]. 3. Press [OK]. 4 Easy Setup Using Wi-Fi Direct Connecting Using Windows M 320FB/320F • Before doing the following procedure, enable the Wi-Fi Direct function on your computer. For details about enabling the Wi-Fi Direct function, see the computer manual. • In Steps 5 to 8, configure each setting within two minutes. 1. DYG611 2. 1.
Press [Wireless (Wi-Fi) Sett.]. 4. Press [Wi-Fi Direct]. 5. Press the wireless LAN icon. Enter the password using the number keys, and then press [OK]. 3. Press [OK]. 4 Easy Setup Using Wi-Fi Direct Connecting Using Windows M 320FB/320F • Before doing the following procedure, enable the Wi-Fi Direct function on your computer. For details about enabling the Wi-Fi Direct function, see the computer manual. • In Steps 5 to 8, configure each setting within two minutes. 1. DYG611 2. 1.
Wi-Fi Direct Guide
Page 10
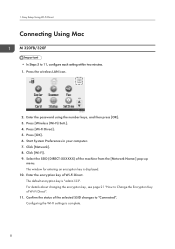
DYG611 2. Click [Network]. 8. Enter the encryption key of Wi-Fi Direct". 11. Easy Setup Using Wi-Fi Direct Connecting Using Mac M 320FB/320F • In Steps 5 to "Connected". Press [Wi-Fi Direct]. 5. Click [Wi-Fi]. 9. For details about changing the encryption key, see page 21 "How to Change ...
DYG611 2. Click [Network]. 8. Enter the encryption key of Wi-Fi Direct". 11. Easy Setup Using Wi-Fi Direct Connecting Using Mac M 320FB/320F • In Steps 5 to "Connected". Press [Wi-Fi Direct]. 5. Click [Wi-Fi]. 9. For details about changing the encryption key, see page 21 "How to Change ...
Wi-Fi Direct Guide
Page 13
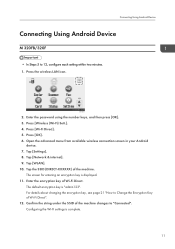
... connection screen in your Android device. 7. The default encryption key is "admin123". Press the wireless LAN icon. Connecting Using Android Device Connecting Using Android Device M 320FB/320F • In Steps 5 to "Connected". DYG611 2. Press [OK]. 6. Tap the SSID (DIRECT-XXXXXX) of Wi-Fi Direct.
... connection screen in your Android device. 7. The default encryption key is "admin123". Press the wireless LAN icon. Connecting Using Android Device Connecting Using Android Device M 320FB/320F • In Steps 5 to "Connected". DYG611 2. Press [OK]. 6. Tap the SSID (DIRECT-XXXXXX) of Wi-Fi Direct.
Wi-Fi Direct Guide
Page 16
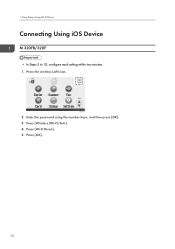
Press [Wireless (Wi-Fi) Sett.]. 4. Press [Wi-Fi Direct]. 5. Press [OK]. 14 DYG611 2. Enter the password using the number keys, and then press [OK]. 3. 1. Easy Setup Using Wi-Fi Direct Connecting Using iOS Device M 320FB/320F • In Steps 5 to 10, configure each setting within two minutes. 1. Press the wireless LAN icon.
Press [Wireless (Wi-Fi) Sett.]. 4. Press [Wi-Fi Direct]. 5. Press [OK]. 14 DYG611 2. Enter the password using the number keys, and then press [OK]. 3. 1. Easy Setup Using Wi-Fi Direct Connecting Using iOS Device M 320FB/320F • In Steps 5 to 10, configure each setting within two minutes. 1. Press the wireless LAN icon.
Wi-Fi Direct Guide
Page 23
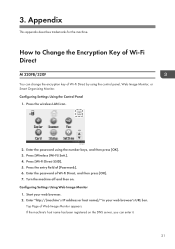
3. How to Change the Encryption Key of Wi-Fi Direct M 320FB/320F You can enter it. 21 Press [Wireless (Wi-Fi) Sett.]. 4. Press the entry field of Wi-Fi Direct by using the number keys, and then ...
3. How to Change the Encryption Key of Wi-Fi Direct M 320FB/320F You can enter it. 21 Press [Wireless (Wi-Fi) Sett.]. 4. Press the entry field of Wi-Fi Direct by using the number keys, and then ...

Users Guide
Page 19
FAQ • Customer registration form (mainly North America) 17 EULA (End User License Agreement) • Decal - Supplied Items Open the box and take out all supplied items. Check that all the following items are present: • Power cord • Modular cable (M 320FB/320F only) • Starter cartridge • Safety Information • Setup Guide • About Open Source Software License • Warranty (except for India) • Sheet -
FAQ • Customer registration form (mainly North America) 17 EULA (End User License Agreement) • Decal - Supplied Items Open the box and take out all supplied items. Check that all the following items are present: • Power cord • Modular cable (M 320FB/320F only) • Starter cartridge • Safety Information • Setup Guide • About Open Source Software License • Warranty (except for India) • Sheet -