Quick Start Guide
Page 3
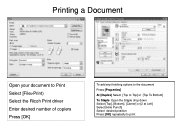
Printing a Document Open your document to Print Select [File>Print) Select the Ricoh Print driver Enter desired number of copiers Press [OK] To add any finishing options to the document Press [Properties] At [Duplex] Select [Top to Top] or [Top To Bottom] To Staple: Open the Staple drop down Select [Top], [Bottom], [Center] or [2 at Left] Select [Hole Punch] Select desired position Press [OK] repeatedly to print
Printing a Document Open your document to Print Select [File>Print) Select the Ricoh Print driver Enter desired number of copiers Press [OK] To add any finishing options to the document Press [Properties] At [Duplex] Select [Top to Top] or [Top To Bottom] To Staple: Open the Staple drop down Select [Top], [Bottom], [Center] or [2 at Left] Select [Hole Punch] Select desired position Press [OK] repeatedly to print
Quick Start Guide
Page 9
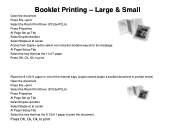
...OK, Ok, Ok, to print the document. Large & Small Open the document Press File >print Select the Ricoh Print Driver (PCL5e/PCL6) Press Properties At Page Set up Tab Select Duplex>booklet Select Staple>2 at center Across from Duplex option select non reduction booklet>say ok to the message At Paper Setup... 11x17 paper Press OK, Ok, Ok, to print Place the 8 1/2x11 paper in one of the internal trays (copier cannot staple a booklet document in portrait mode) Open the document Press File >print Select the Ricoh Print Driver (PCL5e/PCL6) Press Properties At Page Set up Tab Select Duplex>booklet Select...
...OK, Ok, Ok, to print the document. Large & Small Open the document Press File >print Select the Ricoh Print Driver (PCL5e/PCL6) Press Properties At Page Set up Tab Select Duplex>booklet Select Staple>2 at center Across from Duplex option select non reduction booklet>say ok to the message At Paper Setup... 11x17 paper Press OK, Ok, Ok, to print Place the 8 1/2x11 paper in one of the internal trays (copier cannot staple a booklet document in portrait mode) Open the document Press File >print Select the Ricoh Print Driver (PCL5e/PCL6) Press Properties At Page Set up Tab Select Duplex>booklet Select...
Troubleshooting Guide
Page 2
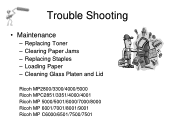
Loading Paper - Replacing Toner - Cleaning Glass Platen and Lid Ricoh MP2800/3300/4000/5000 Ricoh MPC2851/3351/4000/4001 Ricoh MP 5000/5001/6000/7000/8000 Ricoh MP 6001/7001/8001/9001 Ricoh MP C6000/6501/7500/7501 Clearing Paper Jams - Replacing Staples - Trouble Shooting • Maintenance -
Loading Paper - Replacing Toner - Cleaning Glass Platen and Lid Ricoh MP2800/3300/4000/5000 Ricoh MPC2851/3351/4000/4001 Ricoh MP 5000/5001/6000/7000/8000 Ricoh MP 6001/7001/8001/9001 Ricoh MP C6000/6501/7500/7501 Clearing Paper Jams - Replacing Staples - Trouble Shooting • Maintenance -
Troubleshooting Guide
Page 6
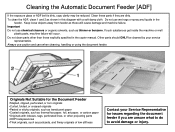
... Feeder [ADF] If the exposure glass or ADF belt is dirty, copy clarity may be cleaned by your Service Representative for the Document Feeder •Stapled, clipped, perforated, or torn originals •Curled, folded, or creased originals •Pasted or sticky originals, such as translucent paper •Coated originals, such as...
... Feeder [ADF] If the exposure glass or ADF belt is dirty, copy clarity may be cleaned by your Service Representative for the Document Feeder •Stapled, clipped, perforated, or torn originals •Curled, folded, or creased originals •Pasted or sticky originals, such as translucent paper •Coated originals, such as...
Troubleshooting Guide
Page 8
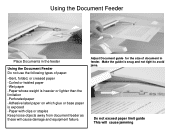
Make the guide is exposed -Paper with clips or staples Keep loose objects away from document feeder as these will cause jamming Adjust Document guide for the size of document in the feeder Using the ...
Make the guide is exposed -Paper with clips or staples Keep loose objects away from document feeder as these will cause jamming Adjust Document guide for the size of document in the feeder Using the ...
Troubleshooting Guide
Page 18
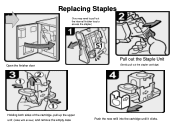
Replacing Staples (You may need to pull out the internal finisher tray to access the stapler) Open the finisher door Pull out the Staple Unit (Gently pull out the stapler cartridge) Holding both sides of the cartridge, pull up the upper unit (sides with arrows) and remove the empty case Push the new refill into the cartridge until it clicks.
Replacing Staples (You may need to pull out the internal finisher tray to access the stapler) Open the finisher door Pull out the Staple Unit (Gently pull out the stapler cartridge) Holding both sides of the cartridge, pull up the upper unit (sides with arrows) and remove the empty case Push the new refill into the cartridge until it clicks.
Troubleshooting Guide
Page 19
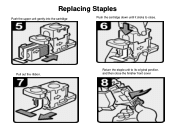
Pull out the ribbon. Return the staple unit to close the finisher front cover Replacing Staples Push the upper unit gently into the cartridge Push the cartridge down until it clicks to its original position, and then close .
Pull out the ribbon. Return the staple unit to close the finisher front cover Replacing Staples Push the upper unit gently into the cartridge Push the cartridge down until it clicks to its original position, and then close .
User Guide
Page 3
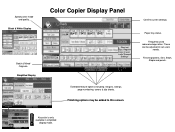
Black & White Display Batch & Mixed Originals. Finishing options. Frequently used reduce/enlarge ratios. These can be added to suit users needs. margins, stamps, page numbering, covers & slip sheets. Key color is only available in user tools "General Settings" Paper tray status. Sort, Stack, Staple and punch. Simplified Display Color Copier Display Panel Confirm current settings. Short cut keys. Finishing options may be adjusted to this screen. Specify color mode and quality. Extended feature options including; Register keys in simplified display mode.
Black & White Display Batch & Mixed Originals. Finishing options. Frequently used reduce/enlarge ratios. These can be added to suit users needs. margins, stamps, page numbering, covers & slip sheets. Key color is only available in user tools "General Settings" Paper tray status. Sort, Stack, Staple and punch. Simplified Display Color Copier Display Panel Confirm current settings. Short cut keys. Finishing options may be adjusted to this screen. Specify color mode and quality. Extended feature options including; Register keys in simplified display mode.
User Guide
Page 4
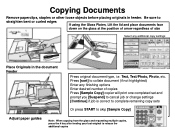
Copying Documents Remove paperclips, staples or other loose objects before placing originals in the document Feeder Press original document type, i.e. Press [sort] to release the additional copies Be sure to ...
Copying Documents Remove paperclips, staples or other loose objects before placing originals in the document Feeder Press original document type, i.e. Press [sort] to release the additional copies Be sure to ...
User Guide
Page 7
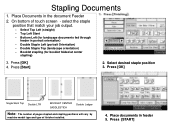
... Slant Top Double LTR BOOKLET CENTER SADDLESTICH Double Ledger Note: The number of pages stapled and stapling positions will vary by machine model type and type of touch screen - Press [Start] 2. Select desired staple position 3. Double Staple Top (landscape orientation) - Place Documents in the document Feeder 2. Stapling Documents 1. Double Staple Left (portrait Orientation) - Top Left Slant -
... Slant Top Double LTR BOOKLET CENTER SADDLESTICH Double Ledger Note: The number of pages stapled and stapling positions will vary by machine model type and type of touch screen - Press [Start] 2. Select desired staple position 3. Double Staple Top (landscape orientation) - Place Documents in the document Feeder 2. Stapling Documents 1. Double Staple Left (portrait Orientation) - Top Left Slant -
User Guide
Page 10
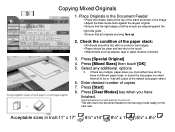
... paper sizes you must either have all the sizes in the Document Feeder Place the smaller sizes at the top of the stack as staples, tags or tapes must all to the touch, Attachments such as shown in Inch:11" x 17" ; 8½" x14" ; 8½" x 11" ;5½" x 8½" Press [Special...
... paper sizes you must either have all the sizes in the Document Feeder Place the smaller sizes at the top of the stack as staples, tags or tapes must all to the touch, Attachments such as shown in Inch:11" x 17" ; 8½" x14" ; 8½" x 11" ;5½" x 8½" Press [Special...
User Guide
Page 14
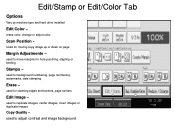
Edit/Stamp or Edit/Color Tab Options Vary by machine type and hard drive installed Edit Color - used to adjust contrast and image background used to replicate images, center images, invert images or duplicate images Copy Quality - erase color, change or adjust color Scan Position - Used for background numbering, page numbering, watermarks, date stamping Erase - used for hole-punching, stapling or binding Stamps - used to move margins for cleaning edges and borders, page centers Edit Image - used for moving copy image up or down on page Margin Adjustments -
Edit/Stamp or Edit/Color Tab Options Vary by machine type and hard drive installed Edit Color - used to adjust contrast and image background used to replicate images, center images, invert images or duplicate images Copy Quality - erase color, change or adjust color Scan Position - Used for background numbering, page numbering, watermarks, date stamping Erase - used for hole-punching, stapling or binding Stamps - used to move margins for cleaning edges and borders, page centers Edit Image - used for moving copy image up or down on page Margin Adjustments -

User Guide
Page 26
Use to copy 2 face forwarding pages of a book to 2 single pages. Series - Default Screen Settings Book - output documents from 2 Sided to have the job stapled and folded. Create a magazine output (use booklet for 4 page output) use Magazine for 2 sided or single sided output and options of placing 2, 4, 8 or pages on a ...
Use to copy 2 face forwarding pages of a book to 2 single pages. Series - Default Screen Settings Book - output documents from 2 Sided to have the job stapled and folded. Create a magazine output (use booklet for 4 page output) use Magazine for 2 sided or single sided output and options of placing 2, 4, 8 or pages on a ...
User Guide
Page 43
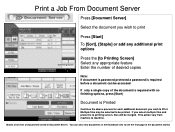
... also view documents in Document Server. Print a Job From Document Server Press [Document Server] Select the document you wish to print Press [Start] To [Sort], [Staple] or add any additional print options To Printing Screen Press the [to Printing Screen] Select any appropriate feature Enter the number of desired copies Note...
... also view documents in Document Server. Print a Job From Document Server Press [Document Server] Select the document you wish to print Press [Start] To [Sort], [Staple] or add any additional print options To Printing Screen Press the [to Printing Screen] Select any appropriate feature Enter the number of desired copies Note...
User Guide
Page 46
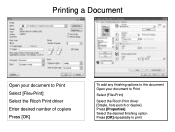
Printing a Document Open your document to Print Select [File>Print] Select the Ricoh Print driver Enter desired number of copiers Press [OK] To add any finishing options to the document Open your document to Print Select [File>Print) Select the Ricoh Print driver [Staple, hole punch or duplex] Press [Properties] Select the desired finishing option Press [OK] repeatedly to print
Printing a Document Open your document to Print Select [File>Print] Select the Ricoh Print driver Enter desired number of copiers Press [OK] To add any finishing options to the document Open your document to Print Select [File>Print) Select the Ricoh Print driver [Staple, hole punch or duplex] Press [Properties] Select the desired finishing option Press [OK] repeatedly to print


