
Manuals
Page 25
... without permission. • You can control the use of the machine, as well as prevent machine settings from being changed without authorization. • By setting passwords, you can prevent unauthorized access via the network. • You can erase or encrypt the data on the hard disk to prevent the information from...
... without permission. • You can control the use of the machine, as well as prevent machine settings from being changed without authorization. • By setting passwords, you can prevent unauthorized access via the network. • You can erase or encrypt the data on the hard disk to prevent the information from...
Manuals
Page 55
...Sided Copy Top to programs: Copier: Color mode, original type, density, Special Original, paper tray, Store File (except for User Name and Password), Create Margin, Finishing, Cover/Slip Sheet (except for Designate: Copy, Designate: Blank, and Chapter in Designate / Chapter), Edit / Colour.../ Enlarge, number of prints Facsimile: Scan Settings, density, Original Feed Type, File Type, Store File (except for User Name and Password), Preview, transmission type, destinations (except for folder destinations), Select Line, Adv.Features, memory transmission/immediate transmission, TX Status Report, TX...
...Sided Copy Top to programs: Copier: Color mode, original type, density, Special Original, paper tray, Store File (except for User Name and Password), Create Margin, Finishing, Cover/Slip Sheet (except for Designate: Copy, Designate: Blank, and Chapter in Designate / Chapter), Edit / Colour.../ Enlarge, number of prints Facsimile: Scan Settings, density, Original Feed Type, File Type, Store File (except for User Name and Password), Preview, transmission type, destinations (except for folder destinations), Select Line, Adv.Features, memory transmission/immediate transmission, TX Status Report, TX...
Manuals
Page 63
The machine only becomes operable after entering your own Login User Name and Login Password. If you can use the machine until you are logged in the Address Book as "User Code". For details about user authentication, see Security Guide . &#...8226; User Code to prevent unauthorized usage. • Ask the user administrator for the Login User Name, Login Password, and User Code. If User Code Authentication is the numerical value registered in . When you go out of it to enter on the display. User...
The machine only becomes operable after entering your own Login User Name and Login Password. If you can use the machine until you are logged in the Address Book as "User Code". For details about user authentication, see Security Guide . &#...8226; User Code to prevent unauthorized usage. • Ask the user administrator for the Login User Name, Login Password, and User Code. If User Code Authentication is the numerical value registered in . When you go out of it to enter on the display. User...

Manuals
Page 64
... set. • To prevent use of the machine by unauthorized persons, always log out when you are using the machine. 1. Press [Yes]. 62 Enter a Login Password, and then press [OK]. Press the [Login/Logout] key. CJS040 2. 2. Getting Started 1.
... set. • To prevent use of the machine by unauthorized persons, always log out when you are using the machine. 1. Press [Yes]. 62 Enter a Login Password, and then press [OK]. Press the [Login/Logout] key. CJS040 2. 2. Getting Started 1.

Manuals
Page 88
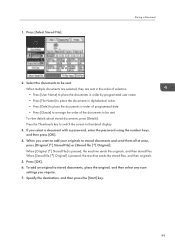
... check the stored documents from the Document Server screen. For details about the Document Server, see p.127 "Storing Data". 1. Enter a file name, user name, or password if necessary. 3. Press the [Start] key. Copy Storing Data in memory and makes one set of this machine. Press [Store File]. 2. Press [OK]. 4. 3. You can...
... check the stored documents from the Document Server screen. For details about the Document Server, see p.127 "Storing Data". 1. Enter a file name, user name, or password if necessary. 3. Press the [Start] key. Copy Storing Data in memory and makes one set of this machine. Press [Store File]. 2. Press [OK]. 4. 3. You can...
Manuals
Page 99
.... Place the original, and then specify the scan settings you do not, the top/bottom orientation of the original will be set for a stored document. Password You can set this function if necessary to store documents. 97 If you require. Specify the "Original Orientation" setting correctly. The following information can specify... a document at the same time. File Name You can be automatically assigned names such as necessary: User Name You can set this function so as a password. Select [Send & Store] or [Store Only].
.... Place the original, and then specify the scan settings you do not, the top/bottom orientation of the original will be set for a stored document. Password You can set this function if necessary to store documents. 97 If you require. Specify the "Original Orientation" setting correctly. The following information can specify... a document at the same time. File Name You can be automatically assigned names such as necessary: User Name You can set this function so as a password. Select [Send & Store] or [Store Only].

Manuals
Page 100
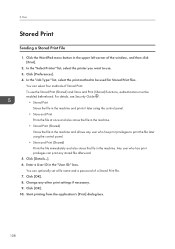
... name, press [OK]. • File Name Press [File Name], enter a file name, and then press [OK]. • Password Press [Password], enter a password using the number keys, and then press [OK]. Sending Stored Documents The machine sends documents stored with the facsimile function in the Document...they were stored. To specify an unregistered user name, press [Manual Entry], and then enter the name. Set the user name, file name, and password as necessary. • User Name Press [User Name], and then select a user name. You cannot use the following transmission methods: • ...
... name, press [OK]. • File Name Press [File Name], enter a file name, and then press [OK]. • Password Press [Password], enter a password using the number keys, and then press [OK]. Sending Stored Documents The machine sends documents stored with the facsimile function in the Document...they were stored. To specify an unregistered user name, press [Manual Entry], and then enter the name. Set the user name, file name, and password as necessary. • User Name Press [User Name], and then select a user name. You cannot use the following transmission methods: • ...
Manuals
Page 101
... the documents in order of programmed date. • Press [Queue] to arrange the order of the documents to thumbnail display. 3. 1. If you select a document with a password, enter the password using the number keys, and then press [OK]. 4.
... the documents in order of programmed date. • Press [Queue] to arrange the order of the documents to thumbnail display. 3. 1. If you select a document with a password, enter the password using the number keys, and then press [OK]. 4.

Manuals
Page 106
... When printing is completed, the stored file will be deleted. 1. Start printing from the application's [Print] dialog box. Click the WordPad menu button in the "Password:" box. 7. In the "Select Printer" list, select the printer you want to use. 3. Click [Details...]. 6. Enter a User ID in the "User ...ID:" box, and then enter a password in the upper left of the window, and then click [Print]. 2. Change any other print settings if necessary. 9. In the "Job Type:" list, click [...
... When printing is completed, the stored file will be deleted. 1. Start printing from the application's [Print] dialog box. Click the WordPad menu button in the "Password:" box. 7. In the "Select Printer" list, select the printer you want to use. 3. Click [Details...]. 6. Enter a User ID in the "User ...ID:" box, and then enter a password in the upper left of the window, and then click [Print]. 2. Change any other print settings if necessary. 9. In the "Job Type:" list, click [...
Manuals
Page 107
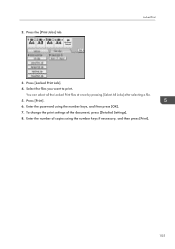
Press the [Print Jobs] tab. Press [Locked Print Job]. 4. Enter the number of the document, press [Detailed Settings]. 8. Locked Print 3. Select the files you want to print. Press [Print]. 6. To change the print settings of copies using the number keys, and then press [OK]. 7. 2. Enter the password using the number keys if necessary, and then press [Print]. 105 You can select all the Locked Print files at once by pressing [Select All Jobs] after selecting a file. 5.
Press the [Print Jobs] tab. Press [Locked Print Job]. 4. Enter the number of the document, press [Detailed Settings]. 8. Locked Print 3. Select the files you want to print. Press [Print]. 6. To change the print settings of copies using the number keys, and then press [OK]. 7. 2. Enter the password using the number keys if necessary, and then press [Print]. 105 You can select all the Locked Print files at once by pressing [Select All Jobs] after selecting a file. 5.
Manuals
Page 110
... of Stored Print: To use . 3. Enter a User ID in the machine and allows any user who has print privileges can optionally set a file name and a password of a Stored Print file. 7. Change any stored file afterward. 5. Any user who has print privileges to be enabled beforehand. You can print any other print...
... of Stored Print: To use . 3. Enter a User ID in the machine and allows any user who has print privileges can optionally set a file name and a password of a Stored Print file. 7. Change any stored file afterward. 5. Any user who has print privileges to be enabled beforehand. You can print any other print...

Manuals
Page 111
... If you want to print. Press [Print]. Enter the number of files to be printed is displayed on the top left of these require a password, the machine prints files that correspond to delete the documents, see "Deleting Stored Print files", Print . 1. Press the [Print Jobs] tab.... 3. Select the files you set the password in the printer driver, enter the password. For the procedure to the entered password and files that do not require a password. CJS113 2. The number of copies using the number keys if necessary, and then press [...
... If you want to print. Press [Print]. Enter the number of files to be printed is displayed on the top left of these require a password, the machine prints files that correspond to delete the documents, see "Deleting Stored Print files", Print . 1. Press the [Print Jobs] tab.... 3. Select the files you set the password in the printer driver, enter the password. For the procedure to the entered password and files that do not require a password. CJS113 2. The number of copies using the number keys if necessary, and then press [...
Manuals
Page 117
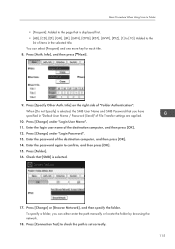
Enter the password of the destination computer, and then press [OK]. 12. Press [Folder]. 16. To specify a folder, you... [OK]. 14. Info] on the right side of items in "Default User Name / Password (Send)" of File Transfer settings are applied. 10. Press [Change] under "Login Password". 13. Enter the password again to confirm, and then press [OK]. 15. Press [Change] under "Login User ... Press [Specify Other Auth. When [Do not Specify] is selected, the SMB User Name and SMB Password that [SMB] is set correctly. 115 Press [Change] or [Browse Network], and then specify the folder.
Enter the password of the destination computer, and then press [OK]. 12. Press [Folder]. 16. To specify a folder, you... [OK]. 14. Info] on the right side of items in "Default User Name / Password (Send)" of File Transfer settings are applied. 10. Press [Change] under "Login Password". 13. Enter the password again to confirm, and then press [OK]. 15. Press [Change] under "Login User ... Press [Specify Other Auth. When [Do not Specify] is selected, the SMB User Name and SMB Password that [SMB] is set correctly. 115 Press [Change] or [Browse Network], and then specify the folder.

Manuals
Page 120
Press [OK]. 6. Check the connection test result, and then press [Exit]. 10. Press [Manual Entry]. 2. Enter the path for the password to the computer. Depending on the destination setting, enter the password for logging in to display the soft keyboard. 8. A connection test is "desk01": \\desk01\user 5. In the following example path, the shared...
Press [OK]. 6. Check the connection test result, and then press [Exit]. 10. Press [Manual Entry]. 2. Enter the path for the password to the computer. Depending on the destination setting, enter the password for logging in to display the soft keyboard. 8. A connection test is "desk01": \\desk01\user 5. In the following example path, the shared...

Manuals
Page 125
...to store important files. If necessary, specify file information, such as [User Name], [File Name], and [Password]. • User Name 123 Files that are not password-protected can specify a password for each stored file. CJS113 2. Press [Store File]. 5. We advise against using DeskTopBinder. Make sure that ... DeskTopBinder. Basic Procedure for Storing Scan Files Basic Procedure for Storing Scan Files • You can be accessed by specifying passwords. • Scan file stored in the machine may be responsible for any damage that may result from unauthorized access by other...
...to store important files. If necessary, specify file information, such as [User Name], [File Name], and [Password]. • User Name 123 Files that are not password-protected can specify a password for each stored file. CJS113 2. Press [Store File]. 5. We advise against using DeskTopBinder. Make sure that ... DeskTopBinder. Basic Procedure for Storing Scan Files Basic Procedure for Storing Scan Files • You can be accessed by specifying passwords. • Scan file stored in the machine may be responsible for any damage that may result from unauthorized access by other...

Manuals
Page 126
...Press [User Name], and then select a user name. To specify an unregistered user name, press [Manual Entry], and then enter the name. Re-enter the password for confirmation, and then press [OK]. 7. Press the [Start] key. Press [Select Stored File]. 2. Press [Preview]. 124 Checking a Stored File Selected from the...file. 3. Press [OK]. 8. After specifying a user name, press [OK]. • File Name Press [File Name], enter a file name, and then press [OK]. • Password Press [Password], enter a password, and then press [OK]. If necessary, press [Scan Settings] to check.
...Press [User Name], and then select a user name. To specify an unregistered user name, press [Manual Entry], and then enter the name. Re-enter the password for confirmation, and then press [OK]. 7. Press the [Start] key. Press [Select Stored File]. 2. Press [Preview]. 124 Checking a Stored File Selected from the...file. 3. Press [OK]. 8. After specifying a user name, press [OK]. • File Name Press [File Name], enter a file name, and then press [OK]. • Password Press [Password], enter a password, and then press [OK]. If necessary, press [Scan Settings] to check.
Manuals
Page 129
...Data This section describes the procedure for the documents, the key icon appears on the Document Server. • A document accessed with a correct password remains selected even after operations are ended. After the operation, be accessed by the scanner, make sure that stored the documents. 7. For details... Privileges] may appear instead of the file name. 127 Depending on the supplied CD-ROM. User Name You can change the file name. Password To prevent unauthorized printing, you can be sure to press the [Reset] key to cancel the document selection. • The user name ...
...Data This section describes the procedure for the documents, the key icon appears on the Document Server. • A document accessed with a correct password remains selected even after operations are ended. After the operation, be accessed by the scanner, make sure that stored the documents. 7. For details... Privileges] may appear instead of the file name. 127 Depending on the supplied CD-ROM. User Name You can change the file name. Password To prevent unauthorized printing, you can be sure to press the [Reset] key to cancel the document selection. • The user name ...
Manuals
Page 130
...7. Press the [Start] key. If the list does not appear, press [Finish Scanning]. 128 Specify a user name, and then press [OK]. Enter a password with the number keys, and then press [OK]. Specify the original scanning conditions. 12. After scanning, a list of the control panel, and press the [Document... registered in the screen, press [Manual Entry], and then enter a user name. 5. The document is scanned. Press [Password]. 8. You can use four to eight digits for the password. 9. Place the original. 11. Press the [Home] key on the top left of stored documents will be displayed. ...
...7. Press the [Start] key. If the list does not appear, press [Finish Scanning]. 128 Specify a user name, and then press [OK]. Enter a password with the number keys, and then press [OK]. Specify the original scanning conditions. 12. After scanning, a list of the control panel, and press the [Document... registered in the screen, press [Manual Entry], and then enter a user name. 5. The document is scanned. Press [Password]. 8. You can use four to eight digits for the password. 9. Place the original. 11. Press the [Home] key on the top left of stored documents will be displayed. ...
Manuals
Page 170
... glass or paper tray is ready for use. Job completed successfully. 10. For details about left on the control panel or screen, or the entered password was incorrect. Troubleshooting Panel Tone The following table describes the meaning of time, the beep alert might continue, even after normal status has resumed. •...
... glass or paper tray is ready for use. Job completed successfully. 10. For details about left on the control panel or screen, or the entered password was incorrect. Troubleshooting Panel Tone The following table describes the meaning of time, the beep alert might continue, even after normal status has resumed. •...
Manuals
Page 173
... (LCT) with the print side down. 171 For details about how to set . The entered login user name or login password is set does not have loaded the paper incorrectly. authentication. Original images are restricted by User displayed. Enter your login user name and...appears. For details about authentication, see Security Guide . appears. The machine cannot perform For details about the correct login user name and login password, see appears. An error message remains, even if misfed paper is removed. • When a misfeed message appears, it remains until ...
... (LCT) with the print side down. 171 For details about how to set . The entered login user name or login password is set does not have loaded the paper incorrectly. authentication. Original images are restricted by User displayed. Enter your login user name and...appears. For details about authentication, see Security Guide . appears. The machine cannot perform For details about the correct login user name and login password, see appears. An error message remains, even if misfed paper is removed. • When a misfeed message appears, it remains until ...


