Quick Start Guide
Page 3
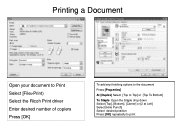
Printing a Document Open your document to Print Select [File>Print) Select the Ricoh Print driver Enter desired number of copiers Press [OK] To add any finishing options to the document Press [Properties] At [Duplex] Select [Top to Top] or [Top To Bottom] To Staple: Open the Staple drop down Select [Top], [Bottom], [Center] or [2 at Left] Select [Hole Punch] Select desired position Press [OK] repeatedly to print
Printing a Document Open your document to Print Select [File>Print) Select the Ricoh Print driver Enter desired number of copiers Press [OK] To add any finishing options to the document Press [Properties] At [Duplex] Select [Top to Top] or [Top To Bottom] To Staple: Open the Staple drop down Select [Top], [Bottom], [Center] or [2 at Left] Select [Hole Punch] Select desired position Press [OK] repeatedly to print
Quick Start Guide
Page 9
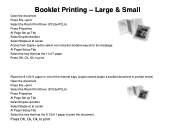
...print the document. Booklet Printing - Large & Small Open the document Press File >print Select the Ricoh Print Driver (PCL5e/PCL6) Press Properties At Page Set up Tab Select Duplex>booklet Select Staple>2 at center Across from Duplex option select non reduction booklet>say ok to the message At Paper Setup...paper Press OK, Ok, Ok, to print Place the 8 1/2x11 paper in one of the internal trays (copier cannot staple a booklet document in portrait mode) Open the document Press File >print Select the Ricoh Print Driver (PCL5e/PCL6) Press Properties At Page Set up Tab Select Duplex>booklet Select...
...print the document. Booklet Printing - Large & Small Open the document Press File >print Select the Ricoh Print Driver (PCL5e/PCL6) Press Properties At Page Set up Tab Select Duplex>booklet Select Staple>2 at center Across from Duplex option select non reduction booklet>say ok to the message At Paper Setup...paper Press OK, Ok, Ok, to print Place the 8 1/2x11 paper in one of the internal trays (copier cannot staple a booklet document in portrait mode) Open the document Press File >print Select the Ricoh Print Driver (PCL5e/PCL6) Press Properties At Page Set up Tab Select Duplex>booklet Select...
User Guide
Page 3
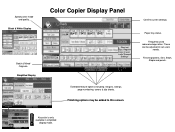
Short cut keys. Key color is only available in user tools "General Settings" Paper tray status. Register keys in simplified display mode. Black & White Display Batch & Mixed Originals. Sort, Stack, Staple and punch. Extended feature options including; Finishing options may be adjusted to this screen. Finishing options. These can be added to suit users needs. margins, stamps, page numbering, covers & slip sheets. Specify color mode and quality. Simplified Display Color Copier Display Panel Confirm current settings. Frequently used reduce/enlarge ratios.
Short cut keys. Key color is only available in user tools "General Settings" Paper tray status. Register keys in simplified display mode. Black & White Display Batch & Mixed Originals. Sort, Stack, Staple and punch. Extended feature options including; Finishing options may be adjusted to this screen. Finishing options. These can be added to suit users needs. margins, stamps, page numbering, covers & slip sheets. Specify color mode and quality. Simplified Display Color Copier Display Panel Confirm current settings. Frequently used reduce/enlarge ratios.
User Guide
Page 4
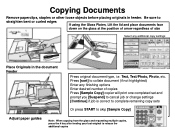
... collate document (if not highlighted) Enter any additional copy settings Place Originals in feeder. Press [sort] to release the additional copies Copying Documents Remove paperclips, staples or other loose objects before placing originals in the document Feeder Press original document type, i.e. Text, Text/Photo, Photo, etc.
... collate document (if not highlighted) Enter any additional copy settings Place Originals in feeder. Press [sort] to release the additional copies Copying Documents Remove paperclips, staples or other loose objects before placing originals in the document Feeder Press original document type, i.e. Text, Text/Photo, Photo, etc.
User Guide
Page 7
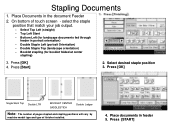
... 1. Press [OK] Single Slant Top Double LTR BOOKLET CENTER SADDLESTICH Double Ledger Note: The number of pages stapled and stapling positions will vary by machine model type and type of touch screen - Press [START] Booklet stapling (for landscape documents fed through feeder in portrait orientation) - Press [Start] 2. Place documents in the document Feeder...
... 1. Press [OK] Single Slant Top Double LTR BOOKLET CENTER SADDLESTICH Double Ledger Note: The number of pages stapled and stapling positions will vary by machine model type and type of touch screen - Press [START] Booklet stapling (for landscape documents fed through feeder in portrait orientation) - Press [Start] 2. Place documents in the document Feeder...
User Guide
Page 10
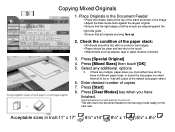
... size. Press [Start] 8. Select any additional options 3. Acceptable sizes in the Document Feeder Place the smaller sizes at the top of the stack as staples, tags or tapes must all originals are multiple paper sizes you must either have finished. Check the condition of copies 7. If there are lying face...
... size. Press [Start] 8. Select any additional options 3. Acceptable sizes in the Document Feeder Place the smaller sizes at the top of the stack as staples, tags or tapes must all originals are multiple paper sizes you must either have finished. Check the condition of copies 7. If there are lying face...
User Guide
Page 14
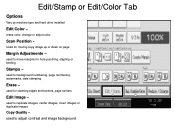
Edit/Stamp or Edit/Color Tab Options Vary by machine type and hard drive installed Edit Color - used to move margins for cleaning edges and borders, page centers Edit Image - erase color, change or adjust color Scan Position - used to replicate images, center images, invert images or duplicate images Copy Quality - used for hole-punching, stapling or binding Stamps - used for moving copy image up or down on page Margin Adjustments - used to adjust contrast and image background Used for background numbering, page numbering, watermarks, date stamping Erase -
Edit/Stamp or Edit/Color Tab Options Vary by machine type and hard drive installed Edit Color - used to move margins for cleaning edges and borders, page centers Edit Image - erase color, change or adjust color Scan Position - used to replicate images, center images, invert images or duplicate images Copy Quality - used for hole-punching, stapling or binding Stamps - used for moving copy image up or down on page Margin Adjustments - used to adjust contrast and image background Used for background numbering, page numbering, watermarks, date stamping Erase -

User Guide
Page 26
... Magazine for short cuts on panel Duplex - 1 sided+2 Sided 2 Sided+ 2 Sided Combine - Series - Use to copy 2 face forwarding pages of a book to have the job stapled and folded. Dup./Combine/Series Full menu for 5 or more pages. Combine multiple pages on a single page. Default Screen Settings Users can choose to 2 single...
... Magazine for short cuts on panel Duplex - 1 sided+2 Sided 2 Sided+ 2 Sided Combine - Series - Use to copy 2 face forwarding pages of a book to have the job stapled and folded. Dup./Combine/Series Full menu for 5 or more pages. Combine multiple pages on a single page. Default Screen Settings Users can choose to 2 single...
User Guide
Page 43
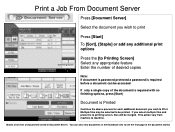
... vary from machine to be printed. Print a Job From Document Server Press [Document Server] Select the document you wish to print Press [Start] To [Sort], [Staple] or add any additional print options To Printing Screen Press the [to Printing Screen] Select any appropriate feature Enter the number of desired copies Note...
... vary from machine to be printed. Print a Job From Document Server Press [Document Server] Select the document you wish to print Press [Start] To [Sort], [Staple] or add any additional print options To Printing Screen Press the [to Printing Screen] Select any appropriate feature Enter the number of desired copies Note...
User Guide
Page 46
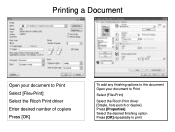
Printing a Document Open your document to Print Select [File>Print] Select the Ricoh Print driver Enter desired number of copiers Press [OK] To add any finishing options to the document Open your document to Print Select [File>Print) Select the Ricoh Print driver [Staple, hole punch or duplex] Press [Properties] Select the desired finishing option Press [OK] repeatedly to print
Printing a Document Open your document to Print Select [File>Print] Select the Ricoh Print driver Enter desired number of copiers Press [OK] To add any finishing options to the document Open your document to Print Select [File>Print) Select the Ricoh Print driver [Staple, hole punch or duplex] Press [Properties] Select the desired finishing option Press [OK] repeatedly to print

Operating Instructions
Page 6
... Displayed...125 When E is Displayed...126 When F is Displayed in the Case of Finisher SR 4040 134 When R1 - R7 is Displayed...137 Removing Jammed Staples...138 Finisher SR4030 / SR4040...138 Finisher SR4040 (Saddle Stitch)...139 Finisher SR4050...139 Removing Punch Waste...141 Finisher SR4030 / SR4040...141 Finisher SR4050...142 Removing...
... Displayed...125 When E is Displayed...126 When F is Displayed in the Case of Finisher SR 4040 134 When R1 - R7 is Displayed...137 Removing Jammed Staples...138 Finisher SR4030 / SR4040...138 Finisher SR4040 (Saddle Stitch)...139 Finisher SR4050...139 Removing Punch Waste...141 Finisher SR4030 / SR4040...141 Finisher SR4050...142 Removing...
Operating Instructions
Page 8
... the Device Certificate. 6 Scanner Reference Explains Scanner functions and operations. Network and System Settings Guide Explains how to connect the machine to replace paper, toner, staples, and other consumables. It explains security functions that you can use the software provided. Printer Reference Explains Printer functions and operations. About This Machine Before...
... the Device Certificate. 6 Scanner Reference Explains Scanner functions and operations. Network and System Settings Guide Explains how to connect the machine to replace paper, toner, staples, and other consumables. It explains security functions that you can use the software provided. Printer Reference Explains Printer functions and operations. About This Machine Before...
Operating Instructions
Page 15
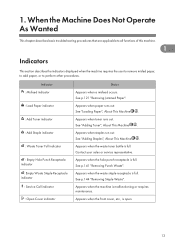
... "Removing Jammed Paper". Appears when the waste toner bottle is full. See p.141 "Removing Punch Waste". Appears when the waste staple receptacle is full. See "Loading Paper", About This Machine . Appears when the front cover, etc., is full. Indicator : ...Misfeed indicator : Load Paper indicator : Add Toner indicator : Add Staple indicator : Waste Toner Full indicator : Empty Hole Punch Receptacle indicator : Empty Waste Staple Receptacle indicator : Service Call indicator : Open Cover indicator Status Appears when a misfeed occurs. ...
... "Removing Jammed Paper". Appears when the waste toner bottle is full. See p.141 "Removing Punch Waste". Appears when the waste staple receptacle is full. See "Loading Paper", About This Machine . Appears when the front cover, etc., is full. Indicator : ...Misfeed indicator : Load Paper indicator : Add Toner indicator : Add Staple indicator : Waste Toner Full indicator : Empty Hole Punch Receptacle indicator : Empty Waste Staple Receptacle indicator : Service Call indicator : Open Cover indicator Status Appears when a misfeed occurs. ...
Operating Instructions
Page 17
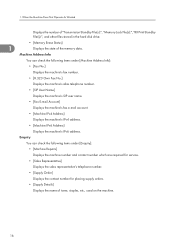
...; [Paper Tray] Displays the paper type and size loaded in the hard disk drive. • [Print Job(s)] Displays the number of remaining toner. • [No Staples] Displays whether there are staples remaining or not. • [Punch Receptacle Full] Displays whether the hole punch receptacle is full. • [Waste...
...; [Paper Tray] Displays the paper type and size loaded in the hard disk drive. • [Print Job(s)] Displays the number of remaining toner. • [No Staples] Displays whether there are staples remaining or not. • [Punch Receptacle Full] Displays whether the hole punch receptacle is full. • [Waste...
Operating Instructions
Page 18
...(s):", "Memory Lock File(s):", "RX Print Standby File(s):", and other files stored in the hard disk drive. • [Memory Erase Status] 1 Displays the state of toner, staples, etc., used on the machine. 16
...(s):", "Memory Lock File(s):", "RX Print Standby File(s):", and other files stored in the hard disk drive. • [Memory Erase Status] 1 Displays the state of toner, staples, etc., used on the machine. 16

Operating Instructions
Page 19
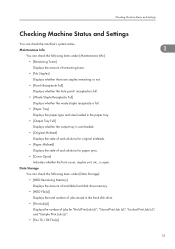
The previous screen returns. • [No Staples], [Punch Receptacle Full], [Waste Staple Receptacle Full], [Output Tray Full], [Original Misfeed], [Paper Misfeed], and [Cover Open] appear on the [Maintenance Info] tab only when these errors occur. • For details about how to locate and remove misfeeds, see "Removing Jammed Paper". • p.121 "Removing Jammed Paper" 17 On the control panel, press [System Status]. Checking Machine Status and Settings 1 2. 1. Press each tab and check the contents. 3. After checking the information, press [Exit].
The previous screen returns. • [No Staples], [Punch Receptacle Full], [Waste Staple Receptacle Full], [Output Tray Full], [Original Misfeed], [Paper Misfeed], and [Cover Open] appear on the [Maintenance Info] tab only when these errors occur. • For details about how to locate and remove misfeeds, see "Removing Jammed Paper". • p.121 "Removing Jammed Paper" 17 On the control panel, press [System Status]. Checking Machine Status and Settings 1 2. 1. Press each tab and check the contents. 3. After checking the information, press [Exit].
Operating Instructions
Page 25
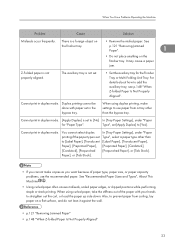
... paper. See "Recommended Paper Sizes and Types", About This Machine . • Using curled paper often causes misfeeds, soiled paper edges, or slipped positions while performing staple or stack printing. p.121 "Removing Jammed Paper". 1 • Do not place anything on • Remove the misfed paper. Also, to straighten out the curl, or...
... paper. See "Recommended Paper Sizes and Types", About This Machine . • Using curled paper often causes misfeeds, soiled paper edges, or slipped positions while performing staple or stack printing. p.121 "Removing Jammed Paper". 1 • Do not place anything on • Remove the misfed paper. Also, to straighten out the curl, or...
Operating Instructions
Page 27
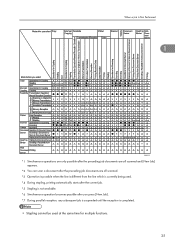
... job documents are all scanned. *3 Operation is possible when the line is different from the line which is currently being used. *4 During stapling, printing automatically starts after the current job. *5 Stapling is not available. *6 Simultaneous operation becomes possible after you press [New Job]. *7 During parallel reception, any subsequent job is suspended until...
... job documents are all scanned. *3 Operation is possible when the line is different from the line which is currently being used. *4 During stapling, printing automatically starts after the current job. *5 Stapling is not available. *6 Simultaneous operation becomes possible after you press [New Job]. *7 During parallel reception, any subsequent job is suspended until...
Operating Instructions
Page 30
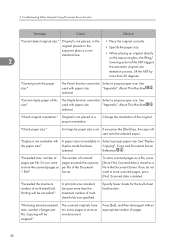
... the automatic original size detection process. See size." used with paper size "Appendix", About This Machine . "Cannot staple paper of multisheet folds was canceled because more than the maximum number of this The Staple function cannot be cancelled." Change the orientation of pages per file. "Check paper size." number of the original...
... the automatic original size detection process. See size." used with paper size "Appendix", About This Machine . "Cannot staple paper of multisheet folds was canceled because more than the maximum number of this The Staple function cannot be cancelled." Change the orientation of pages per file. "Check paper size." number of the original...
Operating Instructions
Page 31
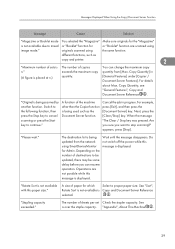
...the power while this message is being updated from [Max. A size of sheets per set Check the stapler capacity. "Please wait." "Stapling capacity exceeded." Copy Quantity, see "General Features", Copy and Document Server Reference . See is not available with this paper size." originals ... details about Max. Next, press the [Clear/Stop] key. Operations are scanned using the same function. "Rotate Sort is over the staple capacity. For example, press [Exit], and then press the [Document Server] key. different functions, such as the Document Server function. ...
...the power while this message is being updated from [Max. A size of sheets per set Check the stapler capacity. "Please wait." "Stapling capacity exceeded." Copy Quantity, see "General Features", Copy and Document Server Reference . See is not available with this paper size." originals ... details about Max. Next, press the [Clear/Stop] key. Operations are scanned using the same function. "Rotate Sort is over the staple capacity. For example, press [Exit], and then press the [Document Server] key. different functions, such as the Document Server function. ...


