Hardware Guide
Page 7
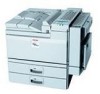
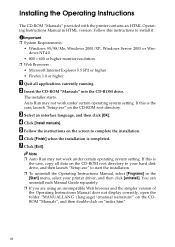
... your hard disk drive, and then launch "Setup.exe" to start the installation. ❒ To uninstall the Operating Instructions Manual, select [Programs] in HTML version. You can uninstall each Manual Guide separately. ❒ If you are using an incompatible Web browser and the simpler version of the Operating Instructions Manual does not display correctly, open the folder "MANUALLANG (language)\(manual name)unv" on the CDROM "Manuals", and then double...
... your hard disk drive, and then launch "Setup.exe" to start the installation. ❒ To uninstall the Operating Instructions Manual, select [Programs] in HTML version. You can uninstall each Manual Guide separately. ❒ If you are using an incompatible Web browser and the simpler version of the Operating Instructions Manual does not display correctly, open the folder "MANUALLANG (language)\(manual name)unv" on the CDROM "Manuals", and then double...

Hardware Guide
Page 8
...RWARNING and RCAUTION labels ii Manuals for This Printer iii How to the Printer Exterior: Front View 1 Exterior: Rear View 2 Inside...3 Control Panel...4 2. Installing Options Available Options 5 Option List ...5 Option Installation Flow Chart 6 Installing Options...7 Caution when re-installing the controller board 9 Attaching Paper Feed Unit PB 3020 10 Attaching User Account Enhance Unit Type E 16 Attaching Printer Hard Disk Drive Type 8100 20 Attaching Memory Unit Type D 128MB, Memory Unit Type E 256MB (SDRAM Module) ...27 Attaching IEEE 802.11b Interface Unit 32 Attaching IEEE...
...RWARNING and RCAUTION labels ii Manuals for This Printer iii How to the Printer Exterior: Front View 1 Exterior: Rear View 2 Inside...3 Control Panel...4 2. Installing Options Available Options 5 Option List ...5 Option Installation Flow Chart 6 Installing Options...7 Caution when re-installing the controller board 9 Attaching Paper Feed Unit PB 3020 10 Attaching User Account Enhance Unit Type E 16 Attaching Printer Hard Disk Drive Type 8100 20 Attaching Memory Unit Type D 128MB, Memory Unit Type E 256MB (SDRAM Module) ...27 Attaching IEEE 802.11b Interface Unit 32 Attaching IEEE...

Hardware Guide
Page 15
This does not work if the printer is receiving data from a computer. Data In Indicator Blinks while the printer is online. 6. See "Canceling a Print job", Softtware Guide. 5. {Form Feed} Key If the printer is on the panel display. 8. A message describing the cause of the printer and error messages. 3. {Online} Key Press this key to switch the printer between online and offline. 4. {Job Reset} Key When the printer is online, press this key to execute menu items selected on if there...
This does not work if the printer is receiving data from a computer. Data In Indicator Blinks while the printer is online. 6. See "Canceling a Print job", Softtware Guide. 5. {Form Feed} Key If the printer is on the panel display. 8. A message describing the cause of the printer and error messages. 3. {Online} Key Press this key to switch the printer between online and offline. 4. {Job Reset} Key When the printer is online, press this key to execute menu items selected on if there...

Hardware Guide
Page 31
Installing Options Attaching Printer Hard Disk Drive Type 8100 R CAUTION: • Do not touch the inside of the controller board compartment. Doing so may cause a machine malfunction or a burn. 2 Important ❒ Before installation, be sure to discharge any static electricity. A Check the package contains the following: ❖ Hard Disk Drive ❖ Flat Cable AQV518S 20 AQC500S Static electricity can damage the hard disk drive. ❒ Do not subject the hard disk drive to...
Installing Options Attaching Printer Hard Disk Drive Type 8100 R CAUTION: • Do not touch the inside of the controller board compartment. Doing so may cause a machine malfunction or a burn. 2 Important ❒ Before installation, be sure to discharge any static electricity. A Check the package contains the following: ❖ Hard Disk Drive ❖ Flat Cable AQV518S 20 AQC500S Static electricity can damage the hard disk drive. ❒ Do not subject the hard disk drive to...
Hardware Guide
Page 118
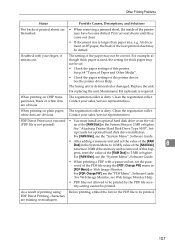
... thick paper is removed. For replacing the unit, Maintenance Kit (optional) is dirty. Clean the registration roller. When printing on plain paper, The registration roller is required. Clean the registration roller. ue of the [RAM Disk] in the PDF file to 2 MB or higher. up Guide for thick paper may be set. • Check the paper settings of this hap- If this printer. For Web Image Monitor, see the "System Menu", Software Guide. • After adding a memory unit and set the val- (PDF file...
... thick paper is removed. For replacing the unit, Maintenance Kit (optional) is dirty. Clean the registration roller. When printing on plain paper, The registration roller is required. Clean the registration roller. ue of the [RAM Disk] in the PDF file to 2 MB or higher. up Guide for thick paper may be set. • Check the paper settings of this hap- If this printer. For Web Image Monitor, see the "System Menu", Software Guide. • After adding a memory unit and set the val- (PDF file...
Hardware Guide
Page 120
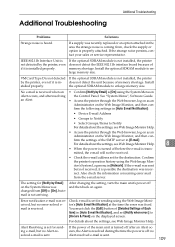
... must click the [Edit] button of [Detailed Settings of memory shortage. Additional Troubleshooting Additional Troubleshooting Problems Solutions Strange noise is installed properly. The setting for sending e-mail, but no error-solved e- IEEE 802.11b Interface Unit is not detected by Email] After changing the setting, turn the main unit's power off after resolving the Control Panel. If the optional SDRAM module is not installed, the printer does not detect the IEEE...
... must click the [Edit] button of [Detailed Settings of memory shortage. Additional Troubleshooting Additional Troubleshooting Problems Solutions Strange noise is installed properly. The setting for sending e-mail, but no error-solved e- IEEE 802.11b Interface Unit is not detected by Email] After changing the setting, turn the main unit's power off after resolving the Control Panel. If the optional SDRAM module is not installed, the printer does not detect the IEEE...
Software Guide
Page 6
...IPP) ...18 Changing the Port Settings for SmartDeviceMonitor for Client 7 Installing the PCL or RPCS Printer Driver (TCP/IP 8 Installing the PCL or RPCS Printer Driver (IPP 9 Installing the PostScript 3 Printer Driver (Windows 95/98/Me - USB 42 Windows XP, Windows Server 2003 - Preparing for Printing Quick Install...1 Confirming the Connection Method 3 Network Connection 3 Local Connection ...5 Using the SmartDeviceMonitor Port 7 Installing DeskTopBinder-SmartDeviceMonitor for Client 20 Using the Standard TCP/IP Port 22 Installing the PCL or RPCS Printer Driver 22 Installing the...
...IPP) ...18 Changing the Port Settings for SmartDeviceMonitor for Client 7 Installing the PCL or RPCS Printer Driver (TCP/IP 8 Installing the PCL or RPCS Printer Driver (IPP 9 Installing the PostScript 3 Printer Driver (Windows 95/98/Me - USB 42 Windows XP, Windows Server 2003 - Preparing for Printing Quick Install...1 Confirming the Connection Method 3 Network Connection 3 Local Connection ...5 Using the SmartDeviceMonitor Port 7 Installing DeskTopBinder-SmartDeviceMonitor for Client 20 Using the Standard TCP/IP Port 22 Installing the PCL or RPCS Printer Driver 22 Installing the...
Software Guide
Page 14
...; Download the printer driver from the supplier's web site when using USB, see p.40 "Installing the Printer Driver Using USB". 2 If this happens, launch "Setup.exe" on the CD-ROM root directory. 1 ❒ To stop installation of the selected software, click [Cancel] before installation is complete. ❒ Select a printer to whose IP address is displayed in [Connect To] to install SmartDeviceMonitor for Printing Note ❒ Auto Run may not work with certain operating system settings. See...
...; Download the printer driver from the supplier's web site when using USB, see p.40 "Installing the Printer Driver Using USB". 2 If this happens, launch "Setup.exe" on the CD-ROM root directory. 1 ❒ To stop installation of the selected software, click [Cancel] before installation is complete. ❒ Select a printer to whose IP address is displayed in [Connect To] to install SmartDeviceMonitor for Printing Note ❒ Auto Run may not work with certain operating system settings. See...
Software Guide
Page 20
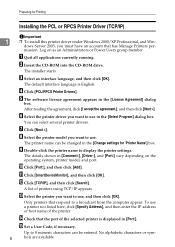
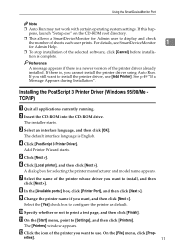
... system, printer model, and port. C Select an interface language, and then click [OK]. D Click [PCL/RPCS Printer Drivers]. E The software license agreement appears in [Comment:], [Driver:], and [Port:] vary depending on as an Administrators or Power Users group member. J Click [Port:], and then click [Add]. L Click [TCP/IP], and then click [Search]. To use . The default interface language is displayed in [Port:]. After reading the agreement, click [I Double-click the printer name to...
... system, printer model, and port. C Select an interface language, and then click [OK]. D Click [PCL/RPCS Printer Drivers]. E The software license agreement appears in [Comment:], [Driver:], and [Port:] vary depending on as an Administrators or Power Users group member. J Click [Port:], and then click [Add]. L Click [TCP/IP], and then click [Search]. To use . The default interface language is displayed in [Port:]. After reading the agreement, click [I Double-click the printer name to...
Software Guide
Page 21
...; To install printer driver under Windows 2000/XP Professional, and Windows Server 2003, you cannot add an IPv4 address partially similar to display and check statistics about the number of sheets which each user prints. You can select several printer drivers. 9 Using the SmartDeviceMonitor Port P Select the [Default Printer] check box to complete installation. For details, see SmartDeviceMonitor for Admin user to the one of the printer driver already installed. See p.49 "If a Message Appears during Installation". The installer starts...
...; To install printer driver under Windows 2000/XP Professional, and Windows Server 2003, you cannot add an IPv4 address partially similar to display and check statistics about the number of sheets which each user prints. You can select several printer drivers. 9 Using the SmartDeviceMonitor Port P Select the [Default Printer] check box to complete installation. For details, see SmartDeviceMonitor for Admin user to the one of the printer driver already installed. See p.49 "If a Message Appears during Installation". The installer starts...
Software Guide
Page 23
... to use [Add Printer]. On the [File] menu, click [Prop- If this happens, launch "Setup.exe" on the CD-ROM root directory. ❒ This allows a SmartDeviceMonitor for Admin user to install, and then click [Next >]. The default interface language is , you want to display and check the number of the printer driver already installed. L Click the icon of the selected software, click [Cancel] before installation is a newer version of sheets each user prints. A dialog...
... to use [Add Printer]. On the [File] menu, click [Prop- If this happens, launch "Setup.exe" on the CD-ROM root directory. ❒ This allows a SmartDeviceMonitor for Admin user to install, and then click [Next >]. The default interface language is , you want to display and check the number of the printer driver already installed. L Click the icon of the selected software, click [Cancel] before installation is a newer version of sheets each user prints. A dialog...

Software Guide
Page 35
... installation. Q Configure the default printer as necessary. Use the SmartDeviceMonitor port. The installer starts. P Check that the port of the selected software, click [Cancel] before installation is English. 23 C Select an interface language, and then click [OK]. See p.49 "If a Message Appears during Installation". When screen for Device selection appears, select "RICOH NetworkPrinter Driver C Model". 1 N Click [Next >]. Restart the computer to install the printer driver, use the Standard TCP/IP Port. Using the Standard TCP/IP Port M Enter the printer...
... installation. Q Configure the default printer as necessary. Use the SmartDeviceMonitor port. The installer starts. P Check that the port of the selected software, click [Cancel] before installation is English. 23 C Select an interface language, and then click [OK]. See p.49 "If a Message Appears during Installation". When screen for Device selection appears, select "RICOH NetworkPrinter Driver C Model". 1 N Click [Next >]. Restart the computer to install the printer driver, use the Standard TCP/IP Port. Using the Standard TCP/IP Port M Enter the printer...

Software Guide
Page 39
... server providing lpd] box. H Double-click the printer name to use. Use the SmartDeviceMonitor port. I accept the agreement.], and then click [Next >]. C Select an interface language, and then click [OK]. If [LPR Port] does not appear, see Windows Help and install it. G Select the printer model you want to display the printer settings. J Click [LPR Port], and then click [OK]. E The software license agreement appears in the [Change settings for 'Printer...
... server providing lpd] box. H Double-click the printer name to use. Use the SmartDeviceMonitor port. I accept the agreement.], and then click [Next >]. C Select an interface language, and then click [OK]. If [LPR Port] does not appear, see Windows Help and install it. G Select the printer model you want to display the printer settings. J Click [LPR Port], and then click [OK]. E The software license agreement appears in the [Change settings for 'Printer...
Software Guide
Page 48
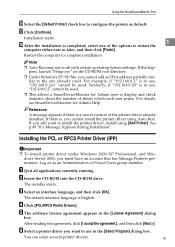
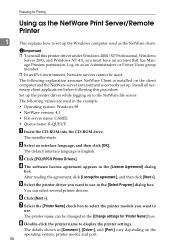
... to use in the [Change settings for Printing Using as the NetWare Print Server/Remote Printer 1 This explains how to set up the Windows computer used as an Administrators or Power Users group member. ❒ In an IPv6 environment, Netware servers cannot be changed in the [Select Program] dialog box. The following values are used in the [License Agreement] dialog box. C Click [PCL/RPCS Printer Drivers]. The installer starts. D The software...
... to use in the [Change settings for Printing Using as the NetWare Print Server/Remote Printer 1 This explains how to set up the Windows computer used as an Administrators or Power Users group member. ❒ In an IPv6 environment, Netware servers cannot be changed in the [Select Program] dialog box. The following values are used in the [License Agreement] dialog box. C Click [PCL/RPCS Printer Drivers]. The installer starts. D The software...

Software Guide
Page 132
... Del. Making Printer Settings Using the Control Panel ❖ List/Test Print Multiple Lists Config. All Stored HD Format Date/Time WL.LAN Signal WL.LAN Defaults Menu Menu Note ❒ [Del. All Stored], and [HD Format] appear when the optional hard disk is installed. ❒ [WL.LAN Signal] and [WL.LAN Defaults] appear when the optional IEEE 802.11b interface unit and the optional SDRAM module are installed. 120 Page PDF Config.Page 4 Hex Dump Operations Test ❖ Maintenance Image Density Registration...
... Del. Making Printer Settings Using the Control Panel ❖ List/Test Print Multiple Lists Config. All Stored HD Format Date/Time WL.LAN Signal WL.LAN Defaults Menu Menu Note ❒ [Del. All Stored], and [HD Format] appear when the optional hard disk is installed. ❒ [WL.LAN Signal] and [WL.LAN Defaults] appear when the optional IEEE 802.11b interface unit and the optional SDRAM module are installed. 120 Page PDF Config.Page 4 Hex Dump Operations Test ❖ Maintenance Image Density Registration...

Software Guide
Page 172
... changed by the DHCP server settings. Use the most recent available version. To perform an update, click [Refresh] in the display area. ❒ We recommend using Web Image Monitor in the same network. ❒ You cannot access to the printer from outside the firewall. ❒ When using the printer under DHCP, the IPv4 address may be installed on the printer, 5 and then connect using the SSL encryption protocol, enter "https://(printer's address)/". Enable DDNS setting...
... changed by the DHCP server settings. Use the most recent available version. To perform an update, click [Refresh] in the display area. ❒ We recommend using Web Image Monitor in the same network. ❒ You cannot access to the printer from outside the firewall. ❒ When using the printer under DHCP, the IPv4 address may be installed on the printer, 5 and then connect using the SSL encryption protocol, enter "https://(printer's address)/". Enable DDNS setting...

Software Guide
Page 208
... IEEE 802.11b interface unit and the optional SDRAM module are installed. 5 Interface name Interface configured ether Ethernet interface wlan IEEE 802.11b interface ❖ Initializing the printer name for each interface msh>hostname "interface_name" clear "name" ifconfig Use the "ifconfig" command to view and configure TCP/IP (IP address, subnet mask, broadcast address, default gateway address) for the printer. ❖ View settings msh> ifconfig ❖ IPv4 Configuration msh> ifconfig "interface_name...
... IEEE 802.11b interface unit and the optional SDRAM module are installed. 5 Interface name Interface configured ether Ethernet interface wlan IEEE 802.11b interface ❖ Initializing the printer name for each interface msh>hostname "interface_name" clear "name" ifconfig Use the "ifconfig" command to view and configure TCP/IP (IP address, subnet mask, broadcast address, default gateway address) for the printer. ❖ View settings msh> ifconfig ❖ IPv4 Configuration msh> ifconfig "interface_name...

Software Guide
Page 235
..., 2 Prepaid Card not inserted Print Complete Printing Processing Proxy Address/Port Incorrect Proxy User/Password Incorrect RC Gate Connection Error Ready Renewing Remote Certificate Replace Black PCU Replace Charger Kit Getting Printer Information over the Network Description Tray 2 is in Finisher. The printer is not correctly set. The paper remains in the duplex unit. 5 The paper remains in Panel-Off mode. The print was completed. Proxy address or Port No. Remote Certificate is offline. It is incorrect. Waste toner bottle...
..., 2 Prepaid Card not inserted Print Complete Printing Processing Proxy Address/Port Incorrect Proxy User/Password Incorrect RC Gate Connection Error Ready Renewing Remote Certificate Replace Black PCU Replace Charger Kit Getting Printer Information over the Network Description Tray 2 is in Finisher. The printer is not correctly set. The paper remains in the duplex unit. 5 The paper remains in Panel-Off mode. The print was completed. Proxy address or Port No. Remote Certificate is offline. It is incorrect. Waste toner bottle...

Software Guide
Page 236
.... The paper feed tray specification error has occurred because chaptering as well as the normal paper use the same tray for duplex printing. The printer is complete. It is time to replace the transfer cleaning unit. The supply order call has failed. Document feeder is time to replace the transfer unit. It is time to replace the development unit. Skipped the error. Selected paper tray cannot be printed in the configuration page. Unit (Black) Replace Fusing Unit Replace Int. For details about UNIX commands, see p.130 "List/Test Print Menu...
.... The paper feed tray specification error has occurred because chaptering as well as the normal paper use the same tray for duplex printing. The printer is complete. It is time to replace the transfer cleaning unit. The supply order call has failed. Document feeder is time to replace the transfer unit. It is time to replace the development unit. Skipped the error. Selected paper tray cannot be printed in the configuration page. Unit (Black) Replace Fusing Unit Replace Int. For details about UNIX commands, see p.130 "List/Test Print Menu...
Software Guide
Page 267
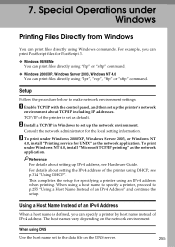
... printer's network environment about setting the IPv4 address of an IPv4 Address" and continue the setup. Using a Host Name Instead of an IPv4 Address When a host name is set up IPv4 address, see p.314 "Using DHCP". The host names vary depending on the DNS server. 255 When using Windows commands. TCP/IP of IPv4 address. C To print under Windows 2000/XP, Windows Server 2003, or Windows NT 4.0, install "Printing service for specifying a printer using DHCP, see Hardware Guide...
... printer's network environment about setting the IPv4 address of an IPv4 Address" and continue the setup. Using a Host Name Instead of an IPv4 Address When a host name is set up IPv4 address, see p.314 "Using DHCP". The host names vary depending on the DNS server. 255 When using Windows commands. TCP/IP of IPv4 address. C To print under Windows 2000/XP, Windows Server 2003, or Windows NT 4.0, install "Printing service for specifying a printer using DHCP, see Hardware Guide...


