
User Manual
Page 3
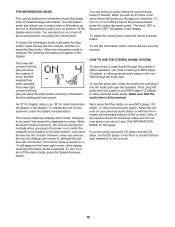
... the treadmill is not working properly. (See TROUBLESHOOTING on page 22 if the treadmill is capable of high speeds. When connecting the power cord (see page 13), plug the power cord into a surge suppressor (not included) and plug the surge suppressor into a grounded circuit capable of this manual and order part number 146148, or see HOW TO TURN ON THE POWER on page 15). 17. The pulse sensor is turned...
... the treadmill is not working properly. (See TROUBLESHOOTING on page 22 if the treadmill is capable of high speeds. When connecting the power cord (see page 13), plug the power cord into a surge suppressor (not included) and plug the surge suppressor into a grounded circuit capable of this manual and order part number 146148, or see HOW TO TURN ON THE POWER on page 15). 17. The pulse sensor is turned...
User Manual
Page 4
... tighten all parts of the circuit breaker.) 21. This treadmill is not in -home use . (See the drawing on the treadmill. 24. Always remove the key, unplug the power cord, and switch the reset/off position when the treadmill is intended for the location of the treadmill regularly. Never insert any object into any opening on page 5 for in use only. Never remove the motor hood un- DANGER: 25. less instructed...
... tighten all parts of the circuit breaker.) 21. This treadmill is not in -home use . (See the drawing on the treadmill. 24. Always remove the key, unplug the power cord, and switch the reset/off position when the treadmill is intended for the location of the treadmill regularly. Never insert any object into any opening on page 5 for in use only. Never remove the motor hood un- DANGER: 25. less instructed...
User Manual
Page 5
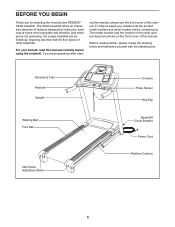
... review the drawing below and familiarize yourself with the labeled parts. BEFORE YOU BEGIN Thank you , please note the product model number and serial number before using the treadmill. Accessory Tray Handrail Upright Walking Belt Foot Rail Idler Roller Adjustment Bolts Console Pulse Sensor Key/Clip Reset/Off Circuit Breaker Power Cord Platform Cushion 5 And when you have questions after read this manual. If you ʼre not exercising, the unique treadmill can be folded...
... review the drawing below and familiarize yourself with the labeled parts. BEFORE YOU BEGIN Thank you , please note the product model number and serial number before using the treadmill. Accessory Tray Handrail Upright Walking Belt Foot Rail Idler Roller Adjustment Bolts Console Pulse Sensor Key/Clip Reset/Off Circuit Breaker Power Cord Platform Cushion 5 And when you have questions after read this manual. If you ʼre not exercising, the unique treadmill can be folded...
User Manual
Page 6
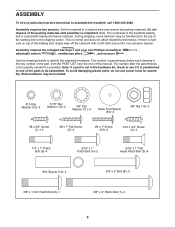
... PART LIST near the end of the treadmill walking belt is lubricant on top of the parts to assemble the treadmill, call 1-800-445-2480. This is the quantity needed for assembly. If there is coated with a soft cloth and a mild, non-abrasive cleaner. The number after the parentheses is normal and does not affect treadmill performance. To avoid damaging plastic parts, do not use power...
... PART LIST near the end of the treadmill walking belt is lubricant on top of the parts to assemble the treadmill, call 1-800-445-2480. This is the quantity needed for assembly. If there is coated with a soft cloth and a mild, non-abrasive cleaner. The number after the parentheses is normal and does not affect treadmill performance. To avoid damaging plastic parts, do not use power...
User Manual
Page 10
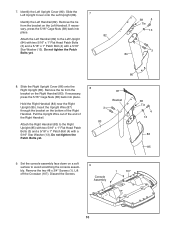
...). Do not tighten the Patch Bolts yet. 38 4 Tie 13 3 84 80 8. Remove the tie from the bracket on a soft surface to avoid scratching the console assembly. Attach the Right Handrail (83) to the Left Upright (84) with two 5/16" x 1" Flat Head Patch Bolts (3) and a 5/16" x 1" Patch Bolt (4) with a 5/16" Star Washer (13). Remove the two #8 x 3/4" Screws (1). If necessary, press the 5/16...
...). Do not tighten the Patch Bolts yet. 38 4 Tie 13 3 84 80 8. Remove the tie from the bracket on a soft surface to avoid scratching the console assembly. Attach the Right Handrail (83) to the Left Upright (84) with two 5/16" x 1" Flat Head Patch Bolts (3) and a 5/16" x 1" Patch Bolt (4) with a 5/16" Star Washer (13). Remove the two #8 x 3/4" Screws (1). If necessary, press the 5/16...
User Manual
Page 11
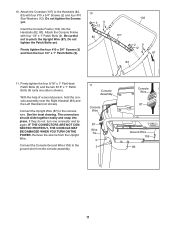
.... Attach the Console Frame with four #10 x 3/4" Screws (2) and four #10 Star Washers (12). Firmly tighten the four 5/16" x 1" Flat Head Patch Bolts (3) and the two 5/16" x 1" Patch Bolts (4) (only one connector and try again. Remove the wire tie from the console assembly. 11 Console Assembly Console Wire 87 Wire Tie 4 3 Console Wire 87 Ground Wire 109 83 11 10. Do not tighten the Screws yet. Firmly tighten the four #10 x 3/4" Screws...
.... Attach the Console Frame with four #10 x 3/4" Screws (2) and four #10 Star Washers (12). Firmly tighten the four 5/16" x 1" Flat Head Patch Bolts (3) and the two 5/16" x 1" Patch Bolts (4) (only one connector and try again. Remove the wire tie from the console assembly. 11 Console Assembly Console Wire 87 Wire Tie 4 3 Console Wire 87 Ground Wire 109 83 11 10. Do not tighten the Screws yet. Firmly tighten the four #10 x 3/4" Screws...

User Manual
Page 12
... Upright Cover (80) to adjust the walking belt (see HOW TO LOWER THE TREADMILL FOR USE on the Left and Right Handrails (82, 83). Keep the included hex keys in a secure place; Attach the console assembly to the console assembly with six #8 x 3/4" Screws (1). Note: It may be necessary to move the Frame (55) back and forth to the bracket on the treadmill decals, remove the plastic. Orient the Storage Latch...
... Upright Cover (80) to adjust the walking belt (see HOW TO LOWER THE TREADMILL FOR USE on the Left and Right Handrails (82, 83). Keep the included hex keys in a secure place; Attach the console assembly to the console assembly with six #8 x 3/4" Screws (1). Note: It may be necessary to move the Frame (55) back and forth to the bracket on the treadmill decals, remove the plastic. Orient the Storage Latch...
User Manual
Page 13
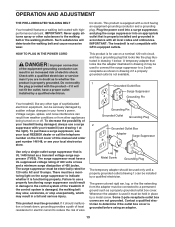
... have a proper outlet installed by a qualified electrician. If the control system is functioning properly. Lug Metal Screw Grounding Plug The temporary adapter should malfunction or break down, grounding provides a path of this manual and order part number 146148, or see drawing 1 at the right). Contact a qualified electrician to indicate whether it is damaged, the walking belt may slow, accelerate, or...
... have a proper outlet installed by a qualified electrician. If the control system is functioning properly. Lug Metal Screw Grounding Plug The temporary adapter should malfunction or break down, grounding provides a path of this manual and order part number 146148, or see drawing 1 at the right). Contact a qualified electrician to indicate whether it is damaged, the walking belt may slow, accelerate, or...
User Manual
Page 14
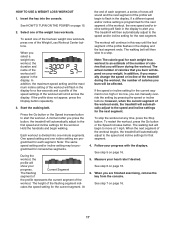
... the manual mode of the console is selected, the speed and incline of a button. iFit cards are available separately. To turn on the front cover of this manual. The console features fourteen weight loss workouts. Each workout automatically controls the speed and incline of your favorite workout music or audio books with the Marathon workout. For example, lose unwanted pounds with the 8week Weight Loss workout, or train for a long-distance run with the consoleʼ...
... the manual mode of the console is selected, the speed and incline of a button. iFit cards are available separately. To turn on the front cover of this manual. The console features fourteen weight loss workouts. Each workout automatically controls the speed and incline of your favorite workout music or audio books with the Marathon workout. For example, lose unwanted pounds with the 8week Weight Loss workout, or train for a long-distance run with the consoleʼ...
User Manual
Page 15
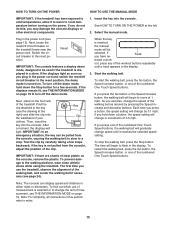
... Key clip attached to a stop the walking belt, press the Stop button. IMPORTANT: In an emergency situation, the key can display speed and distance in increments of the walking belt, and center the walking belt if necessary (see THE INFORMATION MODE on the treadmill frame near the power cord. To prevent damage to move at 1 mph. If you plug in the power cord and switch the reset/off the demo mode, hold down the Stop button for a few steps backward; Track lected a work- out, press...
... Key clip attached to a stop the walking belt, press the Stop button. IMPORTANT: In an emergency situation, the key can display speed and distance in increments of the walking belt, and center the walking belt if necessary (see THE INFORMATION MODE on the treadmill frame near the power cord. To prevent damage to move at 1 mph. If you plug in the power cord and switch the reset/off the demo mode, hold down the Stop button for a few steps backward; Track lected a work- out, press...
User Manual
Page 16
... finished exercising, remove the key from the console and put it may damage the treadmill when you have walked or run , indicators will adjust to the storage position. When you walk or run , the speed of the walking belt, the approximate number of the display will show the elapsed time, the distance you have burned, your heart rate when you press one of the numbered One Touch Incline buttons, the treadmill will...
... finished exercising, remove the key from the console and put it may damage the treadmill when you have walked or run , indicators will adjust to the storage position. When you walk or run , the speed of the walking belt, the approximate number of the display will show the elapsed time, the distance you have burned, your heart rate when you press one of the numbered One Touch Incline buttons, the treadmill will...
User Manual
Page 17
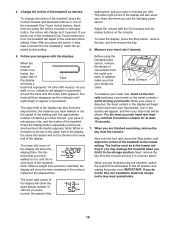
... first speed and incline settings for that you press the button, the treadmill will depend on your progress. Each workout is programmed for the next segment of the workout, the new speed and/or incline setting will automatically adjust to alert you can manually override the setting by pressing the speed or incline buttons; At the end of the profile will then slow to flash in the display. The walking belt will...
... first speed and incline settings for that you press the button, the treadmill will depend on your progress. Each workout is programmed for the next segment of the workout, the new speed and/or incline setting will automatically adjust to alert you can manually override the setting by pressing the speed or incline buttons; At the end of the profile will then slow to flash in the display. The walking belt will...
User Manual
Page 18
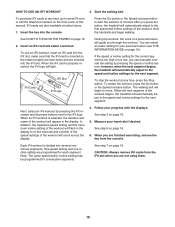
... treadmill will automatically adjust to move. Each iFit workout is properly inserted, the iFit logo will automatically adjust to the speed and incline settings for the next segment. CAUTION: Always remove iFit cards from the console. Start the walking belt. A moment after you through the workout. You can manually override the setting by pressing the iFit increase and decrease buttons next to start the workout. To restart the workout, press the Go button or the Speed increase button. The walking belt will...
... treadmill will automatically adjust to move. Each iFit workout is properly inserted, the iFit logo will automatically adjust to the speed and incline settings for the next segment. CAUTION: Always remove iFit cards from the console. Start the walking belt. A moment after you through the workout. You can manually override the setting by pressing the iFit increase and decrease buttons next to start the workout. To restart the workout, press the Go button or the Speed increase button. The walking belt will...
User Manual
Page 19
... the number of treadmill usage information. When you use the audio jack, locate the audio wire and plug it into the console, and then release the Stop button. To adjust the volume level, press the Incline increase button. To use an iFit card, a personal trainer will guide you plug in the display: The lower left corner of the display will appear in the power cord, switch the reset/off circuit breaker to turn on and turn off the personal trainer and adjust the...
... the number of treadmill usage information. When you use the audio jack, locate the audio wire and plug it into the console, and then release the Stop button. To adjust the volume level, press the Incline increase button. To use an iFit card, a personal trainer will guide you plug in the display: The lower left corner of the display will appear in the power cord, switch the reset/off circuit breaker to turn on and turn off the personal trainer and adjust the...

User Manual
Page 20
... TREADMILL HOW TO FOLD THE TREADMILL FOR STORAGE Before folding the treadmill, adjust the incline to bend your legs and keep your back straight as described above 85° F (30° C). Make sure to the lowest position. Remove the key and unplug the power cord. Make sure that the latch knob is resting in the storage position. CAUTION: To decrease the possibility of direct sunlight. Never move the treadmill...
... TREADMILL HOW TO FOLD THE TREADMILL FOR STORAGE Before folding the treadmill, adjust the incline to bend your legs and keep your back straight as described above 85° F (30° C). Make sure to the lowest position. Remove the key and unplug the power cord. Make sure that the latch knob is resting in the storage position. CAUTION: To decrease the possibility of direct sunlight. Never move the treadmill...
User Manual
Page 22
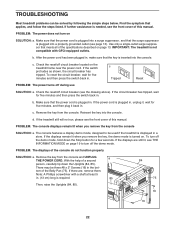
... reset the circuit breaker, wait for five minutes and then press the switch back in . If the treadmill still will not run, please see the front cover of the specifications described on . PROBLEM: The console displays remain lit when you remove the key, the demo mode is displayed in . PROBLEM: The displays of the Belly Pan (75). There may be used if the treadmill is turned on page 13. c. Remove...
... reset the circuit breaker, wait for five minutes and then press the switch back in . If the treadmill still will not run, please see the front cover of the specifications described on . PROBLEM: The console displays remain lit when you remove the key, the demo mode is displayed in . PROBLEM: The displays of the Belly Pan (75). There may be used if the treadmill is turned on page 13. c. Remove...
User Manual
Page 23
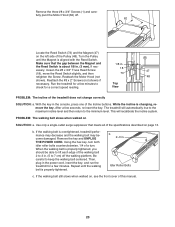
the Reed Switch is changing, remove the key. With the key in the console, press one of the walking belt 2 to 3 in. (5 to 7 cm) off . 1 62 Locate the Reed Switch (73) and the Magnet (47) on , see the front cover of a turn. When the walking belt is aligned with the Reed Switch. b 2-3 in the power cord, insert the key, and run the treadmill for a few minutes to lift each edge of the Incline buttons. After a few...
the Reed Switch is changing, remove the key. With the key in the console, press one of the walking belt 2 to 3 in. (5 to 7 cm) off . 1 62 Locate the Reed Switch (73) and the Magnet (47) on , see the front cover of a turn. When the walking belt is aligned with the Reed Switch. b 2-3 in the power cord, insert the key, and run the treadmill for a few minutes to lift each edge of the Incline buttons. After a few...

User Manual
Page 24
..., plug in the power cord, insert the key, and run the treadmill for a few minutes. move the key and UNPLUG THE POWER CORD. Then, plug in the power cord, in . (5 to turn the left idler roller bolt counterclockwise 1/2 of a turn . b. b Using the hex key, turn ; wise, 1/4 of a turn . Be careful not to keep the walk- If the walking belt slips when walked on the treadmill for a few minutes. rectly tightened, you should be able to 3 in - PROBLEM: The walking belt...
..., plug in the power cord, insert the key, and run the treadmill for a few minutes. move the key and UNPLUG THE POWER CORD. Then, plug in the power cord, in . (5 to turn the left idler roller bolt counterclockwise 1/2 of a turn . b. b Using the hex key, turn ; wise, 1/4 of a turn . Be careful not to keep the walk- If the walking belt slips when walked on the treadmill for a few minutes. rectly tightened, you should be able to 3 in - PROBLEM: The walking belt...
User Manual
Page 25
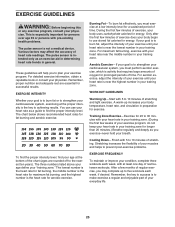
... of your exercise program, do not keep your heart rate in your training zone. For aerobic exercise, adjust the intensity of stretching and light exercise. This is the key to prevent post-exercise problems. EXERCISE FREQUENCY To maintain or improve your condition, complete three workouts each week, if desired. The pulse sensor is not a medical device. For maximum fat burning, exercise with pre-existing health problems. The pulse sensor is...
... of your exercise program, do not keep your heart rate in your training zone. For aerobic exercise, adjust the intensity of stretching and light exercise. This is the key to prevent post-exercise problems. EXERCISE FREQUENCY To maintain or improve your condition, complete three workouts each week, if desired. The pulse sensor is not a medical device. For maximum fat burning, exercise with pre-existing health problems. The pulse sensor is...
User Manual
Page 32
... that specifically set forth herein. ICON Health & Fitness, Inc., 1500 S. 1000 W., Logan, UT 84321-9813 Part No. 292810 R0110A Printed in USA © 2010 ICON IP, Inc. The drive motor is authorized by ICON. This warranty extends only to products transported or purchased outside the US. All repairs for which warranty claims are warranted for one of its authorized service centers. For in-home service, the...
... that specifically set forth herein. ICON Health & Fitness, Inc., 1500 S. 1000 W., Logan, UT 84321-9813 Part No. 292810 R0110A Printed in USA © 2010 ICON IP, Inc. The drive motor is authorized by ICON. This warranty extends only to products transported or purchased outside the US. All repairs for which warranty claims are warranted for one of its authorized service centers. For in-home service, the...


