
English Manual
Page 5
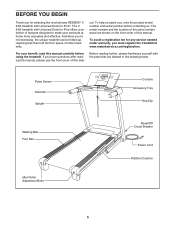
... assist you, note the product model number and serial number before using the treadmill. To avoid a registration fee for any service needed under warranty, you must register the treadmill at home more enjoyable and effective. For your workouts at www.reebokservice.com/...Roller Adjustment Bolts Reset/Off Circuit Breaker Power Cord Platform Cushion 5 The V 6.80 treadmill with Universal Dock for iPod®. BEFORE YOU BEGIN Thank you for selecting the revolutionary REEBOK® V 6.80 treadmill with Universal Dock for iPod offers a selection of features designed to make your ...
... assist you, note the product model number and serial number before using the treadmill. To avoid a registration fee for any service needed under warranty, you must register the treadmill at home more enjoyable and effective. For your workouts at www.reebokservice.com/...Roller Adjustment Bolts Reset/Off Circuit Breaker Power Cord Platform Cushion 5 The V 6.80 treadmill with Universal Dock for iPod®. BEFORE YOU BEGIN Thank you for selecting the revolutionary REEBOK® V 6.80 treadmill with Universal Dock for iPod offers a selection of features designed to make your ...
English Manual
Page 8
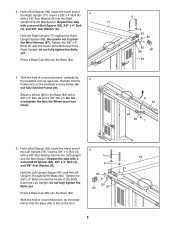
... the Right Upright (77) against the Base (84). Tighten the 3/8" x 4" Bolts (4) until the heads of a second person, carefully tip the treadmill onto its right side. Press a Base Cap (80) into the Base (84). Insert a 3/8" x 4" Bolt (4) 6 with a 3/8" Star Washer (8) into the Left Upright 4 and the Bolt ...; With the help of the Left Upright (78). Partially fold the 5 Frame (52) so the treadmill is flat on the floor. 8 Do not overtighten the Nut; the Wheel must turn freely. 4 8 87 82 82 80 88 84 6 52 84 85 7 6. Repeat this step 77 with a second Bolt Spacer (82),...
... the Right Upright (77) against the Base (84). Tighten the 3/8" x 4" Bolts (4) until the heads of a second person, carefully tip the treadmill onto its right side. Press a Base Cap (80) into the Base (84). Insert a 3/8" x 4" Bolt (4) 6 with a 3/8" Star Washer (8) into the Left Upright 4 and the Bolt ...; With the help of the Left Upright (78). Partially fold the 5 Frame (52) so the treadmill is flat on the floor. 8 Do not overtighten the Nut; the Wheel must turn freely. 4 8 87 82 82 80 88 84 6 52 84 85 7 6. Repeat this step 77 with a second Bolt Spacer (82),...


