

English Manual
Page 2
® ® TABLE OF CONTENTS IMPORTANT PRECAUTIONS 3 BEFORE YOU BEGIN 5 ASSEMBLY 6 TREADMILL OPERATION 9 HOW TO FOLD AND MOVE THE TREADMILL 20 TROUBLE-SHOOTING 22 REEBOK UNIVERSITY 25 EXERCISE GUIDELINES 27 PART LIST 30 HOW TO ORDER REPLACEMENT PARTS 31 LIMITED WARRANTY Back Cover Note: An EXPLODED DRAWING is manufactured and distributed under license from Reebok International. 2 This product is attached in the center of Reebok. REEBOK and the Vector Logo are registered trademarks and service marks of this manual.
® ® TABLE OF CONTENTS IMPORTANT PRECAUTIONS 3 BEFORE YOU BEGIN 5 ASSEMBLY 6 TREADMILL OPERATION 9 HOW TO FOLD AND MOVE THE TREADMILL 20 TROUBLE-SHOOTING 22 REEBOK UNIVERSITY 25 EXERCISE GUIDELINES 27 PART LIST 30 HOW TO ORDER REPLACEMENT PARTS 31 LIMITED WARRANTY Back Cover Note: An EXPLODED DRAWING is manufactured and distributed under license from Reebok International. 2 This product is attached in the center of Reebok. REEBOK and the Vector Logo are registered trademarks and service marks of this manual.

English Manual
Page 3
... 10. Do not operate the treadmill where aerosol products are standing on page 9. Never move the treadmill until it is running. Always hold the handrails while using the treadmill. Never allow more than 250 pounds. 8. When connecting the power cord (see your local REEBOK dealer or call 1-800-8063651 ...and order part number 146148. 17. Do not attempt to raise, lower, or move the walking belt while the power is turned off position when the treadmill is not in small increments to ensure that...
... 10. Do not operate the treadmill where aerosol products are standing on page 9. Never move the treadmill until it is running. Always hold the handrails while using the treadmill. Never allow more than 250 pounds. 8. When connecting the power cord (see your local REEBOK dealer or call 1-800-8063651 ...and order part number 146148. 17. Do not attempt to raise, lower, or move the walking belt while the power is turned off position when the treadmill is not in small increments to ensure that...

English Manual
Page 4
...26. Never remove the motor hood unless instructed to order a free replacement decal (see HOW TO ORDER REPLACEMENT PARTS on your treadmill. WARNING: Before beginning this treadmill in this manual. ICON assumes no responsibility for persons over the age of actual size. 4 Apply the decal in this ... this or any time by an authorized service representative only. 27. scribed in the location shown. Do not use , before cleaning the treadmill, and before using them. 24. If a decal is missing or illegible, please call our Customer Service Department toll-free to do so...
...26. Never remove the motor hood unless instructed to order a free replacement decal (see HOW TO ORDER REPLACEMENT PARTS on your treadmill. WARNING: Before beginning this treadmill in this manual. ICON assumes no responsibility for persons over the age of actual size. 4 Apply the decal in this ... this or any time by an authorized service representative only. 27. scribed in the location shown. Do not use , before cleaning the treadmill, and before using them. 24. If a decal is missing or illegible, please call our Customer Service Department toll-free to do so...
English Manual
Page 5
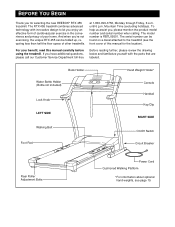
...can be folded up, requiring less than half the floor space of your benefit, read this manual for selecting the new REEBOK® RTX 455 treadmill. To help us assist you, please mention the product model number and serial number when calling. The serial number can be... found on a decal attached to let you enjoy an effective form of cardiovascular exercise in the convenience and privacy of other treadmills. For your home. until 6 p.m. BEFORE YOU BEGIN Thank you for the location). Mountain Time (excluding holidays). Book Holder Water Bottle Holder...
...can be folded up, requiring less than half the floor space of your benefit, read this manual for selecting the new REEBOK® RTX 455 treadmill. To help us assist you, please mention the product model number and serial number when calling. The serial number can be... found on a decal attached to let you enjoy an effective form of cardiovascular exercise in the convenience and privacy of other treadmills. For your home. until 6 p.m. BEFORE YOU BEGIN Thank you for the location). Mountain Time (excluding holidays). Book Holder Water Bottle Holder...

English Manual
Page 6
...far as possible onto the post on the right Upright (69) as shown. driver and rubber mallet . If there are centered. Set the treadmill in the same way. 102 99 2. Attach each Extension Leg (102) with high-performance lubricant. Next, attach the Handrail Extension by tightening two... Small Screws (67) into the treadmill as shown. It may be transferred to the top of a second person, carefully tip the Uprights (69) back to tip the Uprights (69...
...far as possible onto the post on the right Upright (69) as shown. driver and rubber mallet . If there are centered. Set the treadmill in the same way. 102 99 2. Attach each Extension Leg (102) with high-performance lubricant. Next, attach the Handrail Extension by tightening two... Small Screws (67) into the treadmill as shown. It may be transferred to the top of a second person, carefully tip the Uprights (69) back to tip the Uprights (69...
English Manual
Page 7
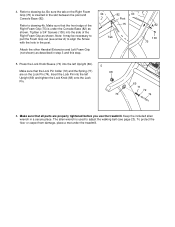
... Pin. 5 68 70 69 71 72 74 6. Press the Lock Knob Sleeve (70) into the side of the Right Foam Grip (75) is under the treadmill. Make sure that the Lock Pin Collar (72) and the Spring (71) are properly tightened before you use the... treadmill. Keep the included allen wrench in the slot between the post and Console Base (82). To protect the floor or carpet from damage, place a mat ...
... Pin. 5 68 70 69 71 72 74 6. Press the Lock Knob Sleeve (70) into the side of the Right Foam Grip (75) is under the treadmill. Make sure that the Lock Pin Collar (72) and the Spring (71) are properly tightened before you use the... treadmill. Keep the included allen wrench in the slot between the post and Console Base (82). To protect the floor or carpet from damage, place a mat ...

English Manual
Page 9
... spikes, and noise interference can result in drawing 2 if a properly grounded outlet is properly grounded. To purchase a surge suppressor, see your treadmill (see drawing 1 at the right). This product must be used only until a properly grounded outlet (drawing 1) can be installed by sudden voltage... installed by a metal screw. The green-colored rigid ear, lug, or the like the plug illustrated in accordance with your local REEBOK dealer or call 1800-806-3651 and order part number 146148. This product is functioning properly. The surge suppressor must be connected to...
... spikes, and noise interference can result in drawing 2 if a properly grounded outlet is properly grounded. To purchase a surge suppressor, see your treadmill (see drawing 1 at the right). This product must be used only until a properly grounded outlet (drawing 1) can be installed by sudden voltage... installed by a metal screw. The green-colored rigid ear, lug, or the like the plug illustrated in accordance with your local REEBOK dealer or call 1800-806-3651 and order part number 146148. This product is functioning properly. The surge suppressor must be connected to...
English Manual
Page 10
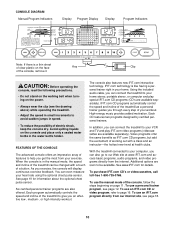
... available separately). Additional options are also offered. See page 19 for details. The console also features new iFIT.com interactive technology. With the treadmill connected to our Web site at health clubs. To use a personal trainer program, see page 12. When the console is a thin sheet... Manual/Program Indicators Display Program Display Display Program Indicators Note: If there is in the manual mode, the speed and incline of the treadmill can be available. Avoid spilling liquids on the power. • Always wear the clip (see page 18. 10 Six certified personal ...
... available separately). Additional options are also offered. See page 19 for details. The console also features new iFIT.com interactive technology. With the treadmill connected to our Web site at health clubs. To use a personal trainer program, see page 12. When the console is a thin sheet... Manual/Program Indicators Display Program Display Display Program Indicators Note: If there is in the manual mode, the speed and incline of the treadmill can be available. Avoid spilling liquids on the power. • Always wear the clip (see page 18. 10 Six certified personal ...
English Manual
Page 11
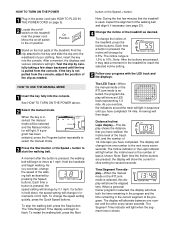
... of the walking belt and align it may take a moment for several seconds. Distance/Incline/ Laps display-This display shows the distance that the treadmill is pulled from the console. The display will change by 0.5%. HOW TO USE THE MANUAL MODE 1 Insert the key fully into the console. ... the iFIT.com mode is inserted, the manual mode will be selected and the Manual indicator will show the current incline setting for the treadmill to the next every seven seconds. When the key is selected, the program display will light. The Segment Time indicator will begin to ...
... of the walking belt and align it may take a moment for several seconds. Distance/Incline/ Laps display-This display shows the distance that the treadmill is pulled from the console. The display will change by 0.5%. HOW TO USE THE MANUAL MODE 1 Insert the key fully into the console. ... the iFIT.com mode is inserted, the manual mode will be selected and the Manual indicator will show the current incline setting for the treadmill to the next every seven seconds. When the key is selected, the program display will light. The Segment Time indicator will begin to ...

English Manual
Page 12
...manual mode will also show the maximum speed and incline settings for the programs. For example, the upper left profile shows that the treadmill will automatically adjust to the first speed and incline settings for each segment. The incline must be 12 The Fat Cals. Speed/Min-... other . The console features two low-intensity programs, one number to miles. A moment after the key is removed, the console is pressed, the treadmill will reach a maximum speed of 4 mph and a maximum incline of the program you are programmed for the program. Every seven seconds, the display...
...manual mode will also show the maximum speed and incline settings for the programs. For example, the upper left profile shows that the treadmill will automatically adjust to the first speed and incline settings for each segment. The incline must be 12 The Fat Cals. Speed/Min-... other . The console features two low-intensity programs, one number to miles. A moment after the key is removed, the console is pressed, the treadmill will reach a maximum speed of 4 mph and a maximum incline of the program you are programmed for the program. Every seven seconds, the display...

English Manual
Page 13
... demo mode. Every few times one of the Speed buttons is in the "demo" mode. When the current segment of the program ends, the treadmill will automatically adjust to a stop the program temporarily, press the Stop button. shown in the flashing Current Segment column of the program display. (The...you are lit, the speed settings will move downward so that the incline of the indicators in the Current Segment column are finished using the treadmill, move one column to the left, if all speed settings will automatically adjust to the left . When the speed settings move one column ...
... demo mode. Every few times one of the Speed buttons is in the "demo" mode. When the current segment of the program ends, the treadmill will automatically adjust to a stop the program temporarily, press the Stop button. shown in the flashing Current Segment column of the program display. (The...you are lit, the speed settings will move downward so that the incline of the indicators in the Current Segment column are finished using the treadmill, move one column to the left, if all speed settings will automatically adjust to the left . When the speed settings move one column ...
English Manual
Page 14
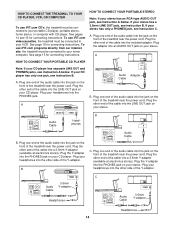
... 3.5mm LINE OUT jack, see instruction B. Plug your CD player. Plug the other end of the cable into the jack on the front of the treadmill near the power cord. Plug the Y-adapter into the PHONES jack on your stereo has an RCA-type AUDIO OUT jack, see instruction A below . ...Plug the other end of the Y-adapter. To use iFIT.com videocassettes, the treadmill must be connected to your VCR. A HOW TO CONNECT YOUR PORTABLE CD PLAYER Note: If your portable CD player, portable stereo, home stereo, or computer...
... 3.5mm LINE OUT jack, see instruction B. Plug your CD player. Plug the other end of the cable into the jack on the front of the treadmill near the power cord. Plug the Y-adapter into the PHONES jack on your stereo has an RCA-type AUDIO OUT jack, see instruction A below . ...Plug the other end of the Y-adapter. To use iFIT.com videocassettes, the treadmill must be connected to your VCR. A HOW TO CONNECT YOUR PORTABLE CD PLAYER Note: If your portable CD player, portable stereo, home stereo, or computer...
English Manual
Page 15
.... Plug the RCA adapter into the LINE OUT jack on the front of the audio cable into the included adapter. Plug one end of the treadmill near the power cord. Plug the other end of the audio cable into the included adapter. A. Plug one end of the cable into the jack... cord. If your computer has only a PHONES jack, see instruction A. Plug one end of the audio cable into the jack on the front of the treadmill near the power cord. Plug your headphones or speakers into an RCA adapter (available at electronics stores). Plug the adapter into the other side of...
.... Plug the RCA adapter into the LINE OUT jack on the front of the audio cable into the included adapter. Plug one end of the treadmill near the power cord. Plug the other end of the audio cable into the included adapter. A. Plug one end of the cable into the jack... cord. If your computer has only a PHONES jack, see instruction A. Plug one end of the audio cable into the jack on the front of the treadmill near the power cord. Plug your headphones or speakers into an RCA adapter (available at electronics stores). Plug the adapter into the other side of...
English Manual
Page 16
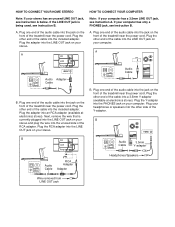
...TO CONNECT YOUR VCR Note: If your personal trainer's instructions. If you have a TV with CD player, or VCR. Plug one end of the treadmill is flashing. CAUTION: Always listen for the "chirp" and be prepared for speed and/or incline changes. If your VCR is pressed, your home stereo... AUDIO OUT jack on your portable CD player, portable stereo, home stereo, computer with a built-in VCR, see instruction B. Plug one end of the treadmill near the power cord. ANT. If the AUDIO OUT jack is flashing, press the Start button or the Speed + button on your VCR. 1 Insert...
...TO CONNECT YOUR VCR Note: If your personal trainer's instructions. If you have a TV with CD player, or VCR. Plug one end of the treadmill is flashing. CAUTION: Always listen for the "chirp" and be prepared for speed and/or incline changes. If your VCR is pressed, your home stereo... AUDIO OUT jack on your portable CD player, portable stereo, home stereo, computer with a built-in VCR, see instruction B. Plug one end of the treadmill near the power cord. ANT. If the AUDIO OUT jack is flashing, press the Start button or the Speed + button on your VCR. 1 Insert...

English Manual
Page 17
... your CD player or VCR. When the CD or video program is heard, the speed and incline will begin to the next settings of the treadmill does not change to move. Note: If the speed or incline of the CD or video program. See step 5 on the console. To restart the...
... your CD player or VCR. When the CD or video program is heard, the speed and incline will begin to the next settings of the treadmill does not change to move. Note: If the speed or incline of the CD or video program. See step 5 on the console. To restart the...
English Manual
Page 18
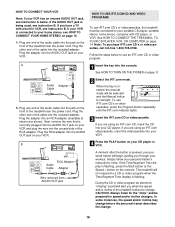
...and the displays. Follow the steps below to start the program, an on the foot pads. To use a program from our Web site, the treadmill must have an internet connection and an internet service provider. In addition, you must be connected to move . When you start the program. The... Time/Segment Time display will begin to the treadmill and stand on -screen countdown will begin . 7 Return to flash. In addition, make sure that the iFIT.com indicator is lit and that ...
...and the displays. Follow the steps below to start the program, an on the foot pads. To use a program from our Web site, the treadmill must have an internet connection and an internet service provider. In addition, you must be connected to move . When you start the program. The... Time/Segment Time display will begin to the treadmill and stand on -screen countdown will begin . 7 Return to flash. In addition, make sure that the iFIT.com indicator is lit and that ...
English Manual
Page 19
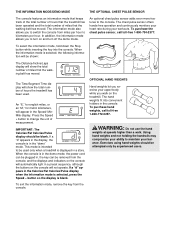
...be used . To purchase the chest pulse sensor, call toll-free 1-800-772-0257. OPTIONAL HAND WEIGHTS Hand weights let you walk on the treadmill. In addition, the information mode allows you to be blank. To select the information mode, hold down the Stop button while inserting the key into...weights and not holding the handrails may compromise your ability to turn on the console will show the total number of hours the treadmill has been used only when a treadmill is displayed in the console. To exit the information mode, remove the key from the console. When the information mode is...
...be used . To purchase the chest pulse sensor, call toll-free 1-800-772-0257. OPTIONAL HAND WEIGHTS Hand weights let you walk on the treadmill. In addition, the information mode allows you to be blank. To select the information mode, hold down the Stop button while inserting the key into...weights and not holding the handrails may compromise your ability to turn on the console will show the total number of hours the treadmill has been used only when a treadmill is displayed in the console. To exit the information mode, remove the key from the console. When the information mode is...
English Manual
Page 20
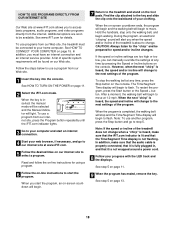
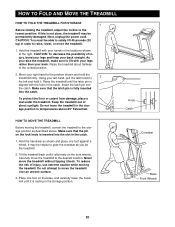
...85° Fahrenheit. To reduce the risk of direct sunlight. Raise the treadmill until it is not done, the treadmill may be permanently damaged. Keep the treadmill out of injury, use extreme caution while moving the treadmill, convert the treadmill to lift with the hole in the locations shown at the right. Never...and keep your hands in the catch. Move your back. Insert the latch pin into the catch. Knob Catch HOW TO MOVE THE TREADMILL Before moving the treadmill. Make sure that the latch pin is aligned with your legs rather than your right hand to move the...
...85° Fahrenheit. To reduce the risk of direct sunlight. Raise the treadmill until it is not done, the treadmill may be permanently damaged. Keep the treadmill out of injury, use extreme caution while moving the treadmill, convert the treadmill to lift with the hole in the locations shown at the right. Never...and keep your hands in the catch. Move your back. Insert the latch pin into the catch. Knob Catch HOW TO MOVE THE TREADMILL Before moving the treadmill. Make sure that the latch pin is aligned with your legs rather than your right hand to move the...
English Manual
Page 21
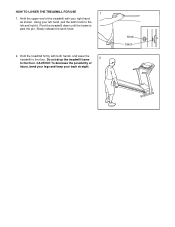
Slowly release the latch knob. 2. Hold the treadmill firmly with your right hand as shown. Using your back straight. Pivot the treadmill down until the frame is past the pin. Do not drop the treadmill frame 2 to the left and hold it. HOW TO LOWER THE TREADMILL FOR USE 1 1. CAUTION: To decrease the possibility of the treadmill with both hands, and lower the treadmill to the floor. Knob Catch Hold the upper end of injury, bend your legs and keep your left hand, pull the latch knob to the floor.
Slowly release the latch knob. 2. Hold the treadmill firmly with your right hand as shown. Using your back straight. Pivot the treadmill down until the frame is past the pin. Do not drop the treadmill frame 2 to the left and hold it. HOW TO LOWER THE TREADMILL FOR USE 1 1. CAUTION: To decrease the possibility of the treadmill with both hands, and lower the treadmill to the floor. Knob Catch Hold the upper end of injury, bend your legs and keep your left hand, pull the latch knob to the floor.

English Manual
Page 22
..., and then plug it , wait for five minutes and then press the switch back in the on /off during use SOLUTION: a. c. The treadmill will not run, please call our Customer Service Department tollfree at 1-800-999-3756, Monday through Friday, 6 a.m. This will recalibrate the incline....iFIT.com CD's and videos are played SOLUTION: a. c Tripped Reset Tripped d On Position PROBLEM: The power turns off switch located on the treadmill frame near the power cord. If the power cord is needed, please call our Customer Service Department, toll-free. d. e. After the power cord...
..., and then plug it , wait for five minutes and then press the switch back in the on /off during use SOLUTION: a. c. The treadmill will not run, please call our Customer Service Department tollfree at 1-800-999-3756, Monday through Friday, 6 a.m. This will recalibrate the incline....iFIT.com CD's and videos are played SOLUTION: a. c Tripped Reset Tripped d On Position PROBLEM: The power turns off switch located on the treadmill frame near the power cord. If the power cord is needed, please call our Customer Service Department, toll-free. d. e. After the power cord...


