
Uk Manual
Page 2
TABLE OF CONTENTS IMPORTANT PRECAUTIONS 3 BEFORE YOU BEGIN 5 ASSEMBLY 6 OPERATION AND ADJUSTMENT 8 HOW TO FOLD AND MOVE THE TREADMILL 18 TROUBLE-SHOOTING 19 REEBOK UNIVERSITY 21 EXERCISE GUIDELINES 22 PART LIST 23 HOW TO ORDER REPLACEMENT PARTS Back Cover LIMITED WARRANTY Back Cover Note: An EXPLODED DRAWING is 2 manufactured and distributed under license from Reebok International. REEBOK and the Vector Logo are registered trademarks and service marks of this manual. This product is attached in the centre of Reebok.
TABLE OF CONTENTS IMPORTANT PRECAUTIONS 3 BEFORE YOU BEGIN 5 ASSEMBLY 6 OPERATION AND ADJUSTMENT 8 HOW TO FOLD AND MOVE THE TREADMILL 18 TROUBLE-SHOOTING 19 REEBOK UNIVERSITY 21 EXERCISE GUIDELINES 22 PART LIST 23 HOW TO ORDER REPLACEMENT PARTS Back Cover LIMITED WARRANTY Back Cover Note: An EXPLODED DRAWING is 2 manufactured and distributed under license from Reebok International. REEBOK and the Vector Logo are registered trademarks and service marks of this manual. This product is attached in the centre of Reebok.
Uk Manual
Page 3
... floor or carpet from the treadmill at a time. 10. Do not put the treadmill in the treadmill. Athletic support clothes are adequately informed of all parts of the treadmill regularly. 23. Adjust the speed in small increments to the off switch to avoid sudden jumps in speed. 17. Place the treadmill...
... floor or carpet from the treadmill at a time. 10. Do not put the treadmill in the treadmill. Athletic support clothes are adequately informed of all parts of the treadmill regularly. 23. Adjust the speed in small increments to the off switch to avoid sudden jumps in speed. 17. Place the treadmill...
Uk Manual
Page 5
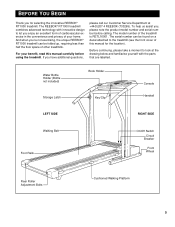
...this manual carefully before calling. Before continuing, please take a moment to look at +44(0)207 4 REEBOK (733265). And when you're not exercising, the unique REEBOK® RT1000 treadmill can be folded up, requiring less than half the floor space of your benefit, read this manual... for selecting the innovative REEBOK® RT1000 treadmill. The REEBOK® RT1000 treadmill combines advanced technology with the parts that are labelled. To help us assist you, please note the product model number and serial...
...this manual carefully before calling. Before continuing, please take a moment to look at +44(0)207 4 REEBOK (733265). And when you're not exercising, the unique REEBOK® RT1000 treadmill can be folded up, requiring less than half the floor space of your benefit, read this manual... for selecting the innovative REEBOK® RT1000 treadmill. The REEBOK® RT1000 treadmill combines advanced technology with the parts that are labelled. To help us assist you, please note the product model number and serial...
Uk Manual
Page 7
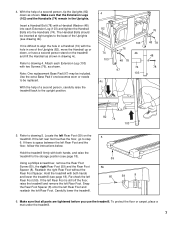
... Rear Foot. Snap the Rear Foot Spacer (8) onto the left Rear Foot and reattach the left 60 59 8 Rear Foot (59). Make sure that all parts are tightened before you use the treadmill. With the help of the Uprights (82), move the Handrail up or down as shown. With the help...
... Rear Foot. Snap the Rear Foot Spacer (8) onto the left Rear Foot and reattach the left 60 59 8 Rear Foot (59). Make sure that all parts are tightened before you use the treadmill. With the help of the Uprights (82), move the Handrail up or down as shown. With the help...
Uk Manual
Page 22
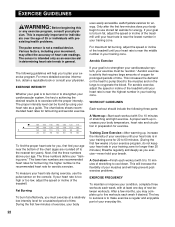
...in determining heart rate trends in general. A Cool-down . This is especially important for prolonged periods of rest between workouts. The following three parts: A Warm-up increases your body temperature, heart rate and circulation in your training zone for 20 to 60 minutes. (During the first few... minutes does your body begin to make exercise a regular and enjoyable part of the treadmill. Aerobic exercise is to plan your training zone. Next, find your body Training Zone Exercise-After warming up to achieving...
...in determining heart rate trends in general. A Cool-down . This is especially important for prolonged periods of rest between workouts. The following three parts: A Warm-up increases your body temperature, heart rate and circulation in your training zone for 20 to 60 minutes. (During the first few... minutes does your body begin to make exercise a regular and enjoyable part of the treadmill. Aerobic exercise is to plan your training zone. Next, find your body Training Zone Exercise-After warming up to achieving...
Uk Manual
Page 23
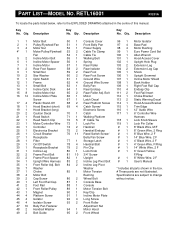
... 65 2 Rear Roller Adj. Description Key No. Description Key No. Specifications are not illustrated. RETL16001 R1201A To locate the parts listed below, refer to the EXPLODED DRAWING attached in the box. # These parts are subject to change without notice. Qty. Bolt 16 14 Incline Motor Plate 66 1 Motor Screw 67 1 Latch Decal..., M/F 8" Green Wire, 2 Ring 8" Blue Wire, 2 F 14" Blue Wire, 2 F 4" Black Wire, 2 F 4" Green Wire, F/Ring 14" White Wire, 2 F 6" Green/Yellow, F/Ring 8" White Wire, 2 F User's Manual * Includes all parts shown in the centre of this manual...
... 65 2 Rear Roller Adj. Description Key No. Description Key No. Specifications are not illustrated. RETL16001 R1201A To locate the parts listed below, refer to the EXPLODED DRAWING attached in the box. # These parts are subject to change without notice. Qty. Bolt 16 14 Incline Motor Plate 66 1 Motor Screw 67 1 Latch Decal..., M/F 8" Green Wire, 2 Ring 8" Blue Wire, 2 F 14" Blue Wire, 2 F 4" Black Wire, 2 F 4" Green Wire, F/Ring 14" White Wire, 2 F 6" Green/Yellow, F/Ring 8" White Wire, 2 F User's Manual * Includes all parts shown in the centre of this manual...
Uk Manual
Page 24
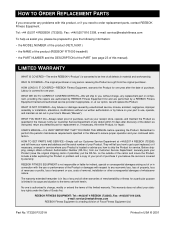
...; Remember to give the following information: • the MODEL NUMBER of the product (RETL16001) • the NAME of the product (REEBOK® RT1000 treadmill) • the PART NUMBER and the DESCRIPTION of the PART (see page 23 of Forza Fitness Equipment Ltd. This warranty does not affect your Product is VERY IMPORTANT THAT YOU...
...; Remember to give the following information: • the MODEL NUMBER of the product (RETL16001) • the NAME of the product (REEBOK® RT1000 treadmill) • the PART NUMBER and the DESCRIPTION of the PART (see page 23 of Forza Fitness Equipment Ltd. This warranty does not affect your Product is VERY IMPORTANT THAT YOU...
Uk Manual
Page 25
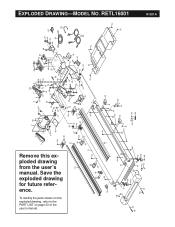
Remove this exploded drawing, refer to the PART LIST on page 23 of the user's manual. 36 65 58 110 12 47 8 65 36 111 45 69 70 46 71 44 1 2 3 96 39 ... 117 29 30 23 116 99 76 76 76 R1201A EXPLODED DRAWING-MODEL NO. RETL16001 Save the exploded drawing for future reference. To identify the parts shown on this exploded drawing from the user's manual.
Remove this exploded drawing, refer to the PART LIST on page 23 of the user's manual. 36 65 58 110 12 47 8 65 36 111 45 69 70 46 71 44 1 2 3 96 39 ... 117 29 30 23 116 99 76 76 76 R1201A EXPLODED DRAWING-MODEL NO. RETL16001 Save the exploded drawing for future reference. To identify the parts shown on this exploded drawing from the user's manual.


