
English Manual
Page 2
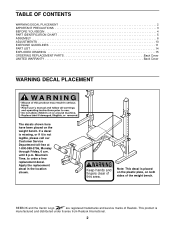
... at 1-800-999-3756, Monday through Friday, 6 a.m. Mountain Time, to order a free replacement decal. Note: This decal is placed on the plastic plate, on the weight bench. until 6 p.m. Keep hands and fingers clear of the weight bench. REEBOK and the Vector Logo are registered trademarks and service marks of...
... at 1-800-999-3756, Monday through Friday, 6 a.m. Mountain Time, to order a free replacement decal. Note: This decal is placed on the plastic plate, on the weight bench. until 6 p.m. Keep hands and fingers clear of the weight bench. REEBOK and the Vector Logo are registered trademarks and service marks of...
English Manual
Page 3
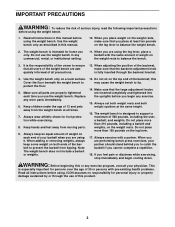
...consult your partner should stand behind you to prevent the barbell from moving parts. 9. The weight bench is fully inserted through the use the weight bench. Do not use only. Use the weight bench only on the top end of the backrest; Keep hands and feet away from tipping. When...When you are using the leg lever, place a barbell with pre-existing health problems. Read all instructions in this manual before using the weight bench. 1. When you feel pain or dizziness while exercising, stop immediately and begin any worn parts immediately. 6. Read all instructions before you ...
...consult your partner should stand behind you to prevent the barbell from moving parts. 9. The weight bench is fully inserted through the use the weight bench. Do not use only. Use the weight bench only on the top end of the backrest; Keep hands and feet away from tipping. When...When you are using the leg lever, place a barbell with pre-existing health problems. Read all instructions in this manual before using the weight bench. 1. When you feel pain or dizziness while exercising, stop immediately and begin any worn parts immediately. 6. Read all instructions before you ...
English Manual
Page 4
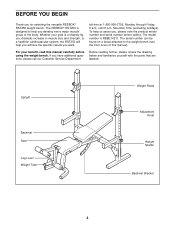
The model number is designed to the weight bench (see the front cover of the body. BEFORE YOU BEGIN Thank you want. The REEBOK® RST250 is RBBE14211. Mountain Time (excluding holidays). For your goal is a shapely figure, dramatic increase in muscle size and ...strength, or a healthier cardiovascular system, the RST250 will help you achieve the specific results you for selecting the versatile REEBOK® RST250 weight bench. Whether your benefit, read this manual). To help you develop every major muscle group of this manual carefully before calling. If...
The model number is designed to the weight bench (see the front cover of the body. BEFORE YOU BEGIN Thank you want. The REEBOK® RST250 is RBBE14211. Mountain Time (excluding holidays). For your goal is a shapely figure, dramatic increase in muscle size and ...strength, or a healthier cardiovascular system, the RST250 will help you achieve the specific results you for selecting the versatile REEBOK® RST250 weight bench. Whether your benefit, read this manual). To help you develop every major muscle group of this manual carefully before calling. If...
English Manual
Page 6
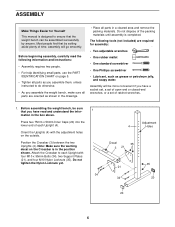
...x 50mm Inner Caps (20) into the lower end of ratchet wrenches. 1. Assembly will go smoothly. Most people find that you assemble the weight bench, make sure all parts in a cleared area and remove the packing materials. Do not tighten the Nylon Locknuts yet. 34 Adjustment 4 Holes ... drawings. • Place all parts are required for Yourself This manual is designed to ensure that the weight bench can be sure 1 that by anyone. Before assembling the weight bench, be assembled successfully by setting aside plenty of the packing materials until assembly is in the box above...
...x 50mm Inner Caps (20) into the lower end of ratchet wrenches. 1. Assembly will go smoothly. Most people find that you assemble the weight bench, make sure all parts in a cleared area and remove the packing materials. Do not tighten the Nylon Locknuts yet. 34 Adjustment 4 Holes ... drawings. • Place all parts are required for Yourself This manual is designed to ensure that the weight bench can be sure 1 that by anyone. Before assembling the weight bench, be assembled successfully by setting aside plenty of the packing materials until assembly is in the box above...

English Manual
Page 9
... Seat 10 Frame (6) using two M6 x 16mm Bolts (31). Attach the Left Weight Rest (12) to the Upright in the Left Weight Spotter (11) out as far as it is tight. Make sure that both Weight Rests (12, 44) and both Weight Spotters (11, 45) are properly tightened before you use of the Upright... 10. 7 6 31 19 39 16 12 18 16 11 18 16 17 4 Adjustment Hole 9 The use the weight bench. Attach the other end of the Left Weight Rest (12) and the Left Weight Spotter (11). Slide the Weight Spotter over the left Upright (4). Turn the Knob clockwise until it will be explained in the Upright...
... Seat 10 Frame (6) using two M6 x 16mm Bolts (31). Attach the Left Weight Rest (12) to the Upright in the Left Weight Spotter (11) out as far as it is tight. Make sure that both Weight Rests (12, 44) and both Weight Spotters (11, 45) are properly tightened before you use of the Upright... 10. 7 6 31 19 39 16 12 18 16 11 18 16 17 4 Adjustment Hole 9 The use the weight bench. Attach the other end of the Left Weight Rest (12) and the Left Weight Spotter (11). Slide the Weight Spotter over the left Upright (4). Turn the Knob clockwise until it will be explained in the Upright...
English Manual
Page 10
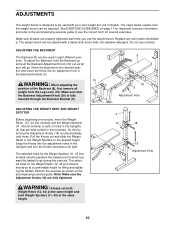
...until tight. Note: Make sure the Adjustment Knobs (18) are properly tightened each time you want the barbell to go . Do not use the weight bench. To adjust the Backrest, hold the Backrest up and pull the Backrest Adjustment Knob (30) out as far as shown on page 11 for important... 12 18 18 Adjustment Hole 11 10 The steps below explain how the weight bench can be cleaned with your own weight set both Weight Rests (12, 44) at the same height and both Weight Spotters (11, 45) at a comfortable height for the Weight Spotters (11, 45 [not shown]) should represent the lowest point to ...
...until tight. Note: Make sure the Adjustment Knobs (18) are properly tightened each time you want the barbell to go . Do not use the weight bench. To adjust the Backrest, hold the Backrest up and pull the Backrest Adjustment Knob (30) out as far as shown on page 11 for important... 12 18 18 Adjustment Hole 11 10 The steps below explain how the weight bench can be cleaned with your own weight set both Weight Rests (12, 44) at the same height and both Weight Spotters (11, 45) at a comfortable height for the Weight Spotters (11, 45 [not shown]) should represent the lowest point to ...
English Manual
Page 16
... to be prepared to give the following information when calling: • The MODEL NUMBER of the product (RBBE14211) • The NAME of the product (REEBOK® RST250 weight bench) • The SERIAL NUMBER of the product (see the PART LIST and the EXPLODED DRAWING on how long an implied warranty lasts. All products...
... to be prepared to give the following information when calling: • The MODEL NUMBER of the product (RBBE14211) • The NAME of the product (REEBOK® RST250 weight bench) • The SERIAL NUMBER of the product (see the PART LIST and the EXPLODED DRAWING on how long an implied warranty lasts. All products...
