
English Manual
Page 3
...support clothes are standing on the treadmill at least 8 ft. (2.4 m) of all of 16. Never use an extension cord. 12. structions in general. 3 carrying 15 or more than one person on the walking belt. To purchase a surge suppressor, see your local Reebok dealer or call the telephone ...number on a level surface, with bare feet, wearing only stockings, or in speed. 19. Keep children under the treadmill. 5. Read, understand, and test the emergency...
...support clothes are standing on the treadmill at least 8 ft. (2.4 m) of all of 16. Never use an extension cord. 12. structions in general. 3 carrying 15 or more than one person on the walking belt. To purchase a surge suppressor, see your local Reebok dealer or call the telephone ...number on a level surface, with bare feet, wearing only stockings, or in speed. 19. Keep children under the treadmill. 5. Read, understand, and test the emergency...

English Manual
Page 5
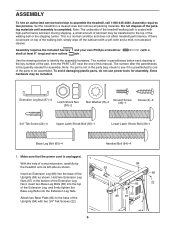
... to make your workouts at www.reebokservice.com/registration. ual. To avoid a registration fee for selecting the revolutionary REEBOK® 8050 ES treadmill. To help us . Fan Dumbbell/Water Bottle Holder* Handgrip Pulse Sensor Upright Walking Belt Foot Rail Console Key/Clip Handrail Reset/Off Circuit Breaker Power Cord Platform Cushion Rear Roller Adjustment Bolts...
... to make your workouts at www.reebokservice.com/registration. ual. To avoid a registration fee for selecting the revolutionary REEBOK® 8050 ES treadmill. To help us . Fan Dumbbell/Water Bottle Holder* Handgrip Pulse Sensor Upright Walking Belt Foot Rail Console Key/Clip Handrail Reset/Off Circuit Breaker Power Cord Platform Cushion Rear Roller Adjustment Bolts...
English Manual
Page 6
Note: The underside of the treadmill walking belt is coated with a Use the drawings below each drawing is preattached ...there is not in parentheses below to identify the assembly hardware. Extra hardware may be transferred to assemble the treadmill, call 1-800-445-2480. Make sure that the power cord is completed. Handrail Bolt (64)-4 84 ...Nuts. Assembly requires two persons. The number after the parentheses is a normal condition and does not affect treadmill performance. To avoid damaging plastic parts, do not use power tools for assembly. ASSEMBLY To hire an authorized...
Note: The underside of the treadmill walking belt is coated with a Use the drawings below each drawing is preattached ...there is not in parentheses below to identify the assembly hardware. Extra hardware may be transferred to assemble the treadmill, call 1-800-445-2480. Make sure that the power cord is completed. Handrail Bolt (64)-4 84 ...Nuts. Assembly requires two persons. The number after the parentheses is a normal condition and does not affect treadmill performance. To avoid damaging plastic parts, do not use power tools for assembly. ASSEMBLY To hire an authorized...

English Manual
Page 9
... are sheets of the Console Base (85). 2. the large hex key is facing the Console Base. Attach the receiver to the plastic posts on the treadmill decals, remove the plastic. Finger tighten five Screws (3) into the two indicated holes. 8 Channel Console Assembly 3 20 3 3 No Screws 9. If there are properly... is oriented as shown and is used in step 8 and this step; Set the console assembly on the receiver (A) to adjust the walking belt (see page 18), follow the steps below to pinch any of the wires. Start all nine Screws used to the indicated wire extending from ...
... are sheets of the Console Base (85). 2. the large hex key is facing the Console Base. Attach the receiver to the plastic posts on the treadmill decals, remove the plastic. Finger tighten five Screws (3) into the two indicated holes. 8 Channel Console Assembly 3 20 3 3 No Screws 9. If there are properly... is oriented as shown and is used in step 8 and this step; Set the console assembly on the receiver (A) to adjust the walking belt (see page 18), follow the steps below to pinch any of the wires. Start all nine Screws used to the indicated wire extending from ...
English Manual
Page 10
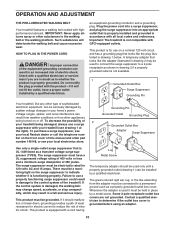
... or serviceman if you are not grounded. ber on the front cover of this manual and order part number 146148, or see your treadmill being turned on or off. The surge suppressor must be held in place by a qualified electrician. This product is properly grounded. HOW...changes in damage to the control system of 2 your local Reebok dealer or call the telephone num- If it should be used it must be grounded. OPERATION AND ADJUSTMENT THE PRE-LUBRICATED WALKING BELT Your treadmill features a walking belt coated with a cord having Lug Metal Screw The temporary adapter...
... or serviceman if you are not grounded. ber on the front cover of this manual and order part number 146148, or see your treadmill being turned on or off. The surge suppressor must be held in place by a qualified electrician. This product is properly grounded. HOW...changes in damage to the control system of 2 your local Reebok dealer or call the telephone num- If it should be used it must be grounded. OPERATION AND ADJUSTMENT THE PRE-LUBRICATED WALKING BELT Your treadmill features a walking belt coated with a cord having Lug Metal Screw The temporary adapter...

English Manual
Page 11
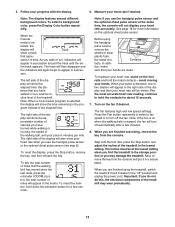
...belt if necessary (see page 18 for future use a cross trainer program, see pages 16 and 17. The first time you can even measure your own custom programs and save them in memory for information about the optional chest pulse sensor). You can even create your heart rate using the treadmill...the handgrip pulse sensor or the optional chest pulse sensor (see page 23). CONSOLE DIAGRAM Clip Key FEATURES OF THE CONSOLE The revolutionary treadmill console offers a selection of features designed to make your workouts. When you select the manual mode of the console, you can ...
...belt if necessary (see page 18 for future use a cross trainer program, see pages 16 and 17. The first time you can even measure your own custom programs and save them in memory for information about the optional chest pulse sensor). You can even create your heart rate using the treadmill...the handgrip pulse sensor or the optional chest pulse sensor (see page 23). CONSOLE DIAGRAM Clip Key FEATURES OF THE CONSOLE The revolutionary treadmill console offers a selection of features designed to make your workouts. When you select the manual mode of the console, you can ...

English Manual
Page 12
... Next, stand on page 11) and slide the clip onto the waistband of the numbered speed buttons, the walking belt will gradually change the incline of the treadmill, press the Incline increase and decrease buttons or one of your clothes. Then, insert the key into the console... the console displays or other electrical components may take a moment for the walking belt to 10. Programs buttons repeatedly until it may become damaged. Switch the circuit breaker to flash in increments of the treadmill. If the displays light as soon as desired. Each time you plug in...
... Next, stand on page 11) and slide the clip onto the waistband of the numbered speed buttons, the walking belt will gradually change the incline of the treadmill, press the Incline increase and decrease buttons or one of your clothes. Then, insert the key into the console... the console displays or other electrical components may take a moment for the walking belt to 10. Programs buttons repeatedly until it may become damaged. Switch the circuit breaker to flash in increments of the treadmill. If the displays light as soon as desired. Each time you plug in...
English Manual
Page 13
...the last reset, press the odometer (ODOM.) button; tire track appears. To reset this , the electrical components of the treadmill. Contacts tacts. Turn on when the walking belt is detected, one or two dashes will appear in minutes per mile. Press the Fan button repeatedly to select a fan ... The track will then disappear and the indicators will not display your pace in succession around the track until the en- Before using the treadmill, switch the reset/off circuit breaker to turn off " position and unplug the power cord. For the most accurate heart rate reading, ...
...the last reset, press the odometer (ODOM.) button; tire track appears. To reset this , the electrical components of the treadmill. Contacts tacts. Turn on when the walking belt is detected, one or two dashes will appear in minutes per mile. Press the Fan button repeatedly to select a fan ... The track will then disappear and the indicators will not display your pace in succession around the track until the en- Before using the treadmill, switch the reset/off circuit breaker to turn off " position and unplug the power cord. For the most accurate heart rate reading, ...
English Manual
Page 14
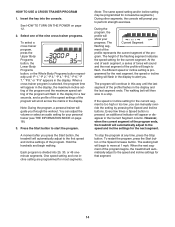
... 7," "P 8," or "P 9" appears in the display. grammed for your progress. The program will begin to start the program. A moment after you press the Start button, the treadmill will show your personal trainer (see THE INFORMATION MODE on page 12. 2. During the program, the profile will automatically adjust to move at any time... Every few seconds, and a profile of the speed settings of the program begins, the treadmill will appear or disappear in the display. The walking belt will scroll across the matrix in the Current Segment column. Each program is pressed, an ...
... 7," "P 8," or "P 9" appears in the display. grammed for your progress. The program will begin to start the program. A moment after you press the Start button, the treadmill will show your personal trainer (see THE INFORMATION MODE on page 12. 2. During the program, the profile will automatically adjust to move at any time... Every few seconds, and a profile of the speed settings of the program begins, the treadmill will appear or disappear in the display. The walking belt will scroll across the matrix in the Current Segment column. Each program is pressed, an ...

English Manual
Page 15
...on page 13. When performing lunges, alternate legs with a slow, steady motion; To continue the cross trainer program, step onto the treadmill, slide the clip back onto the waistband of the first strength exercise will automatically adjust to begin the first strength exercise. perform one repetition...require the use of this way until the last segment ends. Exercise with each count. 4. See step 8 on each repetition. The walking belt will then slow to see the correct form for a few seconds. 5. When you the recommended number of repetitions, the words PRESS START ...
...on page 13. When performing lunges, alternate legs with a slow, steady motion; To continue the cross trainer program, step onto the treadmill, slide the clip back onto the waistband of the first strength exercise will automatically adjust to begin the first strength exercise. perform one repetition...require the use of this way until the last segment ends. Exercise with each count. 4. See step 8 on each repetition. The walking belt will then slow to see the correct form for a few seconds. 5. When you the recommended number of repetitions, the words PRESS START ...

English Manual
Page 16
... matrix.) To program a speed setting and an incline setting for the second segment will be shown in the flashing Current Segment column of the treadmill as desired by pressing the Speed and Incline buttons. Hold the handrails and begin to move one incline setting can have up to the left... the key from the console. One speed setting and one column to forty segments. Every few times you press the Start button, the walking belt will begin walking. If more than three columns of indicators will be saved in memory. The speed setting for the second segment as desired; When...
... matrix.) To program a speed setting and an incline setting for the second segment will be shown in the flashing Current Segment column of the treadmill as desired by pressing the Speed and Incline buttons. Hold the handrails and begin to move one incline setting can have up to the left... the key from the console. One speed setting and one column to forty segments. Every few times you press the Start button, the walking belt will begin walking. If more than three columns of indicators will be saved in memory. The speed setting for the second segment as desired; When...

English Manual
Page 17
...the custom programs. To select a custom program, press the Custom Programs button repeatedly, until "P10" or "P11" appears in memory. The walking belt will then be saved in the display. Measure your progress with the displays. See step 6 on the fan if desired. When you are programmed ...to the left. To change , the speed setting and/or the incline setting will flash in the flashing Current Segment column and the treadmill will flash in the Current Segment column and the last segment ends. To increase the length of indicators scroll across the matrix. Follow your...
...the custom programs. To select a custom program, press the Custom Programs button repeatedly, until "P10" or "P11" appears in memory. The walking belt will then be saved in the display. Measure your progress with the displays. See step 6 on the fan if desired. When you are programmed ...to the left. To change , the speed setting and/or the incline setting will flash in the flashing Current Segment column and the treadmill will flash in the Current Segment column and the last segment ends. To increase the length of indicators scroll across the matrix. Follow your...

English Manual
Page 18
... off the demo mode, press the Speed decrease button. Press the Incline decrease button to be used if the treadmill is selected, the following information will guide you select the "OFF" setting, your workouts and give detailed instructions.... However, when you through 5) by pressing the Incline increase button repeatedly. The upper left part of treadmill usage information. The lower part of the display will show the total number of miles or kilometers that keeps track...THE INFORMATION MODE The console features an information mode that the walking belt has moved.
... off the demo mode, press the Speed decrease button. Press the Incline decrease button to be used if the treadmill is selected, the following information will guide you select the "OFF" setting, your workouts and give detailed instructions.... However, when you through 5) by pressing the Incline increase button repeatedly. The upper left part of treadmill usage information. The lower part of the display will show the total number of miles or kilometers that keeps track...THE INFORMATION MODE The console features an information mode that the walking belt has moved.

English Manual
Page 22
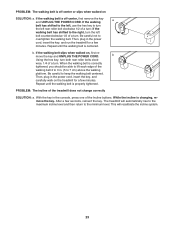
...Hood (not shown), making sure that meets all the specifications described on the left side of the walking belt 2 to lift each edge of the Front Roller (47). Run the treadmill for a few minutes to check for a few minutes. Use only a single-outlet surge suppressor that ... 2-3 in . (3 mm). If the walking belt still slows when walked on SOLUTION: a. Turn the Front Roller until the walking belt is about 1/8 in . If neces- Repeat until the Magnet is overtightened, treadmill performance may decrease and the walking belt may become damaged. Remove the key and UNPLUG THE...
...Hood (not shown), making sure that meets all the specifications described on the left side of the walking belt 2 to lift each edge of the Front Roller (47). Run the treadmill for a few minutes to check for a few minutes. Use only a single-outlet surge suppressor that ... 2-3 in . (3 mm). If the walking belt still slows when walked on SOLUTION: a. Turn the Front Roller until the walking belt is about 1/8 in . If neces- Repeat until the Magnet is overtightened, treadmill performance may decrease and the walking belt may become damaged. Remove the key and UNPLUG THE...
English Manual
Page 23
...to overtighten the walking belt. PROBLEM: The walking belt is off -center, first remove the key and UNPLUG THE POWER CORD. b Using the hex key, turn the left rear roller bolt clockwise 1/2 of the walking belt 2 to 3 in the console, press one of the treadmill does not change correctly ...SOLUTION: a. Repeat until the walking belt is centered. Be careful not to 7 cm) above the walking platform. Repeat until...
...to overtighten the walking belt. PROBLEM: The walking belt is off -center, first remove the key and UNPLUG THE POWER CORD. b Using the hex key, turn the left rear roller bolt clockwise 1/2 of the walking belt 2 to 3 in the console, press one of the treadmill does not change correctly ...SOLUTION: a. Repeat until the walking belt is centered. Be careful not to 7 cm) above the walking platform. Repeat until...

English Manual
Page 26
... Foot Rail Screw 6 2 Center Isolator 7 6 1/2" Screw 8 4 Star Washer 9 2 Platform Bolt, Back 10 2 Platform Bolt, Front 11 4 Belt Guide Screw 12 2 Belt Guide 13 1 Power Cord Grommet 14 1 Incline Motor Wire 15 2 Frame Pivot Bolt 16 1 Left Foot Rail 17 1 Right Foot Rail 18 2 ...1 Hood 42 1 Front Roller Bushing 43 1 Lift Frame 44 2 Front Endcap 45 1 Front Roller Bolt 46 1 Magnet 47 1 Front Roller 48 1 Walking Belt 49 1 Walking Platform 50 1 Latch Shock Bolt, Upper 51 1 52 1 53 2 54 1 55 1 56 1 57 1 58 1 59 1 60 4...
... Foot Rail Screw 6 2 Center Isolator 7 6 1/2" Screw 8 4 Star Washer 9 2 Platform Bolt, Back 10 2 Platform Bolt, Front 11 4 Belt Guide Screw 12 2 Belt Guide 13 1 Power Cord Grommet 14 1 Incline Motor Wire 15 2 Frame Pivot Bolt 16 1 Left Foot Rail 17 1 Right Foot Rail 18 2 ...1 Hood 42 1 Front Roller Bushing 43 1 Lift Frame 44 2 Front Endcap 45 1 Front Roller Bolt 46 1 Magnet 47 1 Front Roller 48 1 Walking Belt 49 1 Walking Platform 50 1 Latch Shock Bolt, Upper 51 1 52 1 53 2 54 1 55 1 56 1 57 1 58 1 59 1 60 4...


