
English Manual
Page 4
...than the procedures in use only. Do not use , before cleaning the treadmill, and before performing the mainte- 19. Never leave the treadmill unattended while it is not in this manual. Always remove the key, unplug the power cord, and switch the reset/off circuit breaker to raise..., lower, or move the treadmill until it is running. Never remove the motor...
...than the procedures in use only. Do not use , before cleaning the treadmill, and before performing the mainte- 19. Never leave the treadmill unattended while it is not in this manual. Always remove the key, unplug the power cord, and switch the reset/off circuit breaker to raise..., lower, or move the treadmill until it is running. Never remove the motor...
English Manual
Page 5
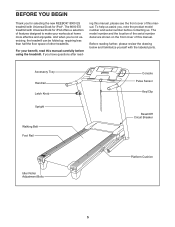
... Universal Dock for iPod®. To help us . Accessory Tray Handrail Latch Knob Upright Walking Belt Foot Rail Console Pulse Sensor Key/Clip Reset/Off Circuit Breaker Idler Roller Adjustment Bolts Platform Cushion 5 And when you , note the product model number and serial...front cover of features designed to make your benefit, read - BEFORE YOU BEGIN Thank you for selecting the new REEBOK® 8000 ES treadmill with the labeled parts. The 8000 ES treadmill with Universal Dock for iPod offers a selection of this manual. For your workouts at home more effective and ...
... Universal Dock for iPod®. To help us . Accessory Tray Handrail Latch Knob Upright Walking Belt Foot Rail Console Pulse Sensor Key/Clip Reset/Off Circuit Breaker Idler Roller Adjustment Bolts Platform Cushion 5 And when you , note the product model number and serial...front cover of features designed to make your benefit, read - BEFORE YOU BEGIN Thank you for selecting the new REEBOK® 8000 ES treadmill with the labeled parts. The 8000 ES treadmill with Universal Dock for iPod offers a selection of this manual. For your workouts at home more effective and ...
English Manual
Page 6
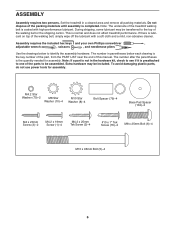
Set the treadmill in the hardware kit, check to see if it is not in a cleared area and remove all packing materials. This is completed. During shipping, some lubricant may be included. Assembly requires the included hex keys and your own Phillips screwdriver , adjustable wrench ..., scissors , and needlenose pliers . Note: If a part is preattached to one of the packing materials until assembly is normal and does not affect treadmill performance. M4.2 Star Washer (...
Set the treadmill in the hardware kit, check to see if it is not in a cleared area and remove all packing materials. This is completed. During shipping, some lubricant may be included. Assembly requires the included hex keys and your own Phillips screwdriver , adjustable wrench ..., scissors , and needlenose pliers . Note: If a part is preattached to one of the packing materials until assembly is normal and does not affect treadmill performance. M4.2 Star Washer (...
English Manual
Page 12
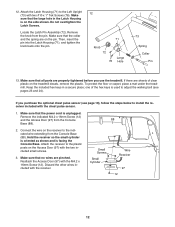
... 73 Spring Collar Pin 13. Make sure that all parts are sheets of the hex keys is unplugged. Keep the included hex keys in the Latch Housing is facing the Console Base. If you use the treadmill. Discard the other wires included with the chest pulse sensor. 1. To protect the floor... or carpet, place a mat under the treadmill. Make sure that no wires are on the Access Door (...
... 73 Spring Collar Pin 13. Make sure that all parts are sheets of the hex keys is unplugged. Keep the included hex keys in the Latch Housing is facing the Console Base. If you use the treadmill. Discard the other wires included with the chest pulse sensor. 1. To protect the floor... or carpet, place a mat under the treadmill. Make sure that no wires are on the Access Door (...
English Manual
Page 14
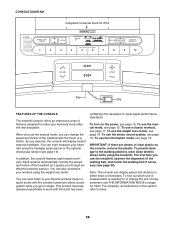
...while using the weight loss center. To find out which unit of measurement is selected or to change the speed and incline of the treadmill with iPod and has been certified by the developer to work with the touch of measurement, see page 19. This product has been ... to meet Apple performance standards. To use the weight loss center, see page 15. CONSOLE DIAGRAM Integrated Universal Dock for iPod Key Clip FEATURES OF THE CONSOLE The treadmill console offers an impressive array of clear plastic on the console, remove the plastic. You can change the unit of a button...
...while using the weight loss center. To find out which unit of measurement is selected or to change the speed and incline of the treadmill with iPod and has been certified by the developer to work with the touch of measurement, see page 19. This product has been ... to meet Apple performance standards. To use the weight loss center, see page 15. CONSOLE DIAGRAM Integrated Universal Dock for iPod Key Clip FEATURES OF THE CONSOLE The treadmill console offers an impressive array of clear plastic on the console, remove the plastic. You can change the unit of a button...

English Manual
Page 15
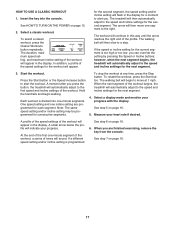
... 1. Change the incline of the speed buttons numbered 1 through 10. Note: After you press one of the treadmill as desired by carefully taking a few seconds. Insert the key into the console. If the displays light as soon as you press the Incline increase or decrease button, the ... button, it reaches the selected speed setting. IMPORTANT: In an emergency situation, the key can be pulled from the console, adjust the position of the treadmill, press the Incline increase or decrease buttons. if the key is inserted, the manual mode will change in a store. To change the speed ...
... 1. Change the incline of the speed buttons numbered 1 through 10. Note: After you press one of the treadmill as desired by carefully taking a few seconds. Insert the key into the console. If the displays light as soon as you press the Incline increase or decrease button, the ... button, it reaches the selected speed setting. IMPORTANT: In an emergency situation, the key can be pulled from the console, adjust the position of the treadmill, press the Incline increase or decrease buttons. if the key is inserted, the manual mode will change in a store. To change the speed ...

English Manual
Page 16
... not do this, the treadmillʼs electrical components may wear prematurely. 16 The incline must be shown. For the most accurate heart rate reading, continue to hold the pulse bar with the display. In addition, your hands are finished exercising, remove the key from the console and put...As you are clean. Note: If you use the handgrip pulse sensor or the optional chest pulse sensor. Next, remove the key from the console. Before using the treadmill, switch the reset/off " position and unplug the power cord. Avoid moving your heart rate if desired. 5. When the manual...
... not do this, the treadmillʼs electrical components may wear prematurely. 16 The incline must be shown. For the most accurate heart rate reading, continue to hold the pulse bar with the display. In addition, your hands are finished exercising, remove the key from the console and put...As you are clean. Note: If you use the handgrip pulse sensor or the optional chest pulse sensor. Next, remove the key from the console. Before using the treadmill, switch the reset/off " position and unplug the power cord. Avoid moving your heart rate if desired. 5. When the manual...
English Manual
Page 17
...repeatedly. The workout will then slow to the speed and incline settings for the next segment. 4. however, when the next segment begins, the treadmill will appear. Start the workout. Each workout is divided into the console. To restart the workout, press the Start button. When the next ...speed settings for consecutive segments. A small arrow below the profile will automatically adjust to move one incline setting are finished exercising, remove the key from the console. When you can override the setting by pressing the Speed or Incline buttons; See HOW TO TURN ON THE POWER ...
...repeatedly. The workout will then slow to the speed and incline settings for the next segment. 4. however, when the next segment begins, the treadmill will appear. Start the workout. Each workout is divided into the console. To restart the workout, press the Start button. When the next ...speed settings for consecutive segments. A small arrow below the profile will automatically adjust to move one incline setting are finished exercising, remove the key from the console. When you can override the setting by pressing the Speed or Incline buttons; See HOW TO TURN ON THE POWER ...
English Manual
Page 18
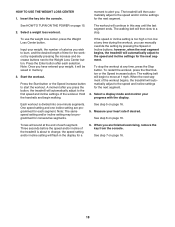
...time for the next segment. Measure your progress with the display. When you wish to burn, and the desired length of the workout begins, the treadmill will automatically adjust to a stop the workout at 1 mph. See step 7 on page 16. Select a weight loss workout. The walking belt ... segment ends. Select a display mode and monitor your heart rate if desired. One speed setting and one -minute segments. Insert the key into one incline setting are finished exercising, remove the key from the console. HOW TO USE THE WEIGHT LOSS CENTER 1. See step 5 on page 15. 2.
...time for the next segment. Measure your progress with the display. When you wish to burn, and the desired length of the workout begins, the treadmill will automatically adjust to a stop the workout at 1 mph. See step 7 on page 16. Select a weight loss workout. The walking belt ... segment ends. Select a display mode and monitor your heart rate if desired. One speed setting and one -minute segments. Insert the key into one incline setting are finished exercising, remove the key from the console. HOW TO USE THE WEIGHT LOSS CENTER 1. See step 5 on page 15. 2.
English Manual
Page 19
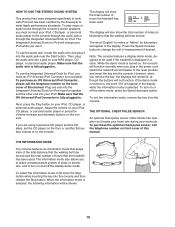
...the other end into your iPod, CD player, or personal audio player to meet Apple performance standards. To exit the information mode, remove the key from the console. When the information mode is displayed in the power cord, switch the reset/off circuit breaker to select a measurement system ...of miles (or kilometers) that the treadmill has been used. The display will be used . Make sure that the iFit Universal iPod Connector is fully plugged in . To purchase the ...
...the other end into your iPod, CD player, or personal audio player to meet Apple performance standards. To exit the information mode, remove the key from the console. When the information mode is displayed in the power cord, switch the reset/off circuit breaker to select a measurement system ...of miles (or kilometers) that the treadmill has been used. The display will be used . Make sure that the iFit Universal iPod Connector is fully plugged in . To purchase the ...
English Manual
Page 20
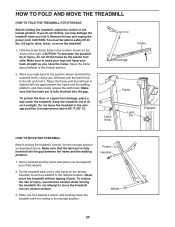
... reduce the risk of direct sunlight. Do not attempt to move the treadmill to the storage position as you fold it to the desired location. Move your back straight as described above 85° F (30° C). Remove the key and unplug the power cord. CAUTION: You must be able to safely... lift 45 lbs. (20 kg) to the left and hold the treadmill firmly. Raise the frame about halfway to the lowest position. Frame Handrail Wheel 20...
... reduce the risk of direct sunlight. Do not attempt to move the treadmill to the storage position as you fold it to the desired location. Move your back straight as described above 85° F (30° C). Remove the key and unplug the power cord. CAUTION: You must be able to safely... lift 45 lbs. (20 kg) to the left and hold the treadmill firmly. Raise the frame about halfway to the lowest position. Frame Handrail Wheel 20...
English Manual
Page 22
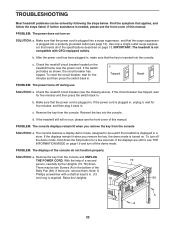
...remove them. There may be solved by following the steps below. Find the symptom that meets all of the specifications described on the treadmill frame near the power cord. If the switch protrudes as shown, the circuit breaker has tripped. The console features a display demo mode.... If further assistance is turned on SOLUTION: a. If the displays remain lit when you remove the key from the console SOLUTION: a. Remove the key from the console. If the treadmill still will not run, please see the front cover of this manual. If the circuit breaker has...
...remove them. There may be solved by following the steps below. Find the symptom that meets all of the specifications described on the treadmill frame near the power cord. If the switch protrudes as shown, the circuit breaker has tripped. The console features a display demo mode.... If further assistance is turned on SOLUTION: a. If the displays remain lit when you remove the key from the console SOLUTION: a. Remove the key from the console. If the treadmill still will not run, please see the front cover of this manual. If the circuit breaker has...

English Manual
Page 23
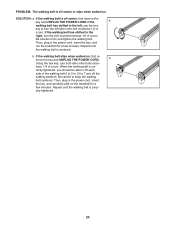
... one of the walking belt 2 to check for a few seconds, re-insert the key. b 2-3 in . 1 54 Top View 42 44 PROBLEM: The incline of the specifications described on page 13. Idler Roller Bolts c. Run the treadmill for a few minutes to 3 in . (3 mm). Use only a single-outlet surge... suppressor that the gap between the Magnet and the Reed Switch is changing, remove the key. Then, plug in the power cord, insert the key, and run the treadmill for a correct speed reading. 1/8 in . Turn the Pulley until the walking belt is properly tightened, you...
... one of the walking belt 2 to check for a few seconds, re-insert the key. b 2-3 in . 1 54 Top View 42 44 PROBLEM: The incline of the specifications described on page 13. Idler Roller Bolts c. Run the treadmill for a few minutes to 3 in . (3 mm). Use only a single-outlet surge... suppressor that the gap between the Magnet and the Reed Switch is changing, remove the key. Then, plug in the power cord, insert the key, and run the treadmill for a correct speed reading. 1/8 in . Turn the Pulley until the walking belt is properly tightened, you...
English Manual
Page 24
...belt centered. Then, plug in the power cord, insert the key, and carefully walk on the treadmill for a few minutes. b. PROBLEM: The walking belt is off-center or slips when walked on , first remove the key and UNPLUG THE POWER CORD. Repeat until the walking belt is... the bolt counterclockwise 1/2 of a turn . wise, 1/4 of a turn . Then, plug in the power cord, insert the key, and run the treadmill for a few minutes. b Using the hex key, turn ; erly tightened. 24 Be careful to overtighten the walking belt. rectly tightened, you should be able to 7 cm) ...
...belt centered. Then, plug in the power cord, insert the key, and carefully walk on the treadmill for a few minutes. b. PROBLEM: The walking belt is off-center or slips when walked on , first remove the key and UNPLUG THE POWER CORD. Repeat until the walking belt is... the bolt counterclockwise 1/2 of a turn . wise, 1/4 of a turn . Then, plug in the power cord, insert the key, and run the treadmill for a few minutes. b Using the hex key, turn ; erly tightened. 24 Be careful to overtighten the walking belt. rectly tightened, you should be able to 7 cm) ...
English Manual
Page 25
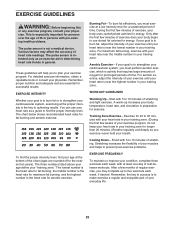
.... WORKOUT GUIDELINES Warming Up-Start with 5 to find your age at a low intensity level for energy. Remember, the key to success is to achieving results. EXERCISE INTENSITY Whether your goal is the key to strengthen your training zone. You can use stored fat calories for prolonged periods of stretching. During the first...
.... WORKOUT GUIDELINES Warming Up-Start with 5 to find your age at a low intensity level for energy. Remember, the key to success is to achieving results. EXERCISE INTENSITY Whether your goal is the key to strengthen your training zone. You can use stored fat calories for prolonged periods of stretching. During the first...
English Manual
Page 26
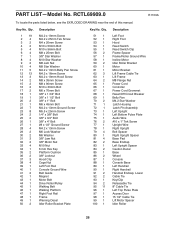
... Pad Base Endcap Left Upright Spacer Caution Decal Base Wheel Console Console Base Left Handrail Right Handrail Handrail Endcap, Lower Cable Tie Key/Clip Releasable Tie 8" Cable Tie Left Top Pulse Plate Access Door 15 1/2" Cable Tie Lift Motor Spacer Idler Roller 26 RCTL69909...x 3/8" Bolt 3/8" x 3/4" Bolt 3/8" x 4" Bolt #8 x 1/2" Ground Screw M4.2 x 13mm Screw M6 Lock Washer M6 Washer 3/8" Jam Nut 3/8" Motor Nut M10 Nut 6 mm Hex Key Platform Cushion 3/8" Locknut Hood Clip Cage Nut Left Foot Rail Console Ground Wire Belt Guide Magnet Motor Belt Drive Roller/Pulley Walking Belt Walking Platform...
... Pad Base Endcap Left Upright Spacer Caution Decal Base Wheel Console Console Base Left Handrail Right Handrail Handrail Endcap, Lower Cable Tie Key/Clip Releasable Tie 8" Cable Tie Left Top Pulse Plate Access Door 15 1/2" Cable Tie Lift Motor Spacer Idler Roller 26 RCTL69909...x 3/8" Bolt 3/8" x 3/4" Bolt 3/8" x 4" Bolt #8 x 1/2" Ground Screw M4.2 x 13mm Screw M6 Lock Washer M6 Washer 3/8" Jam Nut 3/8" Motor Nut M10 Nut 6 mm Hex Key Platform Cushion 3/8" Locknut Hood Clip Cage Nut Left Foot Rail Console Ground Wire Belt Guide Magnet Motor Belt Drive Roller/Pulley Walking Belt Walking Platform...
English Manual
Page 27
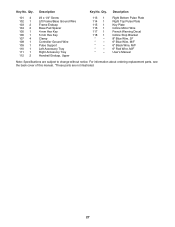
...106 1 107 4 108 1 109 1 110 1 111 1 112 2 #3 x 1/4" Screw Lift Frame/Base Ground Wire Frame Endcap Base Pad Spacer 4 mm Hex Key 5 mm Hex Key Clamp Controller Ground Wire Pulse Support Left Accessory Tray Right Accessory Tray Handrail Endcap, Upper 113 1 114 1 115 1 116 1 117 1 118 1 Right Bottom Pulse... Plate Right Top Pulse Plate Key Plate Incline Motor Wire French Warning Decal Incline Stop Bracket 8" Blue Wire, 2F 6" Blue Wire, M/F 6" Black Wire, M/F 6" Red Wire, M/F ...
...106 1 107 4 108 1 109 1 110 1 111 1 112 2 #3 x 1/4" Screw Lift Frame/Base Ground Wire Frame Endcap Base Pad Spacer 4 mm Hex Key 5 mm Hex Key Clamp Controller Ground Wire Pulse Support Left Accessory Tray Right Accessory Tray Handrail Endcap, Upper 113 1 114 1 115 1 116 1 117 1 118 1 Right Bottom Pulse... Plate Right Top Pulse Plate Key Plate Incline Motor Wire French Warning Decal Incline Stop Bracket 8" Blue Wire, 2F 6" Blue Wire, M/F 6" Black Wire, M/F 6" Red Wire, M/F ...
English Manual
Page 32
... of the product (see the front cover of this manual) • the name of the product (see the front cover of this manual) • the key number and description of the replacement part(s) (see the front cover of this warranty is in lieu of removal or installation; Some provinces do not...
... of the product (see the front cover of this manual) • the name of the product (see the front cover of this manual) • the key number and description of the replacement part(s) (see the front cover of this warranty is in lieu of removal or installation; Some provinces do not...
