
English Manual
Page 2
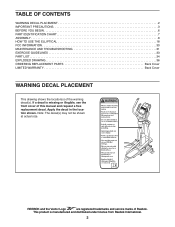
... 2 IMPORTANT PRECAUTIONS 3 BEFORE YOU BEGIN 6 PART IDENTIFICATION CHART 7 ASSEMBLY 8 HOW TO USE THE ELLIPTICAL 18 FCC INFORMATION 30 MAINTENANCE AND TROUBLESHOOTING 31 EXERCISE GUIDELINES 33 PART LIST 34 EXPLODED DRAWING 36 ORDERING REPLACEMENT PARTS Back Cover LIMITED WARRANTY Back Cover WARNING DECAL PLACEMENT This drawing shows the location(s) of Reebok. Apply the decal in the...
... 2 IMPORTANT PRECAUTIONS 3 BEFORE YOU BEGIN 6 PART IDENTIFICATION CHART 7 ASSEMBLY 8 HOW TO USE THE ELLIPTICAL 18 FCC INFORMATION 30 MAINTENANCE AND TROUBLESHOOTING 31 EXERCISE GUIDELINES 33 PART LIST 34 EXPLODED DRAWING 36 ORDERING REPLACEMENT PARTS Back Cover LIMITED WARRANTY Back Cover WARNING DECAL PLACEMENT This drawing shows the location(s) of Reebok. Apply the decal in the...

English Manual
Page 3
... and properly tighten all parts regularly. DANGER: 13. The heart rate monitor is the responsibility of the owner to ensure that could become caught on the same circuit. 10. the pedals will continue to an improper receptacle. Keep your elliptical before cleaning the elliptical. tained by or through... 20. If you feel faint or if you experience pain while exercising, stop immediately and cool down. Before beginning any worn parts immediately. 8. The elliptical is not in use an adapter to connect the power cord to move until the flywheel stops. To protect the floor or ...
... and properly tighten all parts regularly. DANGER: 13. The heart rate monitor is the responsibility of the owner to ensure that could become caught on the same circuit. 10. the pedals will continue to an improper receptacle. Keep your elliptical before cleaning the elliptical. tained by or through... 20. If you feel faint or if you experience pain while exercising, stop immediately and cool down. Before beginning any worn parts immediately. 8. The elliptical is not in use an adapter to connect the power cord to move until the flywheel stops. To protect the floor or ...
English Manual
Page 6
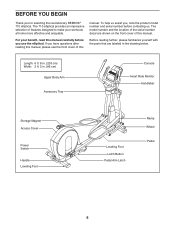
... number and serial number before you use the elliptical. Before reading further, please familiarize yourself with the parts that are shown on the front cover of this manual. If you for selecting the revolutionary REEBOK® 710 elliptical. For your workouts at home more effective and enjoyable. The 710 elliptical provides an impressive selection of features designed...
... number and serial number before you use the elliptical. Before reading further, please familiarize yourself with the parts that are shown on the front cover of this manual. If you for selecting the revolutionary REEBOK® 710 elliptical. For your workouts at home more effective and enjoyable. The 710 elliptical provides an impressive selection of features designed...

English Manual
Page 7
... number is not in parentheses below to see if it has been preassembled. Extra parts may be included. Note: If a part is the quantity needed for assembly. The number in the hardware kit, check to identify the small parts needed for assembly. M6 Washer (140)–-8 M8 Split Washer (131)–-8 M8 x 25mm... x 50mm Screw (62)–-4 M8 x 16mm Screw (102)–-12 M8 x 25mm Screw (128)–-2 M8 x 45mm Bolt (104)–-6 M10 x 120mm Screw (100)–-4 7 PART IDENTIFICATION CHART Use the drawings below each drawing is the key number of the...
... number is not in parentheses below to see if it has been preassembled. Extra parts may be included. Note: If a part is the quantity needed for assembly. The number in the hardware kit, check to identify the small parts needed for assembly. M6 Washer (140)–-8 M8 Split Washer (131)–-8 M8 x 25mm... x 50mm Screw (62)–-4 M8 x 16mm Screw (102)–-12 M8 x 25mm Screw (128)–-2 M8 x 45mm Bolt (104)–-6 M10 x 120mm Screw (100)–-4 7 PART IDENTIFICATION CHART Use the drawings below each drawing is the key number of the...
English Manual
Page 8
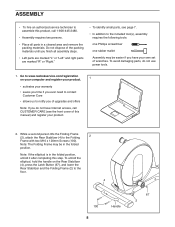
... Folding Frame (2), attach the Rear Stabilizer (4) to notify you of upgrades and offers Note: If you nish all parts in a cleared area and remove the packing materials. To avoid damaging parts, do not have Internet access, call 1-800-445-2480. •• Assembly requires two persons. •• Place...you ever need to contact Customer Care •• allows us to the Folding 2 Frame with two M10 x 120mm Screws (100). To unfold the elliptical, hold the handle on your computer and register your product. 1 •• activates your product. 2. Note: If the...
... Folding Frame (2), attach the Rear Stabilizer (4) to notify you of upgrades and offers Note: If you nish all parts in a cleared area and remove the packing materials. To avoid damaging parts, do not have Internet access, call 1-800-445-2480. •• Assembly requires two persons. •• Place...you ever need to contact Customer Care •• allows us to the Folding 2 Frame with two M10 x 120mm Screws (100). To unfold the elliptical, hold the handle on your computer and register your product. 1 •• activates your product. 2. Note: If the...

English Manual
Page 17
... Handlebar (10) with four M4 x 16mm Screws (93). 33 Avoid pinching the wires 135 10 60 93 21. Make sure that all parts are properly tightened before you use the elliptical. While a second person holds the Console (33) near the Handlebar (10), connect the wires on the 20 Console to the Upright...
... Handlebar (10) with four M4 x 16mm Screws (93). 33 Avoid pinching the wires 135 10 60 93 21. Make sure that all parts are properly tightened before you use the elliptical. While a second person holds the Console (33) near the Handlebar (10), connect the wires on the 20 Console to the Upright...

English Manual
Page 30
FCC INFORMATION This equipment has been tested and found to comply with the instructions, may cause harmful interference to part 15 of the following measures: •• Reorient or relocate the receiving antenna. •• Increase the separation between the equipment and the receiver. •&#...
FCC INFORMATION This equipment has been tested and found to comply with the instructions, may cause harmful interference to part 15 of the following measures: •• Reorient or relocate the receiving antenna. •• Increase the separation between the equipment and the receiver. •&#...
English Manual
Page 31
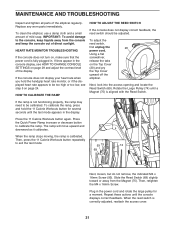
.... If the ramp is fully plugged in. The ramp will move upward and downward as it calibrates. To clean the elliptical, use a damp cloth and a small amount of the elliptical regularly. If lines appear in the display. To adjust the reed switch, first unplug the 20 power cord. Next, ... the console and keep liquids away from the Magnet (75). When the reed switch is calibrated. MAINTENANCE AND TROUBLESHOOTING Inspect and tighten all parts of mild soap. Plug in the power cord and rotate the large pulley for several seconds until the test mode appears in the console ...
.... If the ramp is fully plugged in. The ramp will move upward and downward as it calibrates. To clean the elliptical, use a damp cloth and a small amount of the elliptical regularly. If lines appear in the display. To adjust the reed switch, first unplug the 20 power cord. Next, ... the console and keep liquids away from the Magnet (75). When the reed switch is calibrated. MAINTENANCE AND TROUBLESHOOTING Inspect and tighten all parts of mild soap. Plug in the power cord and rotate the large pulley for several seconds until the test mode appears in the console ...

English Manual
Page 33
... heart rate readings. Training Zone Exercise—-Exercise for successful results. Remember, the key to success is the key to make exercise a regular and enjoyable part of exercise, your goal is activity that requires large amounts of oxygen for prolonged periods of the chart (ages are essential for 20 to the...
... heart rate readings. Training Zone Exercise—-Exercise for successful results. Remember, the key to success is the key to make exercise a regular and enjoyable part of exercise, your goal is activity that requires large amounts of oxygen for prolonged periods of the chart (ages are essential for 20 to the...

English Manual
Page 34
... Latch Bracket Ramp Ramp Cover Ramp Axle Ramp Axle Bushing Lift Motor Upright Axle Lift Axle Right Lift Arm Model No. RBEL07913.0 R0113A Key No. PART LIST Key No.
... Latch Bracket Ramp Ramp Cover Ramp Axle Ramp Axle Bushing Lift Motor Upright Axle Lift Axle Right Lift Arm Model No. RBEL07913.0 R0113A Key No. PART LIST Key No.

English Manual
Page 35
... 8 132 2 133 1 134 2 135 2 136 2 137 2 138 16 139 4 140 8 141 2 142 2 * –- * –- * –- * –- * –- * –- * –- * –- For information about ordering replacement parts, see the back cover of this manual. *These parts are subject to change without notice. Qty. Qty. Key No.
... 8 132 2 133 1 134 2 135 2 136 2 137 2 138 16 139 4 140 8 141 2 142 2 * –- * –- * –- * –- * –- * –- * –- * –- For information about ordering replacement parts, see the back cover of this manual. *These parts are subject to change without notice. Qty. Qty. Key No.

English Manual
Page 40
...see the front cover of this manual) •• the key number and description of the replacement part(s) (see the PART LIST and the EXPLODED DRAWING near the end of this manual. Parts are warranted for two (2) years from state to the customer. Labor is authorized by ICON. No ... of purchase. Accordingly, the above limitation may not apply to the product. To help us assist you, be preauthorized by ICON. If replacement parts are limited in workmanship and material, under normal use , or costs of this manual) LIMITED WARRANTY IMPORTANT: To protect your fitness equipment with...
...see the front cover of this manual) •• the key number and description of the replacement part(s) (see the PART LIST and the EXPLODED DRAWING near the end of this manual. Parts are warranted for two (2) years from state to the customer. Labor is authorized by ICON. No ... of purchase. Accordingly, the above limitation may not apply to the product. To help us assist you, be preauthorized by ICON. If replacement parts are limited in workmanship and material, under normal use , or costs of this manual) LIMITED WARRANTY IMPORTANT: To protect your fitness equipment with...


