
English Manual
Page 2
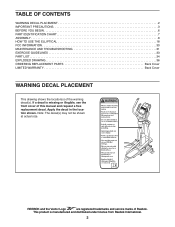
... not be shown at actual size. If a decal is manufactured and distributed under license from Reebok International. 2 TABLE OF CONTENTS WARNING DECAL PLACEMENT 2 IMPORTANT PRECAUTIONS 3 BEFORE YOU BEGIN 6 PART IDENTIFICATION CHART 7 ASSEMBLY 8 HOW TO USE THE ELLIPTICAL 18 FCC INFORMATION 30 MAINTENANCE AND TROUBLESHOOTING 31 EXERCISE GUIDELINES 33 PART LIST 34 EXPLODED DRAWING... shows the location(s) of the warning decal(s). Apply the decal in the location shown. This product is missing or illegible, see the front cover of Reebok.
... not be shown at actual size. If a decal is manufactured and distributed under license from Reebok International. 2 TABLE OF CONTENTS WARNING DECAL PLACEMENT 2 IMPORTANT PRECAUTIONS 3 BEFORE YOU BEGIN 6 PART IDENTIFICATION CHART 7 ASSEMBLY 8 HOW TO USE THE ELLIPTICAL 18 FCC INFORMATION 30 MAINTENANCE AND TROUBLESHOOTING 31 EXERCISE GUIDELINES 33 PART LIST 34 EXPLODED DRAWING... shows the location(s) of the warning decal(s). Apply the decal in the location shown. This product is missing or illegible, see the front cover of Reebok.

English Manual
Page 7
The number in the hardware kit, check to identify the small parts needed for assembly. M6 Washer (140)–-8 M8 Split Washer (131)–-8 M8 x 25mm x 1.5mm Washer (126)–-4 M17 Wave Washer (88)–-4 M8 Locknut (105)–-6 M4 x ... x 45mm Bolt (104)–-6 M10 x 120mm Screw (100)–-4 7 Extra parts may be included. The number following the key number is the quantity needed for assembly. Note: If a part is not in parentheses below to see if it has been preassembled. PART IDENTIFICATION CHART Use the drawings below each drawing is...
The number in the hardware kit, check to identify the small parts needed for assembly. M6 Washer (140)–-8 M8 Split Washer (131)–-8 M8 x 25mm x 1.5mm Washer (126)–-4 M17 Wave Washer (88)–-4 M8 Locknut (105)–-6 M4 x ... x 45mm Bolt (104)–-6 M10 x 120mm Screw (100)–-4 7 Extra parts may be included. The number following the key number is the quantity needed for assembly. Note: If a part is not in parentheses below to see if it has been preassembled. PART IDENTIFICATION CHART Use the drawings below each drawing is...
English Manual
Page 8
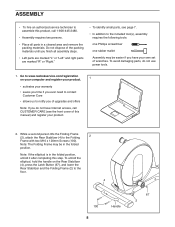
... the handle on your computer and register your product. 1 •• activates your own set of wrenches. Note: If the elliptical is in the folded position, unfold it after completing this manual) and register your product. 2. To avoid damaging parts, do not have ...Internet access, call 1-800-445-2480. •• Assembly requires two persons. •• Place all assembly steps. •• Left parts are marked “"L”" or “"Left”" and right parts are marked “"R”" ...
... the handle on your computer and register your product. 1 •• activates your own set of wrenches. Note: If the elliptical is in the folded position, unfold it after completing this manual) and register your product. 2. To avoid damaging parts, do not have ...Internet access, call 1-800-445-2480. •• Assembly requires two persons. •• Place all assembly steps. •• Left parts are marked “"L”" or “"Left”" and right parts are marked “"R”" ...

English Manual
Page 10
... 126 Avoid damaging the Upright Wire (60) 9 60 88 48 Grease 5 88 8 126 102 10 Using a small plastic bag to two M17 Wave Washers (88). Assemble the Left Upper Body Arm (9) and the Left Upper Body Leg (7) in the same way. 9 104 105 7 8 104 105 Hexagonal Holes 104 6 6. Attach the Right...
... 126 Avoid damaging the Upright Wire (60) 9 60 88 48 Grease 5 88 8 126 102 10 Using a small plastic bag to two M17 Wave Washers (88). Assemble the Left Upper Body Arm (9) and the Left Upper Body Leg (7) in the same way. 9 104 105 7 8 104 105 Hexagonal Holes 104 6 6. Attach the Right...

English Manual
Page 11
... four M6 x 12mm Screws (139). Identify the Right Pedal (14) and the Right Pedal Arm (12) assembly and orient them as shown. 8 Attach the Right Pedal (14) to the Left Pedal Arm (not shown) assembly in the same way. 14 12 140 140 139 62 11 Have the second person hold the...
... four M6 x 12mm Screws (139). Identify the Right Pedal (14) and the Right Pedal Arm (12) assembly and orient them as shown. 8 Attach the Right Pedal (14) to the Left Pedal Arm (not shown) assembly in the same way. 14 12 140 140 139 62 11 Have the second person hold the...

English Manual
Page 35
...Locknut Link Arm Bushing M10 x 25mm Screw M10 Washer Frame Wire M8 x 23.5mm x 1mm Washer Pivot Axle Cover M8 Washer Crank Axle Cover Magnet Assembly Pedal Arm Snap Ring Long Latch Spring Latch Latch Spring Medium Snap Ring Mushroom Fastener/Screw Latch Insert 3/8" x 1/2" Flange Screw Latch Housing M4 x 42mm...Bushing Pulse Wire Sleeve Long Spring Pin M4 x 12mm Screw M6 x 12mm Screw M6 Washer M4 x 25mm Screw M19 Wave Washer User·s Manual Assembly Tool Resistance Motor Wire Lift Motor Wire A Lift Motor Wire B Blue Wire Green Wire White Wire Note: Specifications are not illustrated. 35 Qty.
...Locknut Link Arm Bushing M10 x 25mm Screw M10 Washer Frame Wire M8 x 23.5mm x 1mm Washer Pivot Axle Cover M8 Washer Crank Axle Cover Magnet Assembly Pedal Arm Snap Ring Long Latch Spring Latch Latch Spring Medium Snap Ring Mushroom Fastener/Screw Latch Insert 3/8" x 1/2" Flange Screw Latch Housing M4 x 42mm...Bushing Pulse Wire Sleeve Long Spring Pin M4 x 12mm Screw M6 x 12mm Screw M6 Washer M4 x 25mm Screw M19 Wave Washer User·s Manual Assembly Tool Resistance Motor Wire Lift Motor Wire A Lift Motor Wire B Blue Wire Green Wire White Wire Note: Specifications are not illustrated. 35 Qty.
