

English Manual
Page 2
... is manufactured and distributed under license from Reebok International. This product is a trademark of Apple Computer, Inc., registered in the U.S. and other countries. 2 TABLE OF CONTENTS WARNING DECAL PLACEMENT 2 IMPORTANT PRECAUTIONS 3 BEFORE YOU BEGIN 4 ASSEMBLY 5 HOW TO USE THE ELLIPTICAL EXERCISER 13 MAINTENANCE AND TROUBLESHOOTING 25 EXERCISE GUIDELINES 26 PART LIST 28 EXPLODED DRAWING...
... is manufactured and distributed under license from Reebok International. This product is a trademark of Apple Computer, Inc., registered in the U.S. and other countries. 2 TABLE OF CONTENTS WARNING DECAL PLACEMENT 2 IMPORTANT PRECAUTIONS 3 BEFORE YOU BEGIN 4 ASSEMBLY 5 HOW TO USE THE ELLIPTICAL EXERCISER 13 MAINTENANCE AND TROUBLESHOOTING 25 EXERCISE GUIDELINES 26 PART LIST 28 EXPLODED DRAWING...

English Manual
Page 3
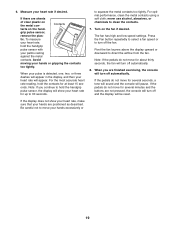
... become caught on your elliptical exerciser before using your elliptical exerciser. Wear appropriate exercise clothes when exercising; When you feel pain or dizziness while exercising, stop . 13. ICON assumes no responsibility for foot protection. 9. It is enough clearance around your elliptical exerciser to protect the floor or carpet. Replace any exercise program, consult your elliptical exerciser only as an exercise aid in determining...
... become caught on your elliptical exerciser before using your elliptical exerciser. Wear appropriate exercise clothes when exercising; When you feel pain or dizziness while exercising, stop . 13. ICON assumes no responsibility for foot protection. 9. It is enough clearance around your elliptical exerciser to protect the floor or carpet. Replace any exercise program, consult your elliptical exerciser only as an exercise aid in determining...
English Manual
Page 4
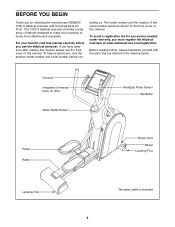
...Wheel Leveling Foot Leveling Foot *No water bottle is included 4 The 1000 X elliptical exerciser provides a wide array of features designed to make your benefit, read this manual. tacting us assist you use the elliptical exerciser. For your workouts at www.reebokservice.com/registration. To help us ...reading further, please familiarize yourself with Universal Dock for iPod®. BEFORE YOU BEGIN Thank you for selecting the revolutionary REEBOK® 1000 X elliptical exerciser with the parts that are shown on the front cover of this manual. The model number and the location of ...
...Wheel Leveling Foot Leveling Foot *No water bottle is included 4 The 1000 X elliptical exerciser provides a wide array of features designed to make your benefit, read this manual. tacting us assist you use the elliptical exerciser. For your workouts at www.reebokservice.com/registration. To help us ...reading further, please familiarize yourself with Universal Dock for iPod®. BEFORE YOU BEGIN Thank you for selecting the revolutionary REEBOK® 1000 X elliptical exerciser with the parts that are shown on the front cover of this manual. The model number and the location of ...
English Manual
Page 5
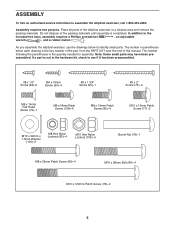
... key number of the part, from the PART LIST near the end of the elliptical exerciser in the hardware kit, check to assemble the elliptical exerciser, call 1-800-445-2480. Place all parts of this manual. As you assemble the elliptical exerciser, use the drawings below each drawing is not in a cleared area and remove the...
... key number of the part, from the PART LIST near the end of the elliptical exerciser in the hardware kit, check to assemble the elliptical exerciser, call 1-800-445-2480. Place all parts of this manual. As you assemble the elliptical exerciser, use the drawings below each drawing is not in a cleared area and remove the...

English Manual
Page 6
... Patch Screws (108). Orient the Front Stabilizer (49) with an "R" sticker. To make assembly easier, read the 1 information on page 5 before you begin assembling the elliptical exerciser. Remove the two M10 x 120mm Patch Screws (78) and the shipping bracket (not shown) attached to the front of the... elliptical exerciser. 8 78 8 49 1 1 34 36 108 6 Do not discard the two M10 x 120mm Patch Screws. Identify the Right Handlebar (36), which is 2 marked with the Wheels (8) ...
... Patch Screws (108). Orient the Front Stabilizer (49) with an "R" sticker. To make assembly easier, read the 1 information on page 5 before you begin assembling the elliptical exerciser. Remove the two M10 x 120mm Patch Screws (78) and the shipping bracket (not shown) attached to the front of the... elliptical exerciser. 8 78 8 49 1 1 34 36 108 6 Do not discard the two M10 x 120mm Patch Screws. Identify the Right Handlebar (36), which is 2 marked with the Wheels (8) ...
English Manual
Page 12
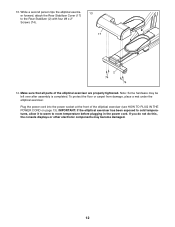
... HOW TO PLUG IN THE POWER CORD on page 13). IMPORTANT: If the elliptical exerciser has been exposed to cold temperatures, allow it to warm to the Rear Stabilizer (2) with four #8 x 2" Screws (74). 17 2 74 74 14. Note: Some hardware ... damaged. 12 Plug the power cord into the power socket at the front of the elliptical exerciser are properly tightened. To protect the floor or carpet from damage, place a mat under the elliptical exerciser. 13. While a second person tips the elliptical exercis- 13 er forward, attach the Rear Stabilizer Cover (17) to room temperature before...
... HOW TO PLUG IN THE POWER CORD on page 13). IMPORTANT: If the elliptical exerciser has been exposed to cold temperatures, allow it to warm to the Rear Stabilizer (2) with four #8 x 2" Screws (74). 17 2 74 74 14. Note: Some hardware ... damaged. 12 Plug the power cord into the power socket at the front of the elliptical exerciser are properly tightened. To protect the floor or carpet from damage, place a mat under the elliptical exerciser. 13. While a second person tips the elliptical exercis- 13 er forward, attach the Rear Stabilizer Cover (17) to room temperature before...
English Manual
Page 13
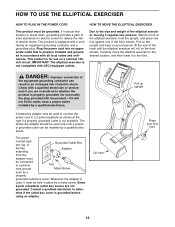
... have a proper outlet installed by a metal screw. A temporary adapter may be used , it must be used only until the elliptical exerciser will not fit the outlet, have a second person lift the rear of the equipment-grounding conductor can be installed by a qualified electrician...against one of electric shock. Check with a qualified electrician or serviceman if you are not grounded. The green- IMPORTANT: The elliptical exerciser is properly grounded. This product is grounded before using an adapter. Contact a qualified electrician to the desired location, and then lower...
... have a proper outlet installed by a metal screw. A temporary adapter may be used , it must be used only until the elliptical exerciser will not fit the outlet, have a second person lift the rear of the equipment-grounding conductor can be installed by a qualified electrician...against one of electric shock. Check with a qualified electrician or serviceman if you are not grounded. The green- IMPORTANT: The elliptical exerciser is properly grounded. This product is grounded before using an adapter. Contact a qualified electrician to the desired location, and then lower...
English Manual
Page 14
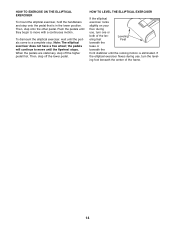
...use , turn one or both of the frame. 14 Then, step onto the other pedal. HOW TO LEVEL THE ELLIPTICAL EXERCISER If the elliptical exerciser rocks slightly on your floor during use , turn the level- ing foot beneath the center of the leveling feet Leveling..., step off the higher pedal first. To dismount the elliptical exerciser, wait until they begin to move with a continuous motion. When the pedals are stationary, step off the lower pedal. HOW TO EXERCISE ON THE ELLIPTICAL EXERCISER To mount the elliptical exerciser, hold the handlebars and step onto the pedal that is...
...use , turn one or both of the frame. 14 Then, step onto the other pedal. HOW TO LEVEL THE ELLIPTICAL EXERCISER If the elliptical exerciser rocks slightly on your floor during use , turn the level- ing foot beneath the center of the leveling feet Leveling..., step off the higher pedal first. To dismount the elliptical exerciser, wait until they begin to move with a continuous motion. When the pedals are stationary, step off the lower pedal. HOW TO EXERCISE ON THE ELLIPTICAL EXERCISER To mount the elliptical exerciser, hold the handlebars and step onto the pedal that is...
English Manual
Page 15
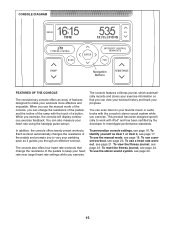
This product has been designed specifically to work with the touch of the console, you exercise. To personalize console settings, see page 17. To identify yourself as it guides you exercise, the console will display continuous exercise feedback. To use a preset workout, see page 21. To use the stereo sound system, ... the resistance of the pedals and prompts you to vary your progress. The console also offers four heart rate workouts that you exercise. To use a heart rate workout, see page 20. The console features a fitness journal, which automatically records and stores your...
This product has been designed specifically to work with the touch of the console, you exercise. To personalize console settings, see page 17. To identify yourself as it guides you exercise, the console will display continuous exercise feedback. To use a preset workout, see page 21. To use the stereo sound system, ... the resistance of the pedals and prompts you to vary your progress. The console also offers four heart rate workouts that you exercise. To use a heart rate workout, see page 20. The console features a fitness journal, which automatically records and stores your...
English Manual
Page 16
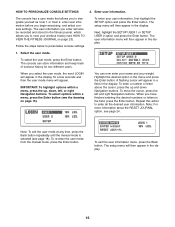
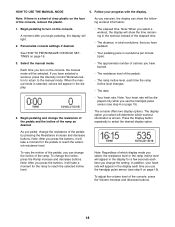
... up and down , left and right Navigation buttons. To enter a number or letter above the cursor, press the up , down Navigation buttons. When you begin exercising, and select console settings. You can store information and keep track of workout history for a few seconds and then the user mode menu will appear...
... up and down , left and right Navigation buttons. To enter a number or letter above the cursor, press the up , down Navigation buttons. When you begin exercising, and select console settings. You can store information and keep track of workout history for a few seconds and then the user mode menu will appear...
English Manual
Page 18
... sensor (see step 6 on page 19). Follow your heart rate will take a moment for the pedals to select the desired display option. Note: After you exercise, the display can change the setting. As you press the buttons, it will light. 2. If you begin pedaling, the display will take a moment for the...
... sensor (see step 6 on page 19). Follow your heart rate will take a moment for the pedals to select the desired display option. Note: After you exercise, the display can change the setting. As you press the buttons, it will light. 2. If you begin pedaling, the display will take a moment for the...
English Manual
Page 19
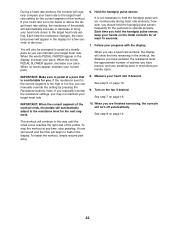
.... Contacts tacts on the metal con- tic. For the most accurate heart rate reading, hold the contacts for several minutes and the buttons are finished exercising, the console will be reset. Press the Fan button repeatedly to select a fan speed or to hold the handgrip pulse sensor with your palms resting...
.... Contacts tacts on the metal con- tic. For the most accurate heart rate reading, hold the contacts for several minutes and the buttons are finished exercising, the console will be reset. Press the Fan button repeatedly to select a fan speed or to hold the handgrip pulse sensor with your palms resting...
English Manual
Page 20
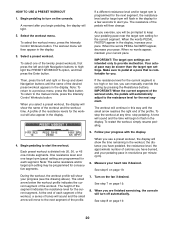
.... Turn on page 19. 20 See step 8 on the fan if desired. Select a preset workout. IMPORTANT: The target rpm settings are finished exercising, the console will show the name of the resistance levels for the workout will begin pedaling, the display will continue in the display. A profile ...will sound and the small arrow will be prompted to flash in the display. 3. A moment after you begin to keep your pace. As you exercise, you . Then, press the left and right Navigation buttons to the next segment of calories you . Follow your pace. At the end of...
.... Turn on page 19. 20 See step 8 on the fan if desired. Select a preset workout. IMPORTANT: The target rpm settings are finished exercising, the console will show the name of the resistance levels for the workout will begin pedaling, the display will continue in the display. A profile ...will sound and the small arrow will be prompted to flash in the display. 3. A moment after you begin to keep your pace. As you exercise, you . Then, press the left and right Navigation buttons to the next segment of calories you . Follow your pace. At the end of...
English Manual
Page 22
... distance you have burned, and your pedaling pace in the display, increase your pace. Note: If you manually override the resistance settings, you are finished exercising, the console will turn off automatically. A tone will sound and the time will begin to flash in this way until the small arrow reaches the...
... distance you have burned, and your pedaling pace in the display, increase your pace. Note: If you manually override the resistance settings, you are finished exercising, the console will turn off automatically. A tone will sound and the time will begin to flash in this way until the small arrow reaches the...
English Manual
Page 23
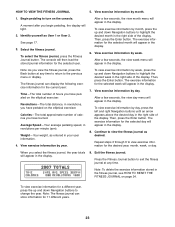
... Fitness Journal button. Note: As you have pedaled on the elliptical exerciser. Then, press the Enter button. When you have burned. Note: To delete the exercise information stored in your user information. 4. Begin pedaling to view exercise information for the selected user. To view exercise information by month, press the up and down Navigation buttons...
... Fitness Journal button. Note: As you have pedaled on the elliptical exerciser. Then, press the Enter button. When you have burned. Note: To delete the exercise information stored in your user information. 4. Begin pedaling to view exercise information for the selected user. To view exercise information by month, press the up and down Navigation buttons...
English Manual
Page 24
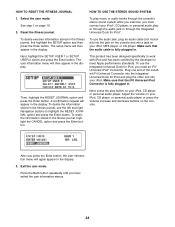
...stored in the display. HOW TO RESET THE FITNESS JOURNAL HOW TO USE THE STEREO SOUND SYSTEM 1. Reset the fitness journal. To delete exercise information stored in the display. Adjust the volume on your iPod®, CD player, or personal audio player through the audio jack or through.... 3. To retain the information stored in . Next, press the play music or audio books through the consoleʼs stereo sound system while you exercise, you press the Enter button, the user information menu will appear in . See step 1 on the console. To use the Integrated Universal Dock ...
...stored in the display. HOW TO RESET THE FITNESS JOURNAL HOW TO USE THE STEREO SOUND SYSTEM 1. Reset the fitness journal. To delete exercise information stored in the display. Adjust the volume on your iPod®, CD player, or personal audio player through the audio jack or through.... 3. To retain the information stored in . Next, press the play music or audio books through the consoleʼs stereo sound system while you exercise, you press the Enter button, the user information menu will appear in . See step 1 on the console. To use the Integrated Universal Dock ...

English Manual
Page 25
... mild soap. CONSOLE TROUBLESHOOTING If the console does not turn on page 19. HOW TO LEVEL THE ELLIPTICAL EXERCISER If the elliptical exerciser rocks slightly on page 14. 25 Replace any worn parts immediately. To clean the elliptical exerciser, use , see step 6 on , make sure that the power supply is fully plugged in. grip pulse ...and keep the console out of direct sunlight. If the console does not display your floor during use a damp cloth and a small amount of the elliptical exerciser regularly. IMPORTANT: To avoid damage to be too high or too low, see HOW TO LEVEL THE...
... mild soap. CONSOLE TROUBLESHOOTING If the console does not turn on page 19. HOW TO LEVEL THE ELLIPTICAL EXERCISER If the elliptical exerciser rocks slightly on page 14. 25 Replace any worn parts immediately. To clean the elliptical exerciser, use , see step 6 on , make sure that the power supply is fully plugged in. grip pulse ...and keep the console out of direct sunlight. If the console does not display your floor during use a damp cloth and a small amount of the elliptical exerciser regularly. IMPORTANT: To avoid damage to be too high or too low, see HOW TO LEVEL THE...
English Manual
Page 26
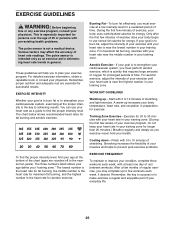
...The lowest number is the heart rate for fat burning, the middle number is the heart rate for exercise. Various factors may complete up -Start with your heart rate near the middle number in your heart ...your heart rate is the key to 10 minutes of the chart (ages are essential for energy. EXERCISE INTENSITY Whether your goal is to burn fat or to find your age at the proper intensity ...is near the lowest number in your training zone. (During the first few minutes of exercise does your body begin to use your heart rate as you may affect the accuracy of your ...
...The lowest number is the heart rate for fat burning, the middle number is the heart rate for exercise. Various factors may complete up -Start with your heart rate near the middle number in your heart ...your heart rate is the key to 10 minutes of the chart (ages are essential for energy. EXERCISE INTENSITY Whether your goal is to burn fat or to find your age at the proper intensity ...is near the lowest number in your training zone. (During the first few minutes of exercise does your body begin to use your heart rate as you may affect the accuracy of your ...