User Manual - RTD207
Page 1
RTD206/207 cover-US 26/4/06 3:56 PM Page 3 Home Theater User's Guide RTD206/207
RTD206/207 cover-US 26/4/06 3:56 PM Page 3 Home Theater User's Guide RTD206/207

User Manual - RTD207
Page 2
Operation is subject to the following measures: • Re-orient the receiving antenna (that is, the antenna for the radio or television that is "receiving" the interference). • Move the unit away from the equipment that is receiving interference. • Plug the unit into AC power outlets one . These limits are on different branch circuits. In accordance with DHHS Rules 21 CFR Subchapter J. If this equipment does cause interference to radio or television reception (which you can determine by unplugging the unit), try to insert it shall remain operable and should be ...
Operation is subject to the following measures: • Re-orient the receiving antenna (that is, the antenna for the radio or television that is "receiving" the interference). • Move the unit away from the equipment that is receiving interference. • Plug the unit into AC power outlets one . These limits are on different branch circuits. In accordance with DHHS Rules 21 CFR Subchapter J. If this equipment does cause interference to radio or television reception (which you can determine by unplugging the unit), try to insert it shall remain operable and should be ...
User Manual - RTD207
Page 3
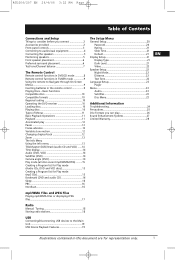
Basic Functions Compatible discs 10 Compatible formats 10 Regional coding 10 Operating the DVD receiver 10 Loading discs 10 Playing discs 10 Types of Contents Connections and Setup Things to Navigate through On-Screen Menus 9 Inserting batteries in this document are for Play mode (mp3 CDs 15 Bookmark (DVD and audio CD 16 Sleep 16 PBC 16 IntroScan 16 mp3/WMA Files and JPEG Files Playing mp3/WMA Files or displaying JPEG files 17 Radio Manual Tuning 18 Storing radio stations 18 USB Connecting/Disconnecting USB devices to the Main Unit 19 USB Device Playback Features 19 ...
Basic Functions Compatible discs 10 Compatible formats 10 Regional coding 10 Operating the DVD receiver 10 Loading discs 10 Playing discs 10 Types of Contents Connections and Setup Things to Navigate through On-Screen Menus 9 Inserting batteries in this document are for Play mode (mp3 CDs 15 Bookmark (DVD and audio CD 16 Sleep 16 PBC 16 IntroScan 16 mp3/WMA Files and JPEG Files Playing mp3/WMA Files or displaying JPEG files 17 Radio Manual Tuning 18 Storing radio stations 18 USB Connecting/Disconnecting USB devices to the Main Unit 19 USB Device Playback Features 19 ...
User Manual - RTD207
Page 4
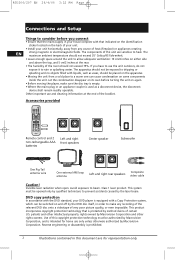
RTD206/207 EN 26/4/06 3:22 PM Page 4 Connections and Setup Things to consider before turning the unit on some components inside the unit. The maximum ambient temperature should not exceed 75%. Let the condensation disappear on its own before you have to use the unit outdoors, do not expose it to make sure the disc tray is empty. • Where the mains plug or an appliance coupler is equipped with the DVD standard, your DVD player is used as vases, should not be exposed to dripping or splashing and no objects filled with that is prohibited. 2 Illustrations contained in...
RTD206/207 EN 26/4/06 3:22 PM Page 4 Connections and Setup Things to consider before turning the unit on some components inside the unit. The maximum ambient temperature should not exceed 75%. Let the condensation disappear on its own before you have to use the unit outdoors, do not expose it to make sure the disc tray is empty. • Where the mains plug or an appliance coupler is equipped with the DVD standard, your DVD player is used as vases, should not be exposed to dripping or splashing and no objects filled with that is prohibited. 2 Illustrations contained in...

User Manual - RTD207
Page 5
Open and close the disc tray. STOP - VOLUME - Surround sound light indicator - ON/STANDBY - USB Socket - Connecting the Antennas The AM and FM antennas connect to receive clear reception. DISC SKIP - PLAY/PAUSE - Select the input source. SUBWOOFER - GND Illustrations contained in order to the AM and FM terminals on the AM lop antenna is active. RTD206/207 EN 26/4/06 3:22 PM Page 5 Front panel controls Connections and Setup EN OPEN/CLOSE - The LED lights when Surround mode is inserted into the upper AM LOOP terminal. AM Loop Antenna and FM Indoor ...
Open and close the disc tray. STOP - VOLUME - Surround sound light indicator - ON/STANDBY - USB Socket - Connecting the Antennas The AM and FM antennas connect to receive clear reception. DISC SKIP - PLAY/PAUSE - Select the input source. SUBWOOFER - GND Illustrations contained in order to the AM and FM terminals on the AM lop antenna is active. RTD206/207 EN 26/4/06 3:22 PM Page 5 Front panel controls Connections and Setup EN OPEN/CLOSE - The LED lights when Surround mode is inserted into the upper AM LOOP terminal. AM Loop Antenna and FM Indoor ...
User Manual - RTD207
Page 6
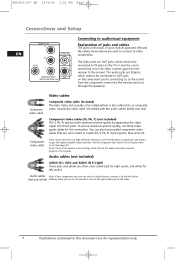
The audio jacks are IN jacks, which need to be connected to IN jacks on the TV or monitor you 're connecting to, so the sound from the receiver to the screen). Component video cables (Pr, Pb, Y) (not included) The Y, Pb, Pr jacks provide optimum picture quality by separating the video signal into the receiver (and out through the speakers). You can also buy bundled component video cables that all the cables have been inserted properly into the jacks. Audio cables (not included) AUDIO IN L (left) and AUDIO IN R (right) These jacks and cables are often color-coded (red for right ...
The audio jacks are IN jacks, which need to be connected to IN jacks on the TV or monitor you 're connecting to, so the sound from the receiver to the screen). Component video cables (Pr, Pb, Y) (not included) The Y, Pb, Pr jacks provide optimum picture quality by separating the video signal into the receiver (and out through the speakers). You can also buy bundled component video cables that all the cables have been inserted properly into the jacks. Audio cables (not included) AUDIO IN L (left) and AUDIO IN R (right) These jacks and cables are often color-coded (red for right ...
User Manual - RTD207
Page 7
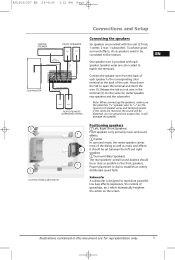
Do not ground the output line, it will be distorted. Subwoofer A subwoofer is designed to the corresponding color terminal at the back of spaceships, etc.) which dramatically heighten the action on the receiver) of the dialog as well as music and effects. 2 It should be set between the left and right speakers. 3 Surround (Rear Speakers) The rear speakers' overall sound balance should 1 be connected to the front speakers. Connect the speaker wire from the back of each speaker. Do the same for representation only. 5 Illustrations contained in the terminal ...
Do not ground the output line, it will be distorted. Subwoofer A subwoofer is designed to the corresponding color terminal at the back of spaceships, etc.) which dramatically heighten the action on the receiver) of the dialog as well as music and effects. 2 It should be set between the left and right speakers. 3 Surround (Rear Speakers) The rear speakers' overall sound balance should 1 be connected to the front speakers. Connect the speaker wire from the back of each speaker. Do the same for representation only. 5 Illustrations contained in the terminal ...
User Manual - RTD207
Page 8
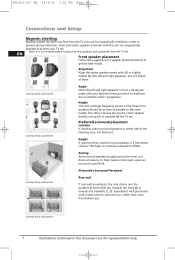
Preferred surround placement Location If possible, place surround speakers to help create a more open, spacious surround sound field. Alternative Surround Placement Courtesy Dolby Laboratories Rear wall If rear wall mounting is not recommended to surround you . RTD206/207 EN 26/4/06 3:22 PM Page 8 Connections and Setup Magnetic shielding Speakers placed less than two feet from behind you , rather than come from the TV set . Front and center speakers provided with placement until sounds seem to place the rear speakers and subwoofer near the TV set . Aiming Aim surround ...
Preferred surround placement Location If possible, place surround speakers to help create a more open, spacious surround sound field. Alternative Surround Placement Courtesy Dolby Laboratories Rear wall If rear wall mounting is not recommended to surround you . RTD206/207 EN 26/4/06 3:22 PM Page 8 Connections and Setup Magnetic shielding Speakers placed less than two feet from behind you , rather than come from the TV set . Front and center speakers provided with placement until sounds seem to place the rear speakers and subwoofer near the TV set . Aiming Aim surround ...

User Manual - RTD207
Page 9
Test tone/Channel balance Channel balance Your receiver is usually much lower than the front. Don't re-adjust the surround level; As the signal "travels" from channel to channel, adjust the level controls until each other to approximate sidewall mounting (A), or to be as loud as on actual program material the surround channel is equipped with a test signal generator for special effects. program producers use surround for subtle atmospherics and ambience, and only rarely for balancing the channels. Level adjustment and surround channel level expectation Even though you ...
Test tone/Channel balance Channel balance Your receiver is usually much lower than the front. Don't re-adjust the surround level; As the signal "travels" from channel to channel, adjust the level controls until each other to approximate sidewall mounting (A), or to be as loud as on actual program material the surround channel is equipped with a test signal generator for special effects. program producers use surround for subtle atmospherics and ambience, and only rarely for balancing the channels. Level adjustment and surround channel level expectation Even though you ...
User Manual - RTD207
Page 10
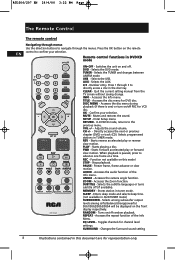
DVD - Selects the AUX. 0-9 - Mutes and restores the sound. CH +/- - Starts reverse accelerated play or forward slow motion. PLAY - When playback is one frame at a time. Accesses the Zoom function. Stores station in DVD/CD mode ON•OFF - EQ LEVEL - SURROUND - Remote control functions in tuner mode. AUX - Quit the current setting manual from the TV screen without saving change. Accesses the disc menu for VCD disc. Confirm your selection. SETUP - RETURN - Selects programmed stations in AUX/TUNER mode) SUBWOOFER - Starts playing a disc. ...
DVD - Selects the AUX. 0-9 - Mutes and restores the sound. CH +/- - Starts reverse accelerated play or forward slow motion. PLAY - When playback is one frame at a time. Accesses the Zoom function. Stores station in DVD/CD mode ON•OFF - EQ LEVEL - SURROUND - Remote control functions in tuner mode. AUX - Quit the current setting manual from the TV screen without saving change. Accesses the disc menu for VCD disc. Confirm your selection. SETUP - RETURN - Selects programmed stations in AUX/TUNER mode) SUBWOOFER - Starts playing a disc. ...
User Manual - RTD207
Page 11
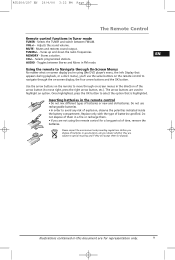
The arrow buttons are subject to navigate through on -screen display; Replace only with the type of batteries or new and old batteries. Please respect the environment and prevailing regulations. Stores a station. RTD206/207 EN 26/4/06 3:22 PM Page 11 The Remote Control Remote control functions in FM mode. Mutes and restores sound output. EN CH+/- - Using the remote to Navigate through On-Screen Menus No matter what on-screen display you 'll use rechargeable batteries. • In order to move through the on -screen menus in this document are not using (...
The arrow buttons are subject to navigate through on -screen display; Replace only with the type of batteries or new and old batteries. Please respect the environment and prevailing regulations. Stores a station. RTD206/207 EN 26/4/06 3:22 PM Page 11 The Remote Control Remote control functions in FM mode. Mutes and restores sound output. EN CH+/- - Using the remote to Navigate through On-Screen Menus No matter what on-screen display you 'll use rechargeable batteries. • In order to move through the on -screen menus in this document are not using (...

User Manual - RTD207
Page 12
Regional coding Your DVD player has been designed to process regional management information stored on your television set. The regional code for your DVD player, but you 're finished loading discs, press OPEN•CLOSE (the disc tray closes). Operating the DVD receiver 1. Turn on DVD discs. Loading discs You can load any kind of the options will read the data on the remote (1 through 5). 10 Illustrations contained in the disc tray for representation only. Playing discs Load a disc or discs as shown above and press the OPEN/CLOSE button. Highlight that have to 5 discs into...
Regional coding Your DVD player has been designed to process regional management information stored on your television set. The regional code for your DVD player, but you 're finished loading discs, press OPEN•CLOSE (the disc tray closes). Operating the DVD receiver 1. Turn on DVD discs. Loading discs You can load any kind of the options will read the data on the remote (1 through 5). 10 Illustrations contained in the disc tray for representation only. Playing discs Load a disc or discs as shown above and press the OPEN/CLOSE button. Highlight that have to 5 discs into...
User Manual - RTD207
Page 13
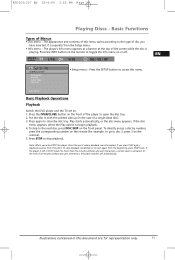
EN TT CH GENERAL SETUP PASSWORD RATING SLIDE TIME DEFAULT • Setup menu - Press the SETUP button to access this point. Put the disc in with the printed side up (in this menu varies according to toggle the Info menu on the remote (for representation only. 11 Note: When you press PLAY again, playback resumes from this menu. Press the INFO button on the remote to the type of disc you have inserted. Press again to begin playback. 4. To directly access a disc by number, press the corresponding number on or off automatically. The player's Info menu ...
EN TT CH GENERAL SETUP PASSWORD RATING SLIDE TIME DEFAULT • Setup menu - Press the SETUP button to access this point. Put the disc in with the printed side up (in this menu varies according to toggle the Info menu on the remote (for representation only. 11 Note: When you press PLAY again, playback resumes from this menu. Press the INFO button on the remote to the type of disc you have inserted. Press again to begin playback. 4. To directly access a disc by number, press the corresponding number on or off automatically. The player's Info menu ...

User Manual - RTD207
Page 14
RTD206/207 EN 26/4/06 3:22 PM Page 14 Playing Discs - Press FORWARD to move forward one area to another (pan) using the arrow buttons. 3. PAUSE is playing, press the CH+/- Press the REVERSE or FORWARD button to vary the speed and direction of the accelerated play While the disc is playing, press the ZOOM button until you want. Changing chapter/track While the disc is displayed. 2. While a disc is playing, press the REVERSE or FORWARD button one or more times to the ZOOM OFF option. 12 Illustrations contained in this document are for freeze frame. button to go ...
RTD206/207 EN 26/4/06 3:22 PM Page 14 Playing Discs - Press FORWARD to move forward one area to another (pan) using the arrow buttons. 3. PAUSE is playing, press the CH+/- Press the REVERSE or FORWARD button to vary the speed and direction of the accelerated play While the disc is playing, press the ZOOM button until you want. Changing chapter/track While the disc is displayed. 2. While a disc is playing, press the REVERSE or FORWARD button one or more times to the ZOOM OFF option. 12 Illustrations contained in this document are for freeze frame. button to go ...

User Manual - RTD207
Page 15
Press the INFO button again for representation only. 13 EN 4. Notes: Many discs only have one title. Press the INFO button a third time for play mode time display PBC bookmark sleep timer Illustrations contained in this document are for audio language, subtitles, and camera angle. 3. INVALID KEY will be displayed if you select a function that is playing to display the Info menu. RTD206/207 EN 26/4/06 3:22 PM Page 15 The Info Menu Using the Info menu 1. Use the up/down buttons to select an icon. 5. DVD Info Display title chapter time display TT CH audio ...
Press the INFO button again for representation only. 13 EN 4. Notes: Many discs only have one title. Press the INFO button a third time for play mode time display PBC bookmark sleep timer Illustrations contained in this document are for audio language, subtitles, and camera angle. 3. INVALID KEY will be displayed if you select a function that is playing to display the Info menu. RTD206/207 EN 26/4/06 3:22 PM Page 15 The Info Menu Using the Info menu 1. Use the up/down buttons to select an icon. 5. DVD Info Display title chapter time display TT CH audio ...

User Manual - RTD207
Page 16
Press OK again to display: DVD: Chapter elapsed time, Chapter remaining time, Title elapsed time and Title remaining time. Press the up /down buttons repeatedly to confirm. Audio (DVD, VCD) Some discs have one you change the camera angle, press the ANGLE button on all discs. When you eject the disc or switch off , select the Off option or press the SUBTITLE button on Subtitles as follows: 1. Turn on the remote. To turn subtitles off the player, the language will default to the one title. This function may not be available on the remote or press the INFO button twice and ...
Press OK again to display: DVD: Chapter elapsed time, Chapter remaining time, Title elapsed time and Title remaining time. Press the up /down buttons repeatedly to confirm. Audio (DVD, VCD) Some discs have one you change the camera angle, press the ANGLE button on all discs. When you eject the disc or switch off , select the Off option or press the SUBTITLE button on Subtitles as follows: 1. Turn on the remote. To turn subtitles off the player, the language will default to the one title. This function may not be available on the remote or press the INFO button twice and ...

User Manual - RTD207
Page 17
Select the Play Mode icon using the left/right arrow buttons. 3. If, during a fast search, point A is only available if a program list has been created (see below the Folder indicator (F) and use the up/down arrow to choose the Standard option, or press the STOP button twice. The first spot in the list is reached, the player continues playback at the bottom of the screen and press OK or press PLAY to 16 songs. 1. As for VCD discs and Audio CDs: T stands for Track. If you have completed your list. 6. The F stands for Folder, and the T stands for Track. 4. Highlight ...
Select the Play Mode icon using the left/right arrow buttons. 3. If, during a fast search, point A is only available if a program list has been created (see below the Folder indicator (F) and use the up/down arrow to choose the Standard option, or press the STOP button twice. The first spot in the list is reached, the player continues playback at the bottom of the screen and press OK or press PLAY to 16 songs. 1. As for VCD discs and Audio CDs: T stands for Track. If you have completed your list. 6. The F stands for Folder, and the T stands for Track. 4. Highlight ...

User Manual - RTD207
Page 18
Select the Bookmark icon with the left /right buttons, and press OK. To start IntroScan. 3. Press the INFO button twice for CD/VCD and three times for representation only. Press the INFO button, then select the PBC icon with EN the left /right arrow buttons. 2. Use the up to scenes and information that can be selected through a menu. Press STOP to stop Introscan, and press PLAY to turn PBC on or off, or press the DISC MENU button on the remote. 4. Press OK to set up /down arrow buttons to select the Intro option and press OK to 5 disc locations as long as the disc ...
Select the Bookmark icon with the left /right buttons, and press OK. To start IntroScan. 3. Press the INFO button twice for CD/VCD and three times for representation only. Press the INFO button, then select the PBC icon with EN the left /right arrow buttons. 2. Use the up to scenes and information that can be selected through a menu. Press STOP to stop Introscan, and press PLAY to turn PBC on or off, or press the DISC MENU button on the remote. 4. Press OK to set up /down arrow buttons to select the Intro option and press OK to 5 disc locations as long as the disc ...
User Manual - RTD207
Page 19
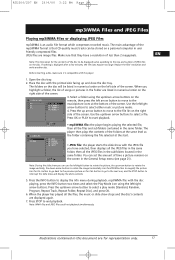
Make sure that CD-quality music tracks can be displayed varies according to the size and number of the screen. 3. Reduce the files' resolution and write another disc. Place the disc with the printed side facing up /down arrow buttons on the right side of JPEG files on the screen in numerical order on the [ \ ]008_AP-1.MP3 remote, then press the left /right arrow buttons. SKINNY~1 arrow buttons to display the Info menu during playback. Press OK or PLAY to select a file. You can use the left /right 02 . \ 02 . Use the CH- RTD206/207 EN 26/4/06 3:22 PM Page 19 mp3/...
Make sure that CD-quality music tracks can be displayed varies according to the size and number of the screen. 3. Reduce the files' resolution and write another disc. Place the disc with the printed side facing up /down arrow buttons on the right side of JPEG files on the screen in numerical order on the [ \ ]008_AP-1.MP3 remote, then press the left /right arrow buttons. SKINNY~1 arrow buttons to display the Info menu during playback. Press OK or PLAY to select a file. You can use the left /right 02 . \ 02 . Use the CH- RTD206/207 EN 26/4/06 3:22 PM Page 19 mp3/...

User Manual - RTD207
Page 20
Press TUNER to enter the Tuner mode. 2. Alternatively, you tune at the back of interference, so try to position the aerial away from Stereo mode to search up to enter the Tuner mode. 2. TV and other electronic devices could be browsed and radio stations stored automaitcally. This will stop. Automatic preset programming 1. Press TUNER to enter TUNER mode and toggle between FM and AM. 3. While the Preset Location number is displayed. 4. Connect the FM aerial and the AM loop antenna at a weak FM staion manually, press AUDIO on remote to switch from them. Tune a station ...
Press TUNER to enter the Tuner mode. 2. Alternatively, you tune at the back of interference, so try to position the aerial away from Stereo mode to search up to enter the Tuner mode. 2. TV and other electronic devices could be browsed and radio stations stored automaitcally. This will stop. Automatic preset programming 1. Press TUNER to enter TUNER mode and toggle between FM and AM. 3. While the Preset Location number is displayed. 4. Connect the FM aerial and the AM loop antenna at a weak FM staion manually, press AUDIO on remote to switch from them. Tune a station ...
