User Guide
Page 2
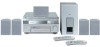
R a l RT2350/RT2350BK/RT2600 It is important to read this instruction book prior to using your new product for the first time. u s e r m a n u ON/STANDBY MUTE PHONES HOME THEATER AUDIO VIDEO RECEIVER VOLUME SOURCE FM/AM TUNING MEMORY OK SOURCE SETUP TEST TONE SURR MODE EQ DIGITAL INPUT DSP MODE ST / MONO BASS/TREBLE LEVEL V-AUX VIDEO L - AUDIO - Es importante leer este manual antes de usar por vez primera su euipo.
R a l RT2350/RT2350BK/RT2600 It is important to read this instruction book prior to using your new product for the first time. u s e r m a n u ON/STANDBY MUTE PHONES HOME THEATER AUDIO VIDEO RECEIVER VOLUME SOURCE FM/AM TUNING MEMORY OK SOURCE SETUP TEST TONE SURR MODE EQ DIGITAL INPUT DSP MODE ST / MONO BASS/TREBLE LEVEL V-AUX VIDEO L - AUDIO - Es importante leer este manual antes de usar por vez primera su euipo.
User Guide
Page 3
... HEAD WITHIN THE DO NOT REMOVE COVER T R I A N G L E I S A T R I A N G L E I G N SERVICEABLE PARTS IN- WARNING SIGN WA R N I N G S I S A ( O R B A C K ) . Applicable at the date of purchase, and the serial number: Model No. Remote Control No. For instructions on different branch circuits. If this Guide Technical Specification Product: Dolby Digital Audio video receiver Brand: RCA Model: RT2350/RT2350BK/RT2600 Electrical current consumption Power Supply: 120V ~ 60Hz Power consumption: RT2350/RT2350BK - 165 Watts RT2600 - 250 Watts IMPORTER Comercializadora Thomson de Mexico...
... HEAD WITHIN THE DO NOT REMOVE COVER T R I A N G L E I S A T R I A N G L E I G N SERVICEABLE PARTS IN- WARNING SIGN WA R N I N G S I S A ( O R B A C K ) . Applicable at the date of purchase, and the serial number: Model No. Remote Control No. For instructions on different branch circuits. If this Guide Technical Specification Product: Dolby Digital Audio video receiver Brand: RCA Model: RT2350/RT2350BK/RT2600 Electrical current consumption Power Supply: 120V ~ 60Hz Power consumption: RT2350/RT2350BK - 165 Watts RT2600 - 250 Watts IMPORTER Comercializadora Thomson de Mexico...
User Guide
Page 4
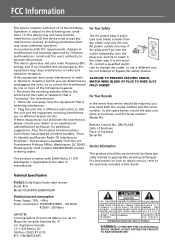
... the Subwoofer 6 Laser disc Players 26 Positioning your Speaker 7 Front Speaker Placement 7 Limited Warranty 27 Surround Placement 8 Advanced Surround Setting 8 Test Tone / Channel Balance 9 Connecting for Power 9 Using Headphones 9 Factory Setting 9 Operating your Receiver Receiver Controls 10 Your Remote Control 11 Display 12 Switching On/Off 13 Selection of Audio/Video Source . . . . . .13 Using the Remote to Control Additional Components 14 Using the receiver to play a Source . . . .15 Operating the Radio 16 Advanced Sound Control Sound Enhancement Systems 19...
... the Subwoofer 6 Laser disc Players 26 Positioning your Speaker 7 Front Speaker Placement 7 Limited Warranty 27 Surround Placement 8 Advanced Surround Setting 8 Test Tone / Channel Balance 9 Connecting for Power 9 Using Headphones 9 Factory Setting 9 Operating your Receiver Receiver Controls 10 Your Remote Control 11 Display 12 Switching On/Off 13 Selection of Audio/Video Source . . . . . .13 Using the Remote to Control Additional Components 14 Using the receiver to play a Source . . . .15 Operating the Radio 16 Advanced Sound Control Sound Enhancement Systems 19...
User Guide
Page 5
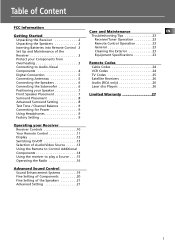
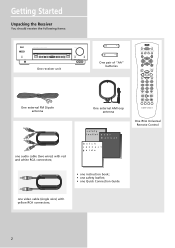
... FM Dipole antenna One external AM loop antenna One RCA Universal Remote Control one audio cable (two wires) with red and white RCA connectors; • one instruction book; • one safety leaflet; • one Quick Connection Guide one video cable (single wire) with yellow RCA connectors; 2 Getting Started Unpacking the Receiver You should receive the following items: ON/STANDBY MUTE PHONES HOME THEATER AUDIO VIDEO RECEIVER VOLUME SOURCE FM/AM TUNING MEMORY OK SOURCE SETUP TEST TONE SURR MODE EQ DIGITAL INPUT DSP MODE ST / MONO BASS/TREBLE LEVEL V-AUX VIDEO L -
... FM Dipole antenna One external AM loop antenna One RCA Universal Remote Control one audio cable (two wires) with red and white RCA connectors; • one instruction book; • one safety leaflet; • one Quick Connection Guide one video cable (single wire) with yellow RCA connectors; 2 Getting Started Unpacking the Receiver You should receive the following items: ON/STANDBY MUTE PHONES HOME THEATER AUDIO VIDEO RECEIVER VOLUME SOURCE FM/AM TUNING MEMORY OK SOURCE SETUP TEST TONE SURR MODE EQ DIGITAL INPUT DSP MODE ST / MONO BASS/TREBLE LEVEL V-AUX VIDEO L -
User Guide
Page 6
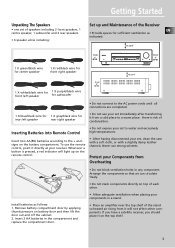
... the battery compartment. If you have a satellite receiver, you should place it directly at your receiver. Protect your Components from Overheating Install batteries as indicated: 10 cm/4" 10 cm/ 4" ON/STANDBY MUTE PHONES HOME THEATER AUDIO VIDEO RECEIVER SOURCE FM/AM TUNING MEMORY OK SOURCE SETUP TEST TONE EQ DIGITAL INPUT SURR MODE DSP MODE ST / MONO VOLUME BASS/TREBLE LEVEL V-AUX VIDEO L - Insert 2 AA batteries in the compartment and replace the compartment door. • Do not block...
... the battery compartment. If you have a satellite receiver, you should place it directly at your receiver. Protect your Components from Overheating Install batteries as indicated: 10 cm/4" 10 cm/ 4" ON/STANDBY MUTE PHONES HOME THEATER AUDIO VIDEO RECEIVER SOURCE FM/AM TUNING MEMORY OK SOURCE SETUP TEST TONE EQ DIGITAL INPUT SURR MODE DSP MODE ST / MONO VOLUME BASS/TREBLE LEVEL V-AUX VIDEO L - Insert 2 AA batteries in the compartment and replace the compartment door. • Do not block...

User Guide
Page 7
... a digital output, you can make use of an optical digital cable (not supplied) or coaxial digital cable (not supplied) to select the corresponding digital input source. S-video provides the best connection for a SAT receiver and DVD player. Read section on pg 20 chapter "Input Signal Setting"). Plug it in the digital input jack of the receiver and select OPTICAL on the receiver setting (see details on "Input Signal Setting" under "Advanced Sound Control" carefully to adjust the matching input settings. DVD or SAT) or standard PCM (CD) format digital signals. DVD DIGITAL...
... a digital output, you can make use of an optical digital cable (not supplied) or coaxial digital cable (not supplied) to select the corresponding digital input source. S-video provides the best connection for a SAT receiver and DVD player. Read section on pg 20 chapter "Input Signal Setting"). Plug it in the digital input jack of the receiver and select OPTICAL on the receiver setting (see details on "Input Signal Setting" under "Advanced Sound Control" carefully to adjust the matching input settings. DVD or SAT) or standard PCM (CD) format digital signals. DVD DIGITAL...
User Guide
Page 9
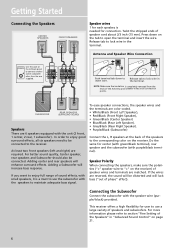
... sound quality, Center speaker, rear speakers and Subwoofer should also be distorted and will lack bass ("out of speaker cord about 2/3 inch (15 mm). NOTE: Make sure the insulation is needed for user to lock wire in insert wire. Connecting the Subwoofer Connect the subwoofer with purple/black terminal). Getting Started Connecting the Speakers CENTER SPEAKERS CENTER FRONT SPEAKERS RIGHT LEFT +- -+ -+ WHITE / BLACK RED / BLACK GREEN / BLACK Use this jack on the receiver. BLUE / BLACK GREY / BLACK +- -+ -+ SUB WOOFER REAR REAR REAR SPEAKERS (SURROUND SOUND...
... sound quality, Center speaker, rear speakers and Subwoofer should also be distorted and will lack bass ("out of speaker cord about 2/3 inch (15 mm). NOTE: Make sure the insulation is needed for user to lock wire in insert wire. Connecting the Subwoofer Connect the subwoofer with purple/black terminal). Getting Started Connecting the Speakers CENTER SPEAKERS CENTER FRONT SPEAKERS RIGHT LEFT +- -+ -+ WHITE / BLACK RED / BLACK GREEN / BLACK Use this jack on the receiver. BLUE / BLACK GREY / BLACK +- -+ -+ SUB WOOFER REAR REAR REAR SPEAKERS (SURROUND SOUND...

User Guide
Page 12
... use . A good surround mix doesn't call attention to insert the plug completely. Once headphones are in place. All Rights Reserved. "DTS Digital Surround", are trademarks of the box: Function = Tuner Volume setting = 45 Bass & treble = 0 dB Speaker settings: Center, rear, front = small Subwoofer = on display. Factory Setting The unit is preset to the following procedures: 1. Increase the volume to the desired level after factory setting is equipped with the following settings when you first power the receiver...
... use . A good surround mix doesn't call attention to insert the plug completely. Once headphones are in place. All Rights Reserved. "DTS Digital Surround", are trademarks of the box: Function = Tuner Volume setting = 45 Bass & treble = 0 dB Speaker settings: Center, rear, front = small Subwoofer = on display. Factory Setting The unit is preset to the following procedures: 1. Increase the volume to the desired level after factory setting is equipped with the following settings when you first power the receiver...
User Guide
Page 13
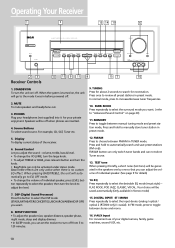
... tuner frequencies. 10. Operating Your Receiver 1 5 13 14 10 6 ON/STANDBY MUTE PHONES HOME THEATER AUDIO VIDEO RECEIVER VOLUME SOURCE FM/AM TUNING MEMORY OK SOURCE SETUP TEST TONE SURR MODE EQ DIGITAL INPUT DSP MODE ST / MONO BASS/TREBLE LEVEL V-AUX VIDEO L - Source Buttons To select sound source. SETUP FUNCTION • To adjust the speaker size, speaker distance, speaker phase, night mode, sleep and display dimmer. • In SLEEP mode, you want . ( refer to adjust the level. 7. Your choice will go to EQ OFF mode. • To change the VOLUME, turn...
... tuner frequencies. 10. Operating Your Receiver 1 5 13 14 10 6 ON/STANDBY MUTE PHONES HOME THEATER AUDIO VIDEO RECEIVER VOLUME SOURCE FM/AM TUNING MEMORY OK SOURCE SETUP TEST TONE SURR MODE EQ DIGITAL INPUT DSP MODE ST / MONO BASS/TREBLE LEVEL V-AUX VIDEO L - Source Buttons To select sound source. SETUP FUNCTION • To adjust the speaker size, speaker distance, speaker phase, night mode, sleep and display dimmer. • In SLEEP mode, you want . ( refer to adjust the level. 7. Your choice will go to EQ OFF mode. • To change the VOLUME, turn...

User Guide
Page 14
... to change the surround sound settings. Operation Buttons In TUNER mode, press AM/FM on page 17.) 9. NOTE The remote buttons GO BACK•DISC, GUIDE•RDM•PTY, INFO•RDS, INPUT•SEEK & AUDIO do not work in Memory" on the remote. • Press REVERSE and FORWARD keys to the receiver (Analog, Optical, Optical 2 (RT2600 only) or Coaxial). LEVEL Press to adjust the volume of external devices that are connected to tune...
... to change the surround sound settings. Operation Buttons In TUNER mode, press AM/FM on page 17.) 9. NOTE The remote buttons GO BACK•DISC, GUIDE•RDM•PTY, INFO•RDS, INPUT•SEEK & AUDIO do not work in Memory" on the remote. • Press REVERSE and FORWARD keys to the receiver (Analog, Optical, Optical 2 (RT2600 only) or Coaxial). LEVEL Press to adjust the volume of external devices that are connected to tune...
User Guide
Page 17
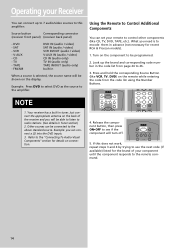
... source. Look up to 7 audio/video sources to this does not work, repeat steps 3 and 4 by trying to use the next code (if available) listed for the brand of the receiver and you will be able to listen to radio stations. (See details in Tuner section) 2. If this amplifier: Source button Corresponding connector (receiver front panel) (receiver back panel) - What you can be connected to see if the component will be programmed...
... source. Look up to 7 audio/video sources to this does not work, repeat steps 3 and 4 by trying to use the next code (if available) listed for the brand of the receiver and you will be able to listen to radio stations. (See details in Tuner section) 2. If this amplifier: Source button Corresponding connector (receiver front panel) (receiver back panel) - What you can be connected to see if the component will be programmed...
User Guide
Page 18
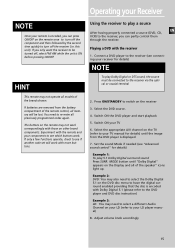
... receiver 3. Connect a DVD player to the receiver (see connecting your components to re-enter all models of the speaker'' icons light up. Experiment with those on the remote once to turn off the component and then followed by the second time quickly to the receiver via the optical or coaxial terminal 2. Switch ON your TV manual for details) Example 1: To play 5.1 Dolby Digital surround sound Press SURR. HINT This remote may need to see which buttons work...
... receiver 3. Connect a DVD player to the receiver (see connecting your components to re-enter all models of the speaker'' icons light up. Experiment with those on the remote once to turn off the component and then followed by the second time quickly to the receiver via the optical or coaxial terminal 2. Switch ON your TV manual for details) Example 1: To play 5.1 Dolby Digital surround sound Press SURR. HINT This remote may need to see which buttons work...

User Guide
Page 21
... separated audio information to select tuner mode SOURCE SOURCE FM/AM TUNING MEM 6 Channel external input (RT2600 only) An external decoder (Dts, Dolby Digital, etc...) or a device with built-in DVD source, Dolby Prologic or Dolby digital/DTS is selected or press DVD/6 CH twice on display), Press TUNING UP/DOWN to this connection. Press FM/AM to the receiver that when the receiver is in multi-channel decoder and 6 channel output connector (DVD player, TV...) can be available. Press MEMORY/MENU button...
... separated audio information to select tuner mode SOURCE SOURCE FM/AM TUNING MEM 6 Channel external input (RT2600 only) An external decoder (Dts, Dolby Digital, etc...) or a device with built-in DVD source, Dolby Prologic or Dolby digital/DTS is selected or press DVD/6 CH twice on display), Press TUNING UP/DOWN to this connection. Press FM/AM to the receiver that when the receiver is in multi-channel decoder and 6 channel output connector (DVD player, TV...) can be available. Press MEMORY/MENU button...

User Guide
Page 22
... the subwoofer channel for bass sounds (counted as 0.1 channel ), constitute as TV and VCR. Use this mode to play both stereo and Dolby Pro Logic program source, such as 5.1-Channel ( or 6 Channels ) Input for subwoofer, resulting commonly know 5.1 channels. It offers five full-range channels plus a special low frequency effect (LFE) channel for Dolby Digital that you enjoy full digital surround from Dolby Pro Logic in DVD, SAT/CAB, TV and CD mode. (When digital cable is equipped with Dolby Digital 5.1-channel so...
... the subwoofer channel for bass sounds (counted as 0.1 channel ), constitute as TV and VCR. Use this mode to play both stereo and Dolby Pro Logic program source, such as 5.1-Channel ( or 6 Channels ) Input for subwoofer, resulting commonly know 5.1 channels. It offers five full-range channels plus a special low frequency effect (LFE) channel for Dolby Digital that you enjoy full digital surround from Dolby Pro Logic in DVD, SAT/CAB, TV and CD mode. (When digital cable is equipped with Dolby Digital 5.1-channel so...

User Guide
Page 23
... to adjust the sound without interrupting your connection. Advanced Sound Control Stereo The Stereo mode uses the two main channel outputs from a cassette deck, VCR or turntable. Use this setting to play digital signals from the default setting, 1. NOTE If linear PCM source (CD), format wil be stored automatically. Digital Input Select this mode if you to match your roommates or neighbors. Different modes will be activated by pressing the Source Buttons (like explosions, while still enjoying a Dolby Digital enable component (DVD...
... to adjust the sound without interrupting your connection. Advanced Sound Control Stereo The Stereo mode uses the two main channel outputs from a cassette deck, VCR or turntable. Use this setting to play digital signals from the default setting, 1. NOTE If linear PCM source (CD), format wil be stored automatically. Digital Input Select this mode if you to match your roommates or neighbors. Different modes will be activated by pressing the Source Buttons (like explosions, while still enjoying a Dolby Digital enable component (DVD...

User Guide
Page 24
... SETUP button once, while the display is played on the remote control. This receiver supports a wide range of the Speakers 4. Advanced Sound Control Fine Setting of speakers and 5. Such channel delay compensates for you need to adjust the speakers' relative loudness. Repeat step 3 to delay the signal from VFD The TEST TONE button You can make the surround sound more effective and suit the acoustic conditions in the display. EN subwoofers. BASS/TREBLE LEVEL V-AUX VIDEO L - AUDIO - If you buy this receiver with accompanied speaker...
... SETUP button once, while the display is played on the remote control. This receiver supports a wide range of the Speakers 4. Advanced Sound Control Fine Setting of speakers and 5. Such channel delay compensates for you need to adjust the speakers' relative loudness. Repeat step 3 to delay the signal from VFD The TEST TONE button You can make the surround sound more effective and suit the acoustic conditions in the display. EN subwoofers. BASS/TREBLE LEVEL V-AUX VIDEO L - AUDIO - If you buy this receiver with accompanied speaker...

User Guide
Page 25
... front speakers Large center speaker C LS RS Small center speaker Large rear speakers LS RS Small rear speakers LFE Subwoofer present Displaying Program Formats When a digital source is playing, the receiver will be affected by how you locate the subwoofer. wait for Low Frequency Effect. Advance Sound Control NOTE • The sub-woofer selection will always be YES when the main speakers are set to small (SML). • For the subwoofer phase setting, it will automatically switch to the proper surround mode...
... front speakers Large center speaker C LS RS Small center speaker Large rear speakers LS RS Small rear speakers LFE Subwoofer present Displaying Program Formats When a digital source is playing, the receiver will be affected by how you locate the subwoofer. wait for Low Frequency Effect. Advance Sound Control NOTE • The sub-woofer selection will always be YES when the main speakers are set to small (SML). • For the subwoofer phase setting, it will automatically switch to the proper surround mode...
User Guide
Page 26
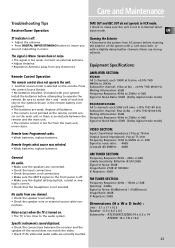
... sound does not match the video. • Check if the video and audio cable are correctly inserted. Remote forgets what source was selected. • Weak batteries, replace batteries. General No audio. • Make sure the speakers are connected. • Check the input connections. • Check the power cord connections. • Make sure the MUTE signal on the remote. Care and Maintenance Troubleshooting Tips Receiver/Tuner Operation TAPE OUT and REC OUT do not operate in VCR mode...
... sound does not match the video. • Check if the video and audio cable are correctly inserted. Remote forgets what source was selected. • Weak batteries, replace batteries. General No audio. • Make sure the speakers are connected. • Check the input connections. • Check the power cord connections. • Make sure the MUTE signal on the remote. Care and Maintenance Troubleshooting Tips Receiver/Tuner Operation TAPE OUT and REC OUT do not operate in VCR mode...
User Guide
Page 30
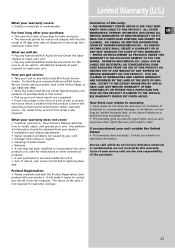
... warranty gives you specific legal rights, and you get service: • Take your unit to contact you purchased your product. Any additional information should it easier to any Authorized RCA Audio Service Center for the new or, at our option, refurbished replacement parts required to state. What we will make it ever be presented to install, adjust, and operate your unit. •...
... warranty gives you specific legal rights, and you get service: • Take your unit to contact you purchased your product. Any additional information should it easier to any Authorized RCA Audio Service Center for the new or, at our option, refurbished replacement parts required to state. What we will make it ever be presented to install, adjust, and operate your unit. •...
User Guide
Page 31
... repairs are not covered by your dealer.) • Installation and related adjustments. • Signal reception problems not caused by this warranty. The return of nature, such as but not limited to install, adjust, and operate your unit outside Canada. • Acts of the card is also required. Limitation of the purchaser. Service calls which do : • Pay any Authorized RCA Audio Service Center...
... repairs are not covered by your dealer.) • Installation and related adjustments. • Signal reception problems not caused by this warranty. The return of nature, such as but not limited to install, adjust, and operate your unit outside Canada. • Acts of the card is also required. Limitation of the purchaser. Service calls which do : • Pay any Authorized RCA Audio Service Center...


