
User Guide
Page 2
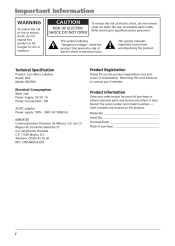
... ELECTRIC SHOCK DO NOT OPEN To reduce the risk of purchase: _____ i This symbol indicates important instructions accompanying the product. Technical Specification Product: Lyra Micro Jukebox Brand: RCA Model: RD2760 Product Registration Please fill out the product registration card and return it here. Electrical Consumption Main unit: Power Supply: 5V DC 1A Power...
... ELECTRIC SHOCK DO NOT OPEN To reduce the risk of purchase: _____ i This symbol indicates important instructions accompanying the product. Technical Specification Product: Lyra Micro Jukebox Brand: RCA Model: RD2760 Product Registration Please fill out the product registration card and return it here. Electrical Consumption Main unit: Power Supply: 5V DC 1A Power...

User Guide
Page 4
... ...11 Install MusicMatch Plug-in ...13 Launch the MusicMatch software ...14 Install Additional Services ...14 Connecting Lyra Micro Jukebox to the Computer ...15 Transferring Files to Lyra Micro Jukebox ...15 Transfer Files via MusicMatch Jukebox ...16 Create Pre-defined Playlists and Transferring them to ...the Jukebox ...17 Transfer Files via Windows Explorer (Drag and Drop) ...17 Disconnecting Your Lyra from the Computer (Windows 2000 or XP) ...18 System Tray Applications ...19 Profile ...19 Updating System File ...20 Verify User Playlists...
... ...11 Install MusicMatch Plug-in ...13 Launch the MusicMatch software ...14 Install Additional Services ...14 Connecting Lyra Micro Jukebox to the Computer ...15 Transferring Files to Lyra Micro Jukebox ...15 Transfer Files via MusicMatch Jukebox ...16 Create Pre-defined Playlists and Transferring them to ...the Jukebox ...17 Transfer Files via Windows Explorer (Drag and Drop) ...17 Disconnecting Your Lyra from the Computer (Windows 2000 or XP) ...18 System Tray Applications ...19 Profile ...19 Updating System File ...20 Verify User Playlists...

User Guide
Page 6
Go to change. 6 Before You Begin Unpacking Your Unit Your Lyra Micro Jukebox came with your computer's USB port. L Clip Phones Armband carrying case Illustrations contained within this publication are for representation only and subject to ... 24 for connection details. all of the items shown below should have been packed in the box with everything you need to make music portable - Lyra Micro Jukebox off stop rev fwd play on M m anage ent Softw ar icM us Music Management CD Contains the...
Go to change. 6 Before You Begin Unpacking Your Unit Your Lyra Micro Jukebox came with your computer's USB port. L Clip Phones Armband carrying case Illustrations contained within this publication are for representation only and subject to ... 24 for connection details. all of the items shown below should have been packed in the box with everything you need to make music portable - Lyra Micro Jukebox off stop rev fwd play on M m anage ent Softw ar icM us Music Management CD Contains the...

User Guide
Page 9
... on your computer and place the Music Management CD that are required. Turn on your Lyra Micro Jukebox. These components do the following: • install USB driver for the Lyra Micro Jukebox to the mp3, mp3PRO or WMA format so you have installed the required drivers. (Windows 98SE/Me only...) 1. The MusicMatch software also enables you to download files from music CDs) to function properly. 2. If you need to your Lyra Micro Jukebox The ...
... on your computer and place the Music Management CD that are required. Turn on your Lyra Micro Jukebox. These components do the following: • install USB driver for the Lyra Micro Jukebox to the mp3, mp3PRO or WMA format so you have installed the required drivers. (Windows 98SE/Me only...) 1. The MusicMatch software also enables you to download files from music CDs) to function properly. 2. If you need to your Lyra Micro Jukebox The ...
User Guide
Page 10
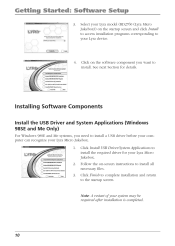
Select your Lyra model (RD2760 (Lyra Micro Jukebox)) on -screen instructions to your Lyra Micro Jukebox. 1. Getting Started: Software Setup 3. Follow the on the ...systems, you want to install a USB driver before your computer can recognize your Lyra device. 4. Click Finish to complete installation and return to install the required driver for details. Note: A restart... of your Lyra Micro Jukebox. Click on the software component you need to install. Click Install USB Driver/System ...
Select your Lyra model (RD2760 (Lyra Micro Jukebox)) on -screen instructions to your Lyra Micro Jukebox. 1. Getting Started: Software Setup 3. Follow the on the ...systems, you want to install a USB driver before your computer can recognize your Lyra device. 4. Click Finish to complete installation and return to install the required driver for details. Note: A restart... of your Lyra Micro Jukebox. Click on the software component you need to install. Click Install USB Driver/System ...

User Guide
Page 11
... delete the C:\Program Files\MusicMatch folder from Windows and where C:\Program Files is recommended to "Install MusicMatch Plug-in" on -screen instructions to your Lyra Micro Jukebox. Click Install MusicMatch Jukebox to start. Wait while the installation program begins. If you better manage your... Lyra Micro Jukebox. 1. Click Finish to complete installation and return to the startup screen. 2. 3. (Refer to page 19 for the installer to run the ...
... delete the C:\Program Files\MusicMatch folder from Windows and where C:\Program Files is recommended to "Install MusicMatch Plug-in" on -screen instructions to your Lyra Micro Jukebox. Click Install MusicMatch Jukebox to start. Wait while the installation program begins. If you better manage your... Lyra Micro Jukebox. 1. Click Finish to complete installation and return to the startup screen. 2. 3. (Refer to page 19 for the installer to run the ...

User Guide
Page 13
Note: As with any device that has a hard drive, you to restart your computer. RCA and Thomson are not responsible for the newly installed Lyra plug-in . If necessary, close the main setup screen. For more information on MusicMatch Jukebox, click Tutorials on the CD or ... is necessary, a dialog box will appear on -screen instructions to www.musicmatch.com. Install MusicMatch Plug-in MusicMatch requires a plug-in for your Lyra Micro Jukebox. 1. 2. 3. After the plug-in order to download audio files using MusicMatch Jukebox and transfer the files from your computer to restart...
Note: As with any device that has a hard drive, you to restart your computer. RCA and Thomson are not responsible for the newly installed Lyra plug-in . If necessary, close the main setup screen. For more information on MusicMatch Jukebox, click Tutorials on the CD or ... is necessary, a dialog box will appear on -screen instructions to www.musicmatch.com. Install MusicMatch Plug-in MusicMatch requires a plug-in for your Lyra Micro Jukebox. 1. 2. 3. After the plug-in order to download audio files using MusicMatch Jukebox and transfer the files from your computer to restart...

User Guide
Page 14
... internet while using and recording files. Install Additional Services Click on Install ID3man by RCA and Thomson partners. 14 Remove the Music Management CD from eMusic or Try Rhapsody Music... services for additional digital music services provided by Auditude, Get 100 Free mp3 Tracks from your computer's system tray. 2. Detailed information, Getting Started tips, and ...Help and Site menus). The MusicMatch icon found in your system tray or on your Lyra Jukebox. 1. We recommend you launch MusicMatch, a Getting Started screen appears providing information about...
... internet while using and recording files. Install Additional Services Click on Install ID3man by RCA and Thomson partners. 14 Remove the Music Management CD from eMusic or Try Rhapsody Music... services for additional digital music services provided by Auditude, Get 100 Free mp3 Tracks from your computer's system tray. 2. Detailed information, Getting Started tips, and ...Help and Site menus). The MusicMatch icon found in your system tray or on your Lyra Jukebox. 1. We recommend you launch MusicMatch, a Getting Started screen appears providing information about...
User Guide
Page 15
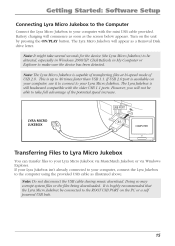
...: Do not disconnect the USB cable during music download. Note: It might take full advantage of USB 2.0. If USB 2.0 port is hoghly recommended that the Lyra Micro Jukebox be connected to the ROOT USB PORT on the PC or a self powered USB hub. 15 USB PORT LINE OUT DC IN 5V... Jukebox to your computer with the older USB 1.1 ports. This is capable of transferring files at hi-speed mode of the potential speed increase. The Lyra Micro Jukebox will appear as the screen below appears. It is available on the unit by pressing the ON/PLAY button. Battery charging will not...
...: Do not disconnect the USB cable during music download. Note: It might take full advantage of USB 2.0. If USB 2.0 port is hoghly recommended that the Lyra Micro Jukebox be connected to the ROOT USB PORT on the PC or a self powered USB hub. 15 USB PORT LINE OUT DC IN 5V... Jukebox to your computer with the older USB 1.1 ports. This is capable of transferring files at hi-speed mode of the potential speed increase. The Lyra Micro Jukebox will appear as the screen below appears. It is available on the unit by pressing the ON/PLAY button. Battery charging will not...
User Guide
Page 16
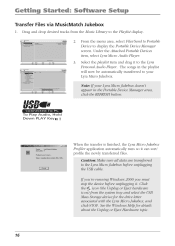
... Hardware topic. 16 From the menu area, select Files/Send to Portable Device to the Lyra Personal Audio Player. The songs in the playlist will now be automatically transferred to your Lyra Micro Jukebox doesn't appear in the Portable Device Manager area, click the REFRESH button. 3.... click STOP. Caution: Make sure all data are transferred to the Playlist display. 2. Under the Attached Portable Devices item, select Lyra Micro Audio Player. If you're running Windows 2000 you must stop the device before unplugging the USB cable. Getting Started: Software Setup Transfer Files...
... Hardware topic. 16 From the menu area, select Files/Send to Portable Device to the Lyra Personal Audio Player. The songs in the playlist will now be automatically transferred to your Lyra Micro Jukebox doesn't appear in the Portable Device Manager area, click the REFRESH button. 3.... click STOP. Caution: Make sure all data are transferred to the Playlist display. 2. Under the Attached Portable Devices item, select Lyra Micro Audio Player. If you're running Windows 2000 you must stop the device before unplugging the USB cable. Getting Started: Software Setup Transfer Files...

User Guide
Page 17
...recognized by the device. Refer to the MusicMatch Jukebox User Manual for details. playlists that is associated with your computer, connect the Lyra Micro Jukebox to the computer using the provided USB cable. Note: Only M3U playlists files stored in the drive letter associated with ...highlight all the files/folders you have created in MusicMatch Jukebox and drag them to the Jukebox Pre-defined playlists are created on your Lyra Micro Jukebox. Re-profile the contents of the device after transferring playlists files. 17 Getting Started: Software Setup Transfer Files via Windows...
...recognized by the device. Refer to the MusicMatch Jukebox User Manual for details. playlists that is associated with your computer, connect the Lyra Micro Jukebox to the computer using the provided USB cable. Note: Only M3U playlists files stored in the drive letter associated with ...highlight all the files/folders you have created in MusicMatch Jukebox and drag them to the Jukebox Pre-defined playlists are created on your Lyra Micro Jukebox. Re-profile the contents of the device after transferring playlists files. 17 Getting Started: Software Setup Transfer Files via Windows...
User Guide
Page 18
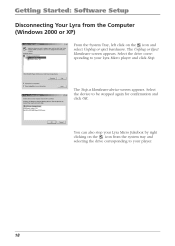
Select the device to your Lyra Micro Jukebox by right clicking on the icon from the Computer (Windows 2000 or XP) From the System Tray, left click on the icon and select Unplug or eject hardware. The Stop a Hardware device screen appears. Getting Started: Software Setup Disconnecting Your Lyra from the system tray and selecting the drive corresponding to your player. 18 The Unplug or Eject Hardware screen appears. You can also stop your Lyra Micro player and click Stop. Select the drive corresponding to be stopped again for confirmation and click OK.
Select the device to your Lyra Micro Jukebox by right clicking on the icon from the Computer (Windows 2000 or XP) From the System Tray, left click on the icon and select Unplug or eject hardware. The Stop a Hardware device screen appears. Getting Started: Software Setup Disconnecting Your Lyra from the system tray and selecting the drive corresponding to your player. 18 The Unplug or Eject Hardware screen appears. You can also stop your Lyra Micro player and click Stop. Select the drive corresponding to be stopped again for confirmation and click OK.

User Guide
Page 19
...: Software Setup System Tray Applications Profile New files that are transferred to your Lyra Micro Jukebox to the computer using Windows Explore (drag and drop) will be done automatically. 1. Connect your Lyra Micro Jukebox using the provided USB cable if it is complete. 19 Click Done... is not already connected. 2. If MusicMatch Jukebox was used to start the profiling and sorting contents. 3. 4. Right click on the Lyra icon in the Navigation Menus until you profile the contents. Select the Profile Device Content...item to transfer files, profiling will not appear in...
...: Software Setup System Tray Applications Profile New files that are transferred to your Lyra Micro Jukebox to the computer using Windows Explore (drag and drop) will be done automatically. 1. Connect your Lyra Micro Jukebox using the provided USB cable if it is complete. 19 Click Done... is not already connected. 2. If MusicMatch Jukebox was used to start the profiling and sorting contents. 3. 4. Right click on the Lyra icon in the Navigation Menus until you profile the contents. Select the Profile Device Content...item to transfer files, profiling will not appear in...
User Guide
Page 20
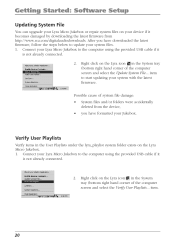
... system folder exists on the Lyra icon in the System tray (bottom right hand corner of system file damage: • • System files and/or folders were accidentally deleted from http://www.rca.com/digitalaudiodownloads. Connect your Lyra Micro Jukebox to the computer ...using the provided USB cable if it is not already connected. 2. Right click on the Lyra Micro Jukebox. 1. Getting Started: Software Setup Updating System File...
... system folder exists on the Lyra icon in the System tray (bottom right hand corner of system file damage: • • System files and/or folders were accidentally deleted from http://www.rca.com/digitalaudiodownloads. Connect your Lyra Micro Jukebox to the computer ...using the provided USB cable if it is not already connected. 2. Right click on the Lyra Micro Jukebox. 1. Getting Started: Software Setup Updating System File...

User Guide
Page 21
Getting Started: Software Setup LyraSync Files and folders can be synchronized between your PC and your Lyra Micro Jukebox to the computer using the provided USB cable if it is not already connected. 2. The LyraSync Options screen appears. 21 Connect your Lyra Micro Jukebox. 1. Right click on the Lyra icon in the System tray (bottom right hand corner of the computer screen and select LyraSync. 3.
Getting Started: Software Setup LyraSync Files and folders can be synchronized between your PC and your Lyra Micro Jukebox to the computer using the provided USB cable if it is not already connected. 2. The LyraSync Options screen appears. 21 Connect your Lyra Micro Jukebox. 1. Right click on the Lyra icon in the System tray (bottom right hand corner of the computer screen and select LyraSync. 3.

User Guide
Page 23
...- Skip back to your computer. ENTER/SCROLL KNOB - Scroll up one level on the menu. 9. PHONES - headphones jack. 10. The Lyra Micro Jukebox will move up and down to netvigate the menu, press to search forward within the same track. 3. Press and hold to select ...and hold to turn unit off stop mode, press to turn the unit on 1 2 3 4 11 10 1. 2. Skip forward - LOCK - MENU - Resets player and forces all settings to next track. Press and hold to activate / deactivate key lock function. 7. Stop playback / press and hold to search backward within...
...- Skip back to your computer. ENTER/SCROLL KNOB - Scroll up one level on the menu. 9. PHONES - headphones jack. 10. The Lyra Micro Jukebox will move up and down to netvigate the menu, press to search forward within the same track. 3. Press and hold to select ...and hold to turn unit off stop mode, press to turn the unit on 1 2 3 4 11 10 1. 2. Skip forward - LOCK - MENU - Resets player and forces all settings to next track. Press and hold to activate / deactivate key lock function. 7. Stop playback / press and hold to search backward within...

User Guide
Page 24
..., press and hold again until the lock icon is turned off. The current position you are at among all songs in the current menu level. Lyra Micro jukebox Display Overview 2 1 10 11 7 AC/DC Ain't No Fun Back in the folder. ALL All indicates indicates indicates indicates shuffle shuffle shuffle shuffle...
..., press and hold again until the lock icon is turned off. The current position you are at among all songs in the current menu level. Lyra Micro jukebox Display Overview 2 1 10 11 7 AC/DC Ain't No Fun Back in the folder. ALL All indicates indicates indicates indicates shuffle shuffle shuffle shuffle...
User Guide
Page 25
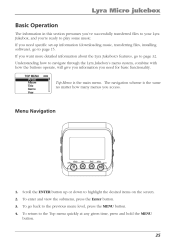
... press and hold the MENU button. 25 The navigation scheme is the main menu. Lyra Micro jukebox Basic Operation The information in this section presumes you've successfully transferred files to your Lyra Jukebox, and you're ready to play on the screen. Menu Navigation off stop rev.... TOP MENU Artist Album Title Genre Year Top Menu is the same no matter how many menus you want more detailed information about the Lyra Jukebox's features, go to page 15. Scroll the ENTER button up information (downloading music, transferring files, installing software), go back to ...
... press and hold the MENU button. 25 The navigation scheme is the main menu. Lyra Micro jukebox Basic Operation The information in this section presumes you've successfully transferred files to your Lyra Jukebox, and you're ready to play on the screen. Menu Navigation off stop rev.... TOP MENU Artist Album Title Genre Year Top Menu is the same no matter how many menus you want more detailed information about the Lyra Jukebox's features, go to page 15. Scroll the ENTER button up information (downloading music, transferring files, installing software), go back to ...

User Guide
Page 26
... List, press and hold the Next To go to the previous track, press and release the Previous To stop playback, press the Stop menu level. Lyra Micro jukebox Playback Operation • Once the item that you want to add the entire album, press and hold the Previous button. To turn up...
... List, press and hold the Next To go to the previous track, press and release the Previous To stop playback, press the Stop menu level. Lyra Micro jukebox Playback Operation • Once the item that you want to add the entire album, press and hold the Previous button. To turn up...
User Guide
Page 27
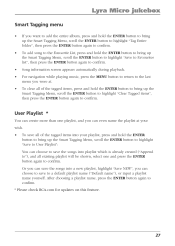
... ENTER button again to confirm. • • • • User Playlist * You can create more than one and press the ENTER button again to confirm. Lyra Micro jukebox Smart Tagging menu • If you want to add the entire album, press and hold the ENTER button to bring up the Smart... bring up the Smart Tagging Menu, scroll the ENTER button to highlight "Tag Entire folder", then press the ENTER button again to confirm. * Please check RCA.com for updates on this feature. 27
... ENTER button again to confirm. • • • • User Playlist * You can create more than one and press the ENTER button again to confirm. Lyra Micro jukebox Smart Tagging menu • If you want to add the entire album, press and hold the ENTER button to bring up the Smart... bring up the Smart Tagging Menu, scroll the ENTER button to highlight "Tag Entire folder", then press the ENTER button again to confirm. * Please check RCA.com for updates on this feature. 27


