User Manual
Page 2
... Regulations. If the Region number of a DVD disc does not correspond to rain or moisture. The Region number for this card allows us to obtain warranty parts and service and for a Class B digital device, pursuant to Part 15 of this DVD player, this DVD player to the Region number of the FCC rules. Reverse engineering or disassembly is Region No 1. Returning this DVD player is prohibited. USE OF CONTROLS OR ADJUSTMENTS OR PERFORMANCE OF...
... Regulations. If the Region number of a DVD disc does not correspond to rain or moisture. The Region number for this card allows us to obtain warranty parts and service and for a Class B digital device, pursuant to Part 15 of this DVD player, this DVD player to the Region number of the FCC rules. Reverse engineering or disassembly is Region No 1. Returning this DVD player is prohibited. USE OF CONTROLS OR ADJUSTMENTS OR PERFORMANCE OF...
User Manual
Page 3
... instantly. By selecting different Info Display icons, you to set the DVD player so that you go right to be used to six bookmarks. You can be entered. The TruSurround® option can store up to a point on the subtitles. TruSurround and the symbol are watching a DVD disc, by pressing the GO BACK•AGAIN button on the remote you can...
... instantly. By selecting different Info Display icons, you to set the DVD player so that you go right to be used to six bookmarks. You can be entered. The TruSurround® option can store up to a point on the subtitles. TruSurround and the symbol are watching a DVD disc, by pressing the GO BACK•AGAIN button on the remote you can...
User Manual
Page 4
... DVD Player 15 How to Find Your TV's Video Input Channel 16 How to Move Around the DVD Player's Menu System 17 Set the Menu Language 17 Setting Other Options ...17 The Buttons on the Remote Control 18 Chapter 2: Playing DVDs Regional Coding ...20 Loading and Playing Discs 20 Using a Disc Menu ...21 Using the On-Screen Info Display 23 Time Display ...24 Selecting a Title ...24 Selecting a Chapter 24 Selecting Subtitles ...25 Selecting a Subtitle Language 25 Changing the Audio Language 25 Using the Repeat Feature 26 A•B Repeat ...26 How to Cancel Repeat 26 Using...
... DVD Player 15 How to Find Your TV's Video Input Channel 16 How to Move Around the DVD Player's Menu System 17 Set the Menu Language 17 Setting Other Options ...17 The Buttons on the Remote Control 18 Chapter 2: Playing DVDs Regional Coding ...20 Loading and Playing Discs 20 Using a Disc Menu ...21 Using the On-Screen Info Display 23 Time Display ...24 Selecting a Title ...24 Selecting a Chapter 24 Selecting Subtitles ...25 Selecting a Subtitle Language 25 Changing the Audio Language 25 Using the Repeat Feature 26 A•B Repeat ...26 How to Cancel Repeat 26 Using...
User Manual
Page 6
... How to set Other as the Audio Language Preference 56 Changing the Subtitle Language Preference 57 How to set Other as the Subtitle Language Preference 57 Glossary ...58 Language Code List ...59 Chapter 6: Other Information How to Resolve Product Performance Problems 62 Troubleshooting ...62 Handling Cautions ...65 Maintenance of Cabinet 65 Formation of Condensation 65 Handling Discs ...65 Cleaning Discs ...65 Front Panel Controls ...66 Front Panel Display ...67 Limited Warranty RCA Digital Video Disc (DVD) Player 68...
... How to set Other as the Audio Language Preference 56 Changing the Subtitle Language Preference 57 How to set Other as the Subtitle Language Preference 57 Glossary ...58 Language Code List ...59 Chapter 6: Other Information How to Resolve Product Performance Problems 62 Troubleshooting ...62 Handling Cautions ...65 Maintenance of Cabinet 65 Formation of Condensation 65 Handling Discs ...65 Cleaning Discs ...65 Front Panel Controls ...66 Front Panel Display ...67 Limited Warranty RCA Digital Video Disc (DVD) Player 68...
User Manual
Page 10
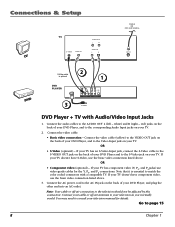
... • Component video (optional) - Connections & Setup TV TV S-VIDEO VIDEO IN AUDIO OUT L R AUDIO IN L R CABLE OR OFF-AIR SIGNAL ANT IN DVD S-Video cable is essential to the corresponding Audio Input jacks on your TV. 2. Connect the audio cables to page 15 8 Chapter 1 If your TV doesn't have component video, use the basic video connection listed above . 3. If your TV. Connect the AC power cord to the Video Input jack on the back of your television manual for the...
... • Component video (optional) - Connections & Setup TV TV S-VIDEO VIDEO IN AUDIO OUT L R AUDIO IN L R CABLE OR OFF-AIR SIGNAL ANT IN DVD S-Video cable is essential to the corresponding Audio Input jacks on your TV. 2. Connect the audio cables to page 15 8 Chapter 1 If your TV doesn't have component video, use the basic video connection listed above . 3. If your TV. Connect the AC power cord to the Video Input jack on the back of your television manual for the...
User Manual
Page 11
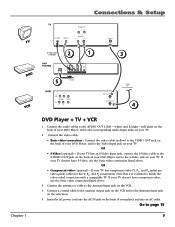
Connections & Setup TV DVD VCR TV S-VIDEO VIDEO IN AUDIO OUT L R AUDIO IN L R S-Video cable is essential to match the color coded connectors with a compatible TV. white) and R (right - If your TV has component video (Y, P , and P jacks) use the basic video connection listed above . 3. Connect the antenna or cable to the Antenna Input jack on the VCR. 4. If your TV. Connect a coaxial cable to the antenna output jack on the VCR and to the Antenna Input jack on the television...
Connections & Setup TV DVD VCR TV S-VIDEO VIDEO IN AUDIO OUT L R AUDIO IN L R S-Video cable is essential to match the color coded connectors with a compatible TV. white) and R (right - If your TV has component video (Y, P , and P jacks) use the basic video connection listed above . 3. Connect the antenna or cable to the Antenna Input jack on the VCR. 4. If your TV. Connect a coaxial cable to the antenna output jack on the VCR and to the Antenna Input jack on the television...
User Manual
Page 12
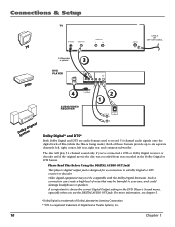
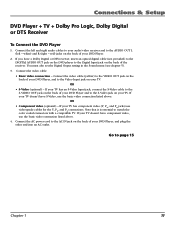
.... The disc will play 5.1-channel sound only if you use the DIGITAL AUDIO OUT jack. Connections & Setup TV TV S-VIDEO VIDEO IN AUDIO IN L R ANT IN CABLE OR OFF-AIR SIGNAL S-Video cable is optional 3 DVD DSoylsbtyemDigital DVD PLAYER AC IN 4 Pr Pb S-VIDEO Y VIDEO OUT DIGITAL AUDIO OUT RIGHT LEFT AUDIO OUT R L To AC Outlet 1 2 AUDIO/VIDEO RECEIVER AUDIO IN L DIGITAL IN R Dolby Digital® and DTS® Both Dolby Digital and DTS are audio formats used to a Dolby Digital or DTS receiver or decoder. Both of Digital Home Theater...
.... The disc will play 5.1-channel sound only if you use the DIGITAL AUDIO OUT jack. Connections & Setup TV TV S-VIDEO VIDEO IN AUDIO IN L R ANT IN CABLE OR OFF-AIR SIGNAL S-Video cable is optional 3 DVD DSoylsbtyemDigital DVD PLAYER AC IN 4 Pr Pb S-VIDEO Y VIDEO OUT DIGITAL AUDIO OUT RIGHT LEFT AUDIO OUT R L To AC Outlet 1 2 AUDIO/VIDEO RECEIVER AUDIO IN L DIGITAL IN R Dolby Digital® and DTS® Both Dolby Digital and DTS are audio formats used to a Dolby Digital or DTS receiver or decoder. Both of Digital Home Theater...
User Manual
Page 13
... S-Video Input jack, connect the S-Video cable to your DVD Player. 2. Connect the AC power cord to the AC IN jack on your TV doesn't have S-Video, use the basic video connection listed above . 4. Go to match the color coded connectors with a compatible TV. red) jacks on the back of your audio/video receiver and to the S-Video jack on the back of your DVD Player and to the AUDIO OUT L (left and right audio cables to...
... S-Video Input jack, connect the S-Video cable to your DVD Player. 2. Connect the AC power cord to the AC IN jack on your TV doesn't have S-Video, use the basic video connection listed above . 4. Go to match the color coded connectors with a compatible TV. red) jacks on the back of your audio/video receiver and to the S-Video jack on the back of your DVD Player and to the AUDIO OUT L (left and right audio cables to...
User Manual
Page 15
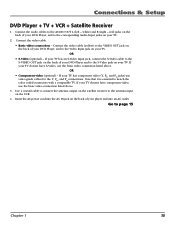
...'t have S-Video, use the basic video connection listed above . If your TV doesn't have component video, use the basic video connection listed above . 3. Insert the AC power cord into the AC IN jack on the VCR. 4. Note that it is essential to page 15 Chapter 1 13 Connections & Setup DVD Player + TV + VCR + Satellite Receiver 1. Connect the video cable. • Basic video connection - OR • S-Video (optional) - Go to match the B R color coded connectors with a compatible TV. OR • Component video (optional...
...'t have S-Video, use the basic video connection listed above . If your TV doesn't have component video, use the basic video connection listed above . 3. Insert the AC power cord into the AC IN jack on the VCR. 4. Note that it is essential to page 15 Chapter 1 13 Connections & Setup DVD Player + TV + VCR + Satellite Receiver 1. Connect the video cable. • Basic video connection - OR • S-Video (optional) - Go to match the B R color coded connectors with a compatible TV. OR • Component video (optional...

User Manual
Page 16
... on your TV or receiver. remember to a compatible Dolby Digital or DTS receiver or decoder. The S-Video cable only carries the picture signal; VIDEO OUT (Composite Video Output) Connect a video cable to this jack and to Right Audio, etc. Connections & Setup The Jacks on the Back of the DVD Player When connecting, make sure you can connect an S-Video cable for the Y, PB, and P connections. AC IN Insert the AC power cord into the DVD Player and plug the other...
... on your TV or receiver. remember to a compatible Dolby Digital or DTS receiver or decoder. The S-Video cable only carries the picture signal; VIDEO OUT (Composite Video Output) Connect a video cable to this jack and to Right Audio, etc. Connections & Setup The Jacks on the Back of the DVD Player When connecting, make sure you can connect an S-Video cable for the Y, PB, and P connections. AC IN Insert the AC power cord into the DVD Player and plug the other...
User Manual
Page 17
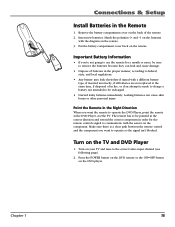
... to be sure to operate the DVD Player, point the remote at the same time, if disposed of the remote. 2. The remote has to be pointed in the correct direction and toward the correct component in the Remote 1. Turn on the remote. Chapter 1 15 Press the POWER button on the DVD remote or the ON•OFF button on the TV and DVD Player 1. Turn on the DVD player. Connections & Setup Install Batteries in order for...
... to be sure to operate the DVD Player, point the remote at the same time, if disposed of the remote. 2. The remote has to be pointed in the correct direction and toward the correct component in the Remote 1. Turn on the remote. Chapter 1 15 Press the POWER button on the DVD remote or the ON•OFF button on the TV and DVD Player 1. Turn on the DVD player. Connections & Setup Install Batteries in order for...

User Manual
Page 18
... Remote Channel # VIDEO SIGNAL VID 1 VID 2 S-VID S-VIDEO VID 1 LINE VID VIDEO S-VID INPUT S-VIDEO SOURCE AUX 00 90 91 92 93 VID 1 VID 2 16 Chapter 1 Below are listed in the channel list by pressing a specific number (see the DVD Player's menu and to work , try one of the following options. • Press a button on the TV remote (see table below). • Select it from the TV's menu system. • Tune directly...
... Remote Channel # VIDEO SIGNAL VID 1 VID 2 S-VID S-VIDEO VID 1 LINE VID VIDEO S-VID INPUT S-VIDEO SOURCE AUX 00 90 91 92 93 VID 1 VID 2 16 Chapter 1 Below are listed in the channel list by pressing a specific number (see the DVD Player's menu and to work , try one of the following options. • Press a button on the TV remote (see table below). • Select it from the TV's menu system. • Tune directly...
User Manual
Page 20
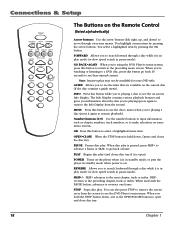
... button. SKIP+ advances to remove the Info Display from the screen to the preceding chapter, track or index. Connections & Setup POWER REVERSE PLAY FORWARD SKIP-- INFO Press this button while you to make selections on . When you 're playing (press again to the next chapter, track or index. STOP PAUSE SKIP+ GUIDE OPEN•CLOSE INFO OK GO B MENU 1 2 4 5 7 8 0 ACK•AG 3 6 9 AIN The Buttons on the Remote Control (listed alphabetically) Arrow buttons Use...
... button. SKIP+ advances to remove the Info Display from the screen to the preceding chapter, track or index. Connections & Setup POWER REVERSE PLAY FORWARD SKIP-- INFO Press this button while you to make selections on . When you 're playing (press again to the next chapter, track or index. STOP PAUSE SKIP+ GUIDE OPEN•CLOSE INFO OK GO B MENU 1 2 4 5 7 8 0 ACK•AG 3 6 9 AIN The Buttons on the Remote Control (listed alphabetically) Arrow buttons Use...
User Manual
Page 22
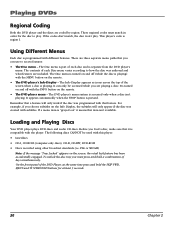
... use to access features: • The Disc menu - It appears automatically when the STOP button is region 1. Loading and Playing Discs Your DVD player plays DVD discs and audio CD discs. Using Different Menus Each disc is programmed with the MENU button on the remote. • The DVD player menu - If a menu item is "grayed out" it is separate from the DVD player's menu. The Disc menu is part of each disc and is compatible with the INFO button on the remote. • The DVD player's Info Display - To unlock the disc tray...
... use to access features: • The Disc menu - It appears automatically when the STOP button is region 1. Loading and Playing Discs Your DVD player plays DVD discs and audio CD discs. Using Different Menus Each disc is programmed with the MENU button on the remote. • The DVD player menu - If a menu item is "grayed out" it is separate from the DVD player's menu. The Disc menu is part of each disc and is compatible with the INFO button on the remote. • The DVD player's Info Display - To unlock the disc tray...
User Manual
Page 23
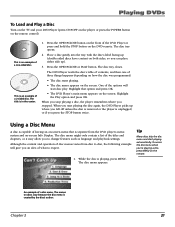
... of a disc menu. The menus on the remote control). The DVD Player reads the disc's table of contents, and then one -sided disc. The disc tray opens. 2. Although the content and operation of disc menus varies from the DVD player's menu system and on the screen. Playing DVDs To Load and Play a Disc Turn on the TV and your DVD Player (press ON•OFF on the player or press the POWER button on discs vary because the disc menu is an...
... of a disc menu. The menus on the remote control). The DVD Player reads the disc's table of contents, and then one -sided disc. The disc tray opens. 2. Although the content and operation of disc menus varies from the DVD player's menu system and on the screen. Playing DVDs To Load and Play a Disc Turn on the TV and your DVD Player (press ON•OFF on the player or press the POWER button on discs vary because the disc menu is an...
User Manual
Page 27
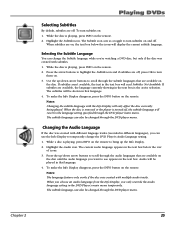
... the DVD player menu. Press the up the Info Display. 2. While a disc is turned off . Notes: The language feature only works if the disc was created with different language tracks (recorded in different languages), you can change the DVD Player's Audio Language setting. 1. Notes: Changing the subtitle language with multiple audio tracks. To turn subtitles on : 1. To make the Info Display disappear, press the INFO button on the remote. While the disc is playing, press INFO on the remote. 2. Playing DVDs Selecting Subtitles By default, subtitles are...
... the DVD player menu. Press the up the Info Display. 2. While a disc is turned off . Notes: The language feature only works if the disc was created with different language tracks (recorded in different languages), you can change the DVD Player's Audio Language setting. 1. Notes: Changing the subtitle language with multiple audio tracks. To turn subtitles on : 1. To make the Info Display disappear, press the INFO button on the remote. While the disc is playing, press INFO on the remote. 2. Playing DVDs Selecting Subtitles By default, subtitles are...
User Manual
Page 38
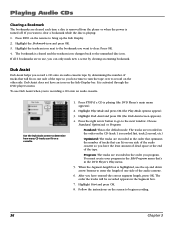
.... To use , you program. Playing Audio CDs Clearing a Bookmark The bookmarks are cleared each time a disc is removed from the player or when the power is playing: 1. Press INFO on the remote to bring up and down arrow buttons to clear a bookmark while the disc is turned off. Follow the instructions on the CD (track 1 is cleared and the trashcan icon changes back to begin recording. 36...
.... To use , you program. Playing Audio CDs Clearing a Bookmark The bookmarks are cleared each time a disc is removed from the player or when the power is playing: 1. Press INFO on the remote to bring up and down arrow buttons to clear a bookmark while the disc is turned off. Follow the instructions on the CD (track 1 is cleared and the trashcan icon changes back to begin recording. 36...
User Manual
Page 64
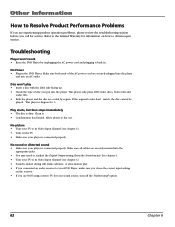
... you connected an audio receiver to your DVD Player, make sure you chose the correct input setting on how to obtain repair service. No picture • Turn your TV to its Video Input Channel (see chapter 1). • Turn on the TV. • Make sure your player is connected properly. Make sure both ends of disc you put into the appropriate jacks. • You may need to readjust the Digital Output setting (from the Sound menu). No Power •...
... you connected an audio receiver to your DVD Player, make sure you chose the correct input setting on how to obtain repair service. No picture • Turn your TV to its Video Input Channel (see chapter 1). • Turn on the TV. • Make sure your player is connected properly. Make sure both ends of disc you put into the appropriate jacks. • You may need to readjust the Digital Output setting (from the Sound menu). No Power •...
User Manual
Page 77
... Front Display menu 53 Front panel controls 66 Front panel display 67 Front panel icons angle 67 locked 67 play direction 67 repeat 67 unlocked 67 G GO BACK button 18 Grayed out 23, 39 GUIDE button 18 H Handling cautions 65 discs 65 DVD Player 65 I Icons 23, 39 Index selecting, video CD 40 INFO button 18 Info Display picture of 23 using 23 Installing batteries 15 Invalid icon 17, 23, 29, 39 J Jacks AC IN 14 AUDIO...
... Front Display menu 53 Front panel controls 66 Front panel display 67 Front panel icons angle 67 locked 67 play direction 67 repeat 67 unlocked 67 G GO BACK button 18 Grayed out 23, 39 GUIDE button 18 H Handling cautions 65 discs 65 DVD Player 65 I Icons 23, 39 Index selecting, video CD 40 INFO button 18 Info Display picture of 23 using 23 Installing batteries 15 Invalid icon 17, 23, 29, 39 J Jacks AC IN 14 AUDIO...

User Manual
Page 78
... Play direction icon 67 Play Menu program play 45 random play 45 standard play 44 Play Modes selecting 25 Playback features audio language 25 bookmarks 27, 35 camera angle 28 fast motion 29 repeat 26, 34, 40 selecting a chapter 24 selecting play modes 25 slow motion 29 Playing digital video discs 20 Program creating 46 deleting 47 editing 47 R R and L jacks 14 Rated Titles 51 Ratings Limits 50 Recalling bookmarks 27, 35 Remote control component buttons 18 pointing 15 installing batteries...
... Play direction icon 67 Play Menu program play 45 random play 45 standard play 44 Play Modes selecting 25 Playback features audio language 25 bookmarks 27, 35 camera angle 28 fast motion 29 repeat 26, 34, 40 selecting a chapter 24 selecting play modes 25 slow motion 29 Playing digital video discs 20 Program creating 46 deleting 47 editing 47 R R and L jacks 14 Rated Titles 51 Ratings Limits 50 Recalling bookmarks 27, 35 Remote control component buttons 18 pointing 15 installing batteries...


