Brochure
Page 2
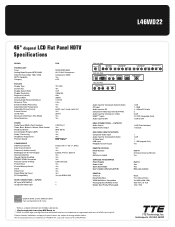
...under license from BBE Sound, Inc *** HDMI, the HDMI logo and High-Definition Multimedia Interface are subject to TTE CORPORATION. TTE Technology, Inc. L46WD22 46" diagonal LCD Flat Panel HDTV Specifications BRAND TECHNOLOGY Tuner Analog Video Formats (NTSC/480i) Video Formats (480p, 720p, 1080i) HDTV Capability ...Picture Memory Presets Clock Sleep Timer Alarm (Wake Up Timer) PC Compatibility REAR CONNECTIONS - AUDIO -- SW Upgrade Only Yes R301F1 3-Device Universal Remote Yes Built-in Yes Yes RCA.com website Black Yes, Glossy B lack Yes (600 x 400 / M6) 36.0 X 51.2 X 16.6 70.0 / 85.8...
...under license from BBE Sound, Inc *** HDMI, the HDMI logo and High-Definition Multimedia Interface are subject to TTE CORPORATION. TTE Technology, Inc. L46WD22 46" diagonal LCD Flat Panel HDTV Specifications BRAND TECHNOLOGY Tuner Analog Video Formats (NTSC/480i) Video Formats (480p, 720p, 1080i) HDTV Capability ...Picture Memory Presets Clock Sleep Timer Alarm (Wake Up Timer) PC Compatibility REAR CONNECTIONS - AUDIO -- SW Upgrade Only Yes R301F1 3-Device Universal Remote Yes Built-in Yes Yes RCA.com website Black Yes, Glossy B lack Yes (600 x 400 / M6) 36.0 X 51.2 X 16.6 70.0 / 85.8...

User Manual
Page 4
... 8 Component Video (Advanced) Connection .......... 8 HDMI/DVI Connection 10 VGA Connection 12 Plug in the TV 13 Put Batteries in the Remote 13 Turn on the TV 13 How to Use the Remote Control to Complete the Initial Setup 13 Complete the Initial Setup 14 Set the Menu Language 14 Complete Channel Setup... You've Programmed It 21 Modes of Operation 21 Volume Punchthrough Feature 21 Deleting ALL Volume Punchthrough Commands 22 Remote Code List 23 Chapter 3: Using the TV's Features Channel Banner 26 Autotuning 26 Parental Controls and V-Chip 28 How V-Chip Works for USA and Canada ...
... 8 Component Video (Advanced) Connection .......... 8 HDMI/DVI Connection 10 VGA Connection 12 Plug in the TV 13 Put Batteries in the Remote 13 Turn on the TV 13 How to Use the Remote Control to Complete the Initial Setup 13 Complete the Initial Setup 14 Set the Menu Language 14 Complete Channel Setup... You've Programmed It 21 Modes of Operation 21 Volume Punchthrough Feature 21 Deleting ALL Volume Punchthrough Commands 22 Remote Code List 23 Chapter 3: Using the TV's Features Channel Banner 26 Autotuning 26 Parental Controls and V-Chip 28 How V-Chip Works for USA and Canada ...
User Manual
Page 5
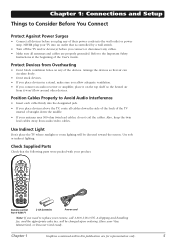
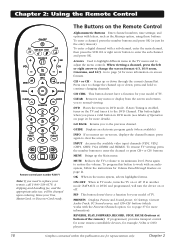
...BACK VOL CH MENU MUTE INFO + CH CTRL ZOOMCLEAR PRESETS ZOOM+ GUIDE ?!+- DEF ABC GHI MNO JKL PQRS INPUT TUV _,.:=$ WXYZ SUB CH Remote control Part # R301F1 2 AA batteries Power cord Note: If you need to the Important Safety Instructions at the beginning of the User's Guide.... instead of straight down the middle. • If your product. Chapter 1 Graphics contained within this publication are properly grounded. Have your remote, call 1-800-338-0376. Position Cables Properly to Avoid Audio Interference • Insert each cable firmly into the wall outlet or power...
...BACK VOL CH MENU MUTE INFO + CH CTRL ZOOMCLEAR PRESETS ZOOM+ GUIDE ?!+- DEF ABC GHI MNO JKL PQRS INPUT TUV _,.:=$ WXYZ SUB CH Remote control Part # R301F1 2 AA batteries Power cord Note: If you need to the Important Safety Instructions at the beginning of the User's Guide.... instead of straight down the middle. • If your product. Chapter 1 Graphics contained within this publication are properly grounded. Have your remote, call 1-800-338-0376. Position Cables Properly to Avoid Audio Interference • Insert each cable firmly into the wall outlet or power...
User Manual
Page 9
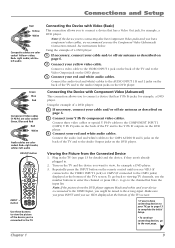
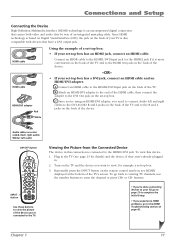
... color coded- See instructions below. Using the example of a DVD player: 1. If necessary, connect your cable and/or off -air antenna as described on the remote control until you see VID1 displayed at the bottom of the TV's screen. Connect three video cables or special Y Pb Pr cables to the COMPONENT...
... color coded- See instructions below. Using the example of a DVD player: 1. If necessary, connect your cable and/or off -air antenna as described on the remote control until you see VID1 displayed at the bottom of the TV's screen. Connect three video cables or special Y Pb Pr cables to the COMPONENT...
User Manual
Page 11
.... C. buttons. • If you're done connecting devices to enter the channel or press CH+ or CH- Audio cables are color coded- Turn on the remote control until you see page 13 for example a set -top box. Viewing the Picture from the Connected Device The device in . 2. Repeatedly press the INPUT...
.... C. buttons. • If you're done connecting devices to enter the channel or press CH+ or CH- Audio cables are color coded- Turn on the remote control until you see page 13 for example a set -top box. Viewing the Picture from the Connected Device The device in . 2. Repeatedly press the INPUT...
User Manual
Page 12
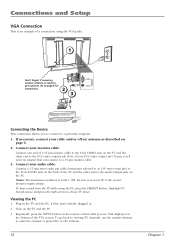
... back of a 15-pin monitor cable to the VGA VIDEO jack on the TV and the other end to the Audio Output jack on the remote control until you see VGA displayed at the bottom of a connection using the PC, press the PRESETS button. Highlight PC Sound source and press the...
... back of a 15-pin monitor cable to the VGA VIDEO jack on the TV and the other end to the Audio Output jack on the remote control until you see VGA displayed at the bottom of a connection using the PC, press the PRESETS button. Highlight PC Sound source and press the...
User Manual
Page 13
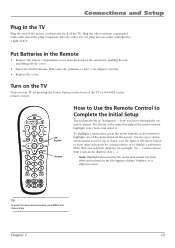
... GO BACK VOL CH MENU MUTE INFO + CH CTRL ZOOMCLEAR PRESETS ZOOM+ GUIDE ?!+- More than one of the TV or ON•OFF on the remote to move through the onscreen menus. Tip To access the setup menus manually, press MENU and choose Setup. Put Batteries in the TV Plug the... end of the power cord into a grounded wall outlet. To highlight a menu item, press the arrow buttons on the remote control. a menu choice with a sub-menu displays dots (...). how you move up or down arrow button to highlight one selection displays, for a menu choice or...
... GO BACK VOL CH MENU MUTE INFO + CH CTRL ZOOMCLEAR PRESETS ZOOM+ GUIDE ?!+- More than one of the TV or ON•OFF on the remote to move through the onscreen menus. Tip To access the setup menus manually, press MENU and choose Setup. Put Batteries in the TV Plug the... end of the power cord into a grounded wall outlet. To highlight a menu item, press the arrow buttons on the remote control. a menu choice with a sub-menu displays dots (...). how you move up or down arrow button to highlight one selection displays, for a menu choice or...
User Manual
Page 17
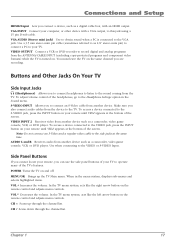
...connect an S-Video cable from the ANTENNA/CABLE INPUT (excluding copy-protected programs and component video formats) while the TV is connected to your remote, you also connect audio cables from the TV. VIDEO OUTPUT Connect a VCR or DVD-recorder to record digital and analog programs from another device...PC to the VGA jack. Side Panel Buttons If you cannot locate your TV. VOL Decreases the volume. You must leave the TV on the remote control and adjusts menu controls. To access a device connected to obtain sound when a PC is turned on your computer, or other device with ...
...connect an S-Video cable from the ANTENNA/CABLE INPUT (excluding copy-protected programs and component video formats) while the TV is connected to your remote, you also connect audio cables from the TV. VIDEO OUTPUT Connect a VCR or DVD-recorder to record digital and analog programs from another device...PC to the VGA jack. Side Panel Buttons If you cannot locate your TV. VOL Decreases the volume. You must leave the TV on the remote control and adjusts menu controls. To access a device connected to obtain sound when a PC is turned on your computer, or other device with ...
User Manual
Page 18
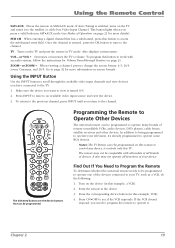
...a sub-channel, enter the main channel, then press the SUB CH or right arrow button to the previous channel. DVD Places the remote in DVD mode (see Modes of Operation on page 21 for more information). This button lights when you to enter the sub-channel and...charged upon ordering. PIP This button doesn't have a function for more information on screen formats. If Auto Tuning is enabled, turns on the Remote Control Alphanumeric Buttons Enter channel numbers; press again to its minimum level. The Buttons on the TV and tunes it to normal viewing. Chapter ...
...a sub-channel, enter the main channel, then press the SUB CH or right arrow button to the previous channel. DVD Places the remote in DVD mode (see Modes of Operation on page 21 for more information). This button lights when you to enter the sub-channel and...charged upon ordering. PIP This button doesn't have a function for more information on screen formats. If Auto Tuning is enabled, turns on the Remote Control Alphanumeric Buttons Enter channel numbers; press again to its minimum level. The Buttons on the TV and tunes it to normal viewing. Chapter ...
User Manual
Page 19
...lights when you want to the channel. SUB CH When entering a digital channel that can be programmed. TV Turns on the TV and puts the remote in SAT•AUX mode (see if the VCR responds. Go to operate one of Operation on the device (in SAT•AUX mode. Programming... video input source and view the device. 3. Press the corresponding device button (in this TV. Chapter 2 19 To program this button to operate some RCA devices. DEF ABC GHI MNO JKL PQRS INPUT TUV _,.:=$ WXYZ SUB CH The darkened buttons are the device buttons that has a subchannel, press this button...
...lights when you want to the channel. SUB CH When entering a digital channel that can be programmed. TV Turns on the TV and puts the remote in SAT•AUX mode (see if the VCR responds. Go to operate one of Operation on the device (in SAT•AUX mode. Programming... video input source and view the device. 3. Press the corresponding device button (in this TV. Chapter 2 19 To program this button to operate some RCA devices. DEF ABC GHI MNO JKL PQRS INPUT TUV _,.:=$ WXYZ SUB CH The darkened buttons are the device buttons that has a subchannel, press this button...
User Manual
Page 20
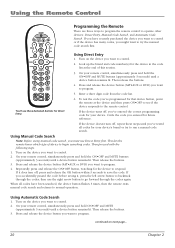
...again. continued on the device you accidentally passed the code before saving it does turn off, repeat these darkened buttons for your remote control, simultaneously press and hold ON•OFF and MUTE (approximately 3 seconds) until you've tested all codes have recently ... MUTE buttons (approximately 3 seconds) until a device button remains lit. MENU MUTE INFO + CH CTRL ZOOMCLEAR PRESETS ZOOM+ GUIDE ?!+- On your remote control, simultaneously press and hold the ON•OFF and MUTE buttons (approximately 3 seconds) until a device button remains lit. If the device ...
...again. continued on the device you accidentally passed the code before saving it does turn off, repeat these darkened buttons for your remote control, simultaneously press and hold ON•OFF and MUTE (approximately 3 seconds) until you've tested all codes have recently ... MUTE buttons (approximately 3 seconds) until a device button remains lit. MENU MUTE INFO + CH CTRL ZOOMCLEAR PRESETS ZOOM+ GUIDE ?!+- On your remote control, simultaneously press and hold the ON•OFF and MUTE buttons (approximately 3 seconds) until a device button remains lit. If the device ...
User Manual
Page 21
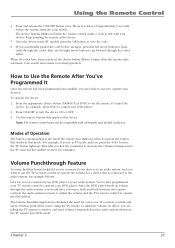
...turns off, quickly press the OK button to operate the DVD player. Press the appropriate device button (SAT•AUX or DVD) to set the remote to your DVD player. This tells you that the command to increase the volume is being sent to the TV (and not the satellite receiver...may not be compatible with your devices. In effect, you 've connected your DVD player. 2. You've also programmed your TV remote control to the audio system. Using the Remote Control 4. Press and release the ON•OFF button once. There is connected to operate your audio system. The device buttons ...
...turns off, quickly press the OK button to operate the DVD player. Press the appropriate device button (SAT•AUX or DVD) to set the remote to your DVD player. This tells you that the command to increase the volume is being sent to the TV (and not the satellite receiver...may not be compatible with your devices. In effect, you 've connected your DVD player. 2. You've also programmed your TV remote control to the audio system. Using the Remote Control 4. Press and release the ON•OFF button once. There is connected to operate your audio system. The device buttons ...
User Manual
Page 22
...a device button remains lit. Press and hold the MUTE button until the device button light turns off , then release the MUTE button. 3. The remote returns to the factory defaults: 1. Then release the buttons. 2. Then release the buttons. 2. Press and release the MUTE button until the device...buttons (approximately 3 seconds) until the device button blinks off . 4. Follow the instructions below to set up Volume Punchthrough. 1. Put the TV's remote in DVD mode (press the DVD button) and you want to adjust the volume, you programmed to the audio system (satellite receiver, for example...
...a device button remains lit. Press and hold the MUTE button until the device button light turns off , then release the MUTE button. 3. The remote returns to the factory defaults: 1. Then release the buttons. 2. Then release the buttons. 2. Press and release the MUTE button until the device...buttons (approximately 3 seconds) until the device button blinks off . 4. Follow the instructions below to set up Volume Punchthrough. 1. Put the TV's remote in DVD mode (press the DVD button) and you want to adjust the volume, you programmed to the audio system (satellite receiver, for example...

User Manual
Page 23
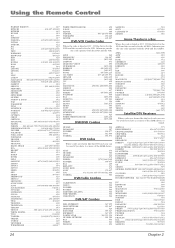
... codes are programmable to any of the device buttons (SAT•AUX or DVD) on the remote. Audio Codes AIWA 839 842 851 860 APEX 436 BOSE 672 CARVER 825 CITIZEN 826 CRITERION 448...485 490 491 492 PHILIPS-MAGNAVOX 505 534 PIONEER 478 506 493 494 PULSAR 486 RADIO SHACK 505 534 525 RCA 460 471 507 REALISTIC 469 REGAL 482 REGENCY 477 REMBRANDT 463 ROGERS 506 RUNCO 486 SAMSUNG 474 494 SCIENTIFIC ...702 719 750 837 876 PROTON 666 QUASAR 716 RADIO SHACK ..........668 699 706 750 786 868 874 876 RCA 661 667 703 723 750 795 844 873 874 876 REALISTIC 661 667 669 673 678 689 697 699 ...
... codes are programmable to any of the device buttons (SAT•AUX or DVD) on the remote. Audio Codes AIWA 839 842 851 860 APEX 436 BOSE 672 CARVER 825 CITIZEN 826 CRITERION 448...485 490 491 492 PHILIPS-MAGNAVOX 505 534 PIONEER 478 506 493 494 PULSAR 486 RADIO SHACK 505 534 525 RCA 460 471 507 REALISTIC 469 REGAL 482 REGENCY 477 REMBRANDT 463 ROGERS 506 RUNCO 486 SAMSUNG 474 494 SCIENTIFIC ...702 719 750 837 876 PROTON 666 QUASAR 716 RADIO SHACK ..........668 699 706 750 786 868 874 876 RCA 661 667 703 723 750 795 844 873 874 876 REALISTIC 661 667 669 673 678 689 697 699 ...
User Manual
Page 24
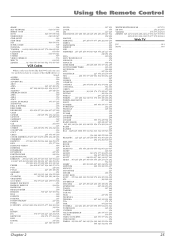
...ONKYO 975 PANASONIC 974 PHILIPS 755 [969 756] PIONEER 976 968 RADIO SHACK 449 894 895 [453 879] RCA 449 920 [453 879] REGENT 931 SABA 919 SAMSUNG 454 942 SONY 986 TEVION 448 ZENITH 405 787] ... DREAMBOX 620 ECHOSTAR 655 647 EXPRESSVU 647 655 FORTEC STAR 569 555 556 HUGHES NETWORK 621 580 RCA 653 PHILIPS 621 PROSCAN 653 SAMSUNG 583 SONY 657 659 ULTIMATE TV 653 659 ZENITH 656 Home ...651 652 098 REALISTIC 567 603 SAMSUNG 594 583 613 616 619 24 Chapter 2 Using the Remote Control HARMAN KARDON 427 HITACHI 404 407 419 428 HITEKER 445 HUMAX 912 ILO 959 INFINITY 417...
...ONKYO 975 PANASONIC 974 PHILIPS 755 [969 756] PIONEER 976 968 RADIO SHACK 449 894 895 [453 879] RCA 449 920 [453 879] REGENT 931 SABA 919 SAMSUNG 454 942 SONY 986 TEVION 448 ZENITH 405 787] ... DREAMBOX 620 ECHOSTAR 655 647 EXPRESSVU 647 655 FORTEC STAR 569 555 556 HUGHES NETWORK 621 580 RCA 653 PHILIPS 621 PROSCAN 653 SAMSUNG 583 SONY 657 659 ULTIMATE TV 653 659 ZENITH 656 Home ...651 652 098 REALISTIC 567 603 SAMSUNG 594 583 613 616 619 24 Chapter 2 Using the Remote Control HARMAN KARDON 427 HITACHI 404 407 419 428 HITEKER 445 HUMAX 912 ILO 959 INFINITY 417...
User Manual
Page 25
... 381 292 RADIO SHACK 225 226 227 239 . 245 268 342 354 361 363 248 251 254 274 292 300 337 RADIX 245 RANDEX 245 RCA ...[225] 245 [308] 309 311 312 313 314 315 316 335 342 354 369 228 278 292 332 REALISTIC ... 225 226 227 245 268 354... 227 338 347 353 358 245 229 310 232 232 376 377 279 368 243 Web TV JVC 612 SONY 585 Chapter 2 25 Using the Remote Control SHARP 604 SKY NETWORK 614 615 646 SIERRA I II III 561 SONY 623 657 659 602 STARCHOICE 640 645 627 STAR SIGHT 633 STAR...
... 381 292 RADIO SHACK 225 226 227 239 . 245 268 342 354 361 363 248 251 254 274 292 300 337 RADIX 245 RANDEX 245 RCA ...[225] 245 [308] 309 311 312 313 314 315 316 335 342 354 369 228 278 292 332 REALISTIC ... 225 226 227 245 268 354... 227 338 347 353 358 245 229 310 232 232 376 377 279 368 243 Web TV JVC 612 SONY 585 Chapter 2 25 Using the Remote Control SHARP 604 SKY NETWORK 614 615 646 SIERRA I II III 561 SONY 623 657 659 602 STARCHOICE 640 645 627 STAR SIGHT 633 STAR...
User Manual
Page 26
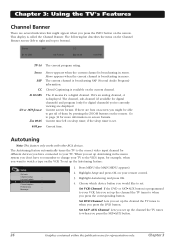
...only. The Autotuning feature automatically tunes the TV to the correct video input channel for different devices you press the INFO button on the remote. To set up the Autotuning feature: Setup Go back Channel setup ... Preferences ... Press MENU (the MAIN MENU appears). 2. If...button. 26 Graphics contained within this publication are displayed. Current screen format. Current time. Autotuning Note: This feature only works with other RCA devices. Message ... 1. Set SAT•AUX Channel Lets you set up the channel the TV tunes to when you want to ...
...only. The Autotuning feature automatically tunes the TV to the correct video input channel for different devices you press the INFO button on the remote. To set up the Autotuning feature: Setup Go back Channel setup ... Preferences ... Press MENU (the MAIN MENU appears). 2. If...button. 26 Graphics contained within this publication are displayed. Current screen format. Current time. Autotuning Note: This feature only works with other RCA devices. Message ... 1. Set SAT•AUX Channel Lets you set up the channel the TV tunes to when you want to ...

User Manual
Page 27
... the TV to tune to channel 3 when you press the corresponding button on the side of the TV or the VIDEO INPUT 2 jack on the remote. Channel 3 or 4 Device is set to the correct channel/input when you press the corresponding device button. Autotuning Go back Set VCR Channel Set DVD...
... the TV to tune to channel 3 when you press the corresponding button on the side of the TV or the VIDEO INPUT 2 jack on the remote. Channel 3 or 4 Device is set to the correct channel/input when you press the corresponding device button. Autotuning Go back Set VCR Channel Set DVD...
User Manual
Page 28
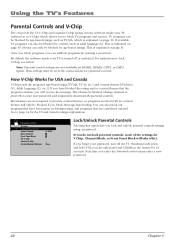
... choices in the connected device's parental controls. This is blocked. TV programs can unblock programs by content, such as V-Chip) which is explained on the remote for HDMI1, HDMI2, CMP1, or CMP2 inputs. Broadcasters are not required to lock V-Chip, see below.
... choices in the connected device's parental controls. This is blocked. TV programs can unblock programs by content, such as V-Chip) which is explained on the remote for HDMI1, HDMI2, CMP1, or CMP2 inputs. Broadcasters are not required to lock V-Chip, see below.
User Manual
Page 29
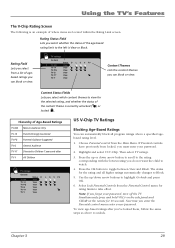
... an example of where items are located within the Rating Limit screen. Simultaneously press and hold VOL v on the side panel and CLEAR on the remote for the rating and all program ratings above to toggle between View and Block. TV ratings Go back TV-MA TV-14 TV-PG TV...
... an example of where items are located within the Rating Limit screen. Simultaneously press and hold VOL v on the side panel and CLEAR on the remote for the rating and all program ratings above to toggle between View and Block. TV ratings Go back TV-MA TV-14 TV-PG TV...


