
User Guide & Warranty
Page 3
...over. 10. Read and follow all servicing to grounding electrodes, and requirements for long periods of time. 11. If the provided plug does not fit your safety. Do not use the attachments/accessories specified by the manufacturer, or sold with the manufacturer's instructions. 3....this component near any ventilation openings. Do not negate the safety purpose of Canadian Electrical Code, Part 1) provides information with the cart, stand, tripod, bracket, or table specified by the manufacturer. 8. Protect the power cord from being walked on or objects falling onto the ...
...over. 10. Read and follow all servicing to grounding electrodes, and requirements for long periods of time. 11. If the provided plug does not fit your safety. Do not use the attachments/accessories specified by the manufacturer, or sold with the manufacturer's instructions. 3....this component near any ventilation openings. Do not negate the safety purpose of Canadian Electrical Code, Part 1) provides information with the cart, stand, tripod, bracket, or table specified by the manufacturer. 8. Protect the power cord from being walked on or objects falling onto the ...
User Guide & Warranty
Page 4
... Setup ...6 Protect Against Power Surges ...6 Safety Information ...6 Avoid Audio Interference ...6 Avoid Direct Light ...6 Check Supplied Parts ...6 Attaching Your TV to the Table Stand 7 Mounting Your TV to the Wall ...7 Obtain the Signal ...8 What You Need ...8 What You Need to Know ...8 Choose Your Connections ...9 Connecting a... a Component with HDMI (Best 11 Connecting a PC Component ...12 Viewing the Picture from the Connected Component 13 Viewing a PC...13 Plug in the TV ...14 Put Batteries in the Remote ...14 Turn on the TV ...14 Using the Remote Control to Complete Initial Setup...
... Setup ...6 Protect Against Power Surges ...6 Safety Information ...6 Avoid Audio Interference ...6 Avoid Direct Light ...6 Check Supplied Parts ...6 Attaching Your TV to the Table Stand 7 Mounting Your TV to the Wall ...7 Obtain the Signal ...8 What You Need ...8 What You Need to Know ...8 Choose Your Connections ...9 Connecting a... a Component with HDMI (Best 11 Connecting a PC Component ...12 Viewing the Picture from the Connected Component 13 Viewing a PC...13 Plug in the TV ...14 Put Batteries in the Remote ...14 Turn on the TV ...14 Using the Remote Control to Complete Initial Setup...
User Guide & Warranty
Page 6
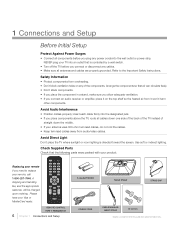
.... Check Supplied Parts Check that air can circulate freely. • Don't stack components • If you place the component in a stand, make sure you allow adequate ventilation. • If you need to the Important Safety Instructions Safety Information • Protect components from overheating...the top shelf so the heated air from audio/video cables. NEVER plug your Visa or RC246 MasterCard ready. REMOTE CONTROL PART # RC2463001/01 6 Chapter 1 Connections and Setup 2 AAA BATTERIES TABLE STAND STAND CAP POWER CORD CABLE MANAGEMENT STRAP St-screws Graphics contained within this...
.... Check Supplied Parts Check that air can circulate freely. • Don't stack components • If you place the component in a stand, make sure you allow adequate ventilation. • If you need to the Important Safety Instructions Safety Information • Protect components from overheating...the top shelf so the heated air from audio/video cables. NEVER plug your Visa or RC246 MasterCard ready. REMOTE CONTROL PART # RC2463001/01 6 Chapter 1 Connections and Setup 2 AAA BATTERIES TABLE STAND STAND CAP POWER CORD CABLE MANAGEMENT STRAP St-screws Graphics contained within this...

User Guide & Warranty
Page 14
... navigate through and select items that appear in the Remote • Remove the battery compartment cover from other end into an outlet, inserting the plug completely. Put Batteries in the on the screen. The remote control allows you to the previous menu, press the GO BACK key or left ...arrow. 14 Chapter 1 Connections and Setup Note: Highlighted items stand out from the back of the remote control by pushing the tab and lifting off the cover. • Insert 2 AAA batteries, making sure the ...
... navigate through and select items that appear in the Remote • Remove the battery compartment cover from other end into an outlet, inserting the plug completely. Put Batteries in the on the screen. The remote control allows you to the previous menu, press the GO BACK key or left ...arrow. 14 Chapter 1 Connections and Setup Note: Highlighted items stand out from the back of the remote control by pushing the tab and lifting off the cover. • Insert 2 AAA batteries, making sure the ...


