Owner/User Manual
Page 5
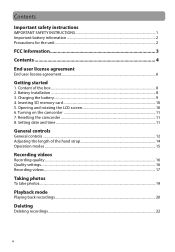
Inserting SD memory card ...10 5. Resetting the camcorder ...11 8. Setting date and time ...11 General controls General controls ...12 Adjusting the length of the box...8 2. Opening and rotating the LCD screen 10 6. Charging ... SAFETY INSTRUCTIONS 1 Important battery information ...2 Precautions for the unit ...2 FCC Information 3 Contents 4 End user license agreement End user license agreement...6 Getting started 1. Turning on the camcorder ...11 7.
Inserting SD memory card ...10 5. Resetting the camcorder ...11 8. Setting date and time ...11 General controls General controls ...12 Adjusting the length of the box...8 2. Opening and rotating the LCD screen 10 6. Charging ... SAFETY INSTRUCTIONS 1 Important battery information ...2 Precautions for the unit ...2 FCC Information 3 Contents 4 End user license agreement End user license agreement...6 Getting started 1. Turning on the camcorder ...11 7.
Owner/User Manual
Page 6
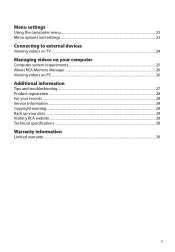
Menu settings Using the camcorder menu...23 Menu options and settings ...23 Connecting to external devices Viewing videos on TV ...24 Managing videos on your computer Computer system requirements...25 About RCA Memory Manager ...26 Viewing videos on PC ...26 Additional information Tips and troubleshooting...27 Product registration ...28 For your records ...28 Service Information...28 Copyright warning...28 Back up your data ...28 Visiting RCA website ...28 Technical specifications ...28 Warranty information Limited warranty ...30 5
Menu settings Using the camcorder menu...23 Menu options and settings ...23 Connecting to external devices Viewing videos on TV ...24 Managing videos on your computer Computer system requirements...25 About RCA Memory Manager ...26 Viewing videos on PC ...26 Additional information Tips and troubleshooting...27 Product registration ...28 For your records ...28 Service Information...28 Copyright warning...28 Back up your data ...28 Visiting RCA website ...28 Technical specifications ...28 Warranty information Limited warranty ...30 5
Owner/User Manual
Page 9
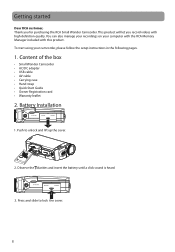
... cover. 8 Press and slide to unlock and lift up the cover. 2 2. You can also manage your recordings on your camcorder, please follow the setup instructions in the following pages. 1. Getting started Dear RCA customer, Thank you record videos with this product. Observe the polarities and insert the battery until a click sound is...
... cover. 8 Press and slide to unlock and lift up the cover. 2 2. You can also manage your recordings on your camcorder, please follow the setup instructions in the following pages. 1. Getting started Dear RCA customer, Thank you record videos with this product. Observe the polarities and insert the battery until a click sound is...
Owner/User Manual
Page 10
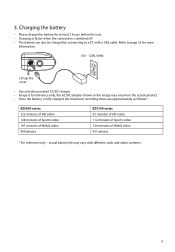
... cards and video contents. 9 3. Charging the battery • Please charge the battery for at least 3 hours before first use. • Charging is faster when the camcorder is switched off. • The battery can also be charged by connecting to page 25 for more information. 100 - 120V, 60Hz Lift up the cover...
... cards and video contents. 9 3. Charging the battery • Please charge the battery for at least 3 hours before first use. • Charging is faster when the camcorder is switched off. • The battery can also be charged by connecting to page 25 for more information. 100 - 120V, 60Hz Lift up the cover...

Owner/User Manual
Page 11
... when locked in the SD memory card. As card is heard • The card icon ( ) appears on the memory card. • In playback mode, the camcorder will only permit minutes of recording time. Do not over rotate the screen or apply excessive force when rotating the screen. 10 The LCD screen... screen 90 degress carefully. • Rotate the LCD screen to the best angle to the USB side. • Rotate the LCD Screen carefully as the camcorder internal memory will playback recordings stored in memory slot, please use care when removing. • The...
... when locked in the SD memory card. As card is heard • The card icon ( ) appears on the memory card. • In playback mode, the camcorder will only permit minutes of recording time. Do not over rotate the screen or apply excessive force when rotating the screen. 10 The LCD screen... screen 90 degress carefully. • Rotate the LCD screen to the best angle to the USB side. • Rotate the LCD Screen carefully as the camcorder internal memory will playback recordings stored in memory slot, please use care when removing. • The...

Owner/User Manual
Page 12
...recording and other operations. 7. Turning on the camcorder • Open the LCD screen and press the power switch until the camcorder turns on the LCD screen when the camcorder is recommended to the following pages for more information. 11 Resetting the camcorder • If the player stops operating properly, ...and time • It is ready for more information on page 23 for recording. 6. Press and hold power switch to turn off camcorder. • The camcorder will automatically turn off after 3 minutes if not in use. • Refer to set the date and time before using the...
...recording and other operations. 7. Turning on the camcorder • Open the LCD screen and press the power switch until the camcorder turns on the LCD screen when the camcorder is recommended to the following pages for more information. 11 Resetting the camcorder • If the player stops operating properly, ...and time • It is ready for more information on page 23 for recording. 6. Press and hold power switch to turn off camcorder. • The camcorder will automatically turn off after 3 minutes if not in use. • Refer to set the date and time before using the...

Owner/User Manual
Page 13
zoom during record and preview Audio speaker Lens Recording indicator Microphone Video light Lift up the cover Lift up the cover AV output (Lift up the cover to access the connector) HDMI video output (Lift up the cover to access the connector) SD card slot (Lift up the cover to show the card slot) Battery compartment (Lift up the cover to show the battery compartment) Camcorder strap hole 12 General controls General controls Take photo Zoom lever -
zoom during record and preview Audio speaker Lens Recording indicator Microphone Video light Lift up the cover Lift up the cover AV output (Lift up the cover to access the connector) HDMI video output (Lift up the cover to access the connector) SD card slot (Lift up the cover to show the card slot) Battery compartment (Lift up the cover to show the battery compartment) Camcorder strap hole 12 General controls General controls Take photo Zoom lever -
Owner/User Manual
Page 16
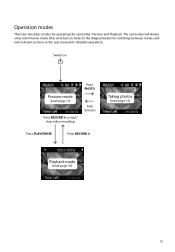
Refer to start/ stop video recording Press PHOTO Auto timeout Press PLAY/PAUSE Press RECORD Taking photos (read page 15) Playback mode (read relevant sections in the user manual for operating the camcorder: Preview and Playback. The camcorder will always enter into Preview mode after switched on Preview mode (read page 13) Press RECORD to the diagram below for switching between modes and read page 16) 15 Switch on . Operation modes There are two basic modes for detailed operations.
Refer to start/ stop video recording Press PHOTO Auto timeout Press PLAY/PAUSE Press RECORD Taking photos (read page 15) Playback mode (read relevant sections in the user manual for operating the camcorder: Preview and Playback. The camcorder will always enter into Preview mode after switched on Preview mode (read page 13) Press RECORD to the diagram below for switching between modes and read page 16) 15 Switch on . Operation modes There are two basic modes for detailed operations.
Owner/User Manual
Page 17
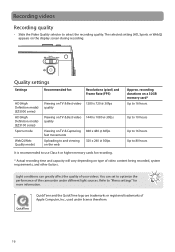
... fast movements Uploading to use Class 4 or higher memory cards for more information. QuickTime and the QuickTime logo are trademarks or registered trademarks of the camcorder under license therefrom. 16 The selected setting (HD, Sports or WebQ) appears on type of your videos.
... fast movements Uploading to use Class 4 or higher memory cards for more information. QuickTime and the QuickTime logo are trademarks or registered trademarks of the camcorder under license therefrom. 16 The selected setting (HD, Sports or WebQ) appears on type of your videos.
Owner/User Manual
Page 18
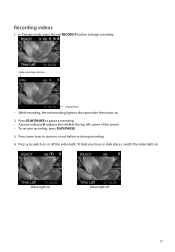
... PLAY/PAUSE to switch on Video light off the video light. Video recording indicator Elapsed time • While recording, the red recording light on the camcorder front turns on .
... PLAY/PAUSE to switch on Video light off the video light. Video recording indicator Elapsed time • While recording, the red recording light on the camcorder front turns on .
Owner/User Manual
Page 24
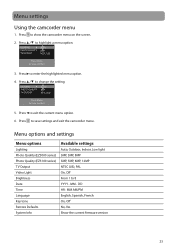
... TV OUTOUT AUTO 8MP NTSC (US) Press Menu to change the setting. Press / to Save and Exit 3. MM - Press to save settings and exit the camcorder menu. Press to enter the highlighted menu option. 4. Press to Save and Exit 5. LIGHTING PHOTO QUALITY TV OUTOUT AUTO 8MP NTSC (US) Press Menu to... settings Auto, Outdoor, Indoor, Low light 3MP, 5MP, 8MP 3MP, 5MP, 8MP, 12MP NTSC (US), PAL On, Off From 1 to 8 YYYY - Menu settings Using the camcorder menu 1. DD HR : MM AM/PM English, Spanish, French On, Off No, Yes Show the current firmware version 23
... TV OUTOUT AUTO 8MP NTSC (US) Press Menu to change the setting. Press / to Save and Exit 3. MM - Press to save settings and exit the camcorder menu. Press to enter the highlighted menu option. 4. Press to Save and Exit 5. LIGHTING PHOTO QUALITY TV OUTOUT AUTO 8MP NTSC (US) Press Menu to... settings Auto, Outdoor, Indoor, Low light 3MP, 5MP, 8MP 3MP, 5MP, 8MP, 12MP NTSC (US), PAL On, Off From 1 to 8 YYYY - Menu settings Using the camcorder menu 1. DD HR : MM AM/PM English, Spanish, French On, Off No, Yes Show the current firmware version 23

Owner/User Manual
Page 25
... standard is NTSC. Recording videos to your TV manual for more information. Switch recording device to the video input connected to the camcorder. • Refer to the camcorder menu. For best viewing or recording quality, use the HDMI connector on the left (white) and audio right (red) inputs ...AV cable (provided) - You may play all videos on the TV by going to your recording device and press and hold PLAY/PAUSE on the camcorder for instructions. 4. Refer to corresponding video (yellow) and audio left panel of your user manual of the recording device (VHS or DVD recorder)....
... standard is NTSC. Recording videos to your TV manual for more information. Switch recording device to the video input connected to the camcorder. • Refer to the camcorder menu. For best viewing or recording quality, use the HDMI connector on the left (white) and audio right (red) inputs ...AV cable (provided) - You may play all videos on the TV by going to your recording device and press and hold PLAY/PAUSE on the camcorder for instructions. 4. Refer to corresponding video (yellow) and audio left panel of your user manual of the recording device (VHS or DVD recorder)....
Owner/User Manual
Page 26
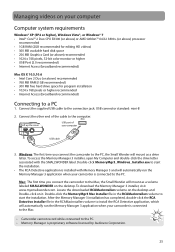
...Double-click MemoryMgr3_Windows_Installer.exe to install the RCA Detective application, which will mount as a drive letter. Double-click the MemoryMgr3 Mac Installer file in the RCAMacInstallers volume to start the installation. Mac: The first time you connect the camcorder to a PC 1. Locate the downloaded... Access (broadband recommended) Connecting to the PC, the Small Wonder will automatically run the Memory Manager 3 application when your camcorder is proprietary software licensed by Audiovox Corporation. 25 Lift up the cover USB port of the cable to the PC. Windows...
...Double-click MemoryMgr3_Windows_Installer.exe to install the RCA Detective application, which will mount as a drive letter. Double-click the MemoryMgr3 Mac Installer file in the RCAMacInstallers volume to start the installation. Mac: The first time you connect the camcorder to a PC 1. Locate the downloaded... Access (broadband recommended) Connecting to the PC, the Small Wonder will automatically run the Memory Manager 3 application when your camcorder is proprietary software licensed by Audiovox Corporation. 25 Lift up the cover USB port of the cable to the PC. Windows...
Owner/User Manual
Page 28
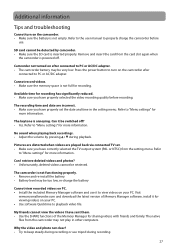
... in the setting menu. The native files from the setting menu. Can it for viewing videos on after connected to properly charge the camcorder before recording. Refer to keep steady during recording or use . My friends cannot view the videos I retrieve deleted videos and photos? ... are distorted when videos are incorrect. • Make sure you have correctly selected the TV output system (PAL or NTSC) from the camcorder may be retrieved. Cannot record videos. • Make sure the memory space is annoying. Additional information Tips and troubleshooting Cannot turn on your...
... in the setting menu. The native files from the setting menu. Can it for viewing videos on after connected to properly charge the camcorder before recording. Refer to keep steady during recording or use . My friends cannot view the videos I retrieve deleted videos and photos? ... are distorted when videos are incorrect. • Make sure you have correctly selected the TV output system (PAL or NTSC) from the camcorder may be retrieved. Cannot record videos. • Make sure the memory space is annoying. Additional information Tips and troubleshooting Cannot turn on your...

Quick Start Guide
Page 1
...Audiovox Accessories Corporation 111 Congressional Blvd., Suite 350 Carmel, IN 46032 Trademark Registered Printed in China Installing RCA Memory Manager application Connect the camcorder to initiate charging. Switch on or off the video light - Selecting recording quality Preview mode LCD ...Preview mode from playback mode; Mac: Open the mounted volume labeled SMALLWONDER on your new RCA High Definition Small Wonder Camcorder. Adjust the brightness of the box • Small Wonder Camcorder • AC/DC adapter • USB cable • AV cable • Carrying...
...Audiovox Accessories Corporation 111 Congressional Blvd., Suite 350 Carmel, IN 46032 Trademark Registered Printed in China Installing RCA Memory Manager application Connect the camcorder to initiate charging. Switch on or off the video light - Selecting recording quality Preview mode LCD ...Preview mode from playback mode; Mac: Open the mounted volume labeled SMALLWONDER on your new RCA High Definition Small Wonder Camcorder. Adjust the brightness of the box • Small Wonder Camcorder • AC/DC adapter • USB cable • AV cable • Carrying...


