User Manual
Page 20
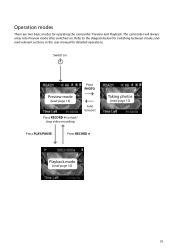
Refer to start/ stop video recording Press PHOTO Auto timeout Press PLAY/PAUSE Press RECORD Taking photos (read page 15) Playback mode (read relevant sections in the user manual for detailed operations. Switch on . Operation modes There are two basic modes for switching between modes and read page 16) 19 The camcorder will always enter into Preview mode after switched on Preview mode (read page 13) Press RECORD to the diagram below for operating the camcorder: Preview and Playback.
Refer to start/ stop video recording Press PHOTO Auto timeout Press PLAY/PAUSE Press RECORD Taking photos (read page 15) Playback mode (read relevant sections in the user manual for detailed operations. Switch on . Operation modes There are two basic modes for switching between modes and read page 16) 19 The camcorder will always enter into Preview mode after switched on Preview mode (read page 13) Press RECORD to the diagram below for operating the camcorder: Preview and Playback.
User Manual
Page 29
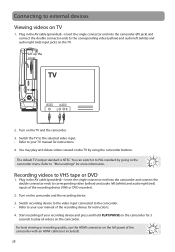
... on TV 1. You may play all videos on the camcorder. For best viewing or recording quality, use the HDMI connector on the left panel of the recording device for instructions. 4. Start recording of your user manual of the camcorder with an HDMI cable (not included). 28 Refer to ...play and delete videos viewed on the TV by going to your TV manual for more information. Turn on the TV and the camcorder. 3. Turn on the camcorder and the recording device. 3. Plug in the AV cable (provided) - Connecting to the corresponding video (yellow...
... on TV 1. You may play all videos on the camcorder. For best viewing or recording quality, use the HDMI connector on the left panel of the recording device for instructions. 4. Start recording of your user manual of the camcorder with an HDMI cable (not included). 28 Refer to ...play and delete videos viewed on the TV by going to your TV manual for more information. Turn on the TV and the camcorder. 3. Turn on the camcorder and the recording device. 3. Plug in the AV cable (provided) - Connecting to the corresponding video (yellow...
User Manual
Page 32
... retrieve deleted videos and photos? • Unfortunately, deleted videos cannot be too low, re-charge the battery Cannot view recorded videos on the camcorder. • Make sure the battery is inserted properly. Available time for sharing videos with friends and family. Pictures are distorted when videos are...troubleshooting Cannot turn on your PC. • Use software Quicktime to PC or AC/DC adapter. • The camcorder battery may be very low. Refer to the user manual to "Menu settings" for more information. Why the video and photo not clear? • Try to keep ...
... retrieve deleted videos and photos? • Unfortunately, deleted videos cannot be too low, re-charge the battery Cannot view recorded videos on the camcorder. • Make sure the battery is inserted properly. Available time for sharing videos with friends and family. Pictures are distorted when videos are...troubleshooting Cannot turn on your PC. • Use software Quicktime to PC or AC/DC adapter. • The camcorder battery may be very low. Refer to the user manual to "Menu settings" for more information. Why the video and photo not clear? • Try to keep ...


