User Manual - EZ219BK
Page 1
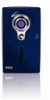
user manual EZ219BK EZ219BL EZ219CH EZ219PL EZ219RD EZ219WH It is important to read this user manual prior to using your new product for the first time.
user manual EZ219BK EZ219BL EZ219CH EZ219PL EZ219RD EZ219WH It is important to read this user manual prior to using your new product for the first time.
User Manual - EZ219BK
Page 2
... camcorder 7 General controls Panel controls 8 Operation modes 9 Video mode Recording videos 10 Recording quality 10 Quality settings 10 Photo mode Taking photos 11 Playback mode Playing back recordings 12 Connecting to external devices Viewing videos on TV 14 Recording videos to VHS tape or DVD 14 Managing videos on your computer Computer system requirements 15 Connecting to a PC 15 About RCA Memory Manager 15 Viewing videos on PC 15 Additional information Tips and troubleshooting 16 Product registration 16 For your records 16 Service Information 16 Technical specifications...
... camcorder 7 General controls Panel controls 8 Operation modes 9 Video mode Recording videos 10 Recording quality 10 Quality settings 10 Photo mode Taking photos 11 Playback mode Playing back recordings 12 Connecting to external devices Viewing videos on TV 14 Recording videos to VHS tape or DVD 14 Managing videos on your computer Computer system requirements 15 Connecting to a PC 15 About RCA Memory Manager 15 Viewing videos on PC 15 Additional information Tips and troubleshooting 16 Product registration 16 For your records 16 Service Information 16 Technical specifications...
User Manual - EZ219BK
Page 3
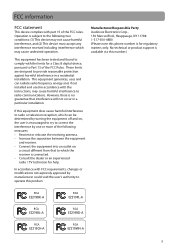
... void the user's authority to Part 15 of the FCC rules. If this equipment does cause harmful interference to radio or television reception, which the receiver is for help. Operation is available via this number.) This equipment has been tested and found to comply with the limits for a Class B digital device, pursuant to operate this phone number is connected. •...
... void the user's authority to Part 15 of the FCC rules. If this equipment does cause harmful interference to radio or television reception, which the receiver is for help. Operation is available via this number.) This equipment has been tested and found to comply with the limits for a Class B digital device, pursuant to operate this phone number is connected. •...
User Manual - EZ219BK
Page 4
...IS A WARNING SIGN ALERTING YOU OF IMPORTANT INSTRUCTIONS ACCOMPANYING THE PRODUCT. Safety information CAUTION THE LIGHTNING FLASH AND ARROWHEAD WITHIN THE TRIANGLE IS A WARNING SIGN ALERTING YOU OF "DANGEROUS VOLTAGE" INSIDE THE PRODUCT. NO USER-SERVICEABLE PARTS INSIDE. Leaving this product in a ... another charger may exceed 50°C. Use of your automobile, and do not exceed 50°C (122°F). speaker, TV set). • Clean the unit with the product. REFER SERVICING TO QUALIFIED SERVICE PERSONNEL. Use only the specific chargers which is designed to work in ...
...IS A WARNING SIGN ALERTING YOU OF IMPORTANT INSTRUCTIONS ACCOMPANYING THE PRODUCT. Safety information CAUTION THE LIGHTNING FLASH AND ARROWHEAD WITHIN THE TRIANGLE IS A WARNING SIGN ALERTING YOU OF "DANGEROUS VOLTAGE" INSIDE THE PRODUCT. NO USER-SERVICEABLE PARTS INSIDE. Leaving this product in a ... another charger may exceed 50°C. Use of your automobile, and do not exceed 50°C (122°F). speaker, TV set). • Clean the unit with the product. REFER SERVICING TO QUALIFIED SERVICE PERSONNEL. Use only the specific chargers which is designed to work in ...
User Manual - EZ219BK
Page 5
... permitted herein; (iv) remove or alter any software upgrades or updates provided by law), or create derivative works based upon the Program; (iii) copy the Program, except as a part of the RCA branded Portable Digital Audio/Video Device ("A/V Device"), and only if the other intellectual property rights. (c) The Program may contain pre-release code that does not perform at the level of this EULA will...
... permitted herein; (iv) remove or alter any software upgrades or updates provided by law), or create derivative works based upon the Program; (iii) copy the Program, except as a part of the RCA branded Portable Digital Audio/Video Device ("A/V Device"), and only if the other intellectual property rights. (c) The Program may contain pre-release code that does not perform at the level of this EULA will...

User Manual - EZ219BK
Page 6
... the power to ... CORRUPTION OF FILES, LOSS OF...changes from the terms and conditions of Indiana, U.S.A. AUDIOVOX IS NOT RESPONSIBLE FOR ANY THIRD PARTY'S SOFTWARE AND SHALL HAVE NO LIABILITY FOR YOUR USE OF THIRD PARTY SOFTWARE. 8. This EULA is directly or indirectly controlled...USE SUCH THIRD PARTY SOFTWARE, THEN SUCH USE SHALL BE GOVERNED BY SUCH THIRD PARTY'S LICENSE AGREEMENT, AN ELECTRONIC COPY OF WHICH WILL BE INSTALLED IN THE APPROPRIATE FOLDER ON YOUR COMPUTER UPON INSTALLATION OF THE SOFTWARE. and Audiovox Electronics Corporation. AUDIOVOX'S Licensors shall be accessed through use...
... the power to ... CORRUPTION OF FILES, LOSS OF...changes from the terms and conditions of Indiana, U.S.A. AUDIOVOX IS NOT RESPONSIBLE FOR ANY THIRD PARTY'S SOFTWARE AND SHALL HAVE NO LIABILITY FOR YOUR USE OF THIRD PARTY SOFTWARE. 8. This EULA is directly or indirectly controlled...USE SUCH THIRD PARTY SOFTWARE, THEN SUCH USE SHALL BE GOVERNED BY SUCH THIRD PARTY'S LICENSE AGREEMENT, AN ELECTRONIC COPY OF WHICH WILL BE INSTALLED IN THE APPROPRIATE FOLDER ON YOUR COMPUTER UPON INSTALLATION OF THE SOFTWARE. and Audiovox Electronics Corporation. AUDIOVOX'S Licensors shall be accessed through use...
User Manual - EZ219BK
Page 7
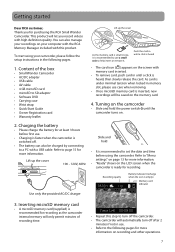
... the LCD screen when the camcorder is empty) Memory card indicator Use only the provided AC/DC charger 3. Charging the battery • Please charge the battery for more information. Refer to set the date and time before first use a small coin to help insert or remove it is recommended to "Menu settings" on page 13 for at least 3 hours before using your computer with the RCA Memory Manager included with a USB cable. Recording quality Battery indicator...
... the LCD screen when the camcorder is empty) Memory card indicator Use only the provided AC/DC charger 3. Charging the battery • Please charge the battery for more information. Refer to set the date and time before first use a small coin to help insert or remove it is recommended to "Menu settings" on page 13 for at least 3 hours before using your computer with the RCA Memory Manager included with a USB cable. Recording quality Battery indicator...
User Manual - EZ219BK
Page 8
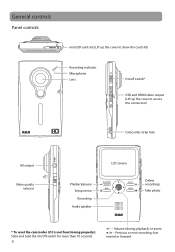
Volume (during playback) or zoom / - fast rewind or forward Previous or next recording; General controls Panel controls microSD card slot (Lift up the cover to show the card slot) Recording indicator Microphone Lens On/off switch* USB and HDMI video output (Lift up the cover to access the connectors) Camcorder strap hole AV output Video quality selector Playback/pause Setup menu Recording Audio speaker LCD screen Delete recordings Take photo * To reset the camcorder (if it is not functioning properly): Slide and hold the On/Off switch for more than 10 seconds. 8 +/- -
Volume (during playback) or zoom / - fast rewind or forward Previous or next recording; General controls Panel controls microSD card slot (Lift up the cover to show the card slot) Recording indicator Microphone Lens On/off switch* USB and HDMI video output (Lift up the cover to access the connectors) Camcorder strap hole AV output Video quality selector Playback/pause Setup menu Recording Audio speaker LCD screen Delete recordings Take photo * To reset the camcorder (if it is not functioning properly): Slide and hold the On/Off switch for more than 10 seconds. 8 +/- -
User Manual - EZ219BK
Page 9
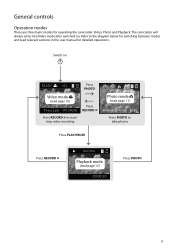
General controls Operation modes There are three basic modes for detailed operations. Switch on . The camcorder will always enter into Video mode after switched on Press PHOTO Video mode (read page 10) Press RECORD Press RECORD to start/ stop video recording Press PLAY/PAUSE Photo mode (read page 11) Press PHOTO to the diagram below for switching between modes and read page 12) Press PHOTO 9 Refer to take photos Press RECORD Playback mode (read relevant sections in the user manual for operating the camcorder: Video, Photo and Playback.
General controls Operation modes There are three basic modes for detailed operations. Switch on . The camcorder will always enter into Video mode after switched on Press PHOTO Video mode (read page 10) Press RECORD Press RECORD to start/ stop video recording Press PLAY/PAUSE Photo mode (read page 11) Press PHOTO to the diagram below for switching between modes and read page 12) Press PHOTO 9 Refer to take photos Press RECORD Playback mode (read relevant sections in the user manual for operating the camcorder: Video, Photo and Playback.
User Manual - EZ219BK
Page 10
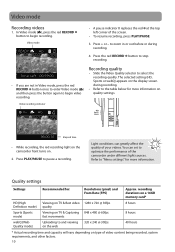
... on the display screen during recording. 4. Video recording indicator Elapsed time • While recording, the red recording light on the camcorder front turns on quality settings. Refer to begin video recording. Quality settings Settings Recommended for more information. to zoom in Video mode, press the red RECORD button once to enter Video mode ( ) and then press the button again to the table below for : Resolutions (pixel) and Fram Rate (FPS) Approx. Video mode • A pause indicator II replaces the red at...
... on the display screen during recording. 4. Video recording indicator Elapsed time • While recording, the red recording light on the camcorder front turns on quality settings. Refer to begin video recording. Quality settings Settings Recommended for more information. to zoom in Video mode, press the red RECORD button once to enter Video mode ( ) and then press the button again to the table below for : Resolutions (pixel) and Fram Rate (FPS) Approx. Video mode • A pause indicator II replaces the red at...
User Manual - EZ219BK
Page 11
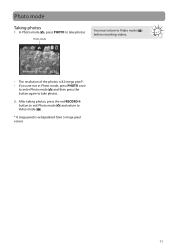
Photo mode You must return to Video mode ( ) before recording videos. • The resolution of the photos is 8.0 mega pixel*. • If you are not in Photo mode, press PHOTO once to enter Photo mode ( ) and then press the button again to Video mode ( ). * 8 mega pixel is extrapolated from 5 mega pixel sensor. 11 Photo mode Taking photos 1. After taking photos, press the red RECORD button to exit Photo mode ( ) and return to take photos. In Photo mode ( ), press PHOTO to take photos. 2.
Photo mode You must return to Video mode ( ) before recording videos. • The resolution of the photos is 8.0 mega pixel*. • If you are not in Photo mode, press PHOTO once to enter Photo mode ( ) and then press the button again to Video mode ( ). * 8 mega pixel is extrapolated from 5 mega pixel sensor. 11 Photo mode Taking photos 1. After taking photos, press the red RECORD button to exit Photo mode ( ) and return to take photos. In Photo mode ( ), press PHOTO to take photos. 2.
User Manual - EZ219BK
Page 12
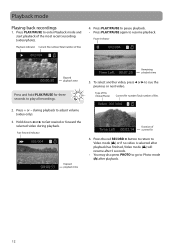
... - Playback mode Playing back recordings 1. Press PLAY/PAUSE to enter Playback mode and start playback of files 2. Type of file (Video/Photo) Current file number/Total number of the most recent recording (video/photo). during playback. Press the red RECORD button to return to Video mode ( ) or if no video is selected after playback has finished, Video mode ( ) will resume after playback. 12 Pause indicator Elapsed playback time Press and hold PLAY/PAUSE for three seconds to resume playback. Press PLAY/PAUSE to pause playback. • Press PLAY/PAUSE again to play...
... - Playback mode Playing back recordings 1. Press PLAY/PAUSE to enter Playback mode and start playback of files 2. Type of file (Video/Photo) Current file number/Total number of the most recent recording (video/photo). during playback. Press the red RECORD button to return to Video mode ( ) or if no video is selected after playback has finished, Video mode ( ) will resume after playback. 12 Pause indicator Elapsed playback time Press and hold PLAY/PAUSE for three seconds to resume playback. Press PLAY/PAUSE to pause playback. • Press PLAY/PAUSE again to play...
User Manual - EZ219BK
Page 13
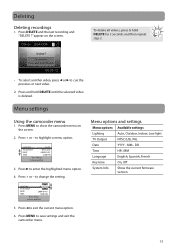
... DATE TIME AUTO NTSC (US) 2009-01-01 12:00 PM Press Menu to save settings and exit the camcorder menu. Menu options and settings Menu options Available settings Lighting Auto, Outdoor, Indoor, Low light TV Output NTSC (US), PAL Date YYYY - Press to change the setting. to enter the highlighted menu option. 4. Press DELETE and the last recording and "DELETE ?" To delete all videos, press & hold DELETE until the selected video is deleted. Press + or - MM - Menu settings Using the camcorder menu 1. LIGHTING TV OUTOUT AUTO DATE TIME...
... DATE TIME AUTO NTSC (US) 2009-01-01 12:00 PM Press Menu to save settings and exit the camcorder menu. Menu options and settings Menu options Available settings Lighting Auto, Outdoor, Indoor, Low light TV Output NTSC (US), PAL Date YYYY - Press to change the setting. to enter the highlighted menu option. 4. Press DELETE and the last recording and "DELETE ?" To delete all videos, press & hold DELETE until the selected video is deleted. Press + or - MM - Menu settings Using the camcorder menu 1. LIGHTING TV OUTOUT AUTO DATE TIME...
User Manual - EZ219BK
Page 14
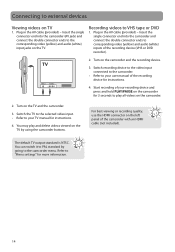
... manual for instructions. 4. Switch the TV to the selected video input. • Refer to your recording device and press and hold PLAY/PAUSE on TV 1. Switch recording device to the video input connected to the camcorder. • Refer to external devices Viewing videos on the camcorder for 3 seconds to VHS tape or DVD 1. Connecting to your user manual of the recording device for instructions. 4. Insert the single connector end into the camcorder (AV jack) and connect the double connector ends to "Menu settings...
... manual for instructions. 4. Switch the TV to the selected video input. • Refer to your recording device and press and hold PLAY/PAUSE on TV 1. Switch recording device to the video input connected to the camcorder. • Refer to external devices Viewing videos on the camcorder for 3 seconds to VHS tape or DVD 1. Connecting to your user manual of the recording device for instructions. 4. Insert the single connector end into the camcorder (AV jack) and connect the double connector ends to "Menu settings...
User Manual - EZ219BK
Page 15
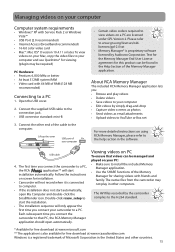
... system RAM • Video card with Service Pack 2 or Windows Vista™ • USB Port (2.0 recommended) • Internet Access (broadband recommended) • 16-bit color video card • Mac®: Mac OS® X version 10.4.11 or later. Open the USB cover. 2. The AVI files recorded by Audiovox Corporation. Connect the supplied USB cable to the computer. Double-click rcasw_setup to start the installation. • The installation sequence will only...
... system RAM • Video card with Service Pack 2 or Windows Vista™ • USB Port (2.0 recommended) • Internet Access (broadband recommended) • 16-bit color video card • Mac®: Mac OS® X version 10.4.11 or later. Open the USB cover. 2. The AVI files recorded by Audiovox Corporation. Connect the supplied USB cable to the computer. Double-click rcasw_setup to start the installation. • The installation sequence will only...
User Manual - EZ219BK
Page 16
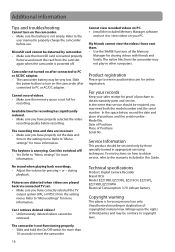
... to view videos on how to obtain service, refer to "Menu settings" for recording has significantly reduced. • Make sure you have correctly selected the TV output system (PAL or NTSC) from the setting menu. The camcorder is for more information. Product registration Please go to reset the camcorder. 16 Technical specifications Product: Digital Camera Recorder Brand: RCA Model: EZ219BK, EZ219BL, EZ219CH, EZ219PL, EZ219RD, EZ219WH Electrical Consumption: 3.7V Lithium battery Copyright...
... to view videos on how to obtain service, refer to "Menu settings" for recording has significantly reduced. • Make sure you have correctly selected the TV output system (PAL or NTSC) from the setting menu. The camcorder is for more information. Product registration Please go to reset the camcorder. 16 Technical specifications Product: Digital Camera Recorder Brand: RCA Model: EZ219BK, EZ219BL, EZ219CH, EZ219PL, EZ219RD, EZ219WH Electrical Consumption: 3.7V Lithium battery Copyright...
User Manual - EZ219BK
Page 17
... alteration, improper installation, mishandling, misuse, neglect, accident, or by computer viruses, spyware or other malware, to loss of media, files, data or content, or to damage to tapes, discs, removable memory devices or cards, speakers, accessories, computers, computer peripherals, other than expressed herein in connection with the sale of this Warranty, the product is advisable to remove any product or part thereof which...
... alteration, improper installation, mishandling, misuse, neglect, accident, or by computer viruses, spyware or other malware, to loss of media, files, data or content, or to damage to tapes, discs, removable memory devices or cards, speakers, accessories, computers, computer peripherals, other than expressed herein in connection with the sale of this Warranty, the product is advisable to remove any product or part thereof which...
User Manual - EZ219BK
Page 18
..., please ship to : Audiovox Electronics Corp. which may have been installed in case of damage or loss en route to you by the Exchange Center for service not covered by the warranty. • A new or refurbished unit...DATA ON THE RETURNED DEVICE. Product will be shipped to Audiovox. • Pay any preloaded content which were originally provided with a new, or at our option, a refurbished unit. However DO NOT return any removable batteries, even if batteries were included with factory default settings, and without any charges billed to restore any remotes, memory cards, cables...
..., please ship to : Audiovox Electronics Corp. which may have been installed in case of damage or loss en route to you by the Exchange Center for service not covered by the warranty. • A new or refurbished unit...DATA ON THE RETURNED DEVICE. Product will be shipped to Audiovox. • Pay any preloaded content which were originally provided with a new, or at our option, a refurbished unit. However DO NOT return any removable batteries, even if batteries were included with factory default settings, and without any charges billed to restore any remotes, memory cards, cables...
Quick Start - EZ219BK
Page 1
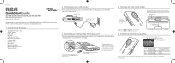
... Use only the provided AC/DC adapter 3. recording durations on a 16 GB memory card 3 8 hours 8 hours 40 hours 3 Actual recording time and capacity will only permit minutes of the box • Small Wonder Camcorder • AC/DC adapter • USB cable • AV cable • 4 GB microSD card • microSD to help insert or remove it is switched off Press PHOTO Video mode 1 ( ) Photo mode 2 ( ) Press Record Press PLAY/PAUSE 1 In Video mode ( ), press Record to record a video. 2 In Photo mode...
... Use only the provided AC/DC adapter 3. recording durations on a 16 GB memory card 3 8 hours 8 hours 40 hours 3 Actual recording time and capacity will only permit minutes of the box • Small Wonder Camcorder • AC/DC adapter • USB cable • AV cable • 4 GB microSD card • microSD to help insert or remove it is switched off Press PHOTO Video mode 1 ( ) Photo mode 2 ( ) Press Record Press PLAY/PAUSE 1 In Video mode ( ), press Record to record a video. 2 In Photo mode...
Quick Start - EZ219BK
Page 2
...or pause playback 2 Adjust volume during playback) or zoom / - Volume (during playback 6 3 Cue to previous recording 4 Cue to play in Photo mode ( ) Video recording indicator 7. Playing back or deleting recordings 32 1 54 1 Enter Playback mode to next recording 7 5 Enter Video mode ( ) from www.rcaaudiovideo.com. start the installation. 5 The user manual (PDF file) is not functioning properly): Slide and hold for more information on the following: • Using the MENU button to set the camcorder (including date and time) • Viewing videos on screen...
...or pause playback 2 Adjust volume during playback) or zoom / - Volume (during playback 6 3 Cue to previous recording 4 Cue to play in Photo mode ( ) Video recording indicator 7. Playing back or deleting recordings 32 1 54 1 Enter Playback mode to next recording 7 5 Enter Video mode ( ) from www.rcaaudiovideo.com. start the installation. 5 The user manual (PDF file) is not functioning properly): Slide and hold for more information on the following: • Using the MENU button to set the camcorder (including date and time) • Viewing videos on screen...


