

Warranty Card
Page 1
... SERVICE AND REFORMATTING. To obtain repair or replacement within 12 months from state to tapes, discs, removable memory devices or cards, speakers, accessories, computers, computer peripherals, other than expressed herein in the opinion of the Company, has suffered or been damaged through alteration, improper installation, mishandling, misuse, neglect, accident, or by computer viruses, spyware or other malware, to loss of media, files, data...
... SERVICE AND REFORMATTING. To obtain repair or replacement within 12 months from state to tapes, discs, removable memory devices or cards, speakers, accessories, computers, computer peripherals, other than expressed herein in the opinion of the Company, has suffered or been damaged through alteration, improper installation, mishandling, misuse, neglect, accident, or by computer viruses, spyware or other malware, to loss of media, files, data...

Owner/User Manual
Page 2
... the product for replacement of the obsolete outlet. • Protect the power cord from being walked on the product. • Connect power cord only to AC power source as power-supply cord or plug is damaged, liquid...time. Use only chargers that came with dry cloth. • Do not block any way, such as marked on a bed, rug, in any ventilation openings. Install in accordance with one wider than the other apparatus (including amplifiers) that objects do not fall into your particular product; Important safety instructions IMPORTANT SAFETY INSTRUCTIONS PLEASE READ AND SAVE...
... the product for replacement of the obsolete outlet. • Protect the power cord from being walked on the product. • Connect power cord only to AC power source as power-supply cord or plug is damaged, liquid...time. Use only chargers that came with dry cloth. • Do not block any way, such as marked on a bed, rug, in any ventilation openings. Install in accordance with one wider than the other apparatus (including amplifiers) that objects do not fall into your particular product; Important safety instructions IMPORTANT SAFETY INSTRUCTIONS PLEASE READ AND SAVE...
Owner/User Manual
Page 4
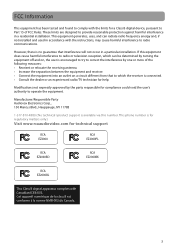
... phone number is connected. • Consult the dealer or an experienced radio/TV technician for help. However, there is available via this equipment does cause harmful interference to radio or television reception, which can radiate radio frequency energy and, if not installed and used in a residential installation. This equipment generates, uses, and can be determined by turning the...
... phone number is connected. • Consult the dealer or an experienced radio/TV technician for help. However, there is available via this equipment does cause harmful interference to radio or television reception, which can radiate radio frequency energy and, if not installed and used in a residential installation. This equipment generates, uses, and can be determined by turning the...

Owner/User Manual
Page 5
... INSTRUCTIONS 1 Important battery precautions ...2 Ecology...2 Precautions for the unit ...2 FCC Information 3 End user license agreement 6 Getting started Content of the box...8 Charging the battery ...8 Inserting microSD memory card ...9 Turning on the camcorder ...9 Resetting the camcorder...10 Setting date and time...10 General controls General controls ...11 Operation modes ...12 Recording videos Recording quality...13 Quality settings...13 Recording videos...14 Taking photos To take photos...15 Playback mode Playing back recordings...16 Deleting Deleting recordings...18 Menu settings...
... INSTRUCTIONS 1 Important battery precautions ...2 Ecology...2 Precautions for the unit ...2 FCC Information 3 End user license agreement 6 Getting started Content of the box...8 Charging the battery ...8 Inserting microSD memory card ...9 Turning on the camcorder ...9 Resetting the camcorder...10 Setting date and time...10 General controls General controls ...11 Operation modes ...12 Recording videos Recording quality...13 Quality settings...13 Recording videos...14 Taking photos To take photos...15 Playback mode Playing back recordings...16 Deleting Deleting recordings...18 Menu settings...
Owner/User Manual
Page 6
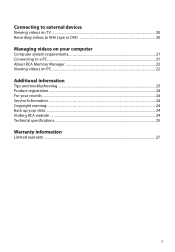
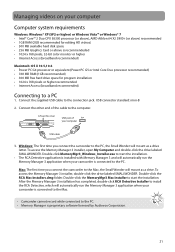
Connecting to external devices Viewing videos on TV ...20 Recording videos to VHS tape or DVD 20 Managing videos on your computer Computer system requirements...21 Connecting to a PC...21 About RCA Memory Manager ...22 Viewing videos on PC ...22 Additional information Tips and troubleshooting...23 Product registration ...24 For your records ...24 Service Information...24 Copyright warning...24 Back up your data ...24 Visiting RCA website ...24 Technical specifications ...25 Warranty information Limited warranty ...27 5
Connecting to external devices Viewing videos on TV ...20 Recording videos to VHS tape or DVD 20 Managing videos on your computer Computer system requirements...21 Connecting to a PC...21 About RCA Memory Manager ...22 Viewing videos on PC ...22 Additional information Tips and troubleshooting...23 Product registration ...24 For your records ...24 Service Information...24 Copyright warning...24 Back up your data ...24 Visiting RCA website ...24 Technical specifications ...25 Warranty information Limited warranty ...27 5
Owner/User Manual
Page 7
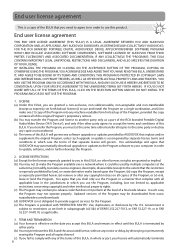
... automatically download upgrades or updates to the Program software to your license will govern. End user license agreement THIS END USER LICENSE AGREEMENT (THIS "EULA") IS A LEGAL AGREEMENT BETWEEN YOU AND AUDIOVOX CORPORATION AND, AS APPLICABLE, ANY AUDIOVOX SUBSIDIARY, AS DEFINED BELOW (COLLECTIVELY "AUDIOVOX"), FOR THE RCA BRANDED PORTABLE DIGITAL AUDIO/VIDEO DEVICE APPLICATION/DRIVER SOFTWARE PROGRAM WHICH MAY INCLUDE ASSOCIATED SOFTWARE COMPONENTS, SOFTWARE LICENSED...
... automatically download upgrades or updates to the Program software to your license will govern. End user license agreement THIS END USER LICENSE AGREEMENT (THIS "EULA") IS A LEGAL AGREEMENT BETWEEN YOU AND AUDIOVOX CORPORATION AND, AS APPLICABLE, ANY AUDIOVOX SUBSIDIARY, AS DEFINED BELOW (COLLECTIVELY "AUDIOVOX"), FOR THE RCA BRANDED PORTABLE DIGITAL AUDIO/VIDEO DEVICE APPLICATION/DRIVER SOFTWARE PROGRAM WHICH MAY INCLUDE ASSOCIATED SOFTWARE COMPONENTS, SOFTWARE LICENSED...
Owner/User Manual
Page 9
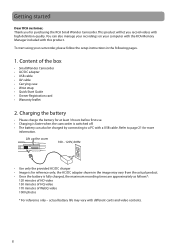
... video 170 minutes of the box • Small Wonder Camcorder • AC/DC adapter • USB cable • AV cable • Carrying case • Wrist strap • Quick Start Guide • Owner Registration card • Warranty leaflet 2. You can also be charged by connecting to page 21 for purchasing the RCA Small Wonder Camcorder. To start using your computer with the RCA Memory Manager included with a USB cable. Charging the battery...
... video 170 minutes of the box • Small Wonder Camcorder • AC/DC adapter • USB cable • AV cable • Carrying case • Wrist strap • Quick Start Guide • Owner Registration card • Warranty leaflet 2. You can also be charged by connecting to page 21 for purchasing the RCA Small Wonder Camcorder. To start using your computer with the RCA Memory Manager included with a USB cable. Charging the battery...

Owner/User Manual
Page 10
... to use care when removing. • The camcorder has internal memory which only permits minutes of recording time. A microSD memory card is recommended for recording. Lift up the cover As the memory card is recommended to help insert or remove it is small in the internal memory, remove the microSD card. 4. To playback recordings in size, it . Turning on the camcorder • Slide and hold the power switch until the camcorder turns on the LCD screen when the camcorder is...
... to use care when removing. • The camcorder has internal memory which only permits minutes of recording time. A microSD memory card is recommended for recording. Lift up the cover As the memory card is recommended to help insert or remove it is small in the internal memory, remove the microSD card. 4. To playback recordings in size, it . Turning on the camcorder • Slide and hold the power switch until the camcorder turns on the LCD screen when the camcorder is...
Owner/User Manual
Page 12
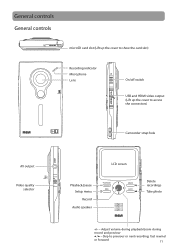
Adjust volume during playback/zoom during record and preview / - Skip to access the connectors) Camcorder strap hole AV output Video quality selector Playback/pause Setup menu Record Audio speaker LCD screen Delete recordings Take photo +/- - General controls General controls microSD card slot (Lift up the cover to show the card slot) Recording indicator Microphone Lens On/off switch USB and HDMI video output (Lift up the cover to previous or next recording; fast rewind or forward 11
Adjust volume during playback/zoom during record and preview / - Skip to access the connectors) Camcorder strap hole AV output Video quality selector Playback/pause Setup menu Record Audio speaker LCD screen Delete recordings Take photo +/- - General controls General controls microSD card slot (Lift up the cover to show the card slot) Recording indicator Microphone Lens On/off switch USB and HDMI video output (Lift up the cover to previous or next recording; fast rewind or forward 11
Owner/User Manual
Page 13
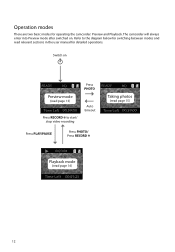
The camcorder will always enter into Preview mode after switched on Preview mode (read page 13) Press RECORD to the diagram below for operating the camcorder: Preview and Playback. Refer to start/ stop video recording Press PHOTO Auto timeout Press PLAY/PAUSE Press PHOTO/ Press RECORD Taking photos (read page 15) Playback mode (read relevant sections in the user manual for detailed operations. Operation modes There are two basic modes for switching between modes and read page 16) 12 Switch on .
The camcorder will always enter into Preview mode after switched on Preview mode (read page 13) Press RECORD to the diagram below for operating the camcorder: Preview and Playback. Refer to start/ stop video recording Press PHOTO Auto timeout Press PLAY/PAUSE Press PHOTO/ Press RECORD Taking photos (read page 15) Playback mode (read relevant sections in the user manual for detailed operations. Operation modes There are two basic modes for switching between modes and read page 16) 12 Switch on .
Owner/User Manual
Page 14
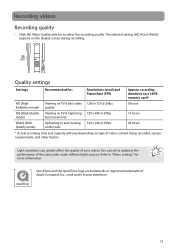
... recording time and capacity will vary depending on the display screen during recording. Refer to select the recording quality. Recording videos Recording quality • Slide the Video Quality selector to "Menu settings" for : Resolutions (pixel) and Frame Rate (FPS) Approx. recording durations on a 16GB memory card* HD (High Viewing on TV & Best video 1280 x 720 @ 30fps Definition mode) quality 8 hours HQ (High Quality Viewing on TV & Capturing 720 x 480 @ 30fps mode...
... recording time and capacity will vary depending on the display screen during recording. Refer to select the recording quality. Recording videos Recording quality • Slide the Video Quality selector to "Menu settings" for : Resolutions (pixel) and Frame Rate (FPS) Approx. recording durations on a 16GB memory card* HD (High Viewing on TV & Best video 1280 x 720 @ 30fps Definition mode) quality 8 hours HQ (High Quality Viewing on TV & Capturing 720 x 480 @ 30fps mode...

Owner/User Manual
Page 15
Press PLAY/PAUSE to stop recording. 14 Recording videos 1. Press + or - Press the red RECORD button to pause a recording. • A pause indicator II replaces the red at the top left corner of the screen. • To resume recording, press PLAY/PAUSE. 3. Video recording indicator Elapsed time • While recording, the red recording light on the camcorder front turns on. 2. In Preview mode, press the red RECORD button to zoom in or out before or during recording. 4. to begin recording.
Press PLAY/PAUSE to stop recording. 14 Recording videos 1. Press + or - Press the red RECORD button to pause a recording. • A pause indicator II replaces the red at the top left corner of the screen. • To resume recording, press PLAY/PAUSE. 3. Video recording indicator Elapsed time • While recording, the red recording light on the camcorder front turns on. 2. In Preview mode, press the red RECORD button to zoom in or out before or during recording. 4. to begin recording.

Owner/User Manual
Page 20
... to change the setting. to enter the highlighted menu option. 4. MM - Menu settings Using the camcorder menu 1. Press + or - LIGHTING PHOTO QUALITY TV OUTOUT DATE AUTO 3MP NTSC (US) 2010-01-01 Press Menu to highlight a menu option. to Save and Exit 3. Press to save settings and exit the camcorder menu. DD Time HR : MM AM/PM Language English, Spanish, French Key tone On, Off Restore Settings No, Yes System Info Show the current firmware...
... to change the setting. to enter the highlighted menu option. 4. MM - Menu settings Using the camcorder menu 1. Press + or - LIGHTING PHOTO QUALITY TV OUTOUT DATE AUTO 3MP NTSC (US) 2010-01-01 Press Menu to highlight a menu option. to Save and Exit 3. Press to save settings and exit the camcorder menu. DD Time HR : MM AM/PM Language English, Spanish, French Key tone On, Off Restore Settings No, Yes System Info Show the current firmware...
Owner/User Manual
Page 21
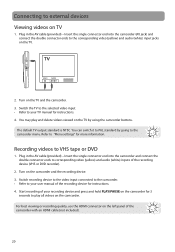
... your recording device and press and hold PLAY/PAUSE on the TV. 2. Start recording of your user manual of the recording device for more information. You may play all videos on TV 1. The default TV output standard is NTSC. You can switch it to PAL standard by using the camcorder buttons. Plug in the AV cable (provided) - Switch recording device to the video input connected to the camcorder. • Refer to play and delete videos viewed on the camcorder and the recording device. 3. Turn...
... your recording device and press and hold PLAY/PAUSE on the TV. 2. Start recording of your user manual of the recording device for more information. You may play all videos on TV 1. The default TV output standard is NTSC. You can switch it to PAL standard by using the camcorder buttons. Plug in the AV cable (provided) - Switch recording device to the video input connected to the camcorder. • Refer to play and delete videos viewed on the camcorder and the recording device. 3. Turn...
Owner/User Manual
Page 22
... Wonder will mount as a drive letter. Double-click the MemoryMgr3 Mac Installer to the connection jack. Lift up the cover USB port of the cable to the Mac, the Small Wonder will mount as a drive. Windows: The first time you connect the camcorder to the computer. To access the Memory Manager 3 installer, double-click the drive labeled SMALLWONDER. To access the Memory Manager 3 installer, open My Computer and double-click...
... Wonder will mount as a drive letter. Double-click the MemoryMgr3 Mac Installer to the connection jack. Lift up the cover USB port of the cable to the Mac, the Small Wonder will mount as a drive. Windows: The first time you connect the camcorder to the computer. To access the Memory Manager 3 installer, double-click the drive labeled SMALLWONDER. To access the Memory Manager 3 installer, open My Computer and double-click...

Owner/User Manual
Page 24
.... Pictures are distorted when videos are incorrect. • Make sure you have properly selected the video recording quality before use it be detected by pressing + or - Cannot view recorded videos on PC. • Install the included Memory Manager software and use . MicroSD card cannot be switched off . Slide the power button to turn on after connected to PC or AC/DC adapter. • The camcorder battery may not play in the setting menu. Can...
.... Pictures are distorted when videos are incorrect. • Make sure you have properly selected the video recording quality before use it be detected by pressing + or - Cannot view recorded videos on PC. • Install the included Memory Manager software and use . MicroSD card cannot be switched off . Slide the power button to turn on after connected to PC or AC/DC adapter. • The camcorder battery may not play in the setting menu. Can...
Owner/User Manual
Page 25
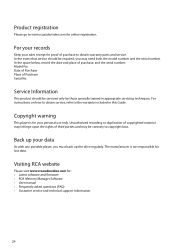
... software and firmware • RCA Memory Manager Software • User manual • Frequently asked questions (FAQ) • Customer service and technical support information 24 In the event that service should be required, you must back up your data As with any portable player, you may need both the model number and the serial number. Date of Purchase Place of purchase, and the serial number: Model No. In the space below, record...
... software and firmware • RCA Memory Manager Software • User manual • Frequently asked questions (FAQ) • Customer service and technical support information 24 In the event that service should be required, you must back up your data As with any portable player, you may need both the model number and the serial number. Date of Purchase Place of purchase, and the serial number: Model No. In the space below, record...
Owner/User Manual
Page 26
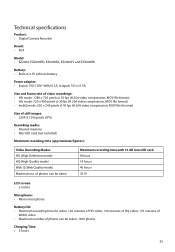
... minutes of WebQ video • Maximum number of still images: • 2304 X 1296 pixels (JPG) Recording media: • Internal memory • MicroSD card (not included) Maximum recording time (approximate figures): Video Recording Modes HD (High Definition mode) HQ (High Quality mode) Web Q (Web Quality mode) Maximum no. Technical specifications Product: • Digital Camera Recorder Brand: • RCA Model: • EZ2000, EZ2000RD, EZ2000BL, EZ2000PL and EZ2000BK Battery: • Built-in 3.7V Lithium battery Power adapter: • (input) 100-120V...
... minutes of WebQ video • Maximum number of still images: • 2304 X 1296 pixels (JPG) Recording media: • Internal memory • MicroSD card (not included) Maximum recording time (approximate figures): Video Recording Modes HD (High Definition mode) HQ (High Quality mode) Web Q (Web Quality mode) Maximum no. Technical specifications Product: • Digital Camera Recorder Brand: • RCA Model: • EZ2000, EZ2000RD, EZ2000BL, EZ2000PL and EZ2000BK Battery: • Built-in 3.7V Lithium battery Power adapter: • (input) 100-120V...
Owner/User Manual
Page 27
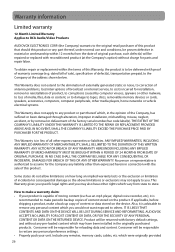
...or limitation of the factory serial number/bar code label(s). which you . dated bill of sale), specification of content stored on the product. How to others. IT IS LIKELY THAT CONTENTS AND DATA ON THE DEVICE WILL BE LOST DURING SERVICE AND REFORMATTING. Consumer...repair or replacement within 12 months from state to state. This Warranty is authorized to assume for installation, removal or reinstallation of product, to corruptions caused by computer viruses, spyware or other malware, to loss of media, files, data or content, or to damage to tapes, discs, removable memory devices or cards...
...or limitation of the factory serial number/bar code label(s). which you . dated bill of sale), specification of content stored on the product. How to others. IT IS LIKELY THAT CONTENTS AND DATA ON THE DEVICE WILL BE LOST DURING SERVICE AND REFORMATTING. Consumer...repair or replacement within 12 months from state to state. This Warranty is authorized to assume for installation, removal or reinstallation of product, to corruptions caused by computer viruses, spyware or other malware, to loss of media, files, data or content, or to damage to tapes, discs, removable memory devices or cards...
Quick Start Guide
Page 1
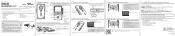
... Mac Installer to start the installation. fast rewind or forward The camcorder internal memory will vary depending on TV • Recording videos to VHS tape or DVD • Connecting the camcorder to record a video. 6. Video recording and photo taking 13 2 1 Start, stop, resume recording in China Make sure that videos can also be managed and played on your new RCA High Definition Small Wonder Camcorder. Adjust volume during playback/ zoom during recording 5 Take photos 45 Video recording indicator 8. start or pause playback 2 Adjust volume during playback...
... Mac Installer to start the installation. fast rewind or forward The camcorder internal memory will vary depending on TV • Recording videos to VHS tape or DVD • Connecting the camcorder to record a video. 6. Video recording and photo taking 13 2 1 Start, stop, resume recording in China Make sure that videos can also be managed and played on your new RCA High Definition Small Wonder Camcorder. Adjust volume during playback/ zoom during recording 5 Take photos 45 Video recording indicator 8. start or pause playback 2 Adjust volume during playback...


