User Guide
Page 2
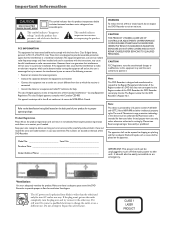
... unauthorized changes or modifications to this equipment may cause harmful interference to change the outlet or use of this DVD Recorder this DVD Recorder cannot play the disc.The Region number for ventilation. Make sure there is Region No 1. However, there is no objects... ventilate the product. Returning the product registration card allows us to provide proper air flow for this DVD Recorder is adequate space around the DVD Recorder to contact you need them.The numbers are designed to provide reasonable protection against harmful interference in a residential ...
... unauthorized changes or modifications to this equipment may cause harmful interference to change the outlet or use of this DVD Recorder this DVD Recorder cannot play the disc.The Region number for ventilation. Make sure there is Region No 1. However, there is no objects... ventilate the product. Returning the product registration card allows us to provide proper air flow for this DVD Recorder is adequate space around the DVD Recorder to contact you need them.The numbers are designed to provide reasonable protection against harmful interference in a residential ...

User Guide
Page 3
...Your Connection 4 Explanation of Input Jacks and Cables 5 Back of the DVD Recorder 6 Explanation of Jacks 6 Front of the DVD Recorder 7 Connection: DVD recorder + TV 9 Connection: DVD recorder + TV + Basic Cable Box...... 11 Connection: DVD recorder + TV + Satellite Receiver ... 13 Connection: DVD recorder + TV + Basic Cable Box +Audio Receiver 15 Install Batteries in... the Remote 17 Point the Remote in the Right Direction 17 Turn on the TV and DVD recorder 17 Complete the Initial Setup 17 Setting the Clock 18 Setting the Date 18 Setting the Time Format (12 or...
...Your Connection 4 Explanation of Input Jacks and Cables 5 Back of the DVD Recorder 6 Explanation of Jacks 6 Front of the DVD Recorder 7 Connection: DVD recorder + TV 9 Connection: DVD recorder + TV + Basic Cable Box...... 11 Connection: DVD recorder + TV + Satellite Receiver ... 13 Connection: DVD recorder + TV + Basic Cable Box +Audio Receiver 15 Install Batteries in... the Remote 17 Point the Remote in the Right Direction 17 Turn on the TV and DVD recorder 17 Complete the Initial Setup 17 Setting the Clock 18 Setting the Date 18 Setting the Time Format (12 or...

User Guide
Page 4
...Graphics contained within this publication are for most prerecorded DVD discs and most pre-recorded VHS tapes. The difference is copy-protected. Some discs may not be recorded using video mode or VM); DVD movie discs (DVD-ROM); DVD-R (must use DVD±R or DVD±RW discs to laser pickup and disc ... stand, make sure you allow adequate ventilation. • If you connect an audio receiver or amplifier, place it on your DVD recorder not VCDs. DVD+R; Arrange the components so that contain JPEG and WMA files and Multisession CDs. • Video CD (VCD) - Audio CDs ...
...Graphics contained within this publication are for most prerecorded DVD discs and most pre-recorded VHS tapes. The difference is copy-protected. Some discs may not be recorded using video mode or VM); DVD movie discs (DVD-ROM); DVD-R (must use DVD±R or DVD±RW discs to laser pickup and disc ... stand, make sure you allow adequate ventilation. • If you connect an audio receiver or amplifier, place it on your DVD recorder not VCDs. DVD+R; Arrange the components so that contain JPEG and WMA files and Multisession CDs. • Video CD (VCD) - Audio CDs ...
User Guide
Page 5
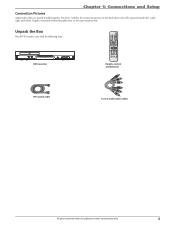
Unpack the Box Your DVD recorder came with the following items: CLEAR DVD recorder Remote control and batteries RF Coaxial cable 1 set of audio video cables Graphics contained within this publication are for representation only. 3 For better visibility, the connection pictures in this publication are usually bundled together. Graphics contained within this book show each cable separately (audio left, audio right, and video). Chapter 1: Connections and Setup Connection Pictures Audio/video cables are for representation only.
Unpack the Box Your DVD recorder came with the following items: CLEAR DVD recorder Remote control and batteries RF Coaxial cable 1 set of audio video cables Graphics contained within this publication are for representation only. 3 For better visibility, the connection pictures in this publication are usually bundled together. Graphics contained within this book show each cable separately (audio left, audio right, and video). Chapter 1: Connections and Setup Connection Pictures Audio/video cables are for representation only.

User Guide
Page 6
... 10 page 12 INPUT CH-/SKIP- CH+/SKIP+ OPEN/CLOSE RECORD STOP REV FWD PLAY/PAUSE DVD Recorder TV • Coaxial • Audio/video TV • S-Video • Component Video • HDMI page 8 INPUT CH-/SKIP- CH+/SKIP+ OPEN/CLOSE RECORD STOP REV FWD PLAY/PAUSE DVD Recorder TV Cable Box • Coaxial • Audio/video •...
... 10 page 12 INPUT CH-/SKIP- CH+/SKIP+ OPEN/CLOSE RECORD STOP REV FWD PLAY/PAUSE DVD Recorder TV • Coaxial • Audio/video TV • S-Video • Component Video • HDMI page 8 INPUT CH-/SKIP- CH+/SKIP+ OPEN/CLOSE RECORD STOP REV FWD PLAY/PAUSE DVD Recorder TV Cable Box • Coaxial • Audio/video •...
User Guide
Page 7
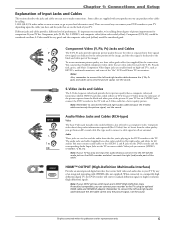
... Interface) Provides an uncompressed digital interface that are usually found on the back of an integrated mini-plug cable (HDMI cable not supplied). Audio/Video Jacks and Cables (RCA-type) Video The basic Video jack (usually color-coded yellow) is separated into three signals (two signals are ...Pb Pr S AV1 IN VIDEO IN L R O IN HDMI OUT Component Video (Y, Pb, Pr) Jacks and Cables The Y, Pb, Pr jacks provide optimum picture quality because the video is also referred to your TV. If your TV has an S-VIDEO jack, connect the DVD recorder to the black and white part of the...
... Interface) Provides an uncompressed digital interface that are usually found on the back of an integrated mini-plug cable (HDMI cable not supplied). Audio/Video Jacks and Cables (RCA-type) Video The basic Video jack (usually color-coded yellow) is separated into three signals (two signals are ...Pb Pr S AV1 IN VIDEO IN L R O IN HDMI OUT Component Video (Y, Pb, Pr) Jacks and Cables The Y, Pb, Pr jacks provide optimum picture quality because the video is also referred to your TV. If your TV has an S-VIDEO jack, connect the DVD recorder to the black and white part of the...
User Guide
Page 8
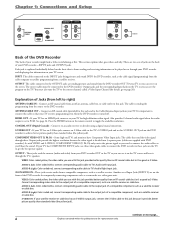
... jacks. OUTPUT - Chapter 1: Connections and Setup IN ANTENNA /CABLE OUT COAXIAL OUT HDMI OUT S-VIDEO OUT COMPONENT VIDEO OUT Y Pb Pr OUTPUT VIDEO L AUDIO R AV1 IN VIDEO IN L R S-VIDEO IN L AUDIO IN R Back of the DVD Recorder The back of your DVD recorder-INPUT jacks and OUTPUT jacks. See page 34. If your TV has...
... jacks. OUTPUT - Chapter 1: Connections and Setup IN ANTENNA /CABLE OUT COAXIAL OUT HDMI OUT S-VIDEO OUT COMPONENT VIDEO OUT Y Pb Pr OUTPUT VIDEO L AUDIO R AV1 IN VIDEO IN L R S-VIDEO IN L AUDIO IN R Back of the DVD Recorder The back of your DVD recorder-INPUT jacks and OUTPUT jacks. See page 34. If your TV has...
User Guide
Page 9
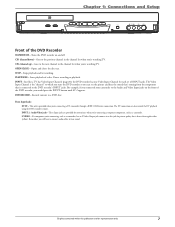
... list when you 're connecting a DV camcorder through a IEEE 1394 Firewire connection. DVD RECORD - Records content to hear sound. PLAY/PAUSE - The Video Input Channel is connected to which you tune the DVD recorder so you 're connecting, such as a camcorder. INPUT 2: Audio/Video jacks -... Just like a TV has Video Input Channels (page 20), the DVD recorder has one Video Input Channel for picture quality that is the "channel" to the DVD recorder's INPUT jacks. This jack is better than regular video (yellow). Chapter 1: Connections and Setup Front...
... list when you 're connecting a DV camcorder through a IEEE 1394 Firewire connection. DVD RECORD - Records content to hear sound. PLAY/PAUSE - The Video Input Channel is connected to which you tune the DVD recorder so you 're connecting, such as a camcorder. INPUT 2: Audio/Video jacks -... Just like a TV has Video Input Channels (page 20), the DVD recorder has one Video Input Channel for picture quality that is the "channel" to the DVD recorder's INPUT jacks. This jack is better than regular video (yellow). Chapter 1: Connections and Setup Front...

User Guide
Page 10
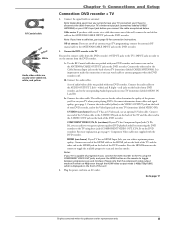
Chapter 1: Connections and Setup DVD recorder + TV In from cable or antenna 1 DVD recorder IN ANTENNA /CABLE OUT COAXIAL OUT HDMI OUT S-VIDEO OUT COMPONENT VIDEO OUT Y Pb Pr OUTPUT VIDEO L AUDIO R AV1 IN VIDEO IN L R S-VIDEO IN L AUDIO IN R 2a 2c 2b S-VIDEO VIDEO L R CABLE/...: To play a disc or tape: Tune the TV to watch one pictured here. Tune the TV to its Input 1 channel or Vid 1 channel Tune the DVD recorder to the channel you want to page 20. 8 Graphics contained within this publication are on page 4. Details about the different kinds of your TV might...
Chapter 1: Connections and Setup DVD recorder + TV In from cable or antenna 1 DVD recorder IN ANTENNA /CABLE OUT COAXIAL OUT HDMI OUT S-VIDEO OUT COMPONENT VIDEO OUT Y Pb Pr OUTPUT VIDEO L AUDIO R AV1 IN VIDEO IN L R S-VIDEO IN L AUDIO IN R 2a 2c 2b S-VIDEO VIDEO L R CABLE/...: To play a disc or tape: Tune the TV to watch one pictured here. Tune the TV to its Input 1 channel or Vid 1 channel Tune the DVD recorder to the channel you want to page 20. 8 Graphics contained within this publication are on page 4. Details about the different kinds of your TV might...
User Guide
Page 11
... the back of the unit. 3. Connect one end of the HDMI cable to the HDMI jack on the DVD recorder. Component Video cables not supplied with your TV is displayed on the DVD recorder). Notes: If your DVD recorder. Note: If you can achieve optimum picture quality. red) jacks... representation only. 9 For more information about cables and signal quality, go to see on the DVD recorder. 2. Press the HDMI button on the remote to the HDMI jack on the back of the DVD recorder. S-VIDEO (not shown) If your TV (sometimes labeled AUDIO IN L and R). 2c. ...
... the back of the unit. 3. Connect one end of the HDMI cable to the HDMI jack on the DVD recorder. Component Video cables not supplied with your TV is displayed on the DVD recorder). Notes: If your DVD recorder. Note: If you can achieve optimum picture quality. red) jacks... representation only. 9 For more information about cables and signal quality, go to see on the DVD recorder. 2. Press the HDMI button on the remote to the HDMI jack on the back of the DVD recorder. S-VIDEO (not shown) If your TV (sometimes labeled AUDIO IN L and R). 2c. ...

User Guide
Page 12
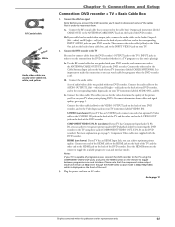
...various Video Input Channels, go to see programming. Since there are for basic channels and the signal could receive the signal with the DVD recorder. In some cases, your TV and/or Cable Box might look different than the ones pictured here. If you contact your situation. ...cable company can scramble the signal for premium channel programming (like movie channels). This may not scramble the signal for representation only. DVD recorder 1a IN ANTENNA /CABLE OUT COAXIAL OUT HDMI OUT S-VIDEO OUT COMPONENT VIDEO OUT Y Pb Pr OUTPUT VIDEO L AUDIO R AV1 IN VIDEO IN L R S-VIDEO IN L...
...various Video Input Channels, go to see programming. Since there are for basic channels and the signal could receive the signal with the DVD recorder. In some cases, your TV and/or Cable Box might look different than the ones pictured here. If you contact your situation. ...cable company can scramble the signal for premium channel programming (like movie channels). This may not scramble the signal for representation only. DVD recorder 1a IN ANTENNA /CABLE OUT COAXIAL OUT HDMI OUT S-VIDEO OUT COMPONENT VIDEO OUT Y Pb Pr OUTPUT VIDEO L AUDIO R AV1 IN VIDEO IN L R S-VIDEO IN L...
User Guide
Page 13
... output mode is 480p/720p/1080i, which is displayed on the DVD recorder). Connect the audio cables to toggle between progressive scan and interlace. HDMI (not shown) If you TV has an HDMI Input Jack, you 'll need to connect cables from the DVD recorder's OUTPUT jacks to the TV's INPUT jacks in order to the... about cables and signal quality, go to the TV using the COMPONENT VIDEO OUT jacks, and press the HDMI button on the DVD recorder. It is off. 2b. red) jacks on the back of your DVD recorder, and to the corresponding Audio Input jacks on the back of the TV and the other end to...
... output mode is 480p/720p/1080i, which is displayed on the DVD recorder). Connect the audio cables to toggle between progressive scan and interlace. HDMI (not shown) If you TV has an HDMI Input Jack, you 'll need to connect cables from the DVD recorder's OUTPUT jacks to the TV's INPUT jacks in order to the... about cables and signal quality, go to the TV using the COMPONENT VIDEO OUT jacks, and press the HDMI button on the DVD recorder. It is off. 2b. red) jacks on the back of your DVD recorder, and to the corresponding Audio Input jacks on the back of the TV and the other end to...

User Guide
Page 14
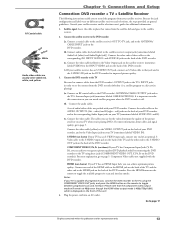
... might look different than the one pictured here. 2a DVD recorder SATELLITE DISH ANTENNA SATELLITE IN LOW SPEED DATA OUT TO TV IN FROM ANT S-VIDE O AUDIO OUT R VIDEO L DIGITAL OUT PHONE JACK 1 2d IN ANTENNA /CABLE OUT COAXIAL OUT HDMI OUT S-VIDEO OUT COMPONENT VIDEO OUT Y Pb Pr ...OUTPUT VIDEO L AUDIO R 2b 2c AV1 IN VIDEO IN L R S-VIDEO IN L AUDIO IN R 3a 3c 3b TV CABLE/ANTENNA VIDEO L INPUT1 R S-VIDEO INPUT2 Important You can't watch one pictured here. Tune the DVD recorder to connect your ...
... might look different than the one pictured here. 2a DVD recorder SATELLITE DISH ANTENNA SATELLITE IN LOW SPEED DATA OUT TO TV IN FROM ANT S-VIDE O AUDIO OUT R VIDEO L DIGITAL OUT PHONE JACK 1 2d IN ANTENNA /CABLE OUT COAXIAL OUT HDMI OUT S-VIDEO OUT COMPONENT VIDEO OUT Y Pb Pr ...OUTPUT VIDEO L AUDIO R 2b 2c AV1 IN VIDEO IN L R S-VIDEO IN L AUDIO IN R 3a 3c 3b TV CABLE/ANTENNA VIDEO L INPUT1 R S-VIDEO INPUT2 Important You can't watch one pictured here. Tune the DVD recorder to connect your ...
User Guide
Page 15
... ends of the picture you can achieve even greater picture quality (DVD playback only) by connecting the DVD recorder to page 5. Connect the audio cables. Connect the video cable (yellow) to the HDMI jack on the back of the DVD recorder. Component Video cables not supplied with your satellite receiver and/or ...the other end to the VIDEO OUTPUT jack on the back of audio/video cables was packed with the DVD recorder. Connect the video cable. HDMI (not shown) If you TV has an HDMI Input Jack, you use for representation only. 13 Go to the Video Input jack on the front ...
... ends of the picture you can achieve even greater picture quality (DVD playback only) by connecting the DVD recorder to page 5. Connect the audio cables. Connect the video cable (yellow) to the HDMI jack on the back of the DVD recorder. Component Video cables not supplied with your satellite receiver and/or ...the other end to the VIDEO OUTPUT jack on the back of audio/video cables was packed with the DVD recorder. Connect the video cable. HDMI (not shown) If you TV has an HDMI Input Jack, you use for representation only. 13 Go to the Video Input jack on the front ...

User Guide
Page 16
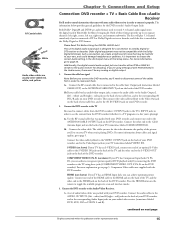
...on the connection shown above reflects a basic setup. This may not scramble the signal for representation only. Chapter 1: Connections and Setup DVD recorder + TV + Basic Cable Box + Audio Receiver Audio Receiver The back of your TV's various Video Input Channels, go to page 20 ... OUT R L AUDIO DIGITAL AUDIO IN Pr VCR 1 SAT IN IN Pb OUT Y S-VIDEO S-VIDEO (ONLY DVD) VIDEO OUT TO TV / MONITOR DVD recorder 1a Cable Box CABLE IN IN ANTENNA /CABLE OUT COAXIAL OUT HDMI OUT S-VIDEO OUT CABLE OU T AUDIO L R VIDEO COMPONENT VIDEO OUT Y Pb Pr OUTPUT VIDEO L AUDIO ...
...on the connection shown above reflects a basic setup. This may not scramble the signal for representation only. Chapter 1: Connections and Setup DVD recorder + TV + Basic Cable Box + Audio Receiver Audio Receiver The back of your TV's various Video Input Channels, go to page 20 ... OUT R L AUDIO DIGITAL AUDIO IN Pr VCR 1 SAT IN IN Pb OUT Y S-VIDEO S-VIDEO (ONLY DVD) VIDEO OUT TO TV / MONITOR DVD recorder 1a Cable Box CABLE IN IN ANTENNA /CABLE OUT COAXIAL OUT HDMI OUT S-VIDEO OUT CABLE OU T AUDIO L R VIDEO COMPONENT VIDEO OUT Y Pb Pr OUTPUT VIDEO L AUDIO ...
User Guide
Page 17
... L and R). Then connect the video cable (yellow) to six separate channels: left, right, center, left - Connect the video cable. Press the HDMI button on the DVD recorder. white) and R (right - If you're using these formats provide up to the Video Out jack on your TV (sometimes labeled VIDEO IN)....to page 5. For more information about cables and signal quality, go to the VIDEO OUTPUT jack on the DVD recorder). Connect the other end to the HDMI jack on the back of your DVD recorder, and to the Video Input jack on the back of film (while the film is designed...
... L and R). Then connect the video cable (yellow) to six separate channels: left, right, center, left - Connect the video cable. Press the HDMI button on the DVD recorder. white) and R (right - If you're using these formats provide up to the Video Out jack on your TV (sometimes labeled VIDEO IN)....to page 5. For more information about cables and signal quality, go to the VIDEO OUTPUT jack on the DVD recorder). Connect the other end to the HDMI jack on the back of your DVD recorder, and to the Video Input jack on the back of film (while the film is designed...
User Guide
Page 18
... an AC outlet. Chapter 1: Connections and Setup The audio input jacks on the audio receiver you use to connect to the DVD recorder will remain at 480p even though the HDMI video output mode is 480p/720p/1080i, which source or input you need to select on the receiver (cable not supplied with... will determine which is displayed on the front of progressive scan, connect the DVD recorder to the TV using the COMPONENT VIDEO OUT jacks, and press the HDMI button on the remote to the DIGITAL AUDIO OUT jack on the DVD recorder and the Digital Audio Input jack on the A/V receiver when you want to...
... an AC outlet. Chapter 1: Connections and Setup The audio input jacks on the audio receiver you use to connect to the DVD recorder will remain at 480p even though the HDMI video output mode is 480p/720p/1080i, which source or input you need to select on the receiver (cable not supplied with... will determine which is displayed on the front of progressive scan, connect the DVD recorder to the TV using the COMPONENT VIDEO OUT jacks, and press the HDMI button on the remote to the DIGITAL AUDIO OUT jack on the DVD recorder and the Digital Audio Input jack on the A/V receiver when you want to...
User Guide
Page 19
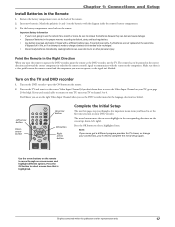
...all batteries are for representation only. 17 Use the arrow buttons on the remote to move through a few pages step you through on your DVD recorder. Left arrow button Down CLEAR arrow button Up arrow button OK button Right arrow button Complete the Initial Setup The next few important menu items... Remote in the Remote 1. Turn on the TV and tune it to the correct Video Input Channel (if you want the remote to operate the DVD recorder, point the remote at the same time, if disposed of the remote. 2. Match the polarities (+ and -) on your TV to channel 3 or 4. Chapter ...
...all batteries are for representation only. 17 Use the arrow buttons on the remote to move through a few pages step you through on your DVD recorder. Left arrow button Down CLEAR arrow button Up arrow button OK button Right arrow button Complete the Initial Setup The next few important menu items... Remote in the Remote 1. Turn on the TV and tune it to the correct Video Input Channel (if you want the remote to operate the DVD recorder, point the remote at the same time, if disposed of the remote. 2. Match the polarities (+ and -) on your TV to channel 3 or 4. Chapter ...
User Guide
Page 20
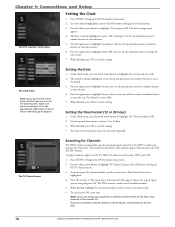
...to change the time of the channel window, you are for all available channels. 5. The TV Channel menu. A progress indicator appears on the DVD recorder, make sure you press the CH+ and CH- Press the down arrow button to highlight TV Channel and press the OK button to bring up...any time. At the bottom of day. 7. If you've connected a satellite receiver to enter the month. 3. The hour is set for Channels The DVD recorder automatically scans the incoming signal connected to save the settings. The month is already highlighted, so use the up the TV Channel menu. 3. When fi...
...to change the time of the channel window, you are for all available channels. 5. The TV Channel menu. A progress indicator appears on the DVD recorder, make sure you press the CH+ and CH- Press the down arrow button to highlight TV Channel and press the OK button to bring up...any time. At the bottom of day. 7. If you've connected a satellite receiver to enter the month. 3. The hour is set for Channels The DVD recorder automatically scans the incoming signal connected to save the settings. The month is already highlighted, so use the up the TV Channel menu. 3. When fi...
User Guide
Page 21
... There are related to the wide variation in order for representation only. 19 For your DVD recorder to watch TV. Many problems encountered when recording (or playing) discs are several different formats of the DVD recorder, you encounter problems with the TV's channel up and down buttons, you need to...content. If you 'll have many "digital features" for Recording Recording to DVD discs is new to many people. What to Expect Chapter 1: Connections and Setup Turn on your DVD recorder, only DVD±R 2.4x, 4x, 8x, or 16x and DVD±RW 2.4x and 4x type discs can use the ...
... There are related to the wide variation in order for representation only. 19 For your DVD recorder to watch TV. Many problems encountered when recording (or playing) discs are several different formats of the DVD recorder, you encounter problems with the TV's channel up and down buttons, you need to...content. If you 'll have many "digital features" for Recording Recording to DVD discs is new to many people. What to Expect Chapter 1: Connections and Setup Turn on your DVD recorder, only DVD±R 2.4x, 4x, 8x, or 16x and DVD±RW 2.4x and 4x type discs can use the ...


