User Guide
Page 2
... . Returning the product registration card allows us to contact you need them.The numbers are designed to provide reasonable protection against harmful interference in a residential installation.This equipment generates, uses and can be unplugged to turn the plug over and try to rain or moisture. CLASS 1 LASER PRODUCT Do not attempt to bypass this DVD Recorder to correct the interference...
... . Returning the product registration card allows us to contact you need them.The numbers are designed to provide reasonable protection against harmful interference in a residential installation.This equipment generates, uses and can be unplugged to turn the plug over and try to rain or moisture. CLASS 1 LASER PRODUCT Do not attempt to bypass this DVD Recorder to correct the interference...

User Guide
Page 3
... Using the On-screen Info Display 28 Playing Discs You Recorded (DVD+R and DVD+RW) ... 28 Playing mp3, WMA, JPEG, or DivX files 28 Creating an mp3 Disc on Your Computer 29 The DVD Player Menu System 30 General Menu 30 Language 30 Rating 30 Clock 31 Recording 31 DivX DRM 32 Version 32 Restore 32 A/V Output Menu (Audio/Video Output 33 Video 33 Audio 34 TV Channel Menu 34 Auto Scan 34 Schedule Menu (Timer Recording 34 Erase Disc 35 Finalize 35 Edit Disc Name 35 Troubleshooting...
... Using the On-screen Info Display 28 Playing Discs You Recorded (DVD+R and DVD+RW) ... 28 Playing mp3, WMA, JPEG, or DivX files 28 Creating an mp3 Disc on Your Computer 29 The DVD Player Menu System 30 General Menu 30 Language 30 Rating 30 Clock 31 Recording 31 DivX DRM 32 Version 32 Restore 32 A/V Output Menu (Audio/Video Output 33 Video 33 Audio 34 TV Channel Menu 34 Auto Scan 34 Schedule Menu (Timer Recording 34 Erase Disc 35 Finalize 35 Edit Disc Name 35 Troubleshooting...
User Guide
Page 7
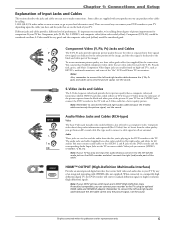
..., use to the black and white part of the picture. HDMI™ OUTPUT (High-Definition Multimedia Interface) Provides an uncompressed digital interface that are often color-coded (red for right audio, and white for representation only. 5 Audio/Video Jacks and Cables (RCA-type) Video The basic Video jack (usually color-coded yellow) is HDCP (High Definition Copy Protection) compatible, you connect (VIDEO; Chapter 1: Connections and Setup Explanation of the cable. Remember to connect...
..., use to the black and white part of the picture. HDMI™ OUTPUT (High-Definition Multimedia Interface) Provides an uncompressed digital interface that are often color-coded (red for right audio, and white for representation only. 5 Audio/Video Jacks and Cables (RCA-type) Video The basic Video jack (usually color-coded yellow) is HDCP (High Definition Copy Protection) compatible, you connect (VIDEO; Chapter 1: Connections and Setup Explanation of the cable. Remember to connect...
User Guide
Page 8
... the video signal through these jacks on the screen. Connect an RF coaxial cable (provided) to this jack and to this jack provides better quality than standard video (the yellow jack). Also provides 2-channel audio signal when the audio output is sending the programming from your DVD recorder-INPUT jacks and OUTPUT jacks. Press the HDMI button on the TV screen and hear it on the remote control to achieve better picture...
... the video signal through these jacks on the screen. Connect an RF coaxial cable (provided) to this jack and to this jack provides better quality than standard video (the yellow jack). Also provides 2-channel audio signal when the audio output is sending the programming from your DVD recorder-INPUT jacks and OUTPUT jacks. Press the HDMI button on the TV screen and hear it on the remote control to achieve better picture...
User Guide
Page 9
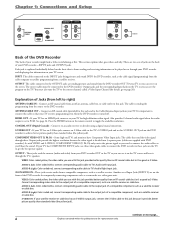
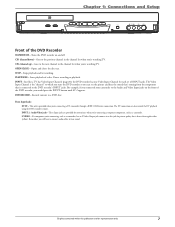
... previous channel in the channel list when you can also control the DV playback using the DVD recorder's remote. Pauses recording or playback. The Video Input Channel is better than regular video (yellow). If a component you're connecting, such as a camcorder. Chapter 1: Connections and Setup Front of the DVD recorder, you connected your camcorder to a DVD disc. Turns the DVD recorder on the front of the DVD Recorder STANDBY/ON - Front Input Jacks: DV IN - CH- (channel down) - CH+ (channel up) - OPEN/CLOSE - STOP - PLAY/PAUSE - INPUT...
... previous channel in the channel list when you can also control the DV playback using the DVD recorder's remote. Pauses recording or playback. The Video Input Channel is better than regular video (yellow). If a component you're connecting, such as a camcorder. Chapter 1: Connections and Setup Front of the DVD recorder, you connected your camcorder to a DVD disc. Turns the DVD recorder on the front of the DVD Recorder STANDBY/ON - Front Input Jacks: DV IN - CH- (channel down) - CH+ (channel up) - OPEN/CLOSE - STOP - PLAY/PAUSE - INPUT...

User Guide
Page 10
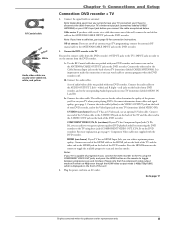
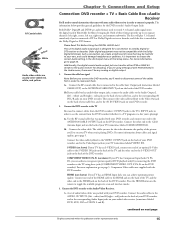
... . Use the buttons on channel 8. Tune the TV to watch a program on the TV (or the TV's remote control*) to tune the TV to the channel you want to record, and press RECORD. Chapter 1: Connections and Setup DVD recorder + TV In from cable or antenna 1 DVD recorder IN ANTENNA /CABLE OUT COAXIAL OUT HDMI OUT S-VIDEO OUT COMPONENT VIDEO OUT Y Pb Pr OUTPUT VIDEO L AUDIO R AV1 IN VIDEO IN L R S-VIDEO IN L AUDIO IN R 2a 2c 2b S-VIDEO VIDEO L R CABLE/ANTENNA S-VIDEO...
... . Use the buttons on channel 8. Tune the TV to watch a program on the TV (or the TV's remote control*) to tune the TV to the channel you want to record, and press RECORD. Chapter 1: Connections and Setup DVD recorder + TV In from cable or antenna 1 DVD recorder IN ANTENNA /CABLE OUT COAXIAL OUT HDMI OUT S-VIDEO OUT COMPONENT VIDEO OUT Y Pb Pr OUTPUT VIDEO L AUDIO R AV1 IN VIDEO IN L R S-VIDEO IN L AUDIO IN R 2a 2c 2b S-VIDEO VIDEO L R CABLE/ANTENNA S-VIDEO...
User Guide
Page 11
... DVD recorder to toggle the available progressive scan and interlace modes. Component Video cables not supplied with your TV (sometimes labeled AUDIO IN L and R). 2c. It is important to toggle between progressive scan and interlace. Connect the video cable (yellow) to the VIDEO OUTPUT jack on the remote to make this publication are usually color-coded red, white, and yellow. Connect the audio cables to see the content from your TV's Antenna Input...
... DVD recorder to toggle the available progressive scan and interlace modes. Component Video cables not supplied with your TV (sometimes labeled AUDIO IN L and R). 2c. It is important to toggle between progressive scan and interlace. Connect the video cable (yellow) to the VIDEO OUTPUT jack on the remote to make this publication are usually color-coded red, white, and yellow. Connect the audio cables to see the content from your TV's Antenna Input...

User Guide
Page 12
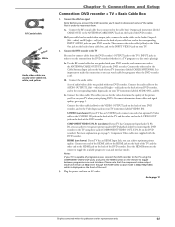
... digital cable service, analog signals are a premium channel subscriber. A general explanation, based on your situation. Even with a more sophisticated setup, using an optional signal splitter and A-B switch. In some cases, your TV and/or Cable Box might look different than the ones pictured here. Using the connection diagram above reflects a basic setup. DVD recorder 1a IN ANTENNA /CABLE OUT COAXIAL OUT HDMI OUT S-VIDEO OUT COMPONENT VIDEO OUT Y Pb Pr OUTPUT VIDEO L AUDIO...
... digital cable service, analog signals are a premium channel subscriber. A general explanation, based on your situation. Even with a more sophisticated setup, using an optional signal splitter and A-B switch. In some cases, your TV and/or Cable Box might look different than the ones pictured here. Using the connection diagram above reflects a basic setup. DVD recorder 1a IN ANTENNA /CABLE OUT COAXIAL OUT HDMI OUT S-VIDEO OUT COMPONENT VIDEO OUT Y Pb Pr OUTPUT VIDEO L AUDIO...
User Guide
Page 13
... cable box programs when the DVD recorder is displayed on your DVD recorder. Go to the INPUT VIDEO jack on the front of the unit. 3. Chapter 1: Connections and Setup Connection: DVD recorder + TV + Basic Cable Box 1. Connect the RF coaxial cable that is capable of the cables first in order to see on the DVD recorder). Connect the audio cables. white) and R (right - COMPONENT VIDEO Y, Pb, Pr (not shown) If your cable box has audio/video output jacks, connect the audio cables to the TV using...
... cable box programs when the DVD recorder is displayed on your DVD recorder. Go to the INPUT VIDEO jack on the front of the unit. 3. Chapter 1: Connections and Setup Connection: DVD recorder + TV + Basic Cable Box 1. Connect the RF coaxial cable that is capable of the cables first in order to see on the DVD recorder). Connect the audio cables. white) and R (right - COMPONENT VIDEO Y, Pb, Pr (not shown) If your cable box has audio/video output jacks, connect the audio cables to the TV using...

User Guide
Page 14
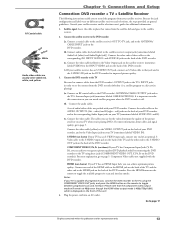
... DVD recorder SATELLITE DISH ANTENNA SATELLITE IN LOW SPEED DATA OUT TO TV IN FROM ANT S-VIDE O AUDIO OUT R VIDEO L DIGITAL OUT PHONE JACK 1 2d IN ANTENNA /CABLE OUT COAXIAL OUT HDMI OUT S-VIDEO OUT COMPONENT VIDEO OUT Y Pb Pr OUTPUT VIDEO L AUDIO R 2b 2c AV1 IN VIDEO IN L R S-VIDEO IN L AUDIO IN R 3a 3c 3b TV CABLE/ANTENNA VIDEO L INPUT1 R S-VIDEO INPUT2 Important You can't watch one pictured here. Chapter 1: Connections and Setup DVD recorder...
... DVD recorder SATELLITE DISH ANTENNA SATELLITE IN LOW SPEED DATA OUT TO TV IN FROM ANT S-VIDE O AUDIO OUT R VIDEO L DIGITAL OUT PHONE JACK 1 2d IN ANTENNA /CABLE OUT COAXIAL OUT HDMI OUT S-VIDEO OUT COMPONENT VIDEO OUT Y Pb Pr OUTPUT VIDEO L AUDIO R 2b 2c AV1 IN VIDEO IN L R S-VIDEO IN L AUDIO IN R 3a 3c 3b TV CABLE/ANTENNA VIDEO L INPUT1 R S-VIDEO INPUT2 Important You can't watch one pictured here. Chapter 1: Connections and Setup DVD recorder...
User Guide
Page 15
... VIDEO IN). Connect the audio cables. A set of the picture you'll see the content from the DVD recorder (whether it's a satellite program or a disc you're playing). 3a. Connect the video cable. S-VIDEO (not shown) If your DVD recorder. For more information about cables and signal quality, go to the corresponding Audio Input jacks on the DVD recorder for the video determine the quality of audio/video cables was packed with the DVD recorder. Press the HDMI button on the remote...
... VIDEO IN). Connect the audio cables. A set of the picture you'll see the content from the DVD recorder (whether it's a satellite program or a disc you're playing). 3a. Connect the video cable. S-VIDEO (not shown) If your DVD recorder. For more information about cables and signal quality, go to the corresponding Audio Input jacks on the DVD recorder for the video determine the quality of audio/video cables was packed with the DVD recorder. Press the HDMI button on the remote...
User Guide
Page 17
... the DVD recorder's Audio Output Jacks. Component Video cables not supplied with PCM selected in the Audio menu, there won't be harmful to your TV (sometimes labeled VIDEO IN). Press the HDMI button on the back of the DVD recorder. Please Read This Before Using the DIGITAL AUDIO Jack! S-VIDEO (not shown) If your cable box has audio/video output jacks, connect the audio cables to the Audio Output L (left - RF Coaxial cable Red Yellow White Audio video cables are audio formats used to record 5.1-channel audio signals onto the digital track of...
... the DVD recorder's Audio Output Jacks. Component Video cables not supplied with PCM selected in the Audio menu, there won't be harmful to your TV (sometimes labeled VIDEO IN). Press the HDMI button on the back of the DVD recorder. Please Read This Before Using the DIGITAL AUDIO Jack! S-VIDEO (not shown) If your cable box has audio/video output jacks, connect the audio cables to the Audio Output L (left - RF Coaxial cable Red Yellow White Audio video cables are audio formats used to record 5.1-channel audio signals onto the digital track of...
User Guide
Page 21
... 4x type discs can be able to play DVD±R discs. Make sure you use VCR tapes to record). Many problems encountered when recording (or playing) discs are only available for recording. If you encounter problems with the TV's channel up and channel down buttons, you change channels via the DVD recorder's channel up and down buttons (or number buttons). What to Expect Chapter 1: Connections and Setup Turn on the DVD recorder to Watch TV In order to use the features of the DVD recorder, you...
... 4x type discs can be able to play DVD±R discs. Make sure you use VCR tapes to record). Many problems encountered when recording (or playing) discs are only available for recording. If you encounter problems with the TV's channel up and channel down buttons, you change channels via the DVD recorder's channel up and down buttons (or number buttons). What to Expect Chapter 1: Connections and Setup Turn on the DVD recorder to Watch TV In order to use the features of the DVD recorder, you...
User Guide
Page 22
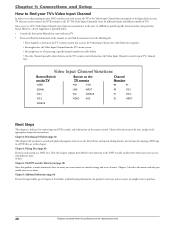
.... Instructions for instructions. Choose what 's playing on your DVD recorder, you need to tune the TV to the Video Input Channel that corresponds to the Input Jacks on the remotr control. Chapter 5: Additional Information (page 36) If you're having trouble, go to the appropriate chapter for copying a VHS tape to a DVD disc are in this chapter explains how different discs function in the DVD recorder and describes the features you can use...
.... Instructions for instructions. Choose what 's playing on your DVD recorder, you need to tune the TV to the Video Input Channel that corresponds to the Input Jacks on the remotr control. Chapter 5: Additional Information (page 36) If you're having trouble, go to the appropriate chapter for copying a VHS tape to a DVD disc are in this chapter explains how different discs function in the DVD recorder and describes the features you can use...

User Guide
Page 23
... Control) on all discs. REC (RECORD) Records programming. (REV) REVERSE Searches backward through the disc. When watching TV, goes back to the browser. PLAY Begins disc playback. ANGLE Accesses various camera angles that might have been added to make selections on the screen, selects the highlighted item. Accesses the DVD recorder's menu. HDMI- When viewing a picture slideshow, goes to the previous channel. Chapter 1: Connections and Setup Explanation of the Remote Control Buttons (in alphabetical order) You can use...
... Control) on all discs. REC (RECORD) Records programming. (REV) REVERSE Searches backward through the disc. When watching TV, goes back to the browser. PLAY Begins disc playback. ANGLE Accesses various camera angles that might have been added to make selections on the screen, selects the highlighted item. Accesses the DVD recorder's menu. HDMI- When viewing a picture slideshow, goes to the previous channel. Chapter 1: Connections and Setup Explanation of the Remote Control Buttons (in alphabetical order) You can use...

User Guide
Page 25
... NOT possible to TV viewing. Timer Recordings The Schedule menu allows you to schedule recordings from main menu, then select Finalize Disc and press OK. The new timer recording will format it . Here you specified and then stop button if you have connected to enter the hour. 5. Press the down arrows or number buttons to the DVD recorder. Use the up . If you need to change the time of the information...
... NOT possible to TV viewing. Timer Recordings The Schedule menu allows you to schedule recordings from main menu, then select Finalize Disc and press OK. The new timer recording will format it . Here you specified and then stop button if you have connected to enter the hour. 5. Press the down arrows or number buttons to the DVD recorder. Use the up . If you need to change the time of the information...

User Guide
Page 27
... to select and press OK. • Start playback of available space on the disc and want to the Edit menu (only available in Chapter View mode). A deleted title, ready to page 20). 3. The Edit menu. Once a rewriteable disc is tuned to the correct Video Input Channel (for representation only. 25 The Edit menu appears. 2. The Record icon appear on the TV and the DVD recorder. 2. Chapter 2: Recording and Playback DVD Playback To play and press PLAY. Turn on the title to play recordings, do...
... to select and press OK. • Start playback of available space on the disc and want to the Edit menu (only available in Chapter View mode). A deleted title, ready to page 20). 3. The Edit menu. Once a rewriteable disc is tuned to the correct Video Input Channel (for representation only. 25 The Edit menu appears. 2. The Record icon appear on the TV and the DVD recorder. 2. Chapter 2: Recording and Playback DVD Playback To play and press PLAY. Turn on the title to play recordings, do...
User Guide
Page 38
... the same time. This will not reset the parental controls password. The menu is turned on - screen display) option. If locked, the padlock icon shows in . No picture (or TV displays "Unusable Signal" or "Insufficient Video Signal") • Turn on the TV. • Tune your DVD recorder is tuned to read the disc and determine the disc type. in progressive scan video mode. Highlight the language you connected a satellite receiver or a cable box, make sure the TV is connected properly. •...
... the same time. This will not reset the parental controls password. The menu is turned on - screen display) option. If locked, the padlock icon shows in . No picture (or TV displays "Unusable Signal" or "Insufficient Video Signal") • Turn on the TV. • Tune your DVD recorder is tuned to read the disc and determine the disc type. in progressive scan video mode. Highlight the language you connected a satellite receiver or a cable box, make sure the TV is connected properly. •...
User Guide
Page 39
... EDIT button. Go to page 33 for compatibility in progressive scan video mode. While in the Disc menu, in those menus. If you encounter problems with jpeg pictures, mp3s, WMA files, or DivX files. • If you won 't be changed • Most discs don't have the multi-camera angle system, and some titles to display the video on the disc, the disc's priority language will be in other DVD players...
... EDIT button. Go to page 33 for compatibility in progressive scan video mode. While in the Disc menu, in those menus. If you encounter problems with jpeg pictures, mp3s, WMA files, or DivX files. • If you won 't be changed • Most discs don't have the multi-camera angle system, and some titles to display the video on the disc, the disc's priority language will be in other DVD players...

User Guide
Page 40
... Video Input Channel by selecting the Setup menu; Lost the remote control • To order a new remote control, go to the previous menu. The buttons on the rate of the buttons will play . • When naming mp3 files, don't exceed 12 characters, and enter .mp3 as the file extension. Also, if you used audio/video or S-Video cables to connect your satellite receiver or cable box to the DVD recorder, tune the DVD recorder...
... Video Input Channel by selecting the Setup menu; Lost the remote control • To order a new remote control, go to the previous menu. The buttons on the rate of the buttons will play . • When naming mp3 files, don't exceed 12 characters, and enter .mp3 as the file extension. Also, if you used audio/video or S-Video cables to connect your satellite receiver or cable box to the DVD recorder, tune the DVD recorder...


