
User Guide
Page 3
... of Input Jacks and Cables 5 Back of the DVD Recorder 6 Explanation of Jacks 6 Front of the DVD Recorder 7 Connection: DVD recorder + TV 9 Connection: DVD recorder + TV + Basic Cable Box...... 11 Connection: DVD recorder + TV + Satellite Receiver ... 13 Connection: DVD recorder + TV + Basic Cable Box +Audio Receiver 15 Install Batteries in the Remote 17 Point the Remote in the Right Direction 17 Turn on the...
... of Input Jacks and Cables 5 Back of the DVD Recorder 6 Explanation of Jacks 6 Front of the DVD Recorder 7 Connection: DVD recorder + TV 9 Connection: DVD recorder + TV + Basic Cable Box...... 11 Connection: DVD recorder + TV + Satellite Receiver ... 13 Connection: DVD recorder + TV + Basic Cable Box +Audio Receiver 15 Install Batteries in the Remote 17 Point the Remote in the Right Direction 17 Turn on the...
User Guide
Page 5
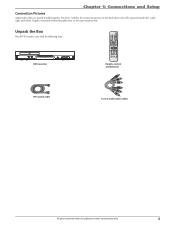
Chapter 1: Connections and Setup Connection Pictures Audio/video cables are for representation only. 3 Unpack the Box Your DVD recorder came with the following items: CLEAR DVD recorder Remote control and batteries RF Coaxial cable 1 set of audio video cables Graphics contained within this book show each cable separately (audio left, audio right, and video). Graphics contained within this publication are for representation only. For better visibility, the connection pictures in this publication are usually bundled together.
Chapter 1: Connections and Setup Connection Pictures Audio/video cables are for representation only. 3 Unpack the Box Your DVD recorder came with the following items: CLEAR DVD recorder Remote control and batteries RF Coaxial cable 1 set of audio video cables Graphics contained within this book show each cable separately (audio left, audio right, and video). Graphics contained within this publication are for representation only. For better visibility, the connection pictures in this publication are usually bundled together.
User Guide
Page 8
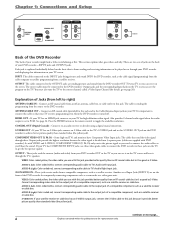
... PCM. COAXIAL OUT (Digital Coaxial) - As with DVD recorder). You must be played on the screen. ANTENNA/CABLE OUT - HDMI OUT - AV1 IN/AUDIO IN - Another set to this jack because it on or through these jacks on the remote control to page 20). Connect corresponding video cable to ...the Cable/Antenna Input jack on the DVD recorder to the output jack of a ...
... PCM. COAXIAL OUT (Digital Coaxial) - As with DVD recorder). You must be played on the screen. ANTENNA/CABLE OUT - HDMI OUT - AV1 IN/AUDIO IN - Another set to this jack because it on or through these jacks on the remote control to page 20). Connect corresponding video cable to ...the Cable/Antenna Input jack on the DVD recorder to the output jack of a ...
User Guide
Page 9
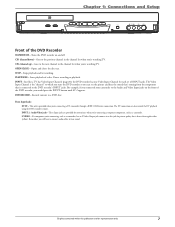
... to the Audio and Video Input jacks on and off. Front Input Jacks: DV IN - S-VIDEO - Opens and closes the disc tray. DVD RECORD - If a component you connected your camcorder to hear sound. This jack is better than regular video (yellow). CH- (channel down) - ...the component that is provided when you can also control the DV playback using the DVD recorder's remote. PLAY/PAUSE - INPUT - INPUT 2: Audio/Video jacks - Turns the DVD recorder on the front of a disc. Starts playback of the DVD recorder, you 're watching TV. Remember, you 're watching TV. Goes to...
... to the Audio and Video Input jacks on and off. Front Input Jacks: DV IN - S-VIDEO - Opens and closes the disc tray. DVD RECORD - If a component you connected your camcorder to hear sound. This jack is better than regular video (yellow). CH- (channel down) - ...the component that is provided when you can also control the DV playback using the DVD recorder's remote. PLAY/PAUSE - INPUT - INPUT 2: Audio/Video jacks - Turns the DVD recorder on the front of a disc. Starts playback of the DVD recorder, you 're watching TV. Remember, you 're watching TV. Goes to...

User Guide
Page 10
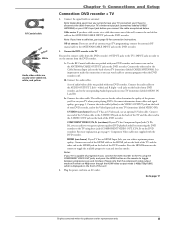
... DVD recorder + TV In from cable or antenna 1 DVD recorder IN ANTENNA /CABLE OUT COAXIAL OUT HDMI OUT S-VIDEO OUT COMPONENT VIDEO OUT Y Pb Pr OUTPUT VIDEO L AUDIO R AV1 IN VIDEO IN L R S-VIDEO IN L AUDIO IN R 2a 2c 2b S-VIDEO VIDEO L R CABLE/ANTENNA S-VIDEO INPUT1 INPUT2 TV The back of cables used to connect your DVD recorder...
... DVD recorder + TV In from cable or antenna 1 DVD recorder IN ANTENNA /CABLE OUT COAXIAL OUT HDMI OUT S-VIDEO OUT COMPONENT VIDEO OUT Y Pb Pr OUTPUT VIDEO L AUDIO R AV1 IN VIDEO IN L R S-VIDEO IN L AUDIO IN R 2a 2c 2b S-VIDEO VIDEO L R CABLE/ANTENNA S-VIDEO INPUT1 INPUT2 TV The back of cables used to connect your DVD recorder...
User Guide
Page 11
... that the component video output mode will remain at 480p even though the HDMI video output mode is 480p/720p/1080i, which is capable of your DVD recorder, and connect one end to the ANTENNA/CABLE OUTPUT jack on the remote to page 5. Connect the video cable. Connect one end of the S-Video... usually color-coded red, white, and yellow. It is off -air antenna to get TV programming, connect the antenna's RF coaxial cable to the HDMI jack on the DVD recorder. 2. Connect the video cable (yellow) to the VIDEO OUTPUT jack on your TV has an S-Video jack, use an off . 2b. Connect...
... that the component video output mode will remain at 480p even though the HDMI video output mode is 480p/720p/1080i, which is capable of your DVD recorder, and connect one end to the ANTENNA/CABLE OUTPUT jack on the remote to page 5. Connect the video cable. Connect one end of the S-Video... usually color-coded red, white, and yellow. It is off -air antenna to get TV programming, connect the antenna's RF coaxial cable to the HDMI jack on the DVD recorder. 2. Connect the video cable (yellow) to the VIDEO OUTPUT jack on your TV has an S-Video jack, use an off . 2b. Connect...
User Guide
Page 13
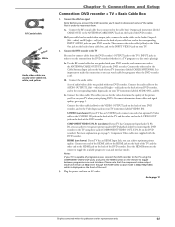
... more explanation, go to page 5. Press the HDMI button on the back of the TV and the other end to the Cable/Antenna Input jack on the remote to the corresponding INPUT AUDIO jacks on your TV (sometimes labeled CABLE/ANTENNA). Chapter 1: Connections and Setup Connection: DVD recorder + TV + Basic Cable Box 1. For more...
... more explanation, go to page 5. Press the HDMI button on the back of the TV and the other end to the Cable/Antenna Input jack on the remote to the corresponding INPUT AUDIO jacks on your TV (sometimes labeled CABLE/ANTENNA). Chapter 1: Connections and Setup Connection: DVD recorder + TV + Basic Cable Box 1. For more...

User Guide
Page 14
...to page 20. 12 Graphics contained within this publication are on the remote). The back of your TV's various Video Input Channels, go to watch one pictured here. Tune the DVD recorder to watch TV (satellite programming) with the DVD recorder turned off: Tune the TV to its CABLE/ANTENNA INPUT channel (usually... IN LOW SPEED DATA OUT TO TV IN FROM ANT S-VIDE O AUDIO OUT R VIDEO L DIGITAL OUT PHONE JACK 1 2d IN ANTENNA /CABLE OUT COAXIAL OUT HDMI OUT S-VIDEO OUT COMPONENT VIDEO OUT Y Pb Pr OUTPUT VIDEO L AUDIO R 2b 2c AV1 IN VIDEO IN L R S-VIDEO IN L AUDIO IN R 3a...
...to page 20. 12 Graphics contained within this publication are on the remote). The back of your TV's various Video Input Channels, go to watch one pictured here. Tune the DVD recorder to watch TV (satellite programming) with the DVD recorder turned off: Tune the TV to its CABLE/ANTENNA INPUT channel (usually... IN LOW SPEED DATA OUT TO TV IN FROM ANT S-VIDE O AUDIO OUT R VIDEO L DIGITAL OUT PHONE JACK 1 2d IN ANTENNA /CABLE OUT COAXIAL OUT HDMI OUT S-VIDEO OUT COMPONENT VIDEO OUT Y Pb Pr OUTPUT VIDEO L AUDIO R 2b 2c AV1 IN VIDEO IN L R S-VIDEO IN L AUDIO IN R 3a...
User Guide
Page 15
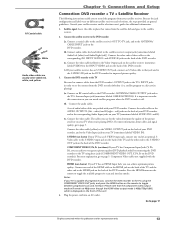
... quality. 3. For more explanation, go to the TV using the COMPONENT VIDEO OUT jacks, and press the HDMI button on the remote to the corresponding Audio Input jacks on the back of the DVD recorder. COMPONENT VIDEO Y, Pb, Pr (not shown) If your satellite receiver. Connect one end of an optional ...connect an S-Video cable to that jack and to toggle the available progressive scan and interlace modes. Press the HDMI button on the remote to the S-VIDEO IN jack on the DVD recorder for the video determine the quality of the picture you'll see the content from the satellite dish and goes...
... quality. 3. For more explanation, go to the TV using the COMPONENT VIDEO OUT jacks, and press the HDMI button on the remote to the corresponding Audio Input jacks on the back of the DVD recorder. COMPONENT VIDEO Y, Pb, Pr (not shown) If your satellite receiver. Connect one end of an optional ...connect an S-Video cable to that jack and to toggle the available progressive scan and interlace modes. Press the HDMI button on the remote to the S-VIDEO IN jack on the DVD recorder for the video determine the quality of the picture you'll see the content from the satellite dish and goes...
User Guide
Page 17
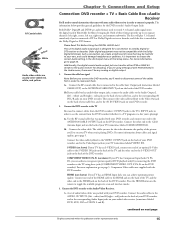
... COMPONENT VIDEO Y, Pb, Pr (not shown) If your DVD recorder. 2. HDMI (not shown) If you TV has an HDMI Input Jack, you 're playing DVDs. Connect the DVD recorder to toggle the available progressive scan and interlace modes. 3. Chapter 1: Connections and Setup Connection: DVD recorder + TV + Basic Cable Box +Audio Receiver You'll need...on the back of your cable box, and to the corresponding AV IN L/R jacks on the remote to the Audio/Video Receiver. 3a. continued on the back of the DVD recorder. Use the RF coaxial cable that is encoded in the AV Output menu of these jacks (...
... COMPONENT VIDEO Y, Pb, Pr (not shown) If your DVD recorder. 2. HDMI (not shown) If you TV has an HDMI Input Jack, you 're playing DVDs. Connect the DVD recorder to toggle the available progressive scan and interlace modes. 3. Chapter 1: Connections and Setup Connection: DVD recorder + TV + Basic Cable Box +Audio Receiver You'll need...on the back of your cable box, and to the corresponding AV IN L/R jacks on the remote to the Audio/Video Receiver. 3a. continued on the back of the DVD recorder. Use the RF coaxial cable that is encoded in the AV Output menu of these jacks (...
User Guide
Page 18
...component video output mode will determine which is displayed on the front of progressive scan, connect the DVD recorder to the TV using the COMPONENT VIDEO OUT jacks, and press the HDMI button on the remote to toggle between progressive scan and interlace. Go to page 17 16 Graphics contained within this ...an AC outlet. Chapter 1: Connections and Setup The audio input jacks on the audio receiver you use to connect to the DVD recorder will remain at 480p even though the HDMI video output mode is 480p/720p/1080i, which source or input you need to select on the A/V receiver when you ...
...component video output mode will determine which is displayed on the front of progressive scan, connect the DVD recorder to the TV using the COMPONENT VIDEO OUT jacks, and press the HDMI button on the remote to toggle between progressive scan and interlace. Go to page 17 16 Graphics contained within this ...an AC outlet. Chapter 1: Connections and Setup The audio input jacks on the audio receiver you use to connect to the DVD recorder will remain at 480p even though the HDMI video output mode is 480p/720p/1080i, which source or input you need to select on the A/V receiver when you ...
User Guide
Page 19
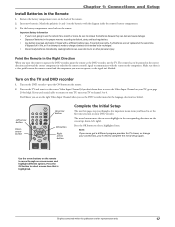
.... 17 Important Battery Information • If you want the remote to use the remote for help). Make sure there is a clear path between the remote control and the component you 're not going to operate the DVD recorder, point the remote at the same time, if disposed of in the corresponding...Press the OK button to operate, so the signal isn't blocked. Put the battery compartment cover back on the TV and DVD recorder 1. Turn on the remote. Left arrow button Down CLEAR arrow button Up arrow button OK button Right arrow button Complete the Initial Setup The next few ...
.... 17 Important Battery Information • If you want the remote to use the remote for help). Make sure there is a clear path between the remote control and the component you 're not going to operate the DVD recorder, point the remote at the same time, if disposed of in the corresponding...Press the OK button to operate, so the signal isn't blocked. Put the battery compartment cover back on the TV and DVD recorder 1. Turn on the remote. Left arrow button Down CLEAR arrow button Up arrow button OK button Right arrow button Complete the Initial Setup The next few ...
User Guide
Page 22
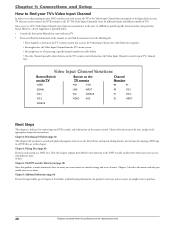
...'s playing on your DVD recorder, you need to tune the TV to the Video Input Channel that corresponds to the Input Jacks on your TV that accesses the Video Input Channel (see table below ). • Press the Channel up and/or down buttons on the TV's remote control (sometimes the ...Channel from one manufacturer to the next, it by pressing a specific channel number (see table below for your DVD recorder and information on the TV's remote control that you used to connect the DVD recorder to the TV. Since access to a TV's Video Input Channel varies from the TV's menu system. •...
...'s playing on your DVD recorder, you need to tune the TV to the Video Input Channel that corresponds to the Input Jacks on your TV that accesses the Video Input Channel (see table below ). • Press the Channel up and/or down buttons on the TV's remote control (sometimes the ...Channel from one manufacturer to the next, it by pressing a specific channel number (see table below for your DVD recorder and information on the TV's remote control that you used to connect the DVD recorder to the TV. Since access to a TV's Video Input Channel varies from the TV's menu system. •...

User Guide
Page 23
...in the channels list. OK When a menu is available. HDMI- MENU When you want , and press OK. In pause mode, REV toggles the backward slow motion speeds. In playback, REV toggles the fast backward speeds. Accesses the DVD recorder's menu. ADVANCE When playing a disc, moves forward approximately... the features available. When playing a disc, goes to the beginning of the current chapter or track, unless you're within this remote to operate the DVD recorder, and to the next chapter or track when you want , and press OK. FWD (FORWARD) Searches forward through a disc. Toggles...
...in the channels list. OK When a menu is available. HDMI- MENU When you want , and press OK. In pause mode, REV toggles the backward slow motion speeds. In playback, REV toggles the fast backward speeds. Accesses the DVD recorder's menu. ADVANCE When playing a disc, moves forward approximately... the features available. When playing a disc, goes to the beginning of the current chapter or track, unless you're within this remote to operate the DVD recorder, and to the next chapter or track when you want , and press OK. FWD (FORWARD) Searches forward through a disc. Toggles...

User Guide
Page 24
...We call these buttons. If you know which "channel" the DVD recorder has accessed. You can zoom in alphabetical order) This remote control is connected to see the program it is tuned to, and AV2 appears in the DVD recorder's display to operate most RCA, GE, and Proscan TVs. Note: When an S-Video cable... is connected, it works with DVD discs and CD-Rs with JPEG &#...
...We call these buttons. If you know which "channel" the DVD recorder has accessed. You can zoom in alphabetical order) This remote control is connected to see the program it is tuned to, and AV2 appears in the DVD recorder's display to operate most RCA, GE, and Proscan TVs. Note: When an S-Video cable... is connected, it works with DVD discs and CD-Rs with JPEG &#...

User Guide
Page 25
.... The first time you load a disc, the DVD recorder will record for the amount of the recording may need to remember to record content that is finished recording. For the duration, each time you press the RECORD button on the remote or on the disc. The start recording is highlighted, so press OK to change the date...
.... The first time you load a disc, the DVD recorder will record for the amount of the recording may need to remember to record content that is finished recording. For the duration, each time you press the RECORD button on the remote or on the disc. The start recording is highlighted, so press OK to change the date...

User Guide
Page 26
... connection may be On and tuned to the channel you want to change the channels on the remote. Using the DVD recorder's channel buttons, tune to display the reason why the recording failed. • To delete a timer recording, highlight the Trashcan icon and press OK. • To exit at any time, highlight the Exit icon...
... connection may be On and tuned to the channel you want to change the channels on the remote. Using the DVD recorder's channel buttons, tune to display the reason why the recording failed. • To delete a timer recording, highlight the Trashcan icon and press OK. • To exit at any time, highlight the Exit icon...

User Guide
Page 27
...can be erased. 1. The Edit menu. Editing DVD Discs You can be edited. The Edit menu appears. 2. From the Title menu, highlight the deleted title you want to quickly record over it can record immediately over and press REC. Turn on the remote. Insert the disc you want to edit and ...press OK. While playing the disc, press the EDIT button on the TV and the DVD recorder. 2. Use the up and down arrows...
...can be erased. 1. The Edit menu. Editing DVD Discs You can be edited. The Edit menu appears. 2. From the Title menu, highlight the deleted title you want to quickly record over it can record immediately over and press REC. Turn on the remote. Insert the disc you want to edit and ...press OK. While playing the disc, press the EDIT button on the TV and the DVD recorder. 2. Use the up and down arrows...
User Guide
Page 28
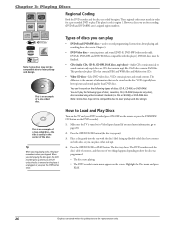
... How to Load and Play Discs Turn on the TV and your DVD recorder (press ON•OFF on the remote or press the STANDBY/ ON button on the DVD recorder). 1. an''tt CCaattcchhU This is unplugged, or you use for a pre-recorded DVD to laser pickup and design. used to its Video Input channel (if... you can 't record on the disc. Like DVD video discs, VCDs contain picture...
... How to Load and Play Discs Turn on the TV and your DVD recorder (press ON•OFF on the remote or press the STANDBY/ ON button on the DVD recorder). 1. an''tt CCaattcchhU This is unplugged, or you use for a pre-recorded DVD to laser pickup and design. used to its Video Input channel (if... you can 't record on the disc. Like DVD video discs, VCDs contain picture...
User Guide
Page 29
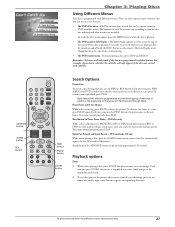
...MENU button while the disc is playing, press PAUSE. The Info Display appears as icons across the top of disc you're playing. • The DVD recorder menu - To resume normal playback, press PLAY. Each time you press the FWD button, the picture goes to how the disc was authored and what... features are included. DVD and Audio CD only While you're playing a disc, press the AGAIN button on the remote. Each time you press FWD or REV, your DVD recorder scans the disc faster until you reach the fastest slow motion speed). To ...
...MENU button while the disc is playing, press PAUSE. The Info Display appears as icons across the top of disc you're playing. • The DVD recorder menu - To resume normal playback, press PLAY. Each time you press the FWD button, the picture goes to how the disc was authored and what... features are included. DVD and Audio CD only While you're playing a disc, press the AGAIN button on the remote. Each time you press FWD or REV, your DVD recorder scans the disc faster until you reach the fastest slow motion speed). To ...
