DRC69705 Product Manual
Page 4
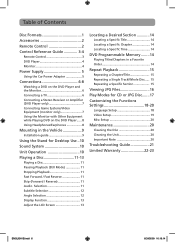
... Control 2 Control Reference Guide 3-4 Remote Control 3 DVD Player 4 Monitor 4 Power Supply 5 Using the Car Power Adapter 5 Connections 6-8 Watching a DVD on the DVD Player and the Monitor 6 Connecting a TV 6 Connecting a Stereo Receiver or Amplifier (DVD Player only 7 Connecting Game Systems/Video Equipment (monitor only... Angle Selection 12 Display Function 13 Adjust the LCD Screen 13 Locating a Desired Section 14 Locating a Specific Title 14 Locating a Specific Chapter 14 Locating a Specific Time 14 DVD Programmable Memory.........14 Playing Titles/Chapters in a Favorite ...
... Control 2 Control Reference Guide 3-4 Remote Control 3 DVD Player 4 Monitor 4 Power Supply 5 Using the Car Power Adapter 5 Connections 6-8 Watching a DVD on the DVD Player and the Monitor 6 Connecting a TV 6 Connecting a Stereo Receiver or Amplifier (DVD Player only 7 Connecting Game Systems/Video Equipment (monitor only... Angle Selection 12 Display Function 13 Adjust the LCD Screen 13 Locating a Desired Section 14 Locating a Specific Title 14 Locating a Specific Chapter 14 Locating a Specific Time 14 DVD Programmable Memory.........14 Playing Titles/Chapters in a Favorite ...
DRC69705 Product Manual
Page 5
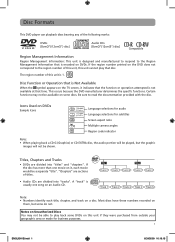
...Certain functions may not be available on a disc. Disc Function or Operation that is Not Available When the symbol appears on the TV screen, it , each title, chapter, and track on some do not. Notes on Unauthorized Discs You may not be able to the ... Audio CDs are divided into "tracks". Most discs have these numbers recorded on DVDs. Note: • Numbers identify each movie would be shown. Disc Formats This DVD player can playback discs bearing any of the following marks: DVDs [8cm(3")/12cm(5") disc] Audio CDs [8cm(3")12cm(5") disc] Compatible Region Management ...
...Certain functions may not be available on a disc. Disc Function or Operation that is Not Available When the symbol appears on the TV screen, it , each title, chapter, and track on some do not. Notes on Unauthorized Discs You may not be able to the ... Audio CDs are divided into "tracks". Most discs have these numbers recorded on DVDs. Note: • Numbers identify each movie would be shown. Disc Formats This DVD player can playback discs bearing any of the following marks: DVDs [8cm(3")/12cm(5") disc] Audio CDs [8cm(3")12cm(5") disc] Compatible Region Management ...
DRC69705 Product Manual
Page 8
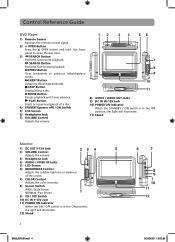
... and frame advance. PREV Button Goes backwards to open the disc door. 3) SEARCH Button Performs fast reverse playback. Control Reference Guide DVD Player 1) Remote Sensor Receives the remote control signal. 2) OPEN Button Press the OPEN button and hold the front panel to previous titles/chapters.../tracks. SEARCH Button Performs fast forward playback. PLAY Button Starts or resumes playback of a disc. 4) STANDBY(power off) / ON Switch 5) LCD Screen 6) Headphone Jack 7) VOLUME Control Adjusts the volume. 8) AUDIO / VIDEO OUT Jacks 9) DC IN 9V-12V Jack 10) POWER ON Indicator When ...
... and frame advance. PREV Button Goes backwards to open the disc door. 3) SEARCH Button Performs fast reverse playback. Control Reference Guide DVD Player 1) Remote Sensor Receives the remote control signal. 2) OPEN Button Press the OPEN button and hold the front panel to previous titles/chapters.../tracks. SEARCH Button Performs fast forward playback. PLAY Button Starts or resumes playback of a disc. 4) STANDBY(power off) / ON Switch 5) LCD Screen 6) Headphone Jack 7) VOLUME Control Adjusts the volume. 8) AUDIO / VIDEO OUT Jacks 9) DC IN 9V-12V Jack 10) POWER ON Indicator When ...
DRC69705 Product Manual
Page 9
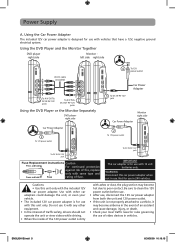
... WARNING: Disconnect this unit only with same type and rating of fire, replace only with the included 12V car power adapter. Using the DVD Player and the Monitor Together DVD player right side Monitor left side right side AV-DC cable (included) 4 To 12V power outlet Car Power Adapter 1 To A/V OUT &... DC IN 9V-12V jacks To A/V IN & 2 DC OUT 9V-12V jacks Using the DVD Player or the Monitor Separately DVD player right side Car Power Adapter 2 To 12V power outlet 3 To DC IN 9V-12V jack Monitor right side Car Power Adapter 2 To 12V...
... WARNING: Disconnect this unit only with same type and rating of fire, replace only with the included 12V car power adapter. Using the DVD Player and the Monitor Together DVD player right side Monitor left side right side AV-DC cable (included) 4 To 12V power outlet Car Power Adapter 1 To A/V OUT &... DC IN 9V-12V jacks To A/V IN & 2 DC OUT 9V-12V jacks Using the DVD Player or the Monitor Separately DVD player right side Car Power Adapter 2 To 12V power outlet 3 To DC IN 9V-12V jack Monitor right side Car Power Adapter 2 To 12V...
DRC69705 Product Manual
Page 10
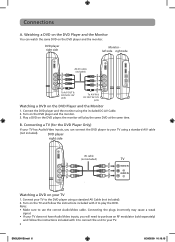
...Connect your TV 1. Connections A. Turn on your TV to the DVD player using the included DC-AV Cable. 2. DVD player right side AV cable (not included) TV To A/V OUT jacks Watching a DVD on the DVD player and the monitor. 3. Turn on the DVD Player and the Monitor 1. Connecting the plugs incorrectly may cause a weak...and follow the instructions included with it to your TV does not have Audio/Video inputs, you can watch the same DVD on the DVD player and the monitor. DVD player right side Monitor left side right side AV-DC cable (included) To A/V OUT & DC IN 9V-12V jacks...
...Connect your TV 1. Connections A. Turn on your TV to the DVD player using the included DC-AV Cable. 2. DVD player right side AV cable (not included) TV To A/V OUT jacks Watching a DVD on the DVD player and the monitor. 3. Turn on the DVD Player and the Monitor 1. Connecting the plugs incorrectly may cause a weak...and follow the instructions included with it to your TV does not have Audio/Video inputs, you can watch the same DVD on the DVD player and the monitor. DVD player right side Monitor left side right side AV-DC cable (included) To A/V OUT & DC IN 9V-12V jacks...
DRC69705 Product Manual
Page 11
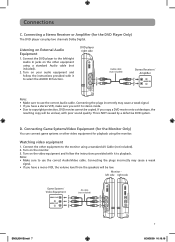
... a Stereo Receiver or Amplifier (for playback using a standard AV Cable (not included). 2. Turn on the other video equipment for the DVD Player Only) The DVD player can connect game systems or other equipment using a standard Audio cable (not included). 2. Connecting the plugs incorrectly may cause a weak signal...incorrectly may cause a weak signal. • If you set it to use the correct Audio cable. Turn on External Audio Equipment 1. DVD player right side Audio cable (not included) Stereo Receiver / Amplifier To Audio OUT jacks Note: • Make sure to use ...
... a Stereo Receiver or Amplifier (for playback using a standard AV Cable (not included). 2. Turn on the other video equipment for the DVD Player Only) The DVD player can connect game systems or other equipment using a standard Audio cable (not included). 2. Connecting the plugs incorrectly may cause a weak signal...incorrectly may cause a weak signal. • If you set it to use the correct Audio cable. Turn on External Audio Equipment 1. DVD player right side Audio cable (not included) Stereo Receiver / Amplifier To Audio OUT jacks Note: • Make sure to use ...
DRC69705 Product Manual
Page 12
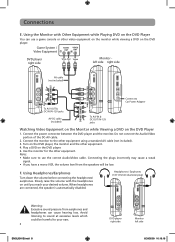
...cable (not included). 3. Note: • Make sure to your desired volume. Slowly raise the volume with Other Equipment while Playing DVD on the DVD player, the monitor and the other equipment. When headphones are connected, the speaker is automatically disabled. Avoid listening to sound at excessive levels... side 6/24/2009 10:19:16 F. Use the monitor for the other equipment. 4. Using the Monitor with the headphones on the DVD player. Play a DVD on the DVD Player 1. Connect the monitor to Car Power Adapter To A/V OUT & DC IN 9V-12V jacks AV-DC cable (included) To A/V ...
...cable (not included). 3. Note: • Make sure to your desired volume. Slowly raise the volume with Other Equipment while Playing DVD on the DVD player, the monitor and the other equipment. When headphones are connected, the speaker is automatically disabled. Avoid listening to sound at excessive levels... side 6/24/2009 10:19:16 F. Use the monitor for the other equipment. 4. Using the Monitor with the headphones on the DVD player. Play a DVD on the DVD Player 1. Connect the monitor to Car Power Adapter To A/V OUT & DC IN 9V-12V jacks AV-DC cable (included) To A/V ...
DRC69705 Product Manual
Page 13
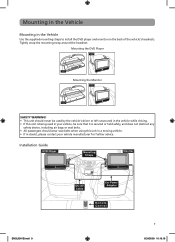
...'s driver or left unsecured in the vehicle while driving. • If this unit is being used in your vehicle manufacturer for further advice. Mounting the DVD Player Mounting the Monitor SAFETY WARNING! • This unit should never be sure that it is secured or held safely, and does not obstruct any safety... passengers should wear seat belts when using this unit in a moving vehicle. • If in the Vehicle Use the supplied mounting straps to install the DVD player and monitor on the back of the vehicle's headrests. Installation Guide ENGLISH IB.indd 9 9 6/24/2009 10:19:16
...'s driver or left unsecured in the vehicle while driving. • If this unit is being used in your vehicle manufacturer for further advice. Mounting the DVD Player Mounting the Monitor SAFETY WARNING! • This unit should never be sure that it is secured or held safely, and does not obstruct any safety... passengers should wear seat belts when using this unit in a moving vehicle. • If in the Vehicle Use the supplied mounting straps to install the DVD player and monitor on the back of the vehicle's headrests. Installation Guide ENGLISH IB.indd 9 9 6/24/2009 10:19:16
DRC69705 Product Manual
Page 14
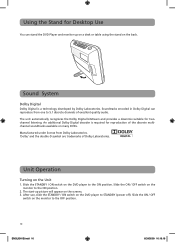
...STANDBY / ON switch on the monitor to the ON position. Slide the ON / OFF switch on the DVD player to the ON position. 2. Slide the ON / OFF switch on the screens. 3. The unit automatically recognizes the Dolby Digital bitstream and provides a downmix suitable for reproduction of the ...discrete multichannel soundtracks available on the DVD player to the OFF position. 10 ENGLISH IB.indd 10 6/24/2009...
...STANDBY / ON switch on the monitor to the ON position. Slide the ON / OFF switch on the DVD player to the ON position. 2. Slide the ON / OFF switch on the screens. 3. The unit automatically recognizes the Dolby Digital bitstream and provides a downmix suitable for reproduction of the ...discrete multichannel soundtracks available on the DVD player to the OFF position. 10 ENGLISH IB.indd 10 6/24/2009...
DRC69705 Product Manual
Page 15
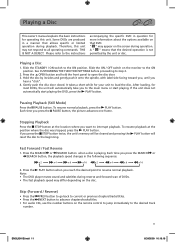
...Each time you hear a "click". 4. Slide the ON / OFF switch on the screen during operation. Press the PLAY button when you press the PAUSE button, the picture advances one frame. Note: • The DVD player mutes sound and subtitles during playback. Hold the disc by the unit or disc. If... the unit does not automatically start playing. A " " means that allows specific or limited operation during reverse and forward scan of DVDs. • The fast playback speed ...
...Each time you hear a "click". 4. Slide the ON / OFF switch on the screen during operation. Press the PLAY button when you press the PAUSE button, the picture advances one frame. Note: • The DVD player mutes sound and subtitles during playback. Hold the disc by the unit or disc. If... the unit does not automatically start playing. A " " means that allows specific or limited operation during reverse and forward scan of DVDs. • The fast playback speed ...
DRC69705 Product Manual
Page 18
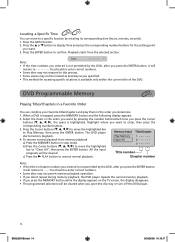
...) to move the highlighted bar to enter, then press the corresponding number buttons. 3. Highlight where you open the disc tray or turn off the DVD player. 14 ENGLISH IB.indd 14 6/24/2009 10:19:17 Note: • If the title or chapter numbers you entered is not permitted by ...permit memory playback operation. • If you select repeat during memory playback, the DVD player repeats the current memory playback. • If you press the MEMORY button while the display appears on the TV screen, the display disappears. • The programmed selections will be located as precisely ...
...) to move the highlighted bar to enter, then press the corresponding number buttons. 3. Highlight where you open the disc tray or turn off the DVD player. 14 ENGLISH IB.indd 14 6/24/2009 10:19:17 Note: • If the title or chapter numbers you entered is not permitted by ...permit memory playback operation. • If you select repeat during memory playback, the DVD player repeats the current memory playback. • If you press the MEMORY button while the display appears on the TV screen, the display disappears. • The programmed selections will be located as precisely ...
DRC69705 Product Manual
Page 22
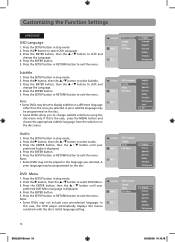
...in a different language other than the ones you selected. A prior subtitle language may be played in stop mode. 2. If this case, the DVD player automatically displays disc menus consistent with the disc's initial language setting. 18 ENGLISH IB.indd 18 6/24/2009 10:19:18 Press the SETUP button... in the language you selected. Press the SETUP button or RETURN button to select DVD Menu. 3. Note: • Some DVDs may not include your preferred Audio is the case, press the MENU button and choose the appropriate subtitle language from the ...
...in a different language other than the ones you selected. A prior subtitle language may be played in stop mode. 2. If this case, the DVD player automatically displays disc menus consistent with the disc's initial language setting. 18 ENGLISH IB.indd 18 6/24/2009 10:19:18 Press the SETUP button... in the language you selected. Press the SETUP button or RETURN button to select DVD Menu. 3. Note: • Some DVDs may not include your preferred Audio is the case, press the MENU button and choose the appropriate subtitle language from the ...
DRC69705 Product Manual
Page 24
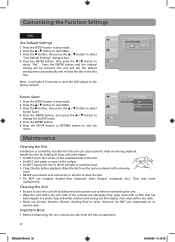
... Settings" dialogue box. 4. If the surfaces are extremely dirty, wipe clean with a dry cloth. • Never use compressed air to select Screen Saver. 4. Do NOT use alcohol, benzine, thinner, cleaning fluid or other chemicals. Press the button, then press the / button to remove ... Misc. 3. Screen Saver 1. Press the / button to drop out during playback. Press the SETUP button in stop mode. 2. Customizing the Function Settings MISC Use Default Settings 1. Press the ENTER button and the original setting will take 3-5 seconds to reset the DVD player to select "Yes...
... Settings" dialogue box. 4. If the surfaces are extremely dirty, wipe clean with a dry cloth. • Never use compressed air to select Screen Saver. 4. Do NOT use alcohol, benzine, thinner, cleaning fluid or other chemicals. Press the button, then press the / button to remove ... Misc. 3. Screen Saver 1. Press the / button to drop out during playback. Press the SETUP button in stop mode. 2. Customizing the Function Settings MISC Use Default Settings 1. Press the ENTER button and the original setting will take 3-5 seconds to reset the DVD player to select "Yes...


