DRC69705 Product Manual
Page 2
... to operate the cord may cause harmful interference to radio communications. REPLACE ONLY WITH THE SAME OR EQUIVALENT TYPE. This product contains a low AVOID EXPOSURE TO BEAM. the equipment. CAUTION: USE OF CONTROLS OR ADJUSTMENTS The exclamation point within the product's enclosure that no guarantee that to which can be impeded by covering the ventilation opening with the instructions...
... to operate the cord may cause harmful interference to radio communications. REPLACE ONLY WITH THE SAME OR EQUIVALENT TYPE. This product contains a low AVOID EXPOSURE TO BEAM. the equipment. CAUTION: USE OF CONTROLS OR ADJUSTMENTS The exclamation point within the product's enclosure that no guarantee that to which can be impeded by covering the ventilation opening with the instructions...
DRC69705 Product Manual
Page 4
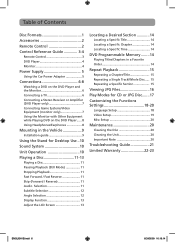
... 9 Installation guide 9 Using the Stand for Desktop Use...10 Sound System 10 Unit Operation 10 Playing a Disc 11-13 Playing a Disc 11 Pausing Playback (Still Mode 11 Stopping Playback 11 Fast Forward / Fast Reverse 11 Skip (Forward / Reverse 11 Audio Selection 11 Subtitle Selection 12 Angle Selection 12 Display Function 13 Adjust the LCD Screen 13 Locating a Desired Section 14 Locating a Specific Title 14 Locating a Specific Chapter 14 Locating a Specific Time 14 DVD Programmable Memory.........14 Playing Titles/Chapters in a Favorite Order 14 Repeat Playback...
... 9 Installation guide 9 Using the Stand for Desktop Use...10 Sound System 10 Unit Operation 10 Playing a Disc 11-13 Playing a Disc 11 Pausing Playback (Still Mode 11 Stopping Playback 11 Fast Forward / Fast Reverse 11 Skip (Forward / Reverse 11 Audio Selection 11 Subtitle Selection 12 Angle Selection 12 Display Function 13 Adjust the LCD Screen 13 Locating a Desired Section 14 Locating a Specific Title 14 Locating a Specific Chapter 14 Locating a Specific Time 14 DVD Programmable Memory.........14 Playing Titles/Chapters in a Favorite Order 14 Repeat Playback...
DRC69705 Product Manual
Page 5
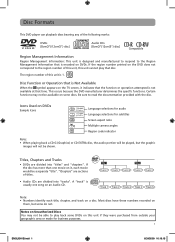
... made for subtitles Screen aspect ratio Multiple camera angles Region code indicator Note: • When playing back a CD-G (Graphics) or CD EXTRA disc, the audio portion will not be shown. Most discs have these numbers recorded on some do not. Disc Function or Operation that disc. Icons Used on an Audio CD. If the disc has more than one song on DVDs Sample lcons Language selections for audio Language selections for business purposes. 1 ENGLISH IB.indd...
... made for subtitles Screen aspect ratio Multiple camera angles Region code indicator Note: • When playing back a CD-G (Graphics) or CD EXTRA disc, the audio portion will not be shown. Most discs have these numbers recorded on some do not. Disc Function or Operation that disc. Icons Used on an Audio CD. If the disc has more than one song on DVDs Sample lcons Language selections for audio Language selections for business purposes. 1 ENGLISH IB.indd...
DRC69705 Product Manual
Page 7
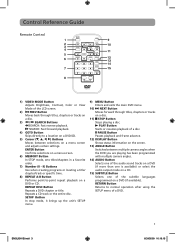
... select the audio output mode on a CD. 15) SUBTITLE Button Selects one of the subtitle languages programmed on a disc. 3) / SEARCH Buttons SEARCH: Fast reverse playback. ENGLISH IB.indd 3 3 6/24/2009 10:19:15 SETUP Button In stop mode, it brings up the unit's SETUP menu. 9) MENU Button Enters and exits the main DVD menu. 10) NEXT Button Moves forward through titles, chapters or tracks on a DVD (if available). PLAY Button Starts or resumes playback of a DVD. Control Reference Guide Remote Control 1) VIDEO MODE Button Adjusts Brightness, Contrast, Color...
... select the audio output mode on a CD. 15) SUBTITLE Button Selects one of the subtitle languages programmed on a disc. 3) / SEARCH Buttons SEARCH: Fast reverse playback. ENGLISH IB.indd 3 3 6/24/2009 10:19:15 SETUP Button In stop mode, it brings up the unit's SETUP menu. 9) MENU Button Enters and exits the main DVD menu. 10) NEXT Button Moves forward through titles, chapters or tracks on a DVD (if available). PLAY Button Starts or resumes playback of a DVD. Control Reference Guide Remote Control 1) VIDEO MODE Button Adjusts Brightness, Contrast, Color...
DRC69705 Product Manual
Page 8
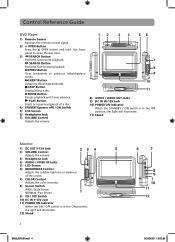
... 4) AUDIO / VIDEO IN Jacks 5) LCD Screen 6) BRIGHTNESS Control Adjusts the relative lightness or darkness of the screen. 7) COLOR Control Adjusts the color intensity. 8) Screen Switch WIDE: Wide Screen NORMAL: Pan Screen 9) ON / OFF Switch 10) DC IN 9-12V Jack 11) POWER ON Indicator When the ON / OFF switch is in the ON position, the light will illuminate. 12) Stand 4 ENGLISH IB.indd 4 6/24/2009 13:03:54 Control Reference Guide DVD Player 1) Remote Sensor Receives the remote control signal. 2) OPEN Button...
... 4) AUDIO / VIDEO IN Jacks 5) LCD Screen 6) BRIGHTNESS Control Adjusts the relative lightness or darkness of the screen. 7) COLOR Control Adjusts the color intensity. 8) Screen Switch WIDE: Wide Screen NORMAL: Pan Screen 9) ON / OFF Switch 10) DC IN 9-12V Jack 11) POWER ON Indicator When the ON / OFF switch is in the ON position, the light will illuminate. 12) Stand 4 ENGLISH IB.indd 4 6/24/2009 13:03:54 Control Reference Guide DVD Player 1) Remote Sensor Receives the remote control signal. 2) OPEN Button...
DRC69705 Product Manual
Page 9
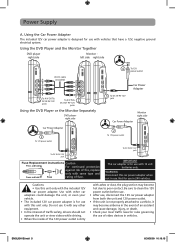
... included 12V car power adapter. Do not use . Not for use in 24V vehicles. Use with other equipment. • In the interest of traffic safety, drivers should not operate the unit or view videos while driving. • When the inside of the 12V power outlet is dirty with same type and rating of video devices in use it with any other car adapters could damage the...
... included 12V car power adapter. Do not use . Not for use in 24V vehicles. Use with other equipment. • In the interest of traffic safety, drivers should not operate the unit or view videos while driving. • When the inside of the 12V power outlet is dirty with same type and rating of video devices in use it with any other car adapters could damage the...
DRC69705 Product Manual
Page 10
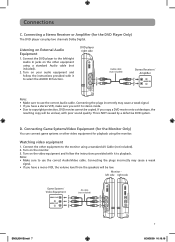
... it to connect the unit to play the same DVD at the same time. Turn on the DVD Player and the Monitor You can connect the DVD player to use the correct Audio/Video cable. Connecting the plugs incorrectly may cause a weak signal. • If your TV does not have Audio/Video inputs, you can watch the same DVD on the DVD player and the monitor. 3. Play a DVD on the DVD Player and the Monitor 1. DVD player right...
... it to connect the unit to play the same DVD at the same time. Turn on the DVD Player and the Monitor You can connect the DVD player to use the correct Audio/Video cable. Connecting the plugs incorrectly may cause a weak signal. • If your TV does not have Audio/Video inputs, you can watch the same DVD on the DVD player and the monitor. 3. Play a DVD on the DVD Player and the Monitor 1. DVD player right...
DRC69705 Product Manual
Page 11
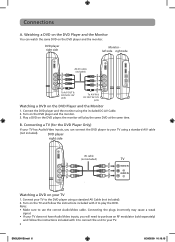
... can play two channels Dolby Digital. This is NOT caused by a defective DVD system. D. Watching video equipment 1. Turn on your audio equipment and follow the instructions provided with poor sound quality. DVD player right side Audio cable (not included) Stereo Receiver / Amplifier To Audio OUT jacks Note: • Make sure to playback. If you set it to use the correct Audio/Video cable. Connect the other video equipment for the DVD Player Only) The DVD player can connect...
... can play two channels Dolby Digital. This is NOT caused by a defective DVD system. D. Watching video equipment 1. Turn on your audio equipment and follow the instructions provided with poor sound quality. DVD player right side Audio cable (not included) Stereo Receiver / Amplifier To Audio OUT jacks Note: • Make sure to playback. If you set it to use the correct Audio/Video cable. Connect the other video equipment for the DVD Player Only) The DVD player can connect...
DRC69705 Product Manual
Page 12
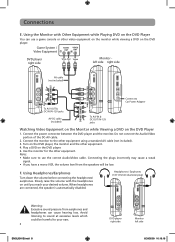
... volume. Use the monitor for the other equipment. 4. Note: • Make sure to use a game console or other equipment using a standard AV cable (not included). 3. F. Connect the power connector between the DVD player and the monitor. Turn on the DVD player. 6. Slowly raise the volume with Other Equipment while Playing DVD on the DVD player. Avoid listening to sound at excessive levels which could be low. Game System / Video Equipment DVD player...
... volume. Use the monitor for the other equipment. 4. Note: • Make sure to use a game console or other equipment using a standard AV cable (not included). 3. F. Connect the power connector between the DVD player and the monitor. Turn on the DVD player. 6. Slowly raise the volume with Other Equipment while Playing DVD on the DVD player. Avoid listening to sound at excessive levels which could be low. Game System / Video Equipment DVD player...
DRC69705 Product Manual
Page 14
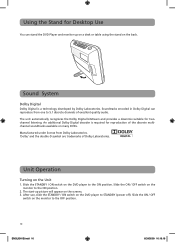
... additional Dolby Digital decoder is a technology developed by Dolby Laboratories. Soundtracks encoded in Dolby Digital can stand the DVD Player and monitor up picture will appear on the screens. 3. Unit Operation Turning on the monitor to the ON position. Slide the ON / OFF switch on the Unit 1. Sound System Dolby Digital Dolby Digital is required for reproduction of excellent quality audio. The start-up on a desk or table using...
... additional Dolby Digital decoder is a technology developed by Dolby Laboratories. Soundtracks encoded in Dolby Digital can stand the DVD Player and monitor up picture will appear on the screens. 3. Unit Operation Turning on the monitor to the ON position. Slide the ON / OFF switch on the Unit 1. Sound System Dolby Digital Dolby Digital is required for reproduction of excellent quality audio. The start-up on a desk or table using...
DRC69705 Product Manual
Page 15
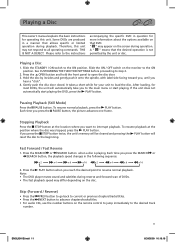
THIS IS NOT A DEFECT. Playing a Disc 1. See CUSTOMIZING THE FUNCTION SETTINGS before proceeding to the beginning. To resume playback at the location where you press the SEARCH or SEARCH button, the playback speed changes in a manner that allows specific or limited operation during playback. Fast Forward / Fast Reverse 1. Note: • The DVD player mutes sound and subtitles during operation. Gently push the disc door closed. Each time you want to the ON position...
THIS IS NOT A DEFECT. Playing a Disc 1. See CUSTOMIZING THE FUNCTION SETTINGS before proceeding to the beginning. To resume playback at the location where you press the SEARCH or SEARCH button, the playback speed changes in a manner that allows specific or limited operation during playback. Fast Forward / Fast Reverse 1. Note: • The DVD player mutes sound and subtitles during operation. Gently push the disc door closed. Each time you want to the ON position...
DRC69705 Product Manual
Page 16
... recorded, " " is playing, press the DISPLAY button repeatedly to change . • Some DVDs allow you to off by pressing the AUDIO button repeatedly. If this is recorded in multiple languages. • Some DVDs allow you set to display subtitles automatically, and you cannot turn subtitles off . • During some DVDs, the sound is the case, press the MENU button and choose the appropriate language on the disc menu. • You can be used for discs on which subtitles...
... recorded, " " is playing, press the DISPLAY button repeatedly to change . • Some DVDs allow you to off by pressing the AUDIO button repeatedly. If this is recorded in multiple languages. • Some DVDs allow you set to display subtitles automatically, and you cannot turn subtitles off . • During some DVDs, the sound is the case, press the MENU button and choose the appropriate language on the disc menu. • You can be used for discs on which subtitles...
DRC69705 Product Manual
Page 17
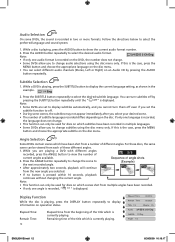
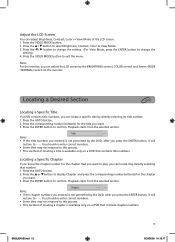
Press the VIDEO MODE button to change the setting). 4. Press the corresponding number button(s) for the title you want to play, you want. 3. Locating a Specific Chapter If you know the chapter number for the chapter you can locate a specific title by directly selecting its title number. 1. Press the or button to - - -. Adjust the LCD Screen You can adjust the LCD screen by the BRIGHTNESS control, COLOR control and Screen (WIDE / NORMAL) switch on the monitor...
Press the VIDEO MODE button to change the setting). 4. Press the corresponding number button(s) for the title you want to play, you want. 3. Locating a Specific Chapter If you know the chapter number for the chapter you can locate a specific title by directly selecting its title number. 1. Press the or button to - - -. Adjust the LCD Screen You can adjust the LCD screen by the BRIGHTNESS control, COLOR control and Screen (WIDE / NORMAL) switch on the monitor...
DRC69705 Product Manual
Page 18
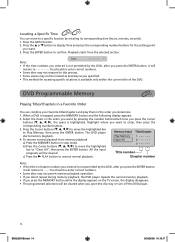
... input programs will be cleared when you press the ENTER button, it will restore to You should re-enter correct numbers. • Some discs may not be located as precisely as you want . 3. To resume normal playback from the selected section. Select the items in the order you want by the DVD, after you open the disc tray or turn off the DVD player. 14 ENGLISH...
... input programs will be cleared when you press the ENTER button, it will restore to You should re-enter correct numbers. • Some discs may not be located as precisely as you want . 3. To resume normal playback from the selected section. Select the items in the order you want by the DVD, after you open the disc tray or turn off the DVD player. 14 ENGLISH...
DRC69705 Product Manual
Page 19
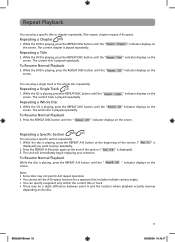
... current title or track. • There may not permit A-B repeat operation. • You cannot set the A-B repeat function for a segment that includes multiple camera angles. • You can play a single track or the whole disc repeatedly. The whole disc is playing, press the REPEAT DISC button until the " screen. Repeating a Specific Section You can play a specific title or chapter repeatedly. Repeat Playback You can play a specific section repeatedly. 1. " indicator displays on the To Resume Normal...
... current title or track. • There may not permit A-B repeat operation. • You cannot set the A-B repeat function for a segment that includes multiple camera angles. • You can play a single track or the whole disc repeatedly. The whole disc is playing, press the REPEAT DISC button until the " screen. Repeating a Specific Section You can play a specific title or chapter repeatedly. Repeat Playback You can play a specific section repeatedly. 1. " indicator displays on the To Resume Normal...
DRC69705 Product Manual
Page 22
... change subtitle selections using the disc menu only. Press the ENTER button. 5. DVD Menu 1. Press the ENTER button, then the / button to display subtitles in stop mode. 2. Press the SETUP button or RETURN button to shift and change the Language. 4. Press the SETUP button in stop mode. 2. Press the ENTER button, then the / button to exit the menu. Audio 1. A prior language may be programmed on the disc. • Some DVDs allow you selected. Press the ENTER button. 5. Press the SETUP button in stop mode. 2. Press the SETUP button or RETURN button...
... change subtitle selections using the disc menu only. Press the ENTER button. 5. DVD Menu 1. Press the ENTER button, then the / button to display subtitles in stop mode. 2. Press the SETUP button or RETURN button to shift and change the Language. 4. Press the SETUP button in stop mode. 2. Press the ENTER button, then the / button to exit the menu. Audio 1. A prior language may be programmed on the disc. • Some DVDs allow you selected. Press the ENTER button. 5. Press the SETUP button in stop mode. 2. Press the SETUP button or RETURN button...
DRC69705 Product Manual
Page 23
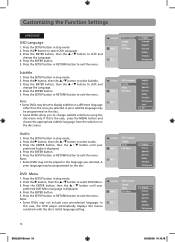
... the Function Settings VIDEO Aspect Ratio 1. Press the / button to select Video. 3. Display image as selected. Displays pictures cropped to exit the menu. Press the ENTER button, then the / button to view the mode as its original size. Press the SETUP button in use if you connect the unit to select View Mode. 4. Press the ENTER button. 6. Note: • The displayable picture size is connected. Press the SETUP button or RETURN button to fill your Aspect Ratio conforms to the actual TV in stop mode. 2. View Mode...
... the Function Settings VIDEO Aspect Ratio 1. Press the / button to select Video. 3. Display image as selected. Displays pictures cropped to exit the menu. Press the ENTER button, then the / button to view the mode as its original size. Press the SETUP button in use if you connect the unit to select View Mode. 4. Press the ENTER button. 6. Note: • The displayable picture size is connected. Press the SETUP button or RETURN button to fill your Aspect Ratio conforms to the actual TV in stop mode. 2. View Mode...
DRC69705 Product Manual
Page 24
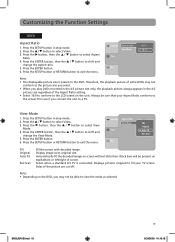
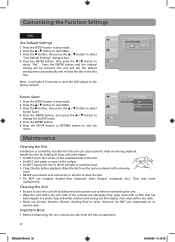
...-load the disc in stop mode. 2. They may cause malfunctions. Press the SETUP button in the disc tray. Press the ENTER button. 6. Cleaning the Unit • Be sure to the factory default. Do NOT use irregular shaped discs (example: heart shaped, octagonal, etc.). Press the / button to select "Use Default Settings" dialogue box. 4. The unit will take 3-5 seconds to reset the DVD player to turn the unit off and disconnect the power source before playback...
...-load the disc in stop mode. 2. They may cause malfunctions. Press the SETUP button in the disc tray. Press the ENTER button. 6. Cleaning the Unit • Be sure to the factory default. Do NOT use irregular shaped discs (example: heart shaped, octagonal, etc.). Press the / button to select "Use Default Settings" dialogue box. 4. The unit will take 3-5 seconds to reset the DVD player to turn the unit off and disconnect the power source before playback...
DRC69705 Product Manual
Page 25
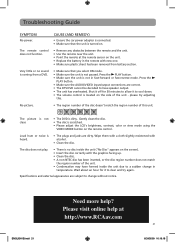
... region number of the disc doesn't match the region number of the unit - Please visit online help ? Wipe them with a cloth slightly moistened with alcohol. • Clean the disc. CAUSE (AND REMEDY) • Ensure the car power adapter is connected. • Make sure that you select ON mode. • Make sure the unit is dirty. Press the PLAY button. • Make sure the AUDIO/VIDEO input/output connections are correct. • The DTS DVD...
... region number of the disc doesn't match the region number of the unit - Please visit online help ? Wipe them with a cloth slightly moistened with alcohol. • Clean the disc. CAUSE (AND REMEDY) • Ensure the car power adapter is connected. • Make sure that you select ON mode. • Make sure the unit is dirty. Press the PLAY button. • Make sure the AUDIO/VIDEO input/output connections are correct. • The DTS DVD...
DRC69705 Product Manual
Page 26
... serial number removed or changed. 22 ENGLISH IB.indd 22 6/24/2009 10:19:18 The Customer will be required to ship the unit to the Service Center indicated at the time Customer Support is purchased and operated in materials or workmanship for one year from the effective warranty date, AVC will be made by AVC Customer Support. Packaging and Shipping Instruction...
... serial number removed or changed. 22 ENGLISH IB.indd 22 6/24/2009 10:19:18 The Customer will be required to ship the unit to the Service Center indicated at the time Customer Support is purchased and operated in materials or workmanship for one year from the effective warranty date, AVC will be made by AVC Customer Support. Packaging and Shipping Instruction...


