User Guide
Page 2
.... Model No: SerialNo:_,, Purchase Date-_ _ Purchased From: CC6151 or CC6251 or CC6271 -, •_ : ;._. ,!. ': : REFER SERVICING TO QUALIFIED SERVICE PERSONNEL. ATTENTION: Pour 6viter les chocs 61ectdques, la plus large de la fiche dans la borne correspondante pousser jusqu au fond. Record the serial number and model numbers located on the bottom of fire or shock hazard, do not expose camcorder or AC adapter/charger...
.... Model No: SerialNo:_,, Purchase Date-_ _ Purchased From: CC6151 or CC6251 or CC6271 -, •_ : ;._. ,!. ': : REFER SERVICING TO QUALIFIED SERVICE PERSONNEL. ATTENTION: Pour 6viter les chocs 61ectdques, la plus large de la fiche dans la borne correspondante pousser jusqu au fond. Record the serial number and model numbers located on the bottom of fire or shock hazard, do not expose camcorder or AC adapter/charger...
User Guide
Page 3
... Turn Off the Camcorder ........ 9 • Close the Lens Cover 9 • Review Camcorder's Operating Controls 10-11 Power Your Camcorder • Use the Adapter/Charger to Power Your Camcorder 12 • Use the Battery to Power Your Camcorder 13-15 • Use the Optional DCC08 Car Cord Adapter 16 Date and Time Display • Install Clock Lithium Cell ........ 17 • Set the Date and Time .......... 18-19 • Record the Date, Time, and Title Displays 20-21 Videocassettes • Erase Protection 22 • Recording and Playback Speeds...
... Turn Off the Camcorder ........ 9 • Close the Lens Cover 9 • Review Camcorder's Operating Controls 10-11 Power Your Camcorder • Use the Adapter/Charger to Power Your Camcorder 12 • Use the Battery to Power Your Camcorder 13-15 • Use the Optional DCC08 Car Cord Adapter 16 Date and Time Display • Install Clock Lithium Cell ........ 17 • Set the Date and Time .......... 18-19 • Record the Date, Time, and Title Displays 20-21 Videocassettes • Erase Protection 22 • Recording and Playback Speeds...
User Guide
Page 4
... • Stop-Action Pause 62 • Time Counter 63 • Memory-Stop Feature 63 • Use the Cassette Adapter ......... 64-65 • Playback on TV (or VCR) with Audio/Video Inputs ..... 66-67 • Playback on a TV Without Audio/Video Inputs 68-69 Optional Accessories 70-75 • Accessory Order Form 73-75 Trouble Checks 76-79 Care and Maintenance • Clean the Camcorder 80 • Clean the Camcorder's Lens ......... 80 • Clean the Camcorder's Viewfinder...
... • Stop-Action Pause 62 • Time Counter 63 • Memory-Stop Feature 63 • Use the Cassette Adapter ......... 64-65 • Playback on TV (or VCR) with Audio/Video Inputs ..... 66-67 • Playback on a TV Without Audio/Video Inputs 68-69 Optional Accessories 70-75 • Accessory Order Form 73-75 Trouble Checks 76-79 Care and Maintenance • Clean the Camcorder 80 • Clean the Camcorder's Lens ......... 80 • Clean the Camcorder's Viewfinder...
User Guide
Page 5
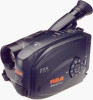
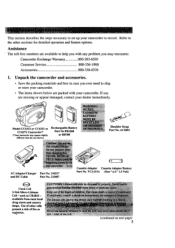
... one shown.) Rechargeable Battery Part No FB1260 or BB700 Shoulder Strap Part No. Model CC6151 or CC6251 or CC6271 Camcorder* (*Your camcorder may encounter. Use of fire or explosion. (continued on next page) 3 If any problem you ever need to help you with any are packed with your camcorder. Adapter Battery Part No. 241017 Part No. ACS091 4+ "{1 AC Adapter/Charger and DC Cable C...a..s..s.e..t.t..e...A...d..a..p...t.e..r........C...a..s.s..e..t.t.e... Assistance The toll-free numbers are available to...
... one shown.) Rechargeable Battery Part No FB1260 or BB700 Shoulder Strap Part No. Model CC6151 or CC6251 or CC6271 Camcorder* (*Your camcorder may encounter. Use of fire or explosion. (continued on next page) 3 If any problem you ever need to help you with any are packed with your camcorder. Adapter Battery Part No. 241017 Part No. ACS091 4+ "{1 AC Adapter/Charger and DC Cable C...a..s..s.e..t.t..e...A...d..a..p...t.e..r........C...a..s.s..e..t.t.e... Assistance The toll-free numbers are available to...

User Guide
Page 8
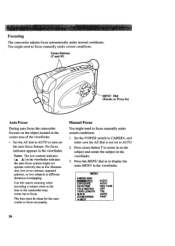
... play provides three times the recording time as SP (60 minutes with a TC-20 tape). The tape speed you record in the viewf'mder. • Adjust the viewf'mder for a comfortable viewing position. • Turn the eyepiece focus control to select a recording speed. Adjust the viewfinder and eyepiece focus control. __ You can see what you select (SP or SLP) appears in normal playback. i@ SP/SLP Button Electronic Viewfinder Eyepiece Focus Control...
... play provides three times the recording time as SP (60 minutes with a TC-20 tape). The tape speed you record in the viewf'mder. • Adjust the viewf'mder for a comfortable viewing position. • Turn the eyepiece focus control to select a recording speed. Adjust the viewfinder and eyepiece focus control. __ You can see what you select (SP or SLP) appears in normal playback. i@ SP/SLP Button Electronic Viewfinder Eyepiece Focus Control...
User Guide
Page 13
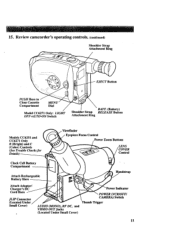
...'s operating controls. (continued) Shoulder Strap Attachment Ring EJECT Button PUSH Here to Close Cassette Compartment MENU Dial Model CC6271 Only: LIGHT OFF.A UTO.ON Switch Shoulder Strap Attachment Ring BATT. (Battery) RELEASE Button Models CC6251 and CC6271 Only B (Bright) and C (Color) Controls (See Trouble Checks for Details) Focus Control Power Zoom Buttons LENS Control Clock Cell Battery Compartment Attach Rechargeable Battery Here Handstrap Attach Adapter/ Charger's DC Cord Here JLIP Connector (Located Under Small Cover) Indicator POWER (VCR/OFF/ CAMERA) Switch AUDIO...
...'s operating controls. (continued) Shoulder Strap Attachment Ring EJECT Button PUSH Here to Close Cassette Compartment MENU Dial Model CC6271 Only: LIGHT OFF.A UTO.ON Switch Shoulder Strap Attachment Ring BATT. (Battery) RELEASE Button Models CC6251 and CC6271 Only B (Bright) and C (Color) Controls (See Trouble Checks for Details) Focus Control Power Zoom Buttons LENS Control Clock Cell Battery Compartment Attach Rechargeable Battery Here Handstrap Attach Adapter/ Charger's DC Cord Here JLIP Connector (Located Under Small Cover) Indicator POWER (VCR/OFF/ CAMERA) Switch AUDIO...
User Guide
Page 22
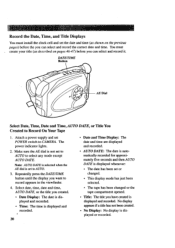
... Time, AUTO DATE, or Title You Created to CAMERA. The power indicator lights. 2. Make sure the AE dial is not set toAUTO. . Note: AUTO DATE is selected when the AE dial is set to AUTO to record appears in the viewfinder. . No display appears if a title has not been created. DATEITIME Button -- Attach a power supply and set or changed. • This display mode has just been selected. • The tape...
... Time, AUTO DATE, or Title You Created to CAMERA. The power indicator lights. 2. Make sure the AE dial is not set toAUTO. . Note: AUTO DATE is selected when the AE dial is set to AUTO to record appears in the viewfinder. . No display appears if a title has not been created. DATEITIME Button -- Attach a power supply and set or changed. • This display mode has just been selected. • The tape...

User Guide
Page 24
... recording times for accessory cleaners or cleaning by a Service Center. Use of tape purchased or rented by pressing and holding the SP/SLP button. This system is considered normal maintenance. Recording and Playback Speeds and Times The camcorder records and plays back in a snowy picture or no control over it. The automatic head-cleaning system minimizes the need for popular VHS-C cassettes. To erase a previous recording, just record over the type of poor quality tapes or tapes...
... recording times for accessory cleaners or cleaning by a Service Center. Use of tape purchased or rented by pressing and holding the SP/SLP button. This system is considered normal maintenance. Recording and Playback Speeds and Times The camcorder records and plays back in a snowy picture or no control over it. The automatic head-cleaning system minimizes the need for popular VHS-C cassettes. To erase a previous recording, just record over the type of poor quality tapes or tapes...

User Guide
Page 31
... appears when the camcorder is set to CAMERA and there is almost empty. Preset Titles Press the TITLE button to display and record one of them, press DATE/TIME until no cassette in the rechargeable battery. • This indicator flashes when the battery is no display appears. • Details are on a sunny day. 29 Cassette Warning • The _ indicator flashes when the POWER switch is adjusting tracking automatically.
... appears when the camcorder is set to CAMERA and there is almost empty. Preset Titles Press the TITLE button to display and record one of them, press DATE/TIME until no cassette in the rechargeable battery. • This indicator flashes when the battery is no display appears. • Details are on a sunny day. 29 Cassette Warning • The _ indicator flashes when the POWER switch is adjusting tracking automatically.
User Guide
Page 35
... release VCR • • when the camcorder is in the viewfinder. 3. The tally light flashes during self-timer and time-lapse recording. Auto Head. Press the QUICK REC button to CAMERA. 2. The camcorder plays back the last few seconds of recordings. See page 54 for accessory cleaners or cleaning by a Service Center. 33 The head-cleaning system minimizes the need for details. Quick Record Feature The quick record feature allows you insert or remove a cassette, this...
... release VCR • • when the camcorder is in the viewfinder. 3. The tally light flashes during self-timer and time-lapse recording. Auto Head. Press the QUICK REC button to CAMERA. 2. The camcorder plays back the last few seconds of recordings. See page 54 for accessory cleaners or cleaning by a Service Center. 33 The head-cleaning system minimizes the need for details. Quick Record Feature The quick record feature allows you insert or remove a cassette, this...
User Guide
Page 38
... not set to display the main MENU in the viewfinder indicates the auto-focus system might need to low illumination, low or no contrast, repeated patterns, or two subjects at different distances overlapping. Press zoom button T to focus. MENU P'MENU END EXPOSURE DATE/TIME TELE MACRO TAPE LENGTH M.W.B. . You might need to focus manually under certain conditions. . Notes: The low-contrast indicator (m & ) in the viewfinder. Focusing The camcorder adjusts focus automatically...
... not set to display the main MENU in the viewfinder indicates the auto-focus system might need to low illumination, low or no contrast, repeated patterns, or two subjects at different distances overlapping. Press zoom button T to focus. MENU P'MENU END EXPOSURE DATE/TIME TELE MACRO TAPE LENGTH M.W.B. . You might need to focus manually under certain conditions. . Notes: The low-contrast indicator (m & ) in the viewfinder. Focusing The camcorder adjusts focus automatically...

User Guide
Page 40
... about. Your camcorder is not set to AUTO. 2. Manual .White Balance 1. Zoom Buttons (T and W) MENU Dial (Rotate or Press In) Auto White Balance During auto white balance, the camcorder adjusts the white balance. • Set the AE dial to AUTO to display the main MENU in the viewfinder. ZOOM SPEED )'NEXT 38 No indicator appears in the scene you record. Press the MENU dial in to turn on the automatic white balance feature. MENU )'MENU END FOCUS EXPOSURE DATE/TIME TELE MACRO TAPE LENGTH AUTO AUTO NOV 18...
... about. Your camcorder is not set to AUTO. 2. Manual .White Balance 1. Zoom Buttons (T and W) MENU Dial (Rotate or Press In) Auto White Balance During auto white balance, the camcorder adjusts the white balance. • Set the AE dial to AUTO to display the main MENU in the viewfinder. ZOOM SPEED )'NEXT 38 No indicator appears in the scene you record. Press the MENU dial in to turn on the automatic white balance feature. MENU )'MENU END FOCUS EXPOSURE DATE/TIME TELE MACRO TAPE LENGTH AUTO AUTO NOV 18...
User Guide
Page 60
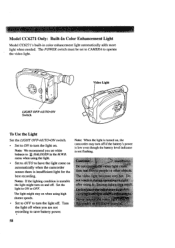
.... menu when using high shutter speeds. Turn the light off when you set to CAMERA to turn the light off . Set to OFF to save battery power. The POWER switch must be set white balance to _:HALOGEN in color enhancement light automatically adds more light when needed. Set to ON to operate the video light. Notes: If the lighting condition is insufficient light for the best recording. Video Light / LIGHT OFF.A UTOoON Switch To Use the Light Set the LIGHT OFFoAUTO •ON switch. Note: When the light is not flashing...
.... menu when using high shutter speeds. Turn the light off when you set to CAMERA to turn the light off . Set to OFF to save battery power. The POWER switch must be set white balance to _:HALOGEN in color enhancement light automatically adds more light when needed. Set to ON to operate the video light. Notes: If the lighting condition is insufficient light for the best recording. Video Light / LIGHT OFF.A UTOoON Switch To Use the Light Set the LIGHT OFFoAUTO •ON switch. Note: When the light is not flashing...
User Guide
Page 62
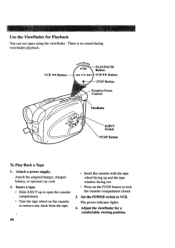
The power indicator lights. . Use the Viewfinder for a comfortable viewing position. Set the POWER switch to lock the cassette compartment closed. 3. Attach the adapter/charger, charged battery, or optional car cord. 2. Insert a tape. • Slide EJECT up to open the cassette compartment. • Turn the tape wheel on the cassette to remove any slack from the tape. 60 • Insert the cassette with the tape wheel facing up and the tape _ window facing out. • Press on...
The power indicator lights. . Use the Viewfinder for a comfortable viewing position. Set the POWER switch to lock the cassette compartment closed. 3. Attach the adapter/charger, charged battery, or optional car cord. 2. Insert a tape. • Slide EJECT up to open the cassette compartment. • Turn the tape wheel on the cassette to remove any slack from the tape. 60 • Insert the cassette with the tape wheel facing up and the tape _ window facing out. • Press on...
User Guide
Page 69
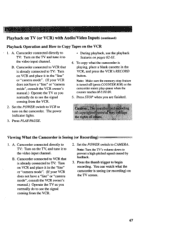
... the camcorder. Set the POWER switch to the video input channel. Viewing What the Camcorder is already connected to see the signal coming from the VCR. 2. B_ Camcorder connected to Copy Tapes on the VCR 1. A° Camcorder connected directly to TV: Turn on the TV and tune it in the VCR, and press the VCR's RECORD button. Playback on TV (or VCR) with Audio/Video Inputs (continued) Playback Operation and How to VCR that is turned off (press COUNTER R/M) or the camcorder enters play-pause...
... the camcorder. Set the POWER switch to the video input channel. Viewing What the Camcorder is already connected to see the signal coming from the VCR. 2. B_ Camcorder connected to Copy Tapes on the VCR 1. A° Camcorder connected directly to TV: Turn on the TV and tune it in the VCR, and press the VCR's RECORD button. Playback on TV (or VCR) with Audio/Video Inputs (continued) Playback Operation and How to VCR that is turned off (press COUNTER R/M) or the camcorder enters play-pause...

User Guide
Page 71
... to VCR. Press STOP on the TV. 3. Set the CH3/CH4 switch on a TV Without Audio/Video Inputs (continued) Playback Operation 1. Set POWER switch to the TV. Power indicator lights. 5. Turn the TV's volume down to CAMERA. Disconnect the adapter's plug from the camcorde r and place the adapter's VCR/ TV switch in VCR. 4. Place adapter's VCR/TV switch in TE. Set POWER switch to prevent a high-pitched squeal caused by feedback. 2. Playback on the RF output adapter to channel 3 or 4. 2. Note to Cable TV Installer...
... to VCR. Press STOP on the TV. 3. Set the CH3/CH4 switch on a TV Without Audio/Video Inputs (continued) Playback Operation 1. Set POWER switch to the TV. Power indicator lights. 5. Turn the TV's volume down to CAMERA. Disconnect the adapter's plug from the camcorde r and place the adapter's VCR/ TV switch in VCR. 4. Place adapter's VCR/TV switch in TE. Set POWER switch to prevent a high-pitched squeal caused by feedback. 2. Playback on the RF output adapter to channel 3 or 4. 2. Note to Cable TV Installer...
User Guide
Page 78
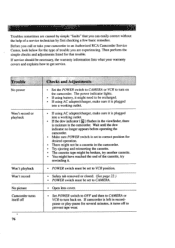
... . Set POWER switch to OFF and then to CAMERA or VCR to CAMERA. • Open lens cover. If service should be recharged. • If using AC adapter/charger, make sure it is moisture in the camcorder. If camcorder is left in recordpause or play-pause for several minutes, it is plugged into a working outlet. • If the dew indicator ( I'/] ) flashes in the camcorder. • Try ejecting and reinserting the cassette. • The cassette tape...
... . Set POWER switch to OFF and then to CAMERA or VCR to CAMERA. • Open lens cover. If service should be recharged. • If using AC adapter/charger, make sure it is moisture in the camcorder. If camcorder is left in recordpause or play-pause for several minutes, it is plugged into a working outlet. • If the dew indicator ( I'/] ) flashes in the camcorder. • Try ejecting and reinserting the cassette. • The cassette tape...
User Guide
Page 83
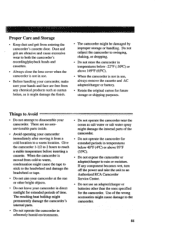
... camcorder's internal parts. • Do not operate the camcorder in eXtremely humid environments. • Do not operate the camcorder near the ocean as it from cold to warm, condensation might cause the tape to stick to the headwheel and damage the headwheel or tape. • Do not aim your camcorder in use , always remove the cassette and AC adapter/charger or battery. Use of the camcorder. • Do not operate...
... camcorder's internal parts. • Do not operate the camcorder in eXtremely humid environments. • Do not operate the camcorder near the ocean as it from cold to warm, condensation might cause the tape to stick to the headwheel and damage the headwheel or tape. • Do not aim your camcorder in use , always remove the cassette and AC adapter/charger or battery. Use of the camcorder. • Do not operate...
User Guide
Page 88
.... (battery) RELEASE button 11, 13 Battery attaching and removing 13 care and storage 15 charging 14 level indicator 15, 29 refreshing 14' using 13 Battery, installing in cassette adapter 64 86 Built-in light (model CC6271) 58 Bulb for light, replacing (model CC6271) 59 C C (color) control (models CC6251 and CC6271) Cable TV installer note 69 11, 77 Camcorder, cleaning 80 Camcorder's operating controls 10 Camera edit feature 33 Car cord adapter 16 Care and maintenance clean the camcorder 80 clean the camcorder's lens 80 clean...
.... (battery) RELEASE button 11, 13 Battery attaching and removing 13 care and storage 15 charging 14 level indicator 15, 29 refreshing 14' using 13 Battery, installing in cassette adapter 64 86 Built-in light (model CC6271) 58 Bulb for light, replacing (model CC6271) 59 C C (color) control (models CC6251 and CC6271) Cable TV installer note 69 11, 77 Camcorder, cleaning 80 Camcorder's operating controls 10 Camera edit feature 33 Car cord adapter 16 Care and maintenance clean the camcorder 80 clean the camcorder's lens 80 clean...
User Guide
Page 90
..., 55, 56, 61 Microphone 10, 32 MWB indicator 39 O Operating controls I0 Optional accessories 70 Optional plug adapter 12 Order form, accessories 73 P Pause indicator 5, 8 Pause, stop-action 62 PLAY/PAUSE button 9, 10,. 61, 62, 67, 69 Playback first 9 on a TV without audio/video inputs 68 : on TV (or VCR) with audio/video ,, inputs 66 using cassette adapter 64 viewfinder 60 88 Playback features memory-stop 63 position the tape 62 stop-action pause 62 time counter 63 tracking...
..., 55, 56, 61 Microphone 10, 32 MWB indicator 39 O Operating controls I0 Optional accessories 70 Optional plug adapter 12 Order form, accessories 73 P Pause indicator 5, 8 Pause, stop-action 62 PLAY/PAUSE button 9, 10,. 61, 62, 67, 69 Playback first 9 on a TV without audio/video inputs 68 : on TV (or VCR) with audio/video ,, inputs 66 using cassette adapter 64 viewfinder 60 88 Playback features memory-stop 63 position the tape 62 stop-action pause 62 time counter 63 tracking...


