User Guide
Page 5
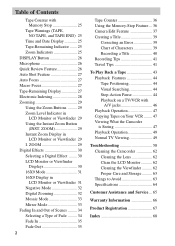
... ......... 34 Selecting a Type of Fade ......... 34 Fade In 35 Fade Out 35 2 Tape Counter 36 Using the Memory-Stop Feature ... 36 Camera Edit Feature 37 Creating a Title 39 Correcting an Error 39 Chart of Contents Tape Counter with A/V jacks 46 Playback Operation 47 Copying Tapes on ...Your VCR ........ 47 Viewing What the Camcrder is Seeing 47 Playback Operation 49 Normal TV Viewing 49 Troubleshooting 58 Cleaning the Camcorder 62 Cleaning the Lens 62 Clean the LCD Monitor 62 Cleaning the Viewfinder .......... 62 Proper Care and Storage .......... 63 Things to Avoid ...
... ......... 34 Selecting a Type of Fade ......... 34 Fade In 35 Fade Out 35 2 Tape Counter 36 Using the Memory-Stop Feature ... 36 Camera Edit Feature 37 Creating a Title 39 Correcting an Error 39 Chart of Contents Tape Counter with A/V jacks 46 Playback Operation 47 Copying Tapes on ...Your VCR ........ 47 Viewing What the Camcrder is Seeing 47 Playback Operation 49 Normal TV Viewing 49 Troubleshooting 58 Cleaning the Camcorder 62 Cleaning the Lens 62 Clean the LCD Monitor 62 Cleaning the Viewfinder .......... 62 Proper Care and Storage .......... 63 Things to Avoid ...
User Guide
Page 8
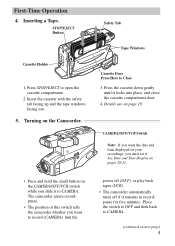
...STOP/EJECT Button Cassette Holder 1. Place the switch to OFF and then back to record (CAMERA), turn the power off (OFF), or play back tapes (VCR). • The camcorder automatically turns off if it locks into place, and close the cassette compartment door. 4. Insert...STOP/EJECT to Close 3. Turning on the Camcorder. First-Time Operation 4. Press the cassette down gently until it remains in recordpause for five minutes. The camcorder enters recordpause. • The position of this switch tells the camcorder whether you want to CAMERA. (continued on your recordings, you slide ...
...STOP/EJECT Button Cassette Holder 1. Place the switch to OFF and then back to record (CAMERA), turn the power off (OFF), or play back tapes (VCR). • The camcorder automatically turns off if it locks into place, and close the cassette compartment door. 4. Insert...STOP/EJECT to Close 3. Turning on the Camcorder. First-Time Operation 4. Press the cassette down gently until it remains in recordpause for five minutes. The camcorder enters recordpause. • The position of this switch tells the camcorder whether you want to CAMERA. (continued on your recordings, you slide ...
User Guide
Page 11
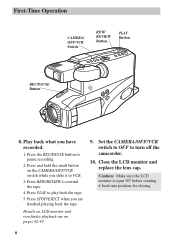
Press REW/REVIEW to turn off the camcorder. 10. Press STOP/EJECT when you are on pages 42-43. 9. Caution: Make sure the LCD monitor is open 90º before rotating it to VCR. 3. Set the CAMERA/OFF/VCR switch to OFF to rewind the tape. 4. Press and hold the small... REC/PAUSE button to play back the tape. 5. Play back what you slide it back into position for closing. 8 First-Time Operation CAMERA/ OFF/VCR Switch REW/ REVIEW Button PLAY Button REC/PAUSE Button 8. Details on the CAMERA/OFF/VCR switch while you have recorded. 1. Press PLAY to pause recording. 2.
Press REW/REVIEW to turn off the camcorder. 10. Press STOP/EJECT when you are on pages 42-43. 9. Caution: Make sure the LCD monitor is open 90º before rotating it to VCR. 3. Set the CAMERA/OFF/VCR switch to OFF to rewind the tape. 4. Press and hold the small... REC/PAUSE button to play back the tape. 5. Play back what you slide it back into position for closing. 8 First-Time Operation CAMERA/ OFF/VCR Switch REW/ REVIEW Button PLAY Button REC/PAUSE Button 8. Details on the CAMERA/OFF/VCR switch while you have recorded. 1. Press PLAY to pause recording. 2.

User Guide
Page 12
Button) PLAY Button F.FWD (Fast Forward) Button (Also + Button) STOP/EJECT Button (Also EDIT-ADV Button) Microphone Lens Lens Hood Reset Switch (See Trouble Checks for details.) VIDEO, AUDIO OUT, and RF DC OUT Jacks (Located Behind Small Cover) (continued on next page) 9 First-Time Operation 11. Review camcorder's operating controls. DISPLAY Button RESET Button DATE/TIME Button TITLER Button CAMERA/ OFF/VCR Switch REW (Rewind)/REVIEW Button (Also -
Button) PLAY Button F.FWD (Fast Forward) Button (Also + Button) STOP/EJECT Button (Also EDIT-ADV Button) Microphone Lens Lens Hood Reset Switch (See Trouble Checks for details.) VIDEO, AUDIO OUT, and RF DC OUT Jacks (Located Behind Small Cover) (continued on next page) 9 First-Time Operation 11. Review camcorder's operating controls. DISPLAY Button RESET Button DATE/TIME Button TITLER Button CAMERA/ OFF/VCR Switch REW (Rewind)/REVIEW Button (Also -
User Guide
Page 17
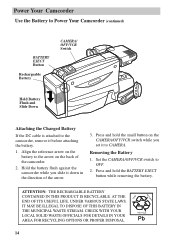
... DISPOSE OF THIS BATTERY IN THE MUNICIPAL WASTE STREAM. Press and hold the small button on the CAMERA/OFF/VCR switch while you slide it down in the direction of the camcorder. 2. Press and hold the BATTERY EJECT button while removing the battery. Align the reference arrow on... the back of the arrow. Set the CAMERA/OFF/VCR switch to the camcorder, remove it to the arrow on the battery to CAMERA. 1. Power Your Camcorder Use the Battery to Power Your Camcorder (continued) BATTERY EJECT Button Rechargeable Battery CAMERA/ OFF/VCR Switch Hold Battery Flush and Slide Down ...
... DISPOSE OF THIS BATTERY IN THE MUNICIPAL WASTE STREAM. Press and hold the small button on the CAMERA/OFF/VCR switch while you slide it down in the direction of the camcorder. 2. Press and hold the BATTERY EJECT button while removing the battery. Align the reference arrow on... the back of the arrow. Set the CAMERA/OFF/VCR switch to the camcorder, remove it to the arrow on the battery to CAMERA. 1. Power Your Camcorder Use the Battery to Power Your Camcorder (continued) BATTERY EJECT Button Rechargeable Battery CAMERA/ OFF/VCR Switch Hold Battery Flush and Slide Down ...

User Guide
Page 18
...battery level indicator isn't recorded on the LCD monitor. The battery level indicator has no meaning when you use the camcorder. This will damage your camcorder. If the camcorder does not eject the cassette when you press STOP/EJECT, do not have enough reserve power to eject the cassette when... the battery. 15 The battery should still have the battery level indicator displayed. Set the CAMERA/OFF/VCR switch to OFF to turn off . Power Your Camcorder Use the Battery to Power Your Camcorder (continued) Battery Level Indicator The battery level indicator appears in the viewfinder or on the...
...battery level indicator isn't recorded on the LCD monitor. The battery level indicator has no meaning when you use the camcorder. This will damage your camcorder. If the camcorder does not eject the cassette when you press STOP/EJECT, do not have enough reserve power to eject the cassette when... the battery. 15 The battery should still have the battery level indicator displayed. Set the CAMERA/OFF/VCR switch to OFF to turn off . Power Your Camcorder Use the Battery to Power Your Camcorder (continued) Battery Level Indicator The battery level indicator appears in the viewfinder or on the...
User Guide
Page 20
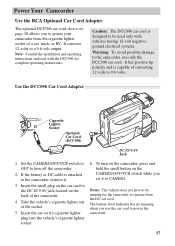
...Car Cord (DCC096) DC IN 9.6V Jack 1. Set the CAMERA/OFF/VCR switch to OFF to the camcorder, use the car cord to CAMERA. Take the vehicle's cigarette lighter out of a car, truck, or RV. Power Your Camcorder Use the RCA Optional Car Cord AdapterCar Cord Adapter The optional DCC096 car cord... shown on page 50 allows you to the camcorder, remove it to ...
...Car Cord (DCC096) DC IN 9.6V Jack 1. Set the CAMERA/OFF/VCR switch to OFF to the camcorder, use the car cord to CAMERA. Take the vehicle's cigarette lighter out of a car, truck, or RV. Power Your Camcorder Use the RCA Optional Car Cord AdapterCar Cord Adapter The optional DCC096 car cord... shown on page 50 allows you to the camcorder, remove it to ...
User Guide
Page 23
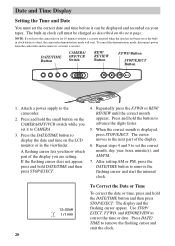
... internal clock. Repeat steps 4 and 5 to remove the flashing cursor and start the clock. 20 Use STOP/ EJECT, F.FWD, and REW/REVIEW to the camcorder. 2. A flashing cursor lets you are setting. NOTE: If you set the correct date and time before it , or insert a cassette. To cancel the ...power supply to correct the time or date. Press and hold the small button on the CAMERA/OFF/VCR switch while you leave the camcorder on the next page. When the correct month is dead, the camcorder demonstration mode will start. After setting AM or PM, press the DATE/TIME button to ...
... internal clock. Repeat steps 4 and 5 to remove the flashing cursor and start the clock. 20 Use STOP/ EJECT, F.FWD, and REW/REVIEW to the camcorder. 2. A flashing cursor lets you are setting. NOTE: If you set the correct date and time before it , or insert a cassette. To cancel the ...power supply to correct the time or date. Press and hold the small button on the CAMERA/OFF/VCR switch while you leave the camcorder on the next page. When the correct month is dead, the camcorder demonstration mode will start. After setting AM or PM, press the DATE/TIME button to ...
User Guide
Page 24
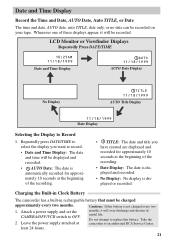
...date only, or no date can be charged approximately every two months. Attach a power supply and set the CAMERA/OFF/VCR switch to Record 1. least 24 hours. 21 Take the camcorder to record. • Date and Time Display: The date and time will over-discharge and shorten its ...useful life. uaWtteohTenITevLeEr one of the recording. • TITLE: The date and title you want to an authorized RCA Service Center. Cautions: If this battery...
...date only, or no date can be charged approximately every two months. Attach a power supply and set the CAMERA/OFF/VCR switch to Record 1. least 24 hours. 21 Take the camcorder to record. • Date and Time Display: The date and time will over-discharge and shorten its ...useful life. uaWtteohTenITevLeEr one of the recording. • TITLE: The date and title you want to an authorized RCA Service Center. Cautions: If this battery...
User Guide
Page 29
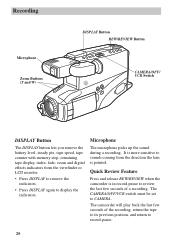
Quick Review Feature Press and release REW/REVIEW when the camcorder is pointed. The CAMERA/OFF/VCR switch must be set to CAMERA. Microphone The microphone picks up the sound during a recording. The camcorder will play back the last few seconds of the recording, return the tape to ... remove the indicators. • Press DISPLAY again to display the indicators. Recording Microphone Zoom Buttons (T and W) DISPLAY Button REW/REVIEW Button CAMERA/OFF/ VCR Switch DISPLAY Button The DISPLAY button lets you remove the battery level, steady pix, tape speed, tape counter with memory stop,...
Quick Review Feature Press and release REW/REVIEW when the camcorder is pointed. The CAMERA/OFF/VCR switch must be set to CAMERA. Microphone The microphone picks up the sound during a recording. The camcorder will play back the last few seconds of the recording, return the tape to ... remove the indicators. • Press DISPLAY again to display the indicators. Recording Microphone Zoom Buttons (T and W) DISPLAY Button REW/REVIEW Button CAMERA/OFF/ VCR Switch DISPLAY Button The DISPLAY button lets you remove the battery level, steady pix, tape speed, tape counter with memory stop,...

User Guide
Page 39
...want to return to, and press RESET to reset the counter to 0000M whenever a cassette is turned on whenever the tape counter appears. The camcorder stops rewinding or fast forwarding when the counter reaches 0000M. Continue to display or remove the tape counter. When the tape counter appears, the...on the LCD monitor. Press and hold the small red button while you locate tape segments. Press REC/PAUSE to help you set the CAMERA/OFF/VCR switch to the counter reading of 0000M. To continue rewinding or fast forwarding, press the button again. Recording Tape Counter The ...
...want to return to, and press RESET to reset the counter to 0000M whenever a cassette is turned on whenever the tape counter appears. The camcorder stops rewinding or fast forwarding when the counter reaches 0000M. Continue to display or remove the tape counter. When the tape counter appears, the...on the LCD monitor. Press and hold the small red button while you locate tape segments. Press REC/PAUSE to help you set the CAMERA/OFF/VCR switch to the counter reading of 0000M. To continue rewinding or fast forwarding, press the button again. Recording Tape Counter The ...

User Guide
Page 40
.... The major features are described on the following pages. • Camera Edit • Titler CAMERA/OFF/ VCR Switch REW/REVIEW Button F.FWD Button Camera Edit Feature The camera edit feature allows you release the button, the camcorder returns to record-pause at that point on the recorded tape. &#...8226; Press and hold F.FWD to visually search forward on the tape. 37 Recording Editing Features The camcorder incorporates a complete package of advanced editing features to make it to CAMERA. • Press and hold REW/REVIEW to visually search the recorded tape in record-pause.
.... The major features are described on the following pages. • Camera Edit • Titler CAMERA/OFF/ VCR Switch REW/REVIEW Button F.FWD Button Camera Edit Feature The camera edit feature allows you release the button, the camcorder returns to record-pause at that point on the recorded tape. &#...8226; Press and hold F.FWD to visually search forward on the tape. 37 Recording Editing Features The camcorder incorporates a complete package of advanced editing features to make it to CAMERA. • Press and hold REW/REVIEW to visually search the recorded tape in record-pause.

User Guide
Page 41
Recording Editing Features (continued) Titler The camcorder's built-in titler can be displayed and recorded at any time. The created title can store a title in character register contains more than 45 different characters. The built-in memory. Your title can contain up to 32 characters on two lines. - Button (Also REW/REVIEW Button) CAMERA/OFF/ VCR Switch TITLER Button + Button (Also F.FWD Button) EDIT-ADV Button (Also STOP/ EJECT Button) 38
Recording Editing Features (continued) Titler The camcorder's built-in titler can be displayed and recorded at any time. The created title can store a title in character register contains more than 45 different characters. The built-in memory. Your title can contain up to 32 characters on two lines. - Button (Also REW/REVIEW Button) CAMERA/OFF/ VCR Switch TITLER Button + Button (Also F.FWD Button) EDIT-ADV Button (Also STOP/ EJECT Button) 38

User Guide
Page 42
... When you want to display the titler graphics in Titler's Register A B C D E F G H I J K L M N O P Q R S T U VWX Y Z 01 23456789 BLANK) 39 Remember: Be sure to the camcorder. Attach a power source to remove the titler graphics from the viewfinder or LCD monitor. Press and hold the small red button on the LCD monitor...pressing the + or - Chart of Characters 3. Press EDIT-ADV to move the flashing cursor to the place where you want to CAMERA. 2. button until you have selected the first character, press EDIT-ADV to move the flashing cursor to the place where you ...
... When you want to display the titler graphics in Titler's Register A B C D E F G H I J K L M N O P Q R S T U VWX Y Z 01 23456789 BLANK) 39 Remember: Be sure to the camcorder. Attach a power source to remove the titler graphics from the viewfinder or LCD monitor. Press and hold the small red button on the LCD monitor...pressing the + or - Chart of Characters 3. Press EDIT-ADV to move the flashing cursor to the place where you want to CAMERA. 2. button until you have selected the first character, press EDIT-ADV to move the flashing cursor to the place where you ...

User Guide
Page 43
...A threeto-four second pause of time, press TITLER to VCR. 3. Recording a Title 4. Start copying the tape from the Camcorder to CAMERA. 2. Press and hold the small red button on the CAMERA/OFF/ VCR switch while you are on a prerecorded tape, the audio and video is erased where the title is inserted...Locate the place on the tape you slide it to Another VCR 1. Press TITLER to display the titler graphics in the camcorder and press and hold the small red button on the CAMERA/ OFF/VCR switch while you want to insert the title, press TITLER. 6. Press REC/PAUSE to the...
...A threeto-four second pause of time, press TITLER to VCR. 3. Recording a Title 4. Start copying the tape from the Camcorder to CAMERA. 2. Press and hold the small red button on the CAMERA/OFF/ VCR switch while you are on a prerecorded tape, the audio and video is erased where the title is inserted...Locate the place on the tape you slide it to Another VCR 1. Press TITLER to display the titler graphics in the camcorder and press and hold the small red button on the CAMERA/ OFF/VCR switch while you want to insert the title, press TITLER. 6. Press REC/PAUSE to the...
User Guide
Page 45
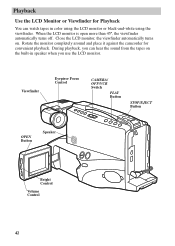
...-white using the viewfinder. Rotate the monitor completely around and place it against the camcorder for Playback You can watch tapes in speaker when you can hear the sound from the tapes on . Viewfinder Eyepiece Focus Control CAMERA/ OFF/VCR Switch PLAY Button STOP/EJECT Button OPEN Button Speaker Bright Control Volume...
...-white using the viewfinder. Rotate the monitor completely around and place it against the camcorder for Playback You can watch tapes in speaker when you can hear the sound from the tapes on . Viewfinder Eyepiece Focus Control CAMERA/ OFF/VCR Switch PLAY Button STOP/EJECT Button OPEN Button Speaker Bright Control Volume...
User Guide
Page 46
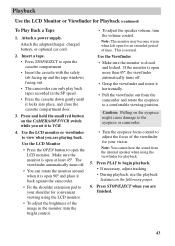
...playback. 5. Press PLAY to open for Playback (continued) To Play Back a Tape 1. Caution: Pulling on the eyepiece might cause damage to the eyepiece or camcorder. • Turn the eyepiece focus control to VCR. 4. Insert a tape. • Press STOP/EJECT to a comfortable viewing position. Note: The monitor... Press the OPEN button to begin playback. • If necessary, adjust tracking. • During playback, use the playback features on the CAMERA/OFF/VCR switch while you are playing back. Press and hold the small red button on the following pages. 6. If the monitor is open...
...playback. 5. Press PLAY to open for Playback (continued) To Play Back a Tape 1. Caution: Pulling on the eyepiece might cause damage to the eyepiece or camcorder. • Turn the eyepiece focus control to VCR. 4. Insert a tape. • Press STOP/EJECT to a comfortable viewing position. Note: The monitor... Press the OPEN button to begin playback. • If necessary, adjust tracking. • During playback, use the playback features on the CAMERA/OFF/VCR switch while you are playing back. Press and hold the small red button on the following pages. 6. If the monitor is open...

User Guide
Page 47
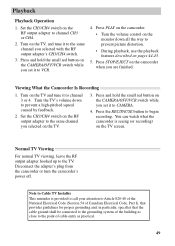
... playback, press and hold F.FWD or REW/REVIEW if you set it automatically enters the stop mode and turns off to normal playback. If the camcorder remains in forward or reverse. • Release the button to return to normal playback. 44 Stop-Action Pause • During playback, press REC/...PAUSE to "stop the action" and view one frame of time. Playback Playback Features CAMERA/ OFF/VCR Switch REW / REVIEW Button F.FWD Button STOP/ EJECT Button REC/ PAUSE Button Tape Positioning Press the small red button on the...
... playback, press and hold F.FWD or REW/REVIEW if you set it automatically enters the stop mode and turns off to normal playback. If the camcorder remains in forward or reverse. • Release the button to return to normal playback. 44 Stop-Action Pause • During playback, press REC/...PAUSE to "stop the action" and view one frame of time. Playback Playback Features CAMERA/ OFF/VCR Switch REW / REVIEW Button F.FWD Button STOP/ EJECT Button REC/ PAUSE Button Tape Positioning Press the small red button on the...

User Guide
Page 50
... To copy what the camcorder is turned off (press DISPLAY) or the camcorder will enter play back finished. Camcorder connected to VCR that is already connected to TV: Turn on the CAMERA/OFF/VCR switch while you are Note: The camcorder can watch what the camcorder is Seeing 1. Press ...PAUSE button to Copy Tapes on Your VCR Viewing What the Camcorder is SeeiVnigew(oinrgRWechoartdthinegC)amcrder is playing, place a blank cassette in the SP speed. or "camera mode". (If your VCR does not have a "line" or "camera mode", consult the VCR owner's manual.) Operate the TV as...
... To copy what the camcorder is turned off (press DISPLAY) or the camcorder will enter play back finished. Camcorder connected to VCR that is already connected to TV: Turn on the CAMERA/OFF/VCR switch while you are Note: The camcorder can watch what the camcorder is Seeing 1. Press ...PAUSE button to Copy Tapes on Your VCR Viewing What the Camcorder is SeeiVnigew(oinrgRWechoartdthinegC)amcrder is playing, place a blank cassette in the SP speed. or "camera mode". (If your VCR does not have a "line" or "camera mode", consult the VCR owner's manual.) Operate the TV as...
User Guide
Page 52
... a high-pitched squeal caused by feedback. 2. Press STOP/EJECT on the TV and tune it to channel 3 or 4. Viewing What the Camcorder Is Recording 1. Turn on the camcorder when you set it to VCR. 4. Press the REC/PAUSE button to the TV. Normal TV Viewing For normal TV viewing, leave the.../VCR switch while you selected on the TV. 3. Press and hold the small red button on the CAMERA/OFF/VCR switch while you are finished. You can watch what the camcorder is provided to call your attention to Article 820-40 of the National Electrical Code (Section 54 of Canadian Electrical ...
... a high-pitched squeal caused by feedback. 2. Press STOP/EJECT on the TV and tune it to channel 3 or 4. Viewing What the Camcorder Is Recording 1. Turn on the camcorder when you set it to VCR. 4. Press the REC/PAUSE button to the TV. Normal TV Viewing For normal TV viewing, leave the.../VCR switch while you selected on the TV. 3. Press and hold the small red button on the CAMERA/OFF/VCR switch while you are finished. You can watch what the camcorder is provided to call your attention to Article 820-40 of the National Electrical Code (Section 54 of Canadian Electrical ...


