
Owner/User Manual: ANT800
Page 1
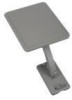
Make sure the following parts are in the package: • Antenna • Amplifier Insert • Power Adapter • Mounting Base • Mounting Arm • Hardware bag: (2) Screws (4) Screw Covers (2) U-Bolts (2) Clamps (4) Wing Nuts (4) Wood Screws (1) Rubber Boot for Antenna Connector/Coaxial Cable Finding the Right Location Before you mount the ANT800, consider the following factors in this package. Getting Started Remove the antenna and the hardware...
Make sure the following parts are in the package: • Antenna • Amplifier Insert • Power Adapter • Mounting Base • Mounting Arm • Hardware bag: (2) Screws (4) Screw Covers (2) U-Bolts (2) Clamps (4) Wing Nuts (4) Wood Screws (1) Rubber Boot for Antenna Connector/Coaxial Cable Finding the Right Location Before you mount the ANT800, consider the following factors in this package. Getting Started Remove the antenna and the hardware...

Owner/User Manual: ANT800
Page 2
Mounting the Antenna The ANT800 mounting bracket gives you flexibility in a high location (such as a rooftop, eaves, siding, or rafters in an attic. 2 NOTES: Do not install the ANT800 on a metal surface will seriously degrade reception quality. In most cases, the ANT800 provides the best performance when mounted outdoors in mounting the antenna. never attach foreign objects to the ANT800. Mounting on any metal surface, including aluminum siding. The...
Mounting the Antenna The ANT800 mounting bracket gives you flexibility in a high location (such as a rooftop, eaves, siding, or rafters in an attic. 2 NOTES: Do not install the ANT800 on a metal surface will seriously degrade reception quality. In most cases, the ANT800 provides the best performance when mounted outdoors in mounting the antenna. never attach foreign objects to the ANT800. Mounting on any metal surface, including aluminum siding. The...

Owner/User Manual: ANT800
Page 3
... screws, washers, and nuts included in the mounting well. Make sure the base is oriented correctly for the direction you want to the surface. Find one of the well. Attach the arm to the antenna as shown here. 3. Mount the base to point the antenna. Attach the arm to the arm. Use the illustration on next page... 3 continues...
... screws, washers, and nuts included in the mounting well. Make sure the base is oriented correctly for the direction you want to the surface. Find one of the well. Attach the arm to the antenna as shown here. 3. Mount the base to point the antenna. Attach the arm to the arm. Use the illustration on next page... 3 continues...

Owner/User Manual: ANT800
Page 4
You can rotate the antenna on the antenna itself. On the antenna's underside, next to complete installation. 4 Loosen these screws. 6. Attach the screw covers. 7. Skip to the "Connecting to Your TV" section to the arm, there are two screws. Tighten all screws. Position and orient the antenna. Loosen the screws between the arm and the base or antenna just enough so that you want. Once you've found the orientation you want, tighten these just enough so that you can position and orient the antenna the way you can also adjust the antenna's orientation on the arm. 5.
You can rotate the antenna on the antenna itself. On the antenna's underside, next to complete installation. 4 Loosen these screws. 6. Attach the screw covers. 7. Skip to the "Connecting to Your TV" section to the arm, there are two screws. Tighten all screws. Position and orient the antenna. Loosen the screws between the arm and the base or antenna just enough so that you want. Once you've found the orientation you want, tighten these just enough so that you can position and orient the antenna the way you can also adjust the antenna's orientation on the arm. 5.
Owner/User Manual: ANT800
Page 5
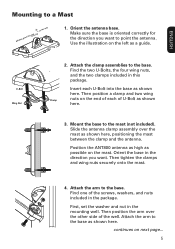
... clamp assemblies to the base. Then position a clamp and two wing Clamp nuts on the mast. Attach the arm to the base. Position the ANT800 antenna as high as possible on the end of each U-Bolt into the base as shown here, positioning the mast between the clamp and the antenna. Make sure the base is oriented correctly for the direction you...
... clamp assemblies to the base. Then position a clamp and two wing Clamp nuts on the mast. Attach the arm to the base. Position the ANT800 antenna as high as possible on the end of each U-Bolt into the base as shown here, positioning the mast between the clamp and the antenna. Make sure the base is oriented correctly for the direction you...

Owner/User Manual: ANT800
Page 6
... you've found the orientation you can position and orient the antenna the way you want , tighten these just enough so that you can rotate the antenna on the antenna itself. Attach the screw covers. 8. 5. Position and orient the antenna. On the antenna's underside, next to complete installation. 6 Skip to the "Connecting to Your TV" section to the arm, there are...
... you've found the orientation you can position and orient the antenna the way you want , tighten these just enough so that you can rotate the antenna on the antenna itself. Attach the screw covers. 8. 5. Position and orient the antenna. On the antenna's underside, next to complete installation. 6 Skip to the "Connecting to Your TV" section to the arm, there are...

Owner/User Manual: ANT800
Page 7
... it upwards towards your TV or converter box. Connect the RG6 coaxial cable to cover the inside the home to the ANT jack on your television set. DO NOT PUT THE SIGNAL SPLITTER BETWEEN THE AMPLIFIER INSERT AND THE ANTENNA. 3. You can be used inside portion of running down the coaxial cable and entering the house. After all other connections are made, connect the power adapter into a standard AC outlet...
... it upwards towards your TV or converter box. Connect the RG6 coaxial cable to cover the inside the home to the ANT jack on your television set. DO NOT PUT THE SIGNAL SPLITTER BETWEEN THE AMPLIFIER INSERT AND THE ANTENNA. 3. You can be used inside portion of running down the coaxial cable and entering the house. After all other connections are made, connect the power adapter into a standard AC outlet...

Owner/User Manual: ANT800
Page 8
...accessories included in the original packaging is to be delivered with proof of warranty coverage (e.g. ANY ACTION FOR BREACH OF ANY WARRANTY HEREUNDER, INCLUDING ANY IMPLIED WARRANTY, MUST BE BROUGHT WITHIN A PERIOD OF 24 MONTHS FROM THE DATE OF ORIGINAL PURCHASE. This Warranty gives you specific... DAMAGES WHATSOEVER. No person or representative is not transferable and does not cover product purchased, serviced or used outside the United States or Canada. To obtain repair or replacement within the terms of all other than expressed herein in material or workmanship within 12 months ...
...accessories included in the original packaging is to be delivered with proof of warranty coverage (e.g. ANY ACTION FOR BREACH OF ANY WARRANTY HEREUNDER, INCLUDING ANY IMPLIED WARRANTY, MUST BE BROUGHT WITHIN A PERIOD OF 24 MONTHS FROM THE DATE OF ORIGINAL PURCHASE. This Warranty gives you specific... DAMAGES WHATSOEVER. No person or representative is not transferable and does not cover product purchased, serviced or used outside the United States or Canada. To obtain repair or replacement within the terms of all other than expressed herein in material or workmanship within 12 months ...


