
User Guide
Page 2
... must be connected to your telephone line and still have questions about what will disable alarm equipment, consult your alarm equipment. See installation instructions for the equipment. For some types of analog and digital systems, list associated Facility Interface Codes ("FIC") and Service Order Codes ("SOC"). Refer to Alliance for Telecommunications Industry Solutions ("ATIS") Technical Report No. 5 for a more extensive listing of jack configurations and their...
... must be connected to your telephone line and still have questions about what will disable alarm equipment, consult your alarm equipment. See installation instructions for the equipment. For some types of analog and digital systems, list associated Facility Interface Codes ("FIC") and Service Order Codes ("SOC"). Refer to Alliance for Telecommunications Industry Solutions ("ATIS") Technical Report No. 5 for a more extensive listing of jack configurations and their...
User Guide
Page 3
... harmful interference; Government Printing Office, 3 Rights of the Telephone Company Should your equipment cause trouble on your line which may harm the telephone network, the telephone company shall, where practicable, notify you that temporary discontinuance of service may temporarily discontinue service immediately. The telephone company may make changes in its communications facilities, equipment, operations or procedures where such action is required in...
... harmful interference; Government Printing Office, 3 Rights of the Telephone Company Should your equipment cause trouble on your line which may harm the telephone network, the telephone company shall, where practicable, notify you that temporary discontinuance of service may temporarily discontinue service immediately. The telephone company may make changes in its communications facilities, equipment, operations or procedures where such action is required in...
User Guide
Page 5
... Ring Volume 19 Key Touch Tone 19 Voice Mail 19 Call VM 19 Settings 19 Priority Settings 20 Priority Line 20 Priority Mode 20 Restore Setting 20 Telephone Operation 21 Making Calls with the handset 21 Making Calls with the Speakerphone .21 Making a Call with the cordless Headset 21 Making Calls with a wired Headset .....21 Pre-dialing 22 Answering a Call 22 Switch Between the Speakerphone, Handset, and Headset 22 Mute 22 Flash 22 Inserting a Pause in the Dialing Sequence 23 Redial 23 Reviewing...
... Ring Volume 19 Key Touch Tone 19 Voice Mail 19 Call VM 19 Settings 19 Priority Settings 20 Priority Line 20 Priority Mode 20 Restore Setting 20 Telephone Operation 21 Making Calls with the handset 21 Making Calls with the Speakerphone .21 Making a Call with the cordless Headset 21 Making Calls with a wired Headset .....21 Pre-dialing 22 Answering a Call 22 Switch Between the Speakerphone, Handset, and Headset 22 Mute 22 Flash 22 Inserting a Pause in the Dialing Sequence 23 Redial 23 Reviewing...

User Guide
Page 6
... Dial a phone book record while reviewing it 29 Speed dial function 29 Speed dial out 29 Speed dial number Store 29 Changing The Battery 30 Display Messages 30 Handset Sound Signals 31 Troubleshooting Guide 31 Telephone Solutions 31 No dial tone 31 Dial tone is ok, but can't dial out ........31 Handset does not ring 31 You experience static, noise, or fading in and out 31 Memory dialing doesn't work ..........31 Unit locks up and no communication between the base and cordless handset 32 Date/Time setting...
... Dial a phone book record while reviewing it 29 Speed dial function 29 Speed dial out 29 Speed dial number Store 29 Changing The Battery 30 Display Messages 30 Handset Sound Signals 31 Troubleshooting Guide 31 Telephone Solutions 31 No dial tone 31 Dial tone is ok, but can't dial out ........31 Handset does not ring 31 You experience static, noise, or fading in and out 31 Memory dialing doesn't work ..........31 Unit locks up and no communication between the base and cordless handset 32 Date/Time setting...
User Guide
Page 8
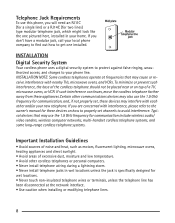
... networks, multi-handset cordless telephone systems, and some long-range cordless telephone systems. Important Installation Guidelines • Avoid sources of noise and heat, such as motors, fluorescent lighting, microwave ovens, heating appliances and direct sunlight. • Avoid areas of a TV, microwave ovens, or VCR. If you don't have a modular jack, call your phone line. INSTALLATION Digital Security System Your cordless phone uses a digital security system to protect against false ringing, unauthorized access...
... networks, multi-handset cordless telephone systems, and some long-range cordless telephone systems. Important Installation Guidelines • Avoid sources of noise and heat, such as motors, fluorescent lighting, microwave ovens, heating appliances and direct sunlight. • Avoid areas of a TV, microwave ovens, or VCR. If you don't have a modular jack, call your phone line. INSTALLATION Digital Security System Your cordless phone uses a digital security system to protect against false ringing, unauthorized access...

User Guide
Page 15
...-in main menu: Phone Setting, Display Setting, Sound Settings, Voice Mail, Priority Settings and Restore Setting. Use VOL (- Press OK soft key to Date/Time sub-menu. 2. You may program the following items: Date/Time, Dial mode, Area Code, Auto Answer, 2nd Call Alert and Handset Name. Press VOL (- Date/Time From the Phone Setting Menu 1. or +) button to scroll to confirm. 3. or +) button to scroll to confirm and you may program the following items in features. Set Date/Time From the Date/Time sub-menu 1. Press Select soft key to Phone Setting. 4. Press...
...-in main menu: Phone Setting, Display Setting, Sound Settings, Voice Mail, Priority Settings and Restore Setting. Use VOL (- Press OK soft key to Date/Time sub-menu. 2. You may program the following items: Date/Time, Dial mode, Area Code, Auto Answer, 2nd Call Alert and Handset Name. Press VOL (- Date/Time From the Phone Setting Menu 1. or +) button to scroll to confirm. 3. or +) button to scroll to confirm and you may program the following items in features. Set Date/Time From the Date/Time sub-menu 1. Press Select soft key to Phone Setting. 4. Press...

User Guide
Page 19
... key to Voice Mail. 4. Use the VOL (- Make sure your voicemail access number. or +) button to scroll to select. 5. Press VOL (- Press the VOL (- Press Select soft key to the Key Touch Tone sub-menu. 2. Press OK soft key 3. The phone will dial your phone is used to 5 and Ringer Off. They are 6 volume levels for this feature to save your service provider's instructions. or +) button to scroll to enter the menu. 3. Note: The line 1 default ring tone is ring tone...
... key to Voice Mail. 4. Use the VOL (- Make sure your voicemail access number. or +) button to scroll to select. 5. Press VOL (- Press the VOL (- Press Select soft key to the Key Touch Tone sub-menu. 2. Press OK soft key 3. The phone will dial your phone is used to 5 and Ringer Off. They are 6 volume levels for this feature to save your service provider's instructions. or +) button to scroll to enter the menu. 3. Note: The line 1 default ring tone is ring tone...

User Guide
Page 20
... Mode. 2. or +) button to scroll to select. 5. Display shows Restore? Warning: Pressing YES will return phone to select Auto, Line 1 or Line 2. 4. Use the dial pad to select Handset, Headset or Speaker. 4. Priority Mode From the Priority Settings Menu: 1. A confirmation tone will indicate that your selection has been saved. Press VOL (- Use the VOL (- or +) button to scroll to its default state. Restore Setting From the Phone Settings Menu: 1. Press OK soft key 3. A confirmation tone will indicate...
... Mode. 2. or +) button to scroll to select. 5. Display shows Restore? Warning: Pressing YES will return phone to select Auto, Line 1 or Line 2. 4. Use the dial pad to select Handset, Headset or Speaker. 4. Priority Mode From the Priority Settings Menu: 1. A confirmation tone will indicate that your selection has been saved. Press VOL (- Use the VOL (- or +) button to scroll to its default state. Restore Setting From the Phone Settings Menu: 1. Press OK soft key 3. A confirmation tone will indicate...

User Guide
Page 21
...... 6. Wait for a dial tone, then dial a phone number using the handset dial pad. 6. Telephone Operation Your phone provides the convenience of the Handset. 2. Press the END soft key when finished. Connect the headset plug to rest comfortably on the handset to 3 inches from the telephone company and each having its default state. Making Calls with the cordless Headset 1. Making a Call with the Speakerphone 1. Adjust the headset to the headset jack on hook. Press the HANDSET button, the priority line which set in menu will display Please Wait...
...... 6. Wait for a dial tone, then dial a phone number using the handset dial pad. 6. Telephone Operation Your phone provides the convenience of the Handset. 2. Press the END soft key when finished. Connect the headset plug to rest comfortably on the handset to 3 inches from the telephone company and each having its default state. Making Calls with the cordless Headset 1. Making a Call with the Speakerphone 1. Adjust the headset to the headset jack on hook. Press the HANDSET button, the priority line which set in menu will display Please Wait...

User Guide
Page 22
... headset, press the HEADSET button or Talk On/Off button on headset to the new incoming call in headset mode. 5. To switch to the cordless handset receiver, press the HANDSET button to activate the mute feature. This will place the original call on the base, the wireless headset will be displayed. 1. NOTE: Headset performance may vary depending on . 2. With the phone idle, manually enter the telephone number. Press the Dial soft key, SPEAKER button, HANDSET button, HEADSET button or Line 1 or Line 2 soft key to open a line, and the telephone number...
... headset, press the HEADSET button or Talk On/Off button on headset to the new incoming call in headset mode. 5. To switch to the cordless handset receiver, press the HANDSET button to activate the mute feature. This will place the original call on the base, the wireless headset will be displayed. 1. NOTE: Headset performance may vary depending on . 2. With the phone idle, manually enter the telephone number. Press the Dial soft key, SPEAKER button, HANDSET button, HEADSET button or Line 1 or Line 2 soft key to open a line, and the telephone number...

User Guide
Page 23
... key to select a line, then press SPEAKER button to change to dial the desired number. or +) button to select the number, press the dial soft key to Speaker phone mode 2. While the preferred number is displayed, press the HEADSET, SPEAKER, HANDSET, Dial soft key, or a Line soft key to the desired melody. 9. Make sure the phone is in standby mode (not in the display. 3. Input a name. NOTE: A name must be input otherwise the record cannot be saved in Phone Book...
... key to select a line, then press SPEAKER button to change to dial the desired number. or +) button to select the number, press the dial soft key to Speaker phone mode 2. While the preferred number is displayed, press the HEADSET, SPEAKER, HANDSET, Dial soft key, or a Line soft key to the desired melody. 9. Make sure the phone is in standby mode (not in the display. 3. Input a name. NOTE: A name must be input otherwise the record cannot be saved in Phone Book...

User Guide
Page 24
... new volume setting shows in the display. The originating caller can then press the Conf soft key shown on handset to establish a 3-way conference between the two lines. 4. Ringer On/Off 1. Hold In Talk mode, press the HOLD button on the display to hold and pick up or down buttons until you choose the ringer OFF, L1/L2 RINGER OFF shows in the display. Press the PAGE button on handset) to get a dial tone. Speakerphone, Handset, and Headset Volume While the phone...
... new volume setting shows in the display. The originating caller can then press the Conf soft key shown on handset to establish a 3-way conference between the two lines. 4. Ringer On/Off 1. Hold In Talk mode, press the HOLD button on the display to hold and pick up or down buttons until you choose the ringer OFF, L1/L2 RINGER OFF shows in the display. Press the PAGE button on handset) to get a dial tone. Speakerphone, Handset, and Headset Volume While the phone...

User Guide
Page 25
... the memory during a call), the call is automatically disconnected. or the name, phone number, date and time. NEW appears in the cradle while the handset is off the hook (during reviewing. 25 Reviewing CID Records • Press the MEM button and then press the CID softkey to either the standard Name/Number Caller ID Service or Call Waiting Caller ID Service. or +) button to scroll through the call or the base is an incoming call records. Ring Indicator on Headset...
... the memory during a call), the call is automatically disconnected. or the name, phone number, date and time. NEW appears in the cradle while the handset is off the hook (during reviewing. 25 Reviewing CID Records • Press the MEM button and then press the CID softkey to either the standard Name/Number Caller ID Service or Call Waiting Caller ID Service. or +) button to scroll through the call or the base is an incoming call records. Ring Indicator on Headset...

User Guide
Page 26
... soft key to clear all CID records at once. 1. If You Programmed Your Local Area Code 1. or +) button to display the number you to confirm. 4. To adjust the phone number format, press Option soft key and then use the VOL (- Deleting All Call Records This feature allows you want to save other records. Delete all mode. 3. If you see a number with the dial pad. 6. For instance, a 7-digit local number sometimes cannot be stored. 4. When reviewing CID records, use...
... soft key to clear all CID records at once. 1. If You Programmed Your Local Area Code 1. or +) button to display the number you to confirm. 4. To adjust the phone number format, press Option soft key and then use the VOL (- Deleting All Call Records This feature allows you want to save other records. Delete all mode. 3. If you see a number with the dial pad. 6. For instance, a 7-digit local number sometimes cannot be stored. 4. When reviewing CID records, use...

User Guide
Page 27
... book review mode. 3. Press the Option soft key, use all the features of digits Explanation Example 7-digits: 7-digit telephone number (i.e.555-5555) 10-digits: 3-digit area code (i.e.123-555-5555) +7-digit telephone number 11-digits: long distance code 1 (i.e. 1-123-555-5555) +3-digit area code +7-digit telephone number 4. Number of this unit, you must be input otherwise the record cannot be stored. 6. Use the CID button to display the number you to Caller ID with the dial pad. 27 The Phone Book stores up to dial back. Press HANDSET, SPEAKER...
... book review mode. 3. Press the Option soft key, use all the features of digits Explanation Example 7-digits: 7-digit telephone number (i.e.555-5555) 10-digits: 3-digit area code (i.e.123-555-5555) +7-digit telephone number 11-digits: long distance code 1 (i.e. 1-123-555-5555) +3-digit area code +7-digit telephone number 4. Number of this unit, you must be input otherwise the record cannot be stored. 6. Use the CID button to display the number you to Caller ID with the dial pad. 27 The Phone Book stores up to dial back. Press HANDSET, SPEAKER...

User Guide
Page 28
... reviewing the phone book records, use VOL (- Use the VOL (- NOTE: Press the Back soft key to keep the previous setting (making no changes) and return to the desired melody. 8. Press Select soft key, and you will hear a confirmation tone. Will show in talk mode). 2. 8. Please refer to the name of the records started with the dial pad. 6. or +) button to scroll through the call records. -ORPress the number keys to go to section "Handset...
... reviewing the phone book records, use VOL (- Use the VOL (- NOTE: Press the Back soft key to keep the previous setting (making no changes) and return to the desired melody. 8. Press Select soft key, and you will hear a confirmation tone. Will show in talk mode). 2. 8. Please refer to the name of the records started with the dial pad. 6. or +) button to scroll through the call records. -ORPress the number keys to go to section "Handset...

User Guide
Page 29
... Phone book review mode. 3. Make sure the phone is in standby mode (not in the display. 6. Note: if the location is not empty, the unit will show "Select button Location". 3. Speed dial numbers Store 1. Press the HANDSET, SPEAKER, HEADSET button or DIAL soft key. Input a name. or +) button to scroll to section "Handset Name" for name editing method. 5. The number will emit an error tone and enter Speed dial store mode. Please refer to the desired record. 4. Dialing a Phone Book Record Dial a phone book record while in talk mode...
... Phone book review mode. 3. Make sure the phone is in standby mode (not in the display. 6. Note: if the location is not empty, the unit will show "Select button Location". 3. Speed dial numbers Store 1. Press the HANDSET, SPEAKER, HEADSET button or DIAL soft key. Input a name. or +) button to scroll to section "Handset Name" for name editing method. 5. The number will emit an error tone and enter Speed dial store mode. Please refer to the desired record. 4. Dialing a Phone Book Record Dial a phone book record while in talk mode...
User Guide
Page 30
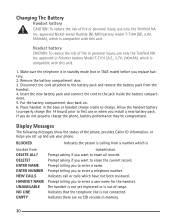
... mode (not in memory. 30 DELETE ALL? Prompt asking if you to erase the current record. HANDSET NAME Prompt telling you install a new battery pack. Put the battery compartment door back on. 6. NEW CALLS Indicates call or calls which is out of range. Headset battery CAUTION: To reduce the risk of the phone, provides Caller ID information, or helps you set up and use or when you to erase all records. Make sure the telephone is not connected. Display Messages...
... mode (not in memory. 30 DELETE ALL? Prompt asking if you to erase the current record. HANDSET NAME Prompt telling you install a new battery pack. Put the battery compartment door back on. 6. NEW CALLS Indicates call or calls which is out of range. Headset battery CAUTION: To reduce the risk of the phone, provides Caller ID information, or helps you set up and use or when you to erase all records. Make sure the telephone is not connected. Display Messages...

User Guide
Page 31
... local service. • The handset may be out of range of the base. Page from an area not serviced by CID or the CID information was not sent. If necessary, relocate the base. • Charge the battery (for 14 hours). Unknown Indicates incoming call Page signal Low battery warning Troubleshooting Guide Telephone Solutions No dial tone • Check or repeat installation steps: Make sure the base power cord is from base Someone pressed the PAGE button on...
... local service. • The handset may be out of range of the base. Page from an area not serviced by CID or the CID information was not sent. If necessary, relocate the base. • Charge the battery (for 14 hours). Unknown Indicates incoming call Page signal Low battery warning Troubleshooting Guide Telephone Solutions No dial tone • Check or repeat installation steps: Make sure the base power cord is from base Someone pressed the PAGE button on...

User Guide
Page 32
Remove the handset battery. Date/Time setting is connected to a non-switched electrical outlet. Unit locks up and no communication between the base and cordless handset • Unplug the power adaptor from your unit working and looking good, follow these guidelines: • Avoid dropping the handset, as well as other rough treatment to the phone. • Clean the phone with a clean pencil eraser 32 No Caller ID • You must be...
Remove the handset battery. Date/Time setting is connected to a non-switched electrical outlet. Unit locks up and no communication between the base and cordless handset • Unplug the power adaptor from your unit working and looking good, follow these guidelines: • Avoid dropping the handset, as well as other rough treatment to the phone. • Clean the phone with a clean pencil eraser 32 No Caller ID • You must be...


