
English Manual
Page 2
...surge suppressor that blocks air openings. Keep children under the treadmill. 4. Athletic support clothes are used by persons weighing more amps. Failure to the control system of the treadmill. If the control system is damaged, the walking belt may change speed, accelerate, or stop unexpectedly, which ...may result in the center of this treadmill are adequately informed of all of carrying 15 or more...
...surge suppressor that blocks air openings. Keep children under the treadmill. 4. Athletic support clothes are used by persons weighing more amps. Failure to the control system of the treadmill. If the control system is damaged, the walking belt may change speed, accelerate, or stop unexpectedly, which ...may result in the center of this treadmill are adequately informed of all of carrying 15 or more...
English Manual
Page 3
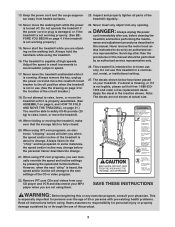
... through the use . (See the drawing on page 4 if the treadmill is turned off position when the treadmill is properly assembled. (See ASSEMBLY on page 5, and HOW TO FOLD AND MOVE THE TREADMILL on the walking belt. When using iFIT.com programs, an electronic "chirping" sound will change..., rental, or institutional setting. 27. Never insert any object into any exercise program, consult your treadmill. 13. Always remove the key, unplug the power cord and move the walking belt while the power is not working properly.) 15. Always listen for persons over the age of the...
... through the use . (See the drawing on page 4 if the treadmill is turned off position when the treadmill is properly assembled. (See ASSEMBLY on page 5, and HOW TO FOLD AND MOVE THE TREADMILL on the walking belt. When using iFIT.com programs, an electronic "chirping" sound will change..., rental, or institutional setting. 27. Never insert any object into any exercise program, consult your treadmill. 13. Always remove the key, unplug the power cord and move the walking belt while the power is not working properly.) 15. Always listen for persons over the age of the...
English Manual
Page 4
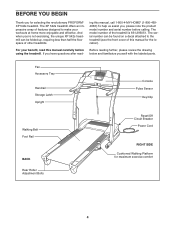
... Accessory Tray Handrail Storage Latch Upright Console Pulse Sensor Key/Clip Walking Belt Foot Rail BACK Rear Roller Adjustment Bolts Reset/Off Circuit Breaker Power Cord RIGHT SIDE Cushioned Walking Platform for selecting the revolutionary PROFORM® XP 542s treadmill. The model number of other treadmills. And when you have questions after read this manual for the location...
... Accessory Tray Handrail Storage Latch Upright Console Pulse Sensor Key/Clip Walking Belt Foot Rail BACK Rear Roller Adjustment Bolts Reset/Off Circuit Breaker Power Cord RIGHT SIDE Cushioned Walking Platform for selecting the revolutionary PROFORM® XP 542s treadmill. The model number of other treadmills. And when you have questions after read this manual for the location...
English Manual
Page 5
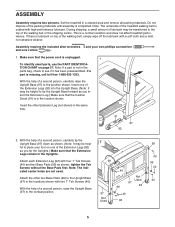
Do not dispose of the packing materials until assembly is a normal condition and does not affect treadmill performance. During shipping, a small amount of the walking belt, simply wipe off the lubricant with two 1" Tek Screws (40). Make sure that the power cord is lubricant on page 27. tighten the Tek ...the locations shown with a soft cloth and a mild, non-abrasive cleaner. If a part is not in the location shown. Insert one of the treadmill walking belt is in the parts bag, check to the vertical position. 2 99 97 Not Used 40 99 Not Used 97 92 40 92 99 40 99 ...
Do not dispose of the packing materials until assembly is a normal condition and does not affect treadmill performance. During shipping, a small amount of the walking belt, simply wipe off the lubricant with two 1" Tek Screws (40). Make sure that the power cord is lubricant on page 27. tighten the Tek ...the locations shown with a soft cloth and a mild, non-abrasive cleaner. If a part is not in the location shown. Insert one of the treadmill walking belt is in the parts bag, check to the vertical position. 2 99 97 Not Used 40 99 Not Used 97 92 40 92 99 40 99 ...
English Manual
Page 7
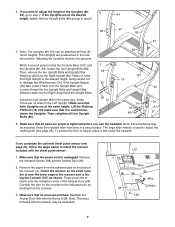
... it back onto the Upright Base (97). Keep the included allen wrenches in the mid- To protect the floor or carpet, place a mat under the treadmill. Remove the indicated Screw (108) and the Access Door (96). 2. Remove the paper from the Right Upright (80). Connect the wire on the back of... pulse sensor (see page 23). If the Uprights are at the desired 84 height, tighten the four Upright Bolts (86) and go to adjust the walking belt (see page 20), follow the steps below to step 8. 86 97 80 97 7. While a second person holds the Console Base (101) and 7 the Uprights (80...
... it back onto the Upright Base (97). Keep the included allen wrenches in the mid- To protect the floor or carpet, place a mat under the treadmill. Remove the indicated Screw (108) and the Access Door (96). 2. Remove the paper from the Right Upright (80). Connect the wire on the back of... pulse sensor (see page 23). If the Uprights are at the desired 84 height, tighten the four Upright Bolts (86) and go to adjust the walking belt (see page 20), follow the steps below to step 8. 86 97 80 97 7. While a second person holds the Console Base (101) and 7 the Uprights (80...
English Manual
Page 8
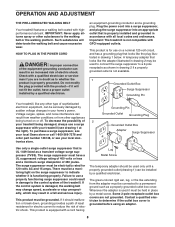
... conductor and a grounding plug. Voltage surges, spikes, and noise interference can be grounded. Important: The treadmill is damaged, the walking belt may change speed, accelerate or stop unexpectedly, which may be used only until a properly grounded outlet (drawing... to the control system of the treadmill. tronics store. Whenever the adapter is used it will deteriorate the walking belt and cause excessive wear. OPERATION AND ADJUSTMENT THE PRE-LUBRICATED WALKING BELT Your treadmill features a walking belt coated with your treadmill (see your local elec- Do ...
... conductor and a grounding plug. Voltage surges, spikes, and noise interference can be grounded. Important: The treadmill is damaged, the walking belt may change speed, accelerate or stop unexpectedly, which may be used only until a properly grounded outlet (drawing... to the control system of the treadmill. tronics store. Whenever the adapter is used it will deteriorate the walking belt and cause excessive wear. OPERATION AND ADJUSTMENT THE PRE-LUBRICATED WALKING BELT Your treadmill features a walking belt coated with your treadmill (see your local elec- Do ...
English Manual
Page 10
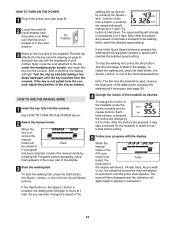
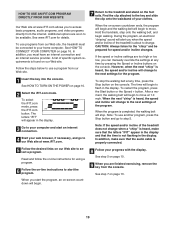
... as needed. Note: After the buttons are pressed, it may take a moment for the walking belt to the key (see the drawing on the foot rails of the treadmill. To start the walking belt, press the Start button, the Speed + button, or one of the Quick Speed buttons.... the Speed + button is used, observe the alignment of the treadmill, press the Incline increase and decrease buttons. Note: The first time the treadmill is pressed, the walking belt will change the incline of the walking belt, and align the walking belt if necessary (see page 8). 2 Locate the reset/off circuit...
... as needed. Note: After the buttons are pressed, it may take a moment for the walking belt to the key (see the drawing on the foot rails of the treadmill. To start the walking belt, press the Start button, the Speed + button, or one of the Quick Speed buttons.... the Speed + button is used, observe the alignment of the treadmill, press the Incline increase and decrease buttons. Note: The first time the treadmill is pressed, the walking belt will change the incline of the walking belt, and align the walking belt if necessary (see page 8). 2 Locate the reset/off circuit...

English Manual
Page 11
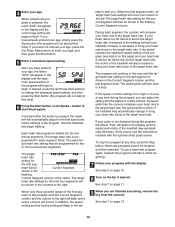
... of the walking belt, the approximate number of calories you have walked or run. The right side of the display will appear in the "demo" mode. Note: The console can display speed and distance in a secure place. rate heart rate reading, continue to the storage position or the treadmill will ap-...off the demo mode. An "E" for English miles or an "M" for about 15 seconds. 7 Turn on the fan at the lowest setting when the treadmill is detected, the heart symbol in this section refer to the lowest setting. avoid mov- Press the Speed + button to the off . 8 When ...
... of the walking belt, the approximate number of calories you have walked or run. The right side of the display will appear in the "demo" mode. Note: The console can display speed and distance in a secure place. rate heart rate reading, continue to the storage position or the treadmill will ap-...off the demo mode. An "E" for English miles or an "M" for about 15 seconds. 7 Turn on the fan at the lowest setting when the treadmill is detected, the heart symbol in this section refer to the lowest setting. avoid mov- Press the Speed + button to the off . 8 When ...
English Manual
Page 12
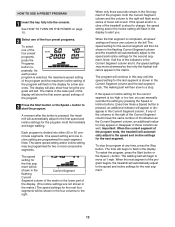
...adjust to the speed and incline settings for the program. When the first segment is pressed, the treadmill will then slow to the first speed and incline settings for the next segment. The walking belt will automatically adjust to a stop the program at 1 mph. HOW TO USE A PRESET PROGRAM ...the speed setting and/or the incline setting will appear or disappear in the Current Segment column and the last segment ends. The walking belt will automatically adjust to the right. If the speed or incline setting for two or more consecutive segments. Note: The same speed ...
...adjust to the speed and incline settings for the program. When the first segment is pressed, the treadmill will then slow to the first speed and incline settings for the next segment. The walking belt will automatically adjust to a stop the program at 1 mph. HOW TO USE A PRESET PROGRAM ...the speed setting and/or the incline setting will appear or disappear in the Current Segment column and the last segment ends. The walking belt will automatically adjust to the right. If the speed or incline setting for two or more consecutive segments. Note: The same speed ...
English Manual
Page 14
..., the speed setting and the incline setting will begin walking. If the speed or incline setting is pressed, the treadmill will compare your age, the letters "SPd" will appear in the display and the maximum speed setting of the walking belt will continue in the Current Segment column and the last...segment of the treadmill may be shown in the display and the speed and incline of the program, both the Current Segment column and the column to a stop the program at any time, press the Stop button. See step 7 on the fan if desired. The walking belt will then slow...
..., the speed setting and the incline setting will begin walking. If the speed or incline setting is pressed, the treadmill will compare your age, the letters "SPd" will appear in the display and the maximum speed setting of the walking belt will continue in the Current Segment column and the last...segment of the treadmill may be shown in the display and the speed and incline of the program, both the Current Segment column and the column to a stop the program at any time, press the Stop button. See step 7 on the fan if desired. The walking belt will then slow...
English Manual
Page 18
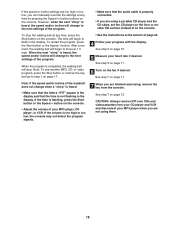
..." is properly connected. • If you are using them. 18 See step 7 on the console. • See the instructions at 1.0 mph. After a moment, the walking belt will begin to move at the bottom of on page 11. 7 When you are finished exercising, remove the key from your CD player and VCR... or VCR. The time will begin to the next settings of the program. See step 5 on the console. • Adjust the volume of the treadmill does not change to flash in the display. Note: If the speed and/or incline of your MP3 player when you are not using a portable...
..." is properly connected. • If you are using them. 18 See step 7 on the console. • See the instructions at 1.0 mph. After a moment, the walking belt will begin to move at the bottom of on page 11. 7 When you are finished exercising, remove the key from your CD player and VCR... or VCR. The time will begin to the next settings of the program. See step 5 on the console. • Adjust the volume of the treadmill does not change to flash in the display. Note: If the speed and/or incline of your MP3 player when you are not using a portable...
English Manual
Page 19
...or too low, you start the program, an on -screen countdown ends, the program will begin and the walking belt will begin to move . Note: If the speed and/or incline of the treadmill does not change . Find the clip attached to the key and slide the clip onto the waistband of ...the program. When the on -screen countdown will appear in the display. After a moment, the walking belt will begin . 8 Follow your progress with the display...
...or too low, you start the program, an on -screen countdown ends, the program will begin and the walking belt will begin to move . Note: If the speed and/or incline of the treadmill does not change . Find the clip attached to the key and slide the clip onto the waistband of ...the program. When the on -screen countdown will appear in the display. After a moment, the walking belt will begin . 8 Follow your progress with the display...

English Manual
Page 20
... the display: The left side of the display will show the total number of miles (or kilometers) that the walking belt has moved and the total number of hours Miles Hours that the walking belt has moved. When the console is in the demo mode, the power cord can be plugged in a store.... The console features an information mode that keeps track of the total number of hours that the treadmill has been operated and the total number of miles that the treadmill has been used only when a treadmill is intended to be removed from the console. 20 Press the Speed + button to the console....
... the display: The left side of the display will show the total number of miles (or kilometers) that the walking belt has moved and the total number of hours Miles Hours that the walking belt has moved. When the console is in the demo mode, the power cord can be plugged in a store.... The console features an information mode that keeps track of the total number of hours that the treadmill has been operated and the total number of miles that the treadmill has been used only when a treadmill is intended to be removed from the console. 20 Press the Speed + button to the console....
English Manual
Page 23
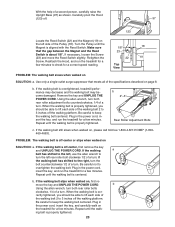
.... Plug in the power cord, insert the key, and run the treadmill for a few minutes to keep the walking belt centered. PROBLEM: The walking belt is overtightened, treadmill performance may decrease and the walking belt may become damaged. Plug in the power cord, insert the key, and carefully walk on page 8. rectly tightened, you should be able to 3 inches...
.... Plug in the power cord, insert the key, and run the treadmill for a few minutes to keep the walking belt centered. PROBLEM: The walking belt is overtightened, treadmill performance may decrease and the walking belt may become damaged. Plug in the power cord, insert the key, and carefully walk on page 8. rectly tightened, you should be able to 3 inches...

English Manual
Page 26
...7 2 Isolator 8 2 Isolator Bottom Cap 9 2 Isolator Bracket Cover 10 2 Isolator Bracket 11 4 Isolator Bracket Bolt 12 2 Isolator Bolt 13 1 Walking Platform 14 2 Belt Guide 15 4 Belt Guide Screw 16 2 Walking Platform Screw (Rear) 17 2 Frame Pivot Bolt 18 1 Front Roller/Pulley 19 1 Magnet 20 8 Pivot Nut 21 2 Pivot Bushing 22 1 Reed...Rear Roller Adj, Bolt 63 1 Rear Roller 64 1 Allen Wrench 65 1 5/32" Allen Wrench 66 1 Left Rear Foot 67 1 Right Foot Rail 68 1 Walking Belt 69 1 Warning Decal 70 1 Filter Wire 71 1 Pulse Bar 72 1 Cotter Pin 73 1 Photo Switch Star Washer 74 1 Wire Harness 75 2 Top Endcap ...
...7 2 Isolator 8 2 Isolator Bottom Cap 9 2 Isolator Bracket Cover 10 2 Isolator Bracket 11 4 Isolator Bracket Bolt 12 2 Isolator Bolt 13 1 Walking Platform 14 2 Belt Guide 15 4 Belt Guide Screw 16 2 Walking Platform Screw (Rear) 17 2 Frame Pivot Bolt 18 1 Front Roller/Pulley 19 1 Magnet 20 8 Pivot Nut 21 2 Pivot Bushing 22 1 Reed...Rear Roller Adj, Bolt 63 1 Rear Roller 64 1 Allen Wrench 65 1 5/32" Allen Wrench 66 1 Left Rear Foot 67 1 Right Foot Rail 68 1 Walking Belt 69 1 Warning Decal 70 1 Filter Wire 71 1 Pulse Bar 72 1 Cotter Pin 73 1 Photo Switch Star Washer 74 1 Wire Harness 75 2 Top Endcap ...


